Uniden OCEANUS DSC Series Owner's Manual
Vhf marine radio with digital elective calling automatic transmitter identifications system
Hide thumbs
Also See for OCEANUS DSC Series:
- Owner's manual (68 pages) ,
- Manual del usuario (68 pages) ,
- Owner's manual (68 pages)
Table of Contents
Advertisement
Quick Links
Advertisement
Table of Contents

Related Manuals for Uniden OCEANUS DSC Series


Summary of Contents for Uniden OCEANUS DSC Series
- Page 1 OCEANUS DSC/ATIS_ENG_0512 5/12/05 10:34 AM Page i...
-
Page 2: Table Of Contents
OCEANUS DSC/ATIS_ENG_0512 5/12/05 10:34 AM Page ii Contents Included with your OCEANUS DSC/ATIS ..........3 Controls and Indicators................4 Installation....................8 Choosing a Location................8 Engine Noise Suppression ..............9 Antenna Considerations ..............9 Antenna Selection and Installation ............9 Installing the OCEANUS DSC/ATIS ..........10 Operation ....................11 Power On/Off ...................11 Last Channel Memory..............11 Squelch....................12... - Page 3 OCEANUS DSC/ATIS_ENG_0512 5/12/05 10:34 AM Page iii Setup ....................27 Alarm Clock ................27 Local Time Adjust...............30 Daylight Savings On/Off.............31 Directory..................32 Auto Channel Switch..............36 Position Reply ................37 CH Tag ..................39 Group MMSI................41 User MMSI .................42 ATIS ID ..................43 System.....................44 Contrast..................44 Lamp Adjust ................45 Key Beep ...................46 Switching the Inland Waterway Mode/Seagoing Mode ......47 NMEA Technical Setup .................48...
- Page 4 10:34 AM Page 2 Uniden OCEANUS DSC/ATIS The Uniden OCEANUS DSC/ATIS VHF marine radio has been designed to give you a rugged, reliable instrument that will provide you with years of trouble-free service. With proper care and maintenance, your marine radio could outlast your present vessel and serve you well on-board.
-
Page 5: Included With Your Oceanus Dsc/Atis
OCEANUS DSC/ATIS_ENG_0512 5/12/05 10:34 AM Page 3 Included with your OCEANUS DSC/ATIS OCEANUS DSC/ATIS OCEANUS DSC/ATIS Radio Microphone Hanger Owner’s Manual and Screws Mounting Bracket DC Cord and Knobs Mounting Hardware Accessory Cable Spare Fuse 250V 6A... -
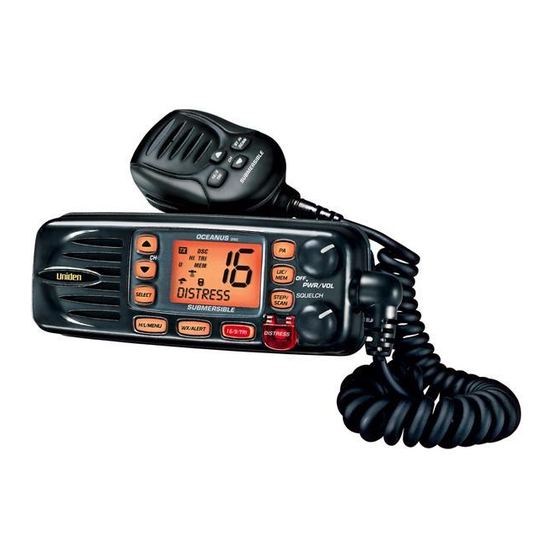
Page 6: Controls And Indicators
OCEANUS DSC/ATIS_ENG_0512 5/12/05 10:34 AM Page 4 Controls and Indicators Front panel/Microphone 12 13 14 PTT Switch - Press to transmit and release to receive. 2.5. CHANNEL/L/M- These keys are used to change the channel number up/down. These buttons are also used to move the cursor in Menu mode. 3.11. - Page 7 OCEANUS DSC/ATIS_ENG_0512 5/12/05 10:34 AM Page 5 Rear Panel Connectors DC Jack ACC Connector Remote Connector Antenna Connector ACC Connector To OCEANUS DSC/ATIS Note: DC13.8V and GND are for GPS ANT.
- Page 8 OCEANUS DSC/ATIS_ENG_0512 5/12/05 10:34 AM Page 6 TX (Transmit) - Indicates transmitting. HI (High) - Indicates transmit output is 25 Watts. DSC - Indicators the radio is in the DSC mode. TRI (Triple Watch) - Indicates Triple Watch Mode is in effect. MEM (Memory) - Indicates Memory Scan Mode status for each channel selected.
- Page 9 OCEANUS DSC/ATIS_ENG_0512 5/12/05 10:34 AM Page 7 Flow Chart for Menu Operation MENU DSC CALL SETUP SYSTEM EXIT INDIVIDUAL ALARM CLOCK CONTRAST LOCAL TIME ADJUST GROUP LAMP ADJUST DAYLITE SAVE ALL SHIPS KEY BEEP POS REQUEST DIRECTORY EXIT POS SEND AUTO CH SW STANDBY POS REPLY...
-
Page 10: Installation
OCEANUS DSC/ATIS_ENG_0512 5/12/05 10:34 AM Page 8 Installation Caution: The OCEANUS DSC/ATIS will only operate with a nominal 12 volt negative ground battery system. It is important to carefully determine the most suitable location for your radio on your vessel. Electrical, mechanical, and environmental considerations must all be taken into account. -
Page 11: Engine Noise Suppression
OCEANUS DSC/ATIS_ENG_0512 5/12/05 10:34 AM Page 9 Engine Noise Suppression Interference from the noise generated by the electrical systems of engines is sometimes a problem with radios. The OCEANUS DSC/ATIS has been designed to be essentially impervious to ignition noise and alternator noise. -
Page 12: Installing The Oceanus Dsc/Atis
OCEANUS DSC/ATIS_ENG_0512 5/12/05 10:34 AM Page 10 Installing the OCEANUS DSC/ATIS After you have carefully considered the various factors affecting your choice of location, position the radio (with the bracket, microphone, power cord, antenna and any auxiliary cables installed) into the selected location to assure there is no interference with the surrounding items. -
Page 13: Operation
OCEANUS DSC/ATIS_ENG_0512 5/12/05 10:34 AM Page 11 Operation POWER On/Off Turn the unit On by rotating the PWR/VOL control clockwise. Adjust the volume to a comfortable level. When you turn the unit On, you will hear a beep, and the greeting message below appears on the LCD for 3 seconds. -
Page 14: Squelch
OCEANUS DSC/ATIS_ENG_0512 5/12/05 10:34 AM Page 12 SQUELCH Turn SQUELCH fully clockwise. This raises the “Squelch Gate” so high that only very strong signals can get through. Strong Signals Medium Signals Weak Signals Noise Turn SQUELCH fully counterclockwise until you hear a hiss. This lowers the “Squelch Gate”... -
Page 15: Coast Guard Channel 16/Channel 9 Communications
OCEANUS DSC/ATIS_ENG_0512 5/12/05 10:34 AM Page 13 COAST GUARD CHANNEL 16/CHANNEL 9 COMMUNICATIONS To access Coast Guard Channel 16 or Channel 9 communications, press 16/9/TRI. You can access Coast Guard 16 CH instantly while tuned to another channel. Press 16/9/TRI again for Channel 9 Calling communications. -
Page 16: Manual Tuning
OCEANUS DSC/ATIS_ENG_0512 5/12/05 10:34 AM Page 14 MANUAL TUNING To manually select a channel, press CH L or M. Communication channels are located on channel 01-28 and 60-88. MEM (Entering channel numbers into Memory Scan) You can enter channels into Memory Scan for instant scanning at any time. -
Page 17: Transmitting
OCEANUS DSC/ATIS_ENG_0512 5/12/05 10:34 AM Page 15 TRANSMITTING Note: Channel 70 is DSC only. All the available marine channel are located on page 49. SETTING TX OUTPUT Caution: It is important to remember to use the LO position in port or for short range communications. -
Page 18: Distress
OCEANUS DSC/ATIS_ENG_0512 5/12/05 10:34 AM Page 16 DISTRESS Note: You must set the user MMSI in order to send a Distress call. Please see page 42 to set the MMSI. This feature will allow you to transmit a Distress call. In order to transmit a Distress call, press and hold DISTRESS for 5 seconds. -
Page 19: Marine Distress Procedure
OCEANUS DSC/ATIS_ENG_0512 5/12/05 10:34 AM Page 17 When the radio receives a Distress call, the following screen appears. Note: If the radio receives a Distress call, it will be displayed on the LCD display. An emergency alert will sound. The name will be displayed if it is the name registered in the directory. -
Page 20: Menu Operation
OCEANUS DSC/ATIS_ENG_0512 5/12/05 10:34 AM Page 18 Menu Operation 1. DIGITAL SELECTIVE CALLING (DSC) Digital Selective Calling is a process of establishing a radio call, it has been chosen by the International Maritime Organization (IMO) as an international standard for establishing VHF, MF and HF radio calls. Digital Selective Calling has also been selected as part of the Global Maritime Distress and Safety System (GMDSS). -
Page 21: Group
OCEANUS DSC/ATIS_ENG_0512 5/12/05 10:34 AM Page 19 Select the individual you want to contact using CH L and M. Press SELECT to transmit the individual DSC signal. appears followed by the WAITING individual you have selected, and the radio use 70 CH while transmitting. When you receive the individual acknowledgment successfully, WAITING... -
Page 22: All Ships
OCEANUS DSC/ATIS_ENG_0512 5/12/05 10:34 AM Page 20 Press SELECT. The MMSI code appears, and you can now call the group members. Press SELECT to call. When you finish calling, the radio returns to the channel display screen. 1-C. ALL SHIPS Press SELECT at DSC CALL (To enter... -
Page 23: Position Request
OCEANUS DSC/ATIS_ENG_0512 5/12/05 10:34 AM Page 21 Select the category of your call using CH L and M ( URGENCY SAFETY EXIT Press SELECT to transmit the ALL SHIPS DSC signal. When sending either an URGENCY SAFETY message, all radios will automatically move to channel 70 until all of the data is received. - Page 24 OCEANUS DSC/ATIS_ENG_0512 5/12/05 10:34 AM Page 22 Press SELECT. The individual directory appears. Select the name to request the individual’s position using CH L and M. Press SELECT to transmit the position request call. POS WAITING appears followed by the individual, and the radio use 70 CH while transmitting.
-
Page 25: Position Send
OCEANUS DSC/ATIS_ENG_0512 5/12/05 10:34 AM Page 23 1-E. POSITION SEND This radio has the ability to send the position of your vessel to another vessel using a VHF marine radio equipped with DSC. Note: Position send is only available when it is connected to the GPS. -
Page 26: Standby
OCEANUS DSC/ATIS_ENG_0512 5/12/05 10:34 AM Page 24 1-F. STANDBY The DSC STANDBY function allows the OCEANUS DSC/ATIS to answer DSC calls with the UNATTENDED message and record the calls for response at another time. When you set the radio to DSC STANDBY mode, voice traffic may still be active on any chosen channel. -
Page 27: Call Wait
OCEANUS DSC/ATIS_ENG_0512 5/12/05 10:34 AM Page 25 1-G. CALL WAIT The DSC Call Waiting directory records 10 received distress calls, and records 20 individual calls that are received and not answered within 5 minutes or while the radio is set to DSC Standby. Calls will be recorded while you are busy with other communications as long as the transmitter is not keyed at the time of the call. -
Page 28: Geographical Call
OCEANUS DSC/ATIS_ENG_0512 5/12/05 10:34 AM Page 26 Press SELECT. If a DISTRESS call is received in Call Wait, the following display appears. If an INDIVIDUAL call is received in Call Wait, the following display appears. At this point, you can call back any of the radios in the log. -
Page 29: Setup
OCEANUS DSC/ATIS_ENG_0512 5/12/05 10:34 AM Page 27 2. SETUP Press MENU to enter Menu Operation. Press CH M once to display SETUP and press SELECT. has some options as follows. To exit, SETUP select EXIT 2-A. ALARM CLOCK This feature is only available when the GPS is connected to the NMEA0183 Accessory Wires. - Page 30 OCEANUS DSC/ATIS_ENG_0512 5/12/05 10:34 AM Page 28 Select AM or PM using CH L or M, then press SELECT. A confirmation screen appears. 2-A-2. ALARM ON This feature allows you to turn the alarm ON. Press SELECT at (To enter SETUP , see page 27).
- Page 31 OCEANUS DSC/ATIS_ENG_0512 5/12/05 10:34 AM Page 29 2-A-3. ALARM OFF This feature allows you to turn the alarm OFF. Press SELECT at SETUP (To enter , see page 27). SETUP ALARM CLOCK appears. Press SELECT. using CH L or M, then press Select SELECT.
-
Page 32: Local Time Adjust
OCEANUS DSC/ATIS_ENG_0512 5/12/05 10:34 AM Page 30 2-B. LOCAL TIME ADJUST This feature allows you to fine tune the Local Time for any location in Europe. The feature enables you to adjust the Local time by ±1 hour. To set LOCAL TIME ADJUST Press SELECT at SETUP (To enter... -
Page 33: Daylight Savings On/Off
OCEANUS DSC/ATIS_ENG_0512 5/12/05 10:34 AM Page 31 2-C. DAYLIGHT SAVINGS On/Off This feature enables you to select the automatic Daylight Savings clock setting. To set DAYLIGHT SAVINGS On/Off Press SELECT at SETUP (To enter , see page 27). SETUP Display DAYLITE SAVE using CHL and CHM. -
Page 34: Directory
OCEANUS DSC/ATIS_ENG_0512 5/12/05 10:34 AM Page 32 2-D. DIRECTORY This function will allow you to send an individual call, etc. The Directory function memorizes the name and MMSI number of 20 other vessels. The following screen will allow you to setup an alphanumeric identity as well as the corresponding MMSI number. - Page 35 OCEANUS DSC/ATIS_ENG_0512 5/12/05 10:34 AM Page 33 2-D-1. NEW This function will allow you to enter new information into the directory. Press SELECT at . The registering screen appears. You can now enter the person’s name. Using the number key pad on the mic, choose the alphabet.
- Page 36 OCEANUS DSC/ATIS_ENG_0512 5/12/05 10:34 AM Page 34 2-D-2. EDIT If you want to edit the DIRECTORY Press SELECT at the individual you want to edit. EDIT appears, then press SELECT. You can now edit the person’s name. Using the number key pad on the mic choose the alphabet.
- Page 37 OCEANUS DSC/ATIS_ENG_0512 5/12/05 10:34 AM Page 35 2-D-3. DELETE If you want to delete the directory Press SELECT at the individual you want to delete. Press CH M once. DELETE appears, then press SELECT. The radio displays the next individual. If no more code remains, EXIT appears.
-
Page 38: Auto Channel Switch
OCEANUS DSC/ATIS_ENG_0512 5/12/05 10:34 AM Page 36 2-E. AUTO CHANNEL SWITCH This feature is to allow you to disable the automatic channel change that happens when receiving a DSC call. This feature is useful when engaged in bridge – to – bridge or other safety related calls. When you have completed these calls, all of the incoming DSC calls received are available in the call log. -
Page 39: Position Reply
OCEANUS DSC/ATIS_ENG_0512 5/12/05 10:34 AM Page 37 2-F. POSITION REPLY When the calling radio has requested the position information of your radio, you can decide to transmit an acknowledgment automatically or on a call by call basis. Press SELECT at (To enter SETUP SETUP... - Page 40 OCEANUS DSC/ATIS_ENG_0512 5/12/05 10:34 AM Page 38 Example: When the radio receives a position request, the following screen appears. Example: When the radio receives a position request, the following screen appears. You can select whether reply the request or not. If you wants to reply press SELECT.
-
Page 41: Ch Tag
OCEANUS DSC/ATIS_ENG_0512 5/12/05 10:34 AM Page 39 2-G. CH TAG This feature allows you to name each marine channel. Press SELECT at SETUP (To enter , see page 27). SETUP using CH L Display CH TAG and M. Press SELECT. The channels and its names appear. - Page 42 OCEANUS DSC/ATIS_ENG_0512 5/12/05 10:34 AM Page 40 2-G-1. EDIT If you want to edit the channel name Press SELECT at the individual channel you want to edit. You can edit the name. Using the number key pad on the mic select the alphabet, numeric, or symbols.
-
Page 43: Group Mmsi
OCEANUS DSC/ATIS_ENG_0512 5/12/05 10:34 AM Page 41 2-H. GROUP MMSI Press SELECT at SETUP (To enter , see page 27). SETUP using CH L Display GROUP MMSI and M. Press SELECT. The group MMSI ID screen appears. You can now enter the GROUP MMSI code. -
Page 44: User Mmsi
OCEANUS DSC/ATIS_ENG_0512 5/12/05 10:34 AM Page 42 2-I. USER MMSI MMSI’s are issued most of the time by National Telecommunication Organisations. You will need to obtain a nine digit MMSI number and program it into the OCEANUS DSC/ATIS. The information obtained from the application is useful for the Coast Guard to help in search and rescue operations. -
Page 45: Atis Id
USER MMSI Note: You can only program your radio once with an MMSI number. After that, send your radio to Uniden Dealer for factory service. 2-J. ATIS ID ATIS is the automatic transmitter identification system. The ATIS ID is composed by number of 10 digits, and it is already registered to your radio. -
Page 46: System
OCEANUS DSC/ATIS_ENG_0512 5/12/05 10:34 AM Page 44 3. SYSTEM Press MENU to enter Menu Operation. Press CH M twice to display SYSTEM and press SELECT. has 3 options as follows. To exit, SYSTEM select EXIT 3-A. CONTRAST Press SELECT at SYSTEM CONTRAST appears. -
Page 47: Lamp Adjust
OCEANUS DSC/ATIS_ENG_0512 5/12/05 10:34 AM Page 45 3-B. LAMP ADJUST Press SELECT at SYSTEM (To enter SYSTEM , see page 44.) Press CH M once to select LAMP ADJUST Press SELECT to enter the setting mode. (Default is set at 3). Press CH L and M to select the backlight brightness level. -
Page 48: Key Beep
OCEANUS DSC/ATIS_ENG_0512 5/12/05 10:34 AM Page 46 3-C. KEY BEEP Press SELECT at SYSTEM (To enter SYSTEM , see page 44.) Press CH M twice to select KEY BEEP Press SELECT to enter the setting mode. Press CH L or M to select Press SELECT. -
Page 49: Switching The Inland Waterway Mode/Seagoing Mode
OCEANUS DSC/ATIS_ENG_0512 5/12/05 10:34 AM Page 47 Switching the Inland Waterway Mode/Seagoing Mode You can switch between Inland Waterway mode and Seagoing mode. Press and hold PA/MODE to switch between the two. When the radio in the Inland Waterway mode; DISTRESS/DSC cannot be transmitted nor received. -
Page 50: Nmea Technical Setup
OCEANUS DSC/ATIS_ENG_0512 5/12/05 10:34 AM Page 48 NMEA Technical Setup OCEANUS NMEA0183 GPS Input Connection Specification This section is useful when attaching an external GPS to the OCEANUS DSC/ATIS radio. Many GPS units have a setup menu to be able to configure the NMEA0183 serial data output. -
Page 51: Vhf Fm Marine Radio Telephone Channel And Functions (International Channels)
OCEANUS DSC/ATIS_ENG_0512 5/12/05 10:34 AM Page 49 VHF FM Marine Radio Telephone Channel and Functions (International Channels) CHANNEL FREQUENCY (MHz) TYPE OF SHIP SHIP DESIG TRANSMIT RECEIVE TRAFFIC TO SHIP TO SHORE 156.050 160.650 VTS,Duplex TELEPHONE 156.100 160.700 Port Ops,Duplex TELEPHONE 156.150 160.750... -
Page 52: Specification
OCEANUS DSC/ATIS_ENG_0512 5/12/05 10:34 AM Page 50 Specification General Controls : On-Off/Volume, Squelch Status Indicators : TX (Transmit), TRI (Triple Watch), HI (High), LO (Low), U, C, I, MEM, WX, DSC, (Alarm), (GPS), and Channel Display Channel Display : LCD with Orange backlight Buttons : 16/9/TRI, DISTRESS, PA/MODE, MEM, SELECT, STEP/SCAN, MENU, HI/LO... -
Page 53: Troubleshooting
10:34 AM Page 51 Troubleshooting If the OCEANUS DSC/ATIS does not perform to your expectations, try the suggestions listed below. If you cannot get satisfactory results contact your nearest Uniden Marine dealer. CAUSE REMEDY SYMPTOM No or low voltage. Check for proper voltage Won’t power On. -
Page 54: Care And Maintenance
Uniden Corporation 2-12-7 Hatchobori Chuo-Ku, Tokyo 104-8512 Japan declare, under our sole responsibility, that this equipment "Uniden Marine model OCEANUS DSC/ATIS" is in compliance with the essential requirements and other relevant provisions of the R&TTE Council Directives of the EU. - Page 55 OCEANUS DSC/ATIS_ENG_0512 5/12/05 10:34 AM Page 53...
- Page 56 OCEANUS DSC/ATIS_ENG_0512 5/12/05 10:34 AM Page b...