
Related Manuals for Wyse 9450XE


Summary of Contents for Wyse 9450XE
-
Page 1: Reference Guide
Reference Guide Wyse Winterm 9 series ® ™ Based on Microsoft Windows XP Embedded ® ® Issue: 063005 PN: 883808-02 Rev. A... -
Page 2: Copyright Notice
End User License Agreement (“License”) A copy of the Wyse Technology End User License Agreement is included in the software and provided for your reference only. The License at http://www.wyse.com/license as of the purchase date is the controlling licensing agreement. - Page 3 Thin Client Requirements Compliance FCC Compliance The Models 9450XE, 9455XL, 9650XE, Model J400, Product 941GXL, Model x150SE, Product 9150SE, SX0, and VX0 Thin Clients meet Class B requirements. IEC/EN Compliance The Models 9450XE, 9455XL, 9650XE, Model J400, Product 941GXL, Model x150SE, Product 9150SE, SX0, and VX0 Thin Clients meet Class B requirements.
- Page 4 For Use with External Power Supply Model LSE9802A1255, or UL Listed Power Unit marked “Class 2” or “LPS” and rated for minimum 4.0A at 12 V DC. Battery Information The 9450XE, 9455XL, 9650XE, Model J400, Product 941GXL, and VX0 Thin Clients contain a replaceable battery. Warning There is a risk of explosion if the battery is replaced by an incorrect type.
-
Page 5: Table Of Contents
Contents Introduction 1 About This Guide 1 Wyse Technical Support 2 Server Environment Requirements 2 Session Servers 2 Citrix Independent Computing Architecture (ICA) 2 Microsoft Remote Desktop Protocol (RDP) 2 Terminal Emulation Support 3 Support Servers 3 Rapport Remote Administration 3... - Page 6 WinVNC 60 VNC Server Properties Settings 60 VNC Viewer Setup and Operation 61 List of Figures Model 9450XE Thin Client 5 Model 9455XL Thin Client 6 Model 9650XE Thin Client 8 Model J400, Product 941GXL Thin Client 10 Model 9150SE Thin Client 12...
- Page 7 Example of a User desktop Example of an administrator desktop Client Information dialog box Power Term Session Manager Terminal emulation window and Connect dialog box Neutron dialog box (extended menu) Internet Explorer window 27 Citrix Program Neighborhood window 28 Remote Desktop Connection dialog box (expanded view) 29 WinVNC: Current User Properties dialog box Administrator Control Panel window (Classic View/List) 31 Administrative Tools window 32...
- Page 8 viii This page intentionally blank.
-
Page 9: Introduction
This reference guide supplements the standard Windows XP and Windows XPe documentation supplied by Microsoft Corporation. The guide explains the differences, enhancements, and additional features provided by Wyse with the thin client. It does not attempt to describe the standard features found in Windows XP and Windows XPe. -
Page 10: Wyse Technical Support
Wyse Support Request Form, or call Customer Support at 1-800-800-WYSE (toll free in U.S. and Canada). Hours of operation are from 7:00 am to 7:00 pm CST, Monday through Friday. To access international support, visit http://www.wyse.com/worldwide. -
Page 11: Terminal Emulation Support
Windows 2000 Server, Advanced Server or Workstation), and be able to access a software repository for your thin client (for information on installing Rapport and configuring the server environment, refer to the Rapport Quick Start Guide or Wyse Rapport Help File). -
Page 12: Model Summary
9 series Thin Clients. Note With all Winterm 9 series Thin Clients, be sure to plug the Wyse PS/2-type mouse into the Wyse keyboard for proper mouse functionality. Note Thin client data sheets, the product registration form, and information about Rapport for Wyse and Rapport Administrative Software are available through the Wyse Web site at: http://www.wyse.com. -
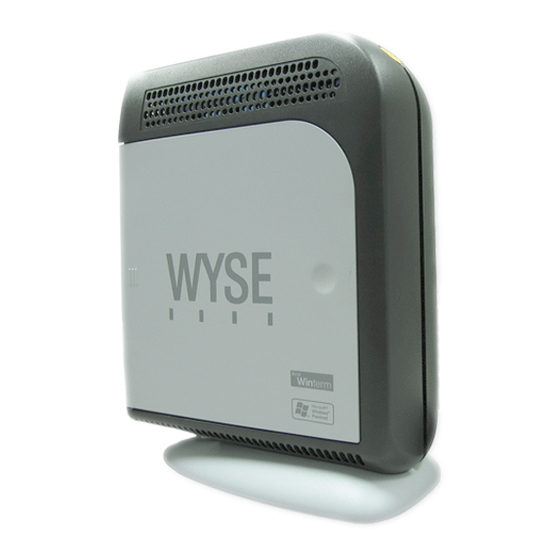
Page 13: Model 9450Xe
Figure 1 Model 9450XE Thin Client The 9450XE has two LED indicators on the back of the unit next to the RJ-45 LAN port (Network connector). The Green LED is a Dual Link/Activity Indicator, and the Yellow LED is a Speed Indicator. -
Page 14: Model 9455Xl
Model 9455XL The 9455XL is a modular thin client with a rugged metal chassis that can be mounted vertically or horizontally. The connections for power, network, keyboard, mouse, serial and parallel devices, and USB ports are on the back panel of the thin client. The rear panel contains an access slot for an optional PCI expansion card. - Page 15 is a Speed Indicator. The blinking sequence (or absence) of these LEDs indicates the condition of the LAN connection. • Green LED On—Link, but no Activity • Green LED Blinking—Link with Activity • Green LED Off—No Link • Yellow LED On—100 Mbps •...
-
Page 16: Model 9650Xe
Model 9650XE The 9650XE is a small-footprint thin client with an integrated 15 inch flat panel LCD. The connections for power, network, keyboard, mouse, serial and parallel devices, speakers, and USB peripherals are on the underside of the back panel of the thin client. The power button switch is located on the front of the thin client. - Page 17 is a Speed Indicator. The blinking sequence (or absence) of these LEDs indicates the condition of the LAN connection. • Green LED On—Link, but no Activity • Green LED Blinking—Link with Activity • Green LED Off—No Link • Yellow LED On—100 Mbps •...
-
Page 18: Model J400, Product 941Gxl
Model J400, Product 941GXL The 941GXL is a modular thin client with a rugged metal chassis that can be mounted vertically or horizontally. The 941GXL has a slightly larger chassis than the 9455XL and features a faster processor than any of the other Series 9000 devices. The connections for power, network, keyboard, mouse, serial and parallel devices, and USB ports are on the back panel of the thin client. - Page 19 is a Speed Indicator. The blinking sequence (or absence) of these LEDs indicates the condition of the LAN connection. • Green LED On—Link, but no Activity • Green LED Blinking—Link with Activity • Green LED Off—No Link • Yellow LED On—100 Mbps •...
-
Page 20: Model X150, Product 9150Se
Model x150, Product 9150SE The 9150SE is a small-footprint, modular thin client. The connections for power, network, audio, monitor (video), keyboard, mouse, serial and parallel devices, and USB devices and peripherals are on the back panel of the thin client. The power button switch is located on the front-top of the unit. - Page 21 After power connection, the power LED will remain amber for some time. The user must not press the power button until the amber light is off. When the amber light is off, lightly press the power button on the thin client to turn on power.
-
Page 22: Model Sx0, Product S90
Model SX0, Product S90 The S90 is a small-footprint, modular XPe-based thin client. The lock receptacle, connections for power, monitor (video), serial port, network, and USB port (2), are on the back panel of the thin client. The microphone in, speaker out, USB port (2), and power button switch are located on the front of the unit. -
Page 23: Model Vx0, Product V90
Model VX0, Product V90 The V90 is a small-footprint, modular XPe-based thin client. The connections for power, network, audio, monitor (video), keyboard, mouse, serial and parallel devices, and USB devices and peripherals are on the back panel of the thin client. The power button switch, LED indicators, Microphone in, Line in, and USB port are located on the front of the unit. -
Page 24: Mounting And Connecting The Thin Client
The Quick Start Guide (included in the shipping carton) provides instructions for mounting and connecting the thin client. The thin client can be placed on a desktop, or it can be mounted on a wall using an optional wall-mount bracket available from Wyse Technology. Caution Mount and connect the thin client only as directed in the Quick Start Guide (and in the wall-mount bracket instructions, if used). -
Page 25: Extended Xpe Features
Extended XPe Features The operating system of the Winterm 9 series Thin Client has extended features not found in standard Windows XP. Controls for extended XPe features are available only through an Administrator logon account—with exceptions of the Citrix Program Neighborhood, the Microsoft Terminal Server Client (Remote Desktop Connection Manager), and if installed, a special-order terminal emulation application. -
Page 26: Automatically Launched Utilities
Note The administrator can create additional user accounts by using the User Manager utility available through the Control Panel. However, due to local memory constraints, the number of additional users should be kept to a minimum. For administrator information on user accounts, refer to “User Manager”... -
Page 27: The Xpe Desktop
The XPe Desktop This section includes information on the following: • “Users Desktop” • “Administrators Desktop” on page 21 • “Client Information” on page 22 • “Logging Off, Restarting, and Shutting Down the Thin Client” on page 23 Users Desktop The desktop that appears for a User log-on is a Windows desktop. - Page 28 For information about the functionality of the standard Windows XP desktop and Start menu items, refer to the applicable Microsoft documentation (search and navigate to the Windows XP Support Center) at: http://support.microsoft.com/default.aspx. For Internet locations of the Citrix Program Neighborhood and Remote Desktop Connection help documents, refer to “Programs Extended Menu”...
-
Page 29: Administrators Desktop
Administrators Desktop The desktop that appears for an administrator log-on is a Windows desktop. Icons present on the default administrator desktop are My Computer, My Network Places, Citrix Program Neighborhood, Remote Desktop Connection, Internet Explorer, Enhanced Write Filter Enable, and Enhanced Write Filter Disable (for a description of the Enhanced Write Filter Disable and Enhanced Write Filter Enable icons, refer to “Enhanced Write Filter Enable and Enhanced Write Filter Disable Desktop Icons”... -
Page 30: Client Information
Client Information Use the Client Information dialog box (Start | About this Device) to view various information about the thin client. Note The information shown varies for different thin clients and software releases. For example, the General tab displays thin client information such as the Website, Product Name, Product ID, Version, Windows XPE Version, MAC Address, Serial Number, Terminal H/W Rev, CPU Type, CPU Speed in MHz, Flash Configuration, RAM Configuration, and System Partition. -
Page 31: Logging Off, Restarting, And Shutting Down The Thin Client
QFEs tab to view the list of Microsoft QFEs applied to the thin client. • Copyrights tab to view Wyse copyright information. Logging Off, Restarting, and Shutting Down the Thin Client Use the Start menu on the taskbar to log off, restart, or shut down the thin client. Click Start | Shut Down to open the Shut Down Windows dialog box, and select the option you want from the list box. -
Page 32: Programs Extended Menu
Note Correct time should be maintained as some applications require access to local thin client time. The Date and Time Properties dialog box can be opened by clicking the System time area in the taskbar or by double-clicking the Date and Time icon in the Control Panel. Programs Extended Menu The Programs extended menu (Start | Programs) includes: •... -
Page 33: Terminal Emulation Window And Connect Dialog Box
Clicking Start | Programs | PowerTerm | ptw32 (by default, a desktop icon is not installed) opens the terminal emulation window and Connect dialog box. Figure 12 Terminal emulation window and Connect dialog box The ptw32 application allows you to configure your connection information. For complete instructions on installing and using terminal emulation, refer to the terminal emulation documentation supplied separately. -
Page 34: Neutron Time Synchronization Application
Neutron Time Synchronization Application Clicking Start | Programs | Startup | Neutron opens the Neutron dialog box. The Neutron dialog box contains the current System Time and Atomic Time. To Synchronize the System Time with the Atomic Time, click Synchronize in the Neutron dialog box. To retrieve the current Atomic time from a time server, click Get Atomic Time. -
Page 35: Internet Explorer
Internet Explorer Microsoft Internet Explorer (MSIE) version 6.0 browser is installed locally on the thin client. Clicking Start | Programs | Internet Explorer or Start | Internet Explorer (or double-clicking the desktop icon) opens IE 6.0. The Internet options settings for the browser have been preselected at the factory to limit writing to flash memory. -
Page 36: Citrix Program Neighborhood
Citrix Program Neighborhood Clicking Start | Programs | Citrix Program Neighborhood or Start | Citrix Program Neighborhood (or double-clicking the desktop icon) opens the Citrix Program Neighborhood window. Use this program to manage connections to remote applications running on ICA servers. Documentation for the ICA client application is available from the Citrix Corporation Web site at: http://download2.citrix.com/files/en/products/client/ica/current/docs/ica_win32_guide.pdf... -
Page 37: Remote Desktop Connection
Remote Desktop Connection Clicking Start | Programs | Remote Desktop Connection or Start | Remote Desktop Connection (or double-clicking the desktop icon) opens the Remote Desktop Connection dialog box (you can expanded the view by clicking Options). Use this program to establish connections to remote applications using RDP. -
Page 38: Winvnc Current User Properties
WinVNC: Current User Properties dialog box. Use this dialog box to enter the VNC log-on password (the default password is Wyse), and to select the parameters for the VNC server utility installed on a user thin client. -
Page 39: Control Panel Extended Selections
Control Panel Extended Selections Clicking Start | Settings | Control Panel opens the Control Panel window (the administrator Control Panel contains extended selections). Figure 18 Administrator Control Panel window (Classic View/List) Notable extended selections available on the administrators Control Panel include: •... -
Page 40: Administrative Tools
• “RAMdisk” on page 37 • “Rapport” on page 39 • “Regional and Language Options” on page 39 • “Winlog” on page 40 • “Wireless LAN Settings” on page 41 Administrative Tools Double-clicking the Administrative Tools icon in the Control Panel opens the Administrative Tools window. -
Page 41: Component Services Window
Component Services Double-clicking the Component Services icon opens the Component Services window. The console allows access to configure the Component Services, Event Viewer, and Local Services. Figure 20 Component Services window Event Viewer Double-clicking the Event Viewer icon opens the Event Viewer window. This tool displays monitoring and troublehooting messages from Windows and other programs. -
Page 42: Services Window
Services Double-clicking the Services icon opens the Services window. The Services window lists the services installed on the thin client. VNC Server and Client Clean-up (NetXClean) are two services which may need to be stopped or restarted by the thin client administrator and are discussed in “Utilities and Settings”... -
Page 43: Local Users And Groups Window
User Manager Double-clicking the User Manager icon opens the Local Users and Groups window. This tool allows administrators to manage users and groups. For detailed information on the User Manager, refer to “User Manager” on page 55. Figure 23 Local Users and Groups window WinVNC Current User Properties Double-clicking the WinVNC Current User Properties icon opens the WinVNC: Current User Properties dialog box. -
Page 44: Custom Fields
Figure 24 WinVNC: Current User Properties dialog box Use this dialog box to enter the VNC log-on password (the default password is Wyse), and to select the parameters for the VNC server utility installed on a user thin client. VNC server allows the user thin client to be operated/monitored (shadowed) from a remote machine on which VNC Viewer is installed. -
Page 45: Elo Touchscreen
Figure 25 Custom Fields dialog box ELO Touchscreen If the ELO Touchscreen option is installed on the thin client, double-clicking the ELO Touchscreen icon in the Control Panel allows you to calibrate and customize the settings for a touchscreen monitor that is connected to the thin client (or when ELO Touchscreen is integrated with Model 9650XE). -
Page 46: Ramdisk Configuration Dialog Box
• Print spooling • User/system temporary files • ICA bitmap cache The RAMdisk can also be used for temporary storage of other data according to administrator discretion (see “Local Drives” on page 51). Double-clicking the RAMdisk icon in the Control Panel opens the Ramdisk Configuration dialog box. -
Page 47: Rapport
Rapport Double-clicking the Rapport icon in the Control Panel opens the Rapport Properties dialog box. Use this dialog box to configure the Rapport settings. Figure 27 Rapport Properties dialog box To configure the Rapport settings: 1. Enter the Rapport Server hostname or IP address in the IP Address text box. 2. -
Page 48: Winlog
The next time the user logs on, the GUI will be in the selected language. Note For more information on multi-language builds, go to: http://www.wyse.com. The keyboard layout does not automatically change with the GUI changes. It must be changed manually. -
Page 49: Wireless Lan Settings
Wireless LAN Settings If Wyse USB 802.11b hardware is installed on the thin client, double-clicking the Wireless LAN Settings icon in the administrator Control Panel allows you to customize wireless LAN settings (such as the wireless network ID, and so on). -
Page 50: Audio
4. Click Next in the first window of the wizard. 5. Select the Local printer attached to this computer option. 6. Ensure that the Automatically detect and install my Plug and Play printer check box is not selected. 7. Click Next. 8. -
Page 51: Utilities And Settings
Utilities and Settings The following utilities and settings are available for administrative use: • “Enhanced Write Filter” • “NetXClean Utility” on page 50 • “Local Drives” on page 51 • “Mapping Network Drives” on page 52 • “Domain Participation” on page 52 •... -
Page 52: Password Change With The Enhanced Write Filter
Enhanced Write Filter state (enabled or disabled). If you want to have other registry settings preserved regardless of Enhanced Write Filter state, contact support for help at http://www.wyse.com. For procedures on using the Enhanced Write Filter, refer to: •... - Page 53 not the thin client traffic. If you also set the DisablePasswordChange registry entry to a value of 1 in the thin client, both thin client and replication traffic will stop. Disabling the machine account password change on a Winterm 9 series Thin Client To disable the machine account password change on a Winterm 9 series Thin Client:...
-
Page 54: Enhanced Write Filter Command Line Control
Enhanced Write Filter Command Line Control There are several Start | Run command lines you can use to control the Enhanced Write Filter. Note Command line arguments cannot be combined. Caution Thin client administrators should use NT file security to prevent undesired usage of these commands. -
Page 55: Enhanced Write Filter Enable And Enhanced Write Filter Disable Desktop
Enhanced Write Filter Enable and Enhanced Write Filter Disable Desktop Icons For convenience, the Enhanced Write Filter Enable and Enhanced Write Filter Disable icons are present on the Administrator desktop. Depending on which icon you use, you can either enable or disable the Enhanced Write Filter. •... -
Page 56: Enhanced Write Filter Control Dialog Box
Enhanced Write Filter Control Dialog Box The Enhanced Write Filter Control dialog box can be opened either through the Start | Run command line (ewfmgr.exe C:) or by double-clicking the EWF icon in the administrator system tray. Note To open the dialog box using the command line, click Start | Run and type ewfmgr.exe C: and then click OK. - Page 57 command button and the Commit Changes command button are disabled when the Enhanced Write Filter is currently disabled). If you do not restart the thin client, the changes made will not be saved until the thin client is restarted. Note After flushing the cache and disabling the Enhanced Write Filter, the Enhanced Write Filter status icon (in the desktop system tray) turns red and the Enhanced Write Filter remains disabled after the system restarts.
-
Page 58: Netxclean Utility
NetXClean Utility NetXClean keeps extraneous information from being stored in flash memory. NetXClean is a service that runs in the background and operates on the flash memory only. NetXClean clean-up is triggered on either service startup or user log off. It performs the clean-up invisibly and no user input is necessary. -
Page 59: Local Drives
Local Drives Administrators need to know the following information about local drives. Drive Z Drive Z is onboard volatile memory (Ms-ramdrive) of the thin client. Because drive Z is volatile memory, it is recommended that you do not use this drive to save data that you want to retain. -
Page 60: Saving Files
Saving Files The thin client uses an embedded operating system with a fixed amount of flash memory. It is recommended that you save files that you want to keep on a server rather than on your thin client. Caution Be careful of application settings that write to the C drive, which resides in flash memory (in particular, those applications which by default write cache files to the C drive on the local system). -
Page 61: Roaming Profiles
Directory domain. For instructions on disabling and enabling the Enhanced Write Filter, refer to “Enhanced Write Filter” on page 43. To make the domain changes permanent, complete the following steps: 1. Disable the Enhanced Write Filter. 2. Join the domain. 3. -
Page 62: Winping Utility
WinPing Utility To open the WinPing window, click Start | Run, type WinPing in the text field, and click OK. The WinPing window is used to launch the Windows PING (Packet InterNet Groper) diagnostic utility and view the results from pinging. Figure 29 WinPing window WinPing is a diagnostic tool familiar to administrators. -
Page 63: User Manager
User Manager The User Manager allows administrators to create new user accounts and configure user profiles. It also allows administrators to create new groups and determine group membership. By default, a new user is only a member of the Users group and is not locked down. You, as the administrator, must select the attributes and profile settings for a new user. -
Page 64: Creating New Groups
recommended that extreme care be exercised when changing configuration settings of the factory-installed applications. To add a user to the Administrators group: 1. Log-in as an administrator. 2. Click Start | Settings | Control Panel | Administrative Tools, and then double-click the User Manager icon to open the Local Users and Groups window. -
Page 65: Determining Group Membership
Determining Group Membership Only an administrator can determine group membership. For example, new users cannot put themselves into the Administrators group, only the administrator can add a user to the Administrators group. To add a member to the Administrators group: 1. -
Page 66: Remote Administration And Firmware Upgrades
“WinVNC” on page 60 Wyse Rapport Version 4.4.x Rapport is a full-featured remote administration tool set available from Wyse Technology. It accesses the thin client through the Rapport Agent, PXE, and VNC server utilities installed on the thin client. Rapport allows the thin client administration functions (including firmware upgrades) to be performed without requiring an administrator to visit the individual thin client sites. -
Page 67: User Instructions On The First Boot Process After Loading A Standard Image (V2.2 Or Earlier Only)
If you are running version 2.2 or earlier, you must follow these important instructions when imaging the Winterm 9 series Thin Clients with the standard XPe image downloaded from the Wyse Web site. Note When performing a mass distribution of a custom device image that has been created with Rapport, certain devices will require unique preparation prior to image creation and distribution. -
Page 68: Winvnc
To open the WinVNC: Current User Properties dialog box, click Start | Programs | WinVNC Current User Properties, or double-click the WinVNC icon in the system tray of the administrator taskbar. The default password in this dialog box is Wyse. Caution... -
Page 69: Vnc Viewer Setup And Operation
Connections, clicking the Local Area Connection icon and scrolling down to the Details area in the left pane). Note You can obtain the IP Address of an administrator thin client by hovering the mouse arrow over the VNC icon in the system tray of the administrator taskbar. -
Page 70: Vnc Connection Options Dialog Box
Figure 33 VNC Connection Options dialog box Note The VNC Connection Options dialog box varies for different VNC software releases. Use the general guidelines in Table 1 to configure the VNC Connection Options dialog box. Table 1 VNC Connection Options dialog box guidelines Selection Description Preferred encoding radio buttons... - Page 71 Table 1 VNC Connection Options dialog box guidelines, Continued Selection Description Disable clipboard transfer Clipboard changes caused by cutting or copying at either the viewer of server are normally transferred to the other end. This option disables clipboard transfers. Mouse check boxes Emulate 3 Buttons (with 2-button Users with a two-button mouse can emulate a click)
-
Page 72: Vnc Authentication Dialog Box
4. In the VNC server text field, type the IP address or valid DNS name of the (the desktop that is to be operated/monitored) thin client followed by a colon and 0. For example: snoopy:0 132.237.16.238:0 5. Click OK to open the VNC Authentication dialog box. Figure 34 VNC Authentication dialog box 6. - Page 73 This page intentionally blank.
- Page 74 Reference Guide ® Wyse Winterm™ 9 series ® ® Based on Microsoft Windows XP Embedded Issue: 063005 Written and published by: Wyse Technology Inc., June 2005 ® ® Created using FrameMaker and Acrobat...