
Related Manuals for Fujitsu Siemens Computers JETSON


Summary of Contents for Fujitsu Siemens Computers JETSON
- Page 1 J E T S O N J E T S O N J E T S O N J E T S O N OPERATING MANUAL OPERATING MANUAL OPERATING MANUAL OPERATING MANUAL...
- Page 2 • your sales outlet The addresses of your service partners are contained in the guarantee booklet or in the service address booklet. The latest information on our products, tips, updates, etc., can be found on the Internet under: http://www.fujitsu-siemens.com...
- Page 4 Este manual ha sido impreso sobre papel reciclado. Questo manuale è stato stampato su carta da riciclaggio. Denna handbok är tryckt på recyclingpapper. Dit handboek werd op recycling-papier gedrukt. Herausgegeben von/Published by Fujitsu Siemens Computers GmbH A26361-K619-Z100-1-7619 A26361-K619-Z100-1-7619 A26361-K619-Z100-1-7619 A26361-K619-Z100-1-7619 Bestell-Nr./Order No.:...
-
Page 5: Operating Manual
Introduction Important notes JETSON Preparation for use and operation Troubleshooting and tips System expansions Operating Manual Technical data Index July 2000 edition... - Page 6 All other trademarks referenced are trademarks or registered trademarks of their respective owners, whose protected rights are acknowledged. Copyright ã Fujitsu Siemens Computers GmbH 2000 All rights, including rights of translation, reproduction by printing, copying or similar methods, even of parts are reserved.
-
Page 7: Table Of Contents
Contents Introduction .............................1 Notational conventions ........................2 Important notes ..........................3 Safety ..............................3 Manufacturer’s notes .........................3 Energy saving..........................3 Disposal and recycling.......................4 CE certificate ..........................4 Transporting the PC ..........................4 Cleaning the PC ..........................4 Preparation for use and operation ....................7 Unpacking and checking the delivery ....................7 Setting up the PC ..........................8... - Page 8 Contents Information on boards ......................29 Opening the system unit ......................... 30 Assembling the system unit ......................31 Extensions on the system board ..................... 32 Upgrading main memory ......................32 Replacing processor ....................... 34 Replacing lithium battery ......................36 Technical data ..........................
-
Page 9: Introduction
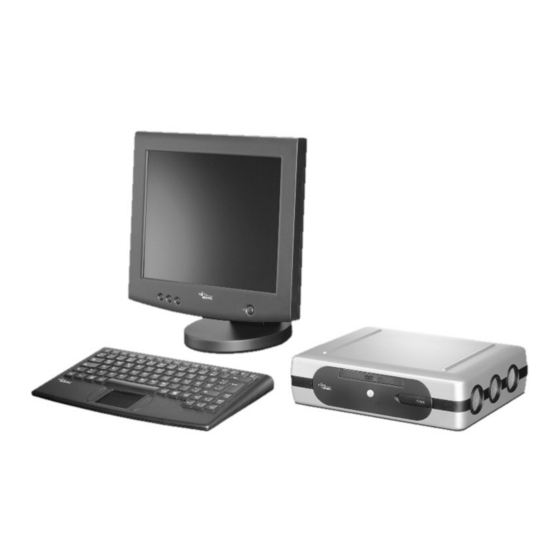
JETSON. In place of serial and parallel ports, the JETSON has USB ports on the front and on the back. The abbreviation USB stands for "Universal Serial Bus" and represents a new kind of interface system. -
Page 10: Notational Conventions
Introduction Notational conventions Notational conventions The meanings of the symbols and fonts used in this manual are as follows: indicates information which is important for your health or for preventing physical damage. indicates important information that is required to use the system properly. Ê... -
Page 11: Important Notes
Important notes In this chapter you will find information regarding safety which it is essential to take note of when working with your PC. The manufacturer's notes contain helpful information on your PC. Safety This device complies with the relevant safety regulations for data processing equipment. If you have any questions, contact your sales outlet or our customer service center. -
Page 12: Disposal And Recycling
Do not throw lithium batteries or accumulators into the trashcan. They must be disposed of in accordance with local regulations concerning special waste. If you have any questions on disposal, please contact your local office, our customer service center, Fujitsu Siemens Computers GmbH Recyclingcenter D-33106 Paderborn Tel.: ..49 5251 818010... - Page 13 Cleaning the PC Important notes Cleaning the keyboard and the mouse Use disinfectant wipes to clean the keyboard and the mouse. Remove the retaining ring on the underside of the mouse and then clean the mouse mechanism and the rotating ball. Ê...
-
Page 15: Preparation For Use And Operation
Preparation for use and operation Please pay attention to the safety information provided in the chapter "Important notes" and in the manual "Safety, Guarantee and Ergonomics". Unpacking and checking the delivery It is recommended not to throw away the original packaging material! It may be required for reshipment at some later date. -
Page 16: Setting Up The Pc
Preparation for use and operation Setting up the PC Setting up the PC When installing your PC, give consideration to the recommendations on video workstation ergonomics in the manual "Safety, Guarantee and Ergonomics". Do not expose the PC to extreme environmental conditions (see chapter "Technical data"). -
Page 17: Connecting Devices
Connecting devices Preparation for use and operation Connecting devices Read the documentation on the external device before connecting it. When you set up the PC for the first time, connect only the monitor, the keyboard and the mouse. Notes on standard units The notes in this section do not apply to units with a USB port and not to the LAN connection. -
Page 18: Ports For External Devices
Preparation for use and operation Connecting devices Ports for external devices The ports for external devices are on the front and on the rear of the system unit. The ports available on your device depend on the configuration level you have selected. 1 = USB ports 5 = Audio output 2 = Optional audio connections... -
Page 19: Connecting The Keyboard
Connecting devices Preparation for use and operation USB ports You can connect any desired device equipped with USB (Universal Serial Bus) to a USB port. USB components can be connected or disconnected during operation. A symbol is provided on the plugs of USB cables that usually faces upward during connection. -
Page 20: Connecting The Monitor To The Line Voltage
Preparation for use and operation Connecting the PC to the line voltage Connecting the monitor to the line voltage Ê Prepare the monitor as described in the Operating Manual for the monitor. Ê Plug the data cable of the monitor into the monitor port of the system unit. Ê... - Page 21 Connecting the PC to the line voltage Preparation for use and operation 1 = Notch for inserting the screwdriver Ê If the rated voltage does not agree with the local line voltage, lift out the plug-in unit with a screwdriver (1), turn it and replace it. Ê...
-
Page 22: Unlocking/Locking The Pc (Optional)
Preparation for use and operation Unlocking/locking the PC (optional) Unlocking/locking the PC (optional) If your PC is equipped with a casing lock, you can mechanically lock the system unit. Locking the system unit Ê Turn the key clockwise (1). Unlocking the system unit Ê... -
Page 23: Switching The Pc On And Off
Switching the PC on and off Preparation for use and operation Switching the PC on and off 1 = Main switch 2 = ON/OFF switch 0 = System unit is switched off 3 = Power-on indicator I = System unit is ready-to-operate A26361-K619-Z100-1-7619... -
Page 24: Switching On The Pc For The First Time
Preparation for use and operation Switching the PC on and off Switching on the PC for the first time When you switch on your PC for the first time the supplied software is set up and configured. The software required for the initial installation already exists on the hard disk. The supplied Recovery CD or the CD "Drivers &... -
Page 25: Switching On The Pc
Switching the PC on and off Preparation for use and operation Switching on the PC Ê Switch the monitor on (see the Operating Manual for the monitor). Ê Switch the system unit on with the main switch at the rear of the system unit. Ê... -
Page 26: Indicators On The System Unit
Preparation for use and operation Indicators on the system unit Indicators on the system unit 1 = ON/OFF switch 4 = Hard disk indicator 2 = Message indicator 5 = Indicator CD/DVD drive 3 = Power-on indicator 1 - ON/OFF switch 2 - Power-on indicator −... -
Page 27: Keyboard
Keyboard Preparation for use and operation Keyboard This chapter contains information on the office keyboard. For information on the radio keyboard, see the documentation supplied with the radio keyboard. 1 = Function keys 4 = Cursor control keys 2 = OFF switch (optional) 5 = Numeric keypad (calculator keypad) 3 = Alphanumeric keypad Important keys and key combinations... - Page 28 Preparation for use and operation Keyboard Alt Gr (e. g. German keyboard) produces a character shown on the right-hand side of a key (e. g. the character " " Alt Gr on the key [ß] [ß] [ß]). [ß] Euro key enables the output of the euro symbol.
-
Page 29: Property And Data Protection
BIOS Setup fan control settings In the BIOS Setup you can select between different fan settings in order to control the amount of noise your JETSON will produce. In this operating mode, the processor can be slowed down so that the fan does not Silent have to run. -
Page 31: Troubleshooting And Tips
Troubleshooting and tips Take note of the safety notes in the manual "Safety, Guarantee and Ergonomics" and in the chapter "Preparation for use and operation", when you connect or disconnect cables. If a fault occurs, try to correct it as described in the following documents: •... -
Page 32: The Screen Stays Blank
Troubleshooting and tips The screen stays blank If your screen remains blank this may have the following causes: Monitor is switched off Ê Switch your monitor on. Power cable or monitor cable not connected Ê Switch off the monitor and the system unit. Ê... -
Page 33: Flickering Stripes On The Monitor Screen
Troubleshooting and tips Flickering stripes on the monitor screen Switch off the PC immediately. Monitor does not support the set horizontal frequency Ê Find out which horizontal frequency your monitor screen supports. You will find the horizontal frequency (also known as line frequency or horizontal deflection frequency) in the documentation of your monitor. -
Page 34: Keyboard Does Not React Or Types Incorrect Characters
"BIOS Setup" manual and in the documentation of the installed software. Restoring the hard disk contents When the JETSON is delivered the entire software is already preinstalled on the hard disk. Use the Recovery CD to restore the software installation e.g if an error occurs. -
Page 35: Tips
Troubleshooting and tips Tips PC switches on briefly and then off again The power cable has been plugged in or the device was switched on with the main switch. For technical reasons, this brief switching on and off is necessary. Out of system resources If you have too many applications running at once, you may experience problems due to a lack of system resources. -
Page 37: System Expansions
System expansions This chapter describes all activities that must be carried out when hardware changes are to be carried out in your PC. As detailed PC knowledge is required for these activities, they should always be carried out by specially trained experts. It may be necessary to update the BIOS when carrying out a system expansion or hardware upgrade. -
Page 38: Opening The System Unit
System expansions Opening the system unit Ê Switch the PC off. Pull the power plug out of the power outlet so that the system is totally removed from the line voltage! Ê If any cables attached to the system unit are obstructing you, pull out the connectors on the system unit. -
Page 39: Assembling The System Unit
System expansions Assembling the system unit Before you assemble the system unit, make sure that the ventilation duct has correctly snapped into place. Ê Place the top cover on the system unit from above. Ê Mount the two screws at the rear (2). Ê... -
Page 40: Extensions On The System Board
System expansions Extensions on the system board Details of how and if you can upgrade the main memory or the processor of your PC are provided in the Technical Manual for the system board. Below the necessary steps are described to enable you to work on the system board. - Page 41 System expansions Installing drive carrier Ê If you previously disconnected them, plug the data and power cable connectors back into the hard disk and the CD-ROM or DVD drive. Ê Mount the drive carrier in the bracket again (1), slide it into position (2) and secure it with the screw (3).
-
Page 42: Replacing Processor
System expansions Replacing processor To replace the processor you must remove the ventilation duct. Removing ventilation duct The ventilation duct is secured in the system unit with two lugs (a). Ê Lift the ventilation duct out of the system unit in the direction of the arrow by unhooking the two lugs (a). - Page 43 System expansions Installing ventilation duct Ê Place the ventilation duct in the system unit as indicated by the arrow. The two lugs (a) must engage. If the ventilation duct is not installed properly, the system may be damaged by overheating! Ê...
-
Page 44: Replacing Lithium Battery
System expansions Replacing lithium battery Incorrect replacement of the lithium battery may lead to a risk of explosion. The lithium battery may be replaced only with an identical battery or with a type recommended by the manufacturer. Do not throw lithium batteries into the trashcan. It must be disposed of in accordance with local regulations concerning special waste. -
Page 45: Technical Data
< 5 W *) Noise emission: Sound power level (L ) < 30 dB (A) *) These values only apply for a JETSON with the configuration below. Processor (512 Kbyte cache): Pentium III Processor at 733 MHz Main memory: 128 Mbyte... -
Page 47: Index
Index Ê Accumulator, disposal ACPI function Activating, security measures Alphanumeric keypad Alt Gr key Assembling, system unit Audio input output Battery disposal BIOS password BIOS Setup fan control security function Board Cable connecting disconnecting Cabling, PC Calculator keypad Casing assembling opening CE certificate Changing... - Page 48 Index USB interface Connecting to power voltage Contents of delivery Control key Courier Ctrl key Cursor control keys Dark screen Data protection technical Date, not correct Devices connecting interface Dimensions Display cleaning Disposal Documentation, overview Drive carrier installing removing Electrical data Electromagnetic compatibility Energy saving Enter key...
- Page 49 Index Flickering stripes on the monitor screen Function keys Further informations, overview Guarantee coupon booklet Important notes Indicator power-on indicator fails to light remains blank Indicators, system unit Installing drive carrier new Software ventilation duct Insufficient memory Interfaces Italics Key combination Keyboard cleaning connecting...
- Page 50 Index transporting Mouse cleaning connecting error Network port New Installation, Software No screen display Noise level Not enough memory Notational conventions Notes boards CE certificate disposal energy saving important manufacturer safety Num Lock key Numeric keypad Office keyboard connecting ON/OFF switch Opening, system unit Operation Other manuals...
- Page 51 Index indicator dark indicator, dark Preparation for use Processor replacing Property protection Radio receiver for radio keyboard connecting Rated voltage setting Recycling Removing drive carrier ventilation duct Replacing lithium battery processor Return key Safety Save to RAM function Save-to-RAM mode Screen blank flickering...
- Page 52 Index System unit cleaning indicators Technical data Time, not correct Tips Transport Trouble flickering screen mouse screen screen display drifts system unit Unlocking, PC Unpacking Upgrading, memory USB port connecting devices USB port USB, Universal Serial Bus Ventilation area Ventilation duct installing removing Vertical operating position...