IBM PROJECTOR C400 User Manual
Ibm projector user guide c400
Hide thumbs
Also See for PROJECTOR C400:
- Manual do utilizador (94 pages) ,
- Guide utilisateur (94 pages) ,
- User manual (94 pages)
Table of Contents
Advertisement
Quick Links
Advertisement
Table of Contents

Related Manuals for IBM PROJECTOR C400


Summary of Contents for IBM PROJECTOR C400
- Page 1 IBM C400 PROJECTOR User’s Guide...
- Page 3 IBM C400 PROJECTOR User’s Guide...
- Page 4 Note: Before using this information and the product it supports, read the information in and Appendix E, “IBM Statement of Limited Warranty Z125-4753-08 04/2004,” on page E-1. First Edition (June 2004) © Copyright International Business Machines Corporation 2004. All rights reserved.
-
Page 5: Table Of Contents
Adjusting the image . Adjusting the volume . Chapter 3. Connecting devices to the projector ... . . 3-1 Connecting devices Connecting to a USB device . Connecting to a computer monitor . - Page 6 IBM C400 PROJECTOR: User’s Guide...
-
Page 7: Safety Information
Lees voordat u dit product installeert eerst de veiligheidsvoorschriften. Les sikkerhetsinformasjonen (Safety Information) før du installerer dette produktet. Antes de instalar este produto, leia as Informações sobre Segurança. Antes de instalar este producto lea la información de seguridad. © Copyright IBM Corp. 2004... - Page 8 Läs säkerhetsinformationen innan du installerar den här produkten. IBM C400 PROJECTOR: User’s Guide...
-
Page 9: General Safety Guidelines
Always observe the following precautions to reduce the risk of injury and property damage. Service Do not attempt to service a product yourself unless instructed to do so by the IBM Support Center. Use only an IBM authorized service provider who is approved to repair your particular product. -
Page 10: Extension Cords And Related Devices
In addition many mobile products such as Thinkpad notebook PCs utilize a rechargeable battery pack to provide system power when in portable mode. Batteries supplied by IBM for use with your product have been tested for compatibility and should only be replaced with IBM approved parts. -
Page 11: Heat And Product Ventilation
shorten the life of the battery and can also pose a safety hazard. Do not let rechargeable Lithium-Ion batteries completely discharge or store these batteries in a discharged state. Heat and product ventilation Computers generate heat when turned on and when batteries are charging. Notebook PCs can generate a significant amount of heat due to their compact size. - Page 12 IBM C400 PROJECTOR: User’s Guide...
-
Page 13: Registering Your Option
Registering your option Thank you for purchasing this IBM register your product and provide us with information that will help IBM to better serve you in the future. Your feedback is valuable to us in developing products and services that are important to you, as well as in developing better ways to communicate with you. - Page 14 IBM C400 PROJECTOR: User’s Guide...
-
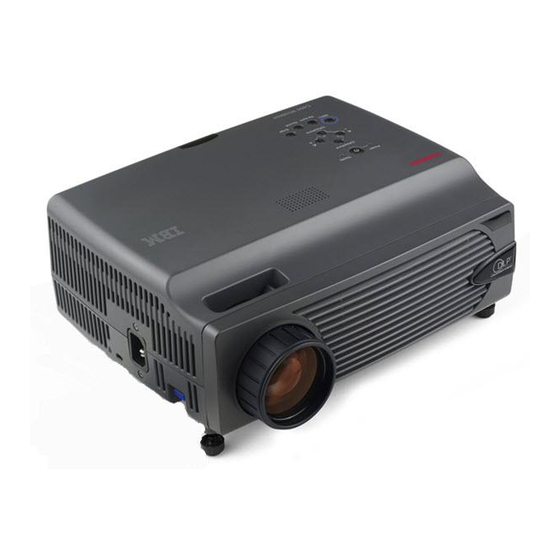
Page 15: Chapter 1. Product Description
Chapter 1. Product description The IBM C400 PROJECTOR projects a bright, quality image that enables you to make professional presentations. Being lightweight and compact in size the C400 is a great departmental solution and allows you to move it easily from the boardroom to the conference room, or to customer locations. - Page 16 2 Remote control 3 Batteries 4 User’s guide (and installation) CD 5 Multi-language quick start guide 6 Carrying case 7 Audio cable (Mini Jack- RCA) 8 Power cord 9 Video cable (S-video) 10 USB Cable (USB-Mini USB) IBM C400 PROJECTOR: User’s Guide...
-
Page 17: Projector Features
Be sure to attach the lens cap and place the projector into the soft case with the lens facing upward to avoid damaging the lens. - Page 18 3 Elevator foot adjuster button 4 Elevator foot 5 Focus ring Figure 1-4. OSD buttons and LEDs 1 Ready LED 2 Source button 3 Enter button 4 Keystone/Up cursor button 5 Volume/right cursor button 6 Menu button IBM C400 PROJECTOR: User’s Guide...
- Page 19 8 Volume/left cursor button 9 Auto button 10 Power button 11 Power LED Figure 1-5. Rear view of projector 1 Local Area Network RJ-45 2 RS-232 Note: This is a service port and is not intended for personal use. 3 Monitor out...
- Page 20 Figure 1-6. Bottom view of projector 1 Front elevator feet 2 Elevator foot adjuster buttons 3 Ceiling support mounting holes 4 Projection lamp cover IBM C400 PROJECTOR: User’s Guide...
-
Page 21: Chapter 2. Setting Up The Projector
Power button to turn on the projector. The projector display window opens and the projector detects connected devices. If you connected the projector to an IBM computer, press Fn+F7 on the computer to switch the display output to the projector. If you connected the projector to a non-IBM computer, refer to the documentation that came with your computer for information on how to change the display output. -
Page 22: Positioning The Projector
1.5 m (4.9 ft) from the projection screen. v Position the projector within 2.7 m (9 ft) of your power source and within 1.8 m (6 ft) of your video device (unless you purchase extension cables). To ensure adequate cable access, do not place the projector within .15 m (6 in.) of a wall or... - Page 23 2.5 m/99.6 in. 1.9 m/74.8 in. 2.8 m/108.7 in. 2.1 m/81.6 in. 3.0 m/117.7 in. 2.2 m/88.2 in. 3.2 m/126.8 in. 2.4 m/95.3 in. 3.5 m/135.8 in. 2.6 m/101.9 in. 5.8 m/226.8 in. 4.3 m/170.1 in. Chapter 2. Setting up the projector...
-
Page 24: Adjusting The Projector Level And Height
Adjusting the projector level and height To adjust the projector level and height, complete the following procedure: 1. To raise the height of the projector, lift the projector 1 and press the height-adjuster buttons 2 . The elevator foot 3 drops down. -
Page 25: Adjusting The Volume
1. Twist the rings on the projector to adjust the focus 1 and zoom 2 , as shown below. 2. Use the Keystone buttons on the projector or the remote to correct image-trapezoid (wider top or bottom) effect. The Keystone buttons on the remote and projector are shown below. - Page 26 2. Use the Volume +/- buttons shown below to adjust the level. 3. Press the Mute button (on the remote control only) to turn off the volume. 4. Press any Volume +/- buttons on the projector or remote control to turn off mute.
-
Page 27: Chapter 3. Connecting Devices To The Projector
This chapter provides information on connecting devices to the C400 projector. Connecting devices Computers and video devices can be connected to the projector at the same time. Refer to the documentation that comes with the connecting device to verify that the device has the appropriate output connector. -
Page 28: Connecting To A Usb Device
Connecting to a USB device To control your computer mouse using the projector remote control, connect the projector to the computer with a USB cable as shown below. Note: USB mouse function is only supported with Windows 2000 and Windows... -
Page 29: Chapter 4. Using The Projector Features
Chapter 4. Using the projector features This chapter provides information on installing the remote control batteries and on using the remote control, audio, keypad buttons, and other projector features. Before you begin Before you can use the remote control, you must install the AAA batteries that come with this projector. -
Page 30: Using The Remote Control
To reduce the risk of injury to the eyes, do not look directly into the remote control laser light and do not point the laser light into anyone’s eyes. The remote control is equipped with a Class II laser that emits radiation. IBM C400 PROJECTOR: User’s Guide 1 Laser 2 IR transmitter... -
Page 31: Operating Range
Note: The remote will still work when it is pointed at the projected image. Projector and remote control buttons The projector can be operated using the remote control or the buttons on the top of the projector. All operations can be carried out with the remote control. The figure below shows the corresponding buttons on the remote control and on the projector for OSD menu operation. - Page 32 IBM C400 PROJECTOR: User’s Guide...
-
Page 33: Chapter 5. On-Screen Display Menu Controls
Note: You must have a display on the screen in order to access the OSD. Navigating the OSD You can use the remote control or the buttons on the top of the projector to navigate and make changes to the OSD. The following sections show the menus in the OSD. - Page 34 Item Brightness Contrast Sharpness Color Temperature Color Saturation Color Tint IBM C400 PROJECTOR: User’s Guide Description Default Press the cursor left/right button to adjust the brightness. Range: 0 to 100 Press the cursor left/right button to adjust the contrast.
-
Page 35: Properties Menu
Item Gamma Color Space Cancel Properties menu The Properties menu can be found through the main menu. To access the Properties menu, follow these steps: 1. Press the Menu button to open the main menu. 2. Press the cursor left/right button to move to the Properties menu. 3. -
Page 36: Options Menu
2. Press the cursor left/right button to move to the Options menu. 3. Press the cursor up/down button to move up and down within the Options menu. The Options menu is shown below. IBM C400 PROJECTOR: User’s Guide Description Default Press the cursor left/right button to move the image left or right. -
Page 37: Setup Menu
The following table shows the options that you will see in the Options menu and the default. Item Blank Screen Auto Source Auto Power Off Volume Menu Position Menu Display Translucent Menu Cancel Setup menu To access the View menu, follow the steps below: 1. - Page 38 Figure 5-2. Setup Menu with dual input The following table shows the options that you will see in the Setup menu and the default. Item Video type IBM C400 PROJECTOR: User’s Guide Description Default Press the cursor right/left button Auto to select the Video standard.
-
Page 39: Information Menu
Range: 0-100 Press the cursor left/right button to adjust the secondary image size. Note: Pip Size is only available when the projector is connected to dual input sources. Range: Off/Small/Medium/Large Press the cursor left/right button Upper Left to adjust the secondary image location. -
Page 40: Network Setting Menu
Information menu. 4. Press the cursor left/right button or the Enter button to select the Network Setting menu. An example Network Setting menu is shown below. IBM C400 PROJECTOR: User’s Guide Description Displays the resolution and refresh rate of the connected video device. - Page 41 Static and DHCP settings. In Static, the user can enter IP Address, Subnet Mask, Default Gateway, and DNS Server. In DHCP, the projector will have IP Address, Subnet Mask, Default Gateway, and DNS Server set. Note: The default setting is DHCP.
- Page 42 5-10 IBM C400 PROJECTOR: User’s Guide...
-
Page 43: Chapter 6. Remote Network Operation
(PCs connected to the LAN) on the LAN. The projector can also be accessed outside the LAN, provided a firewall is configured accordingly. Note: The factory default is set to DHCP for the projector. You can see the current IP address in the Information menu. - Page 44 Remote: This screen shows the current status of the projector. v Remote-2: This screen is used to control the projector. IBM C400 PROJECTOR: User’s Guide...
- Page 45 IP Settings: This screen allows the IP address to be set for static or DHCP. v E-mail settings:Status messages for the projector can be e-mailed to the administrator or any other address.
-
Page 46: Setting Up Remote Operation
Password (if required) for remote PC v Outgoing server (SMTP) for remote PC Note: Using a proxy server for your LAN may filter messages from the projector. Disable the proxy server to prevent this. IBM C400 PROJECTOR: User’s Guide... -
Page 47: Using The Dhcp Address Settings
The factory default is set to DHCP for the projector. You can see the current IP address in the Information menu. You can change the settings in the Network Setting menu. To access the Network Setting menu, follow the steps below: 1. -
Page 48: Enabling And Disabling Passwords
1. Enter the address of the projector in the address bar of your browser. Example: http://10.0.50.100 The Remote page opens. 2. Click IP Settings. 3. Check the DHCP Address radio button and click Set. Enabling and disabling passwords The default setting is Disable and no password has been set. -
Page 49: Setting The Maximum Connections
3. Click your browser back button to go to the Input PASSWORD box. 4. Enter the password and click Login. Setting the maximum connections Refer to the following to limit the amount of users that can log on to the projector. Chapter 6. Remote network operation... -
Page 50: Retrieving A Forgotten Password
1. Click Administrate Settings. The Administrate Settings page opens. 2. Enter the amount and click Set. Retrieving a forgotten password Refer to the following to retrieve a forgotten password. IBM C400 PROJECTOR: User’s Guide... - Page 51 1. Make sure the Enable radio button (next to Security Status) is selected and click Set. 2. In the Input Password screen, click Forgot your Password? 3. Enter your e-mail address and click Send. 4. The current projector password is e-mailed to you. Chapter 6. Remote network operation...
- Page 52 6-10 IBM C400 PROJECTOR: User’s Guide...
-
Page 53: Appendix A. Maintenance
Replacing the projector lamp The projector lamp should only be replaced with an IBM certified replacement part, which you can order from your business partner or go to www.ibm.com/pc. To replace the projector lamp, complete the following procedure: 1. Turn off the projector, unplug the power cord, and allow the projector to cool for at least 1 hour. - Page 54 4. Remove the two screws from the lamp module as shown in 3 . 5. Lift the module handle up and pull up firmly as shown in 4 . 6. Reverse steps 1 through 5 to install the new lamp module. IBM C400 PROJECTOR: User’s Guide...
-
Page 55: Resetting The Lamp Timer
4. Press Enter to select Lamp Hour Reset. The OSD will show ″Please see User Manual...″ 5. Press the buttons on the remote or on the projector in the following order: Down Arrow, Up Arrow, Left Arrow, Right Arrow. This will confirm the lamp hour reset. -
Page 56: Using The Security Slot
Using the security slot The projector has a security slot, as shown below in 1 . Refer to the information that comes with the lock for instructions on how to use it. IBM C400 PROJECTOR: User’s Guide... -
Page 57: Appendix B. Troubleshooting
Appendix B. Troubleshooting The guidelines below provide tips to deal with problems you may encounter while using the projector. If the problem remains unsolved, contact your dealer for assistance. Common problems and solutions Check the following before proceeding to the problem-specific solutions. - Page 58 Make sure the lamp cover is flush with the projector case when closed. v Replace the lamp module. v Put the old lamp back in the projector and have the projector serviced. v Power surges can cause the lamp to turn off. Press the Power button twice to turn off the projector.
-
Page 59: Projector Leds
The sound is distorted. Projector LEDs The LED on top of the projector indicates the state of the projector and can help you troubleshoot. There are two-second pauses between the blinking cycles. For more details on LED projector errors, contact your IBM representative. - Page 60 IBM C400 PROJECTOR: User’s Guide...
-
Page 61: Appendix C. Specifications
Appendix C. Specifications Following are specifications for the IBM C400 projector. Temperature (non-operating) Altitude (operating) Altitude (non-operating) Humidity (operating) Humidity (non-operating) Dimensions (H x W x D) Weight Optics (focus range) Lamp type Lumens Input power requirements © Copyright IBM Corp. 2004 5°... - Page 62 IBM C400 PROJECTOR: User’s Guide...
-
Page 63: Appendix D. Service And Support
Telephone technical support Installation and configuration support through the IBM Support Center will be withdrawn or made available for a fee, at IBM’s discretion, 90 days after the option has been withdrawn from marketing. Additional support offerings, including step-by-step installation assistance, are available for a nominal fee. - Page 64 Belgium Brazil Canada Chile China China (Hong Kong and S.A.R.) Colombia Costa Rica Denmark Dominican Republic Ecuador IBM C400 PROJECTOR: User’s Guide Telephone Number Country or Region +44 (0) 1475 555 055 Japan 0800-666-0011 Luxembourg 131-426 Malaysia 01-24592-5901 Mexico 0800-0189...
- Page 65 Telephone Number Sweden 08-477 4420 Switzerland 058-333-0900 Taiwan 886-2-8723-9799 Thailand (66) 2-273-4000 Turkey 00-800-446-32-041 United Kingdom 0-1475-555 055 United States 1-800-IBM-SERV (1-800-426-7378) Uruguay 000-411-005-6649 Venezuela 0-800-100-2011 Vietnam Ho Chi Minh: (84) 8-829-5160 Hanoi: (84) 4-843-6675 Appendix D. Service and Support...
- Page 66 IBM C400 PROJECTOR: User’s Guide...
- Page 67 Many features, conversions, or upgrades involve the removal of parts and their return to IBM. A part that replaces a removed part will assume the warranty service status of the removed part. Unless IBM specifies otherwise, these warranties apply only in the country or region in which you purchased the Machine.THESE WARRANTIES ARE YOUR...
- Page 68 1) repair it to make it function as warranted, or 2) replace it with one that is at least functionally equivalent. If IBM is unable to do either, you may return the Machine to your place of purchase and your money will be refunded.
-
Page 69: Appendix E. Ibm Statement Of Limited Warranty Z125-4753-08 04/2004
Personal Data. Limitation of Liability IBM is responsible for loss of, or damage to, your Machine only while it is 1) in IBM’s possession or 2) in transit in those cases where IBM is responsible for the transportation charges. -
Page 70: Part 2 - Country-Unique Terms
Limitation of Liability: The following is added at the end of this section:In accordance with Article 1328 of the Peruvian Civil Code the limitations and exclusions specified in this section will not apply to damages caused by IBM’s willful misconduct (″dolo″) or gross negligence (″culpa inexcusable″). - Page 71 Limitation of Liability: The following is added to this Section: Where IBM is in breach of a condition or warranty implied by the Trade Practices Act 1974 or other similar legislation, IBM’s liability is limited to the repair or replacement of the goods or the supply of equivalent goods.
- Page 72 IBM’s negligence; as to any other actual damage arising in any situation involving nonperformance by IBM pursuant to, or in any way related to the subject of this Statement of Limited Warranty, the charge paid by you for the individual Machine that is the subject of the claim.
- Page 73 Consumer Guarantees Act 1993 or other legislation which cannot be excluded or limited. The Consumer Guarantees Act 1993 will not apply in respect of any goods which IBM provides, if you require the goods for the purposes of a business as defined in that Act.
- Page 74 Machine in any of those countries from either (1) an IBM reseller approved to perform warranty service or (2) from IBM. If you purchase a Machine in a Middle Eastern or African country, you may obtain...
- Page 75 598 (2) of the Austrian Code of Civil Procedure, the parties expressly waive the application of paragraph 595 (1) figure 7 of the Code. IBM may, however, institute proceedings in a competent court in the country of installation.In Estonia, Latvia and Lithuania all disputes arising in connection with...
- Page 76 (if IBM is at fault) or of such cause, for a maximum amount equal to the charges you paid for the Machine. For purposes of this item, the term ″Machine″...
- Page 77 The limitation period for consumers in action for breach of warranty is the statutory period as a minimum. In case IBM or your reseller is unable to repair an IBM Machine, you can alternatively ask for a partial refund as far as justified by the reduced value of the unrepaired Machine or ask for a cancellation of the respective agreement for such Machine and get your money refunded.
- Page 78 The minimum warranty period for Machines is twelve months. In case IBM or your reseller is unable to repair an IBM Machine, you can alternatively ask for a partial refund as far as justified by the reduced value of the unrepaired Machine or ask for a cancellation of the respective agreement for such Machine and get your money refunded.
- Page 79 3. Except as provided in items 1 and 2 above, IBM’s entire liability for actual damages for any one Default will not in any event exceed the greater of 1) EUR 125,000, or 2) 125% of the amount you paid for the Machine directly relating to the Default.
-
Page 80: Part 3 - Warranty Information
Country or Region of Purchase Worldwide A warranty period of 3 years on parts and 3 years on labor means that IBM provides warranty service without charge for parts and labor during the 3 year warranty period. A warranty period of 3 months on parts and 3 months on labor means that IBM provides warranty service without charge for parts and labor during the 3 month warranty period. - Page 81 This type of Warranty Service is a combination of Type 1 and Type 4 (see above). When a 5, 6 or 7 type of warranty service is listed, IBM will determine which type of warranty service is appropriate for the repair.
- Page 82 Brazil Canada Chile China China (Hong Kong and S.A.R.) Colombia Costa Rica Denmark Dominican Republic Ecuador E-16 IBM C400 PROJECTOR: User’s Guide Telephone Number Country or Region +44 (0) 1475 555 055 Japan 0800-666-0011 Luxembourg 131-426 Malaysia 01-24592-5901 Mexico 0800-0189...
- Page 83 Pedro Sula: 232-4222 San Pedro Sula: 552-2234 India 1600-44-6666 Indonesia (62) 21-523-8535 Ireland 01-815-9202 Italy 01-815-9202 Appendix E. IBM Statement of Limited Warranty Z125-4753-08 04/2004 Country or Region Telephone Number Sweden 08-477 4420 Switzerland 058-333-0900 Taiwan 886-2-8723-9799 Thailand (66) 2-273-4000...
- Page 84 E-18 IBM C400 PROJECTOR: User’s Guide...
-
Page 85: Appendix F. Guarantee Supplement For Mexico
Services not chargeable to the guarantee shall be charged to the final user, prior an authorization. In the event that warranty repair is required please call the IBM Support Center at 001-866-434-2080, where you will be directed to the nearest Authorized Service Center. - Page 86 IBM C400 PROJECTOR: User’s Guide...
-
Page 87: Appendix G. Notices
Web sites. The materials at those Web sites are not part of the materials for this IBM product, and use of those Web sites is at your own risk. -
Page 88: Trademarks
Consult an IBM authorized dealer or service representative for help. Properly shielded and grounded cables and connectors must be used in order to meet FCC emission limits. Proper cables and connectors are available from IBM authorized dealers. IBM is not responsible for any radio or television interference caused by using other than recommended cables and connectors or by unauthorized changes or modifications to this equipment. - Page 89 In solch einem FA11 ist der Abstand bzw. die Abschirmungzu der industriellen Störquelle zu vergröβern.” Anmerkung: Um die Einhaltung des EMVG sicherzustellen sind die Geräte, wie in den IBM Handbüchern angegeben, zu installieren und zu betreiben. European Union - emission directive...
- Page 90 IBM can not accept responsibility for any failure to satisfy the protection requirements resulting from a non-recommended modification of the product, including the fitting of non-IBM option cards. This product has been tested and found to comply with the limits for Class B Information Technology Equipment according to European Standard EN 55022.
- Page 91 al fine di fornire ragionevole protezione da interferenze mediante dispositivi di comunicazione in concessione in ambienti residenziali tipici. Japanese statement of compliance for products less than or equal to 20 A per phase Appendix G. Notices...
- Page 92 IBM C400 PROJECTOR: User’s Guide...
- Page 94 Part Number: 73P3195 Printed in USA (1P) P/N: 73P3195...