
Related Manuals for ESI IVX X-Class


Summary of Contents for ESI IVX X-Class
- Page 1 ESI Feature Phone User’s Guide IVX X-Class • IVX E-Class 0450-0366 Rev. M For on-line help, visit www.esiusers.com.
- Page 2 IVX is a registered trademark, and Esi-Dex, Quick Groups, Quick Moves, Virtual Mailbox Key, AutoPage, Quick Page and Verbal User Guide are trademarks, of ESI. Act! is a registered trademark of Symantec Corporation. Goldmine is a trademark of Goldmine Software Corporation. Microsoft, Windows, NT and Outlook are registered trademarks of Microsoft Corporation.
-
Page 3: Table Of Contents
2. Channel queue display................................... G.1 3. Paging limitation ...................................... G.1 4. No 911/emergency calls..................................G.1 Troubleshooting......................................G.2 Using Esi-Link................................H.1 Overview........................................H.1 Location Keys .......................................H.1 Programmable feature keys and Esi-Link: an introduction........................H.2 Dialing an Esi-Link location..................................H.3 Using feature keys with Esi-Link .................................H.4 Other Esi-Link features ....................................H.7... - Page 4 ACD agent operation ..............................I.1 Programming the agent log-on/off key ................................I.1 Wrap mode ........................................I.2 LED indicator........................................I.2 Display indications ......................................I.3 While logged on: no DND, monitor mode, call forward, or programming....................I.4 Call waiting ........................................I.4 ACD administrator key ....................................I.5 Analog stations .................................J.1 Caller ID.........................................J.1 Placing calls ........................................J.1 Transferring calls ......................................J.2 Conference calling......................................J.2...
-
Page 5: Introduction
You will be able to learn many of the features by simply using your phone; and this ESI Feature Phone User’s Guide will introduce you to the wide variety of features offered by your ESI phone system and how to use your phone effectively to achieve maximum benefits. -
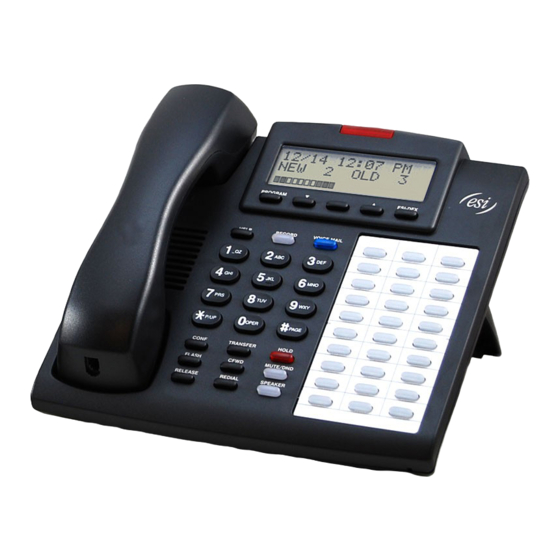
Page 6: 48-Key Feature Phone
(similar to how you might program a car radio button). This isn’t applicable to the fixed-feature keys which, as their name implies, are already programmed. Of the systems covered in this User’s Guide, the Second Expansion Console works with only IVX X-Class. - Page 7 Note: Of the systems covered in this User’s Guide, the Second Expansion Console works with only IVX X-Class. Your ESI 48-Key Feature Phone can support up to two optional Expansion Consoles, for a possible total of 120 additional programmable feature keys.
-
Page 8: 24-Key Feature Phone
24-Key Feature Phone The 24-Key Feature Phone has features similar to those of the 48-Key Feature Phone. However, the 24-Key Feature Phone is available only as a digital model and doesn’t support TAPI, IP, ESI’s VIP family of software applications , or the Expansion Consoles. -
Page 9: 12-Key Feature Phone
12-Key Feature Phone The 12-Key Feature Phone includes the basic, most commonly used phone features. This simplified model is available only as a digital model and doesn’t support TAPI, IP, ESI’s VIP family of software applications , the Expansion Consoles, speakerphone operation , or Esi-Dex. -
Page 10: Esi Cordless Handsets
User’s Guide ESI Cordless Handsets ESI’s digital Cordless Handsets come in two models — small and large — but each offers the same features. Note that they do not have the following features found on some ESI desktop phones: speakerphone, Esi-Dex support (or ESI-DEX key), Caller ID key, Virtual Mailbox Key support, or Verbal User Guide (or HELP key). -
Page 11: Connecting Your Esi Phone
Introduction Connecting your ESI phone Depending on which ESI phone you have, use the appropriate diagram (below) to connect it. Each diagram represents the panel on the phone’s underside. Note: The “Top of phone” and “Bottom of phone” references in these diagrams show the correct vertical orientation of the phone —... - Page 12 Expansion Console. 5. For maximum convenience, label the paper overlay to show how the keys are programmed (your Installer or System Administrator can do this with ESI software). 6. Install the labeled paper overlay on the 60-Key Expansion Console. 7. Install the clear plastic overlay over the paper overlay, to protect it.
- Page 13 6. If necessary, remove the clear plastic overlay from the keys on the two 60-Key Expansion Consoles. 7. For maximum convenience, label the paper overlay to show how the keys are programmed (your Installer or System Administrator can do this with ESI software). 8. Install the labeled paper overlays on the two 60-Key Expansion Consoles.
-
Page 14: Base Station Installation
CH key. Each Handset should have its own channel. There are 30 available channels on the small Cordless Handset and 10 on the large Cordless Handset. Note: Feedback may result if the Cordless Handset is within three inches of an ESI desktop Feature Phone. Radio frequency interference. -
Page 15: Help Mode (Verbal User Guide)
Notes: As explained on page E.2, each of the two smaller Feature Phones, 12-Key and 24-Key, has a combo PROG/HELP key. The ESI Cordless Handsets have no access to the Verbal User Guide and, therefore, no HELP key. Tutorial When your station is idle, press HELP, and then follow the spoken Help menu to: •... - Page 16 Help mode (Verbal User Guide) User’s Guide (This page included for pagination purposes only.)
-
Page 17: User Programming: An Introduction
E.12), are not available on a 12-Key Feature Phone. For use with only ESI Cordless Handsets. Available only if your phone system is using ESI Presence Management. If you’re not sure whether it is, consult your System Administrator. For more information about ESI Presence Management, visit www.esi-estech.com/presence. -
Page 18: Select Personal Greeting
User programming: An introduction User’s Guide 1 Select personal greeting Select the desired greeting — 1, 2 or 3. The system will play the current greeting, followed by prompts to re-record, delete or hear again — or select the current greeting by pressing #. Record personal greeting Begin recording at the tone. - Page 19 (see page C.6 for more details.) The speed-dial number can be up to 24 characters long. Note: You can also program Location Keys for use with Esi-Link. See page H.1 for more information. • Other feature keys — If you enter a feature code, the programmable feature key will serve as an enable/disable key for that feature.
-
Page 20: Station Options
For example: If you have a programmable feature key set as a station key for someone’s extension, the system updates your Cordless Handset based on that extension’s current status (busy, idle, do-not-disturb, or — with optional ESI Presence Management — off-premises). -
Page 21: Station Audibles
4 Station audibles The station audibles programming provides control of the following audible items. Note: Only the third setting, message ring, is applicable to the ESI Cordless Handset. Station ring tone You can select from six possible tones to help distinguish it from other nearby ringing phones. -
Page 22: External Message Notification
User programming: An introduction User’s Guide 6 External message notification Note: To use this feature, a 12-Key Feature Phone must have a voice mail key assigned. Delivery options Delivery to phone number only Notify pager only No off-premises delivery Phone delivery Enter phone number Enter the phone number (24 digits, maximum) followed by #. -
Page 23: Personal Call Routing
For details, consult the ESI Presence Management User’s Guide (ESI part # 0450-0793). Note: This function is available only if your phone system is using ESI Presence Management. If you’re not sure whether it is, consult your System Administrator. For more information about ESI Presence Management, visit www.esi-estech.com/presence. - Page 24 User programming: An introduction User’s Guide (This page included for pagination purposes only.)
-
Page 25: Voice Mail Operation
579 to a programmable feature key. • On an ESI Cordless Handset, use the blue-outlined VOICE MAIL key. The display, directly above the VOICE MAIL key, will show an “envelope” icon when you have one or more new messages. -
Page 26: Leaving Messages
If your system is using ESI Presence Management, consult the ESI Presence Management User’s Guide (ESI part # 0450-0793) to learn about additional, special functionality that may be available to you. If you’re not sure whether your system is using ESI Presence Management, consult your System Administrator. -
Page 27: Autopage
When you receive a call forwarded in this fashion, you’ll be prompted to “press any key” to accept the call. If you don’t answer the call, the caller is returned to your voice mailbox on the ESI phone system. Off-premises “reach-me” is available on guest mailboxes, as well. -
Page 28: Message Retrieval
Feature Phone Feature Phone On an ESI Cordless Handset, an “envelope” icon on the display also appears when you have at least one new message. Note: Message status information (shown in the examples above as NEW 3 OLD 1) appears on a 24-Key or 48-Key Feature Phone only when new messages exist. - Page 29 1. Press VOICE MAIL and then 2. Dial your extension number. 3. Follow the procedures described in “Retrieving voice mail messages from your ESI Feature Phone” (page D.4). A local call may not be dialed correctly depending on the limitations of the local dialing plan. You may need to dial some of these...
- Page 30 (Not available on ESI Cordless Handset or 12-Key Feature Phone.) If you frequently pick up your messages from another user’s ESI Feature Phone or have others help pick up your messages, you may want to program a programmable feature key on that phone as a Virtual Mailbox ™...
-
Page 31: Live Recording
(Not available on 12-Key Feature Phone.) Note: To use this feature on an ESI Cordless Handset, it must have a programmable feature key set for key code 582. (See “Optional features,” page F.12.) It then functions like the RECORD key described herein. -
Page 32: Off-Premises Message Delivery
To program this, press PROGRAM 6. Introduction The ESI phone system can be programmed to deliver messages to an off-premises phone and/or to page you when your voice mailbox receives a message. You can set the phone number (cell phone, home number, another extension, etc.), a delay time (the period that the system is to wait before... -
Page 33: Message Recycle Bin (Un-Delete)
Message Recycle Bin (un-delete) The ESI phone system stores your most recently deleted 10 messages in a Message Recycle Bin to allow you to recover, or "un-delete,” messages that may have been deleted in error. -
Page 34: Optional Voice Mail Feature: Guest Mailboxes
If your system is using ESI Presence Management, consult the ESI Presence Management User’s Guide (ESI part # 0450-0793) to learn about additional, special functionality that may be available to you. If you’re not sure whether your system is using ESI Presence Management, consult your System Administrator. -
Page 35: Urgent Messages
User’s Guide Voice mail operation Programming your guest mailbox from an ESI Feature Phone Press PROGRAM , then the mailbox number and then # to confirm. You will be prompted to: record the greeting, change the password, enter an external paging number, or exit by hanging up. -
Page 36: Optional Voice Mail Feature: Group/Broadcast Mailboxes
To help monitor that all messages have been picked up, you can program a programmable feature key on any ESI Feature Phone as a Virtual Mailbox Key for the group mailbox. When new messages exist, the key will blink rapidly; press it to connect automatically to the mailbox. Program the programmable feature key with VOICE MAIL followed by the mailbox number (see “Programmable feature keys,”... -
Page 37: Optional Voice Mail Feature: Cascade Notification Mailboxes
If a cascade notification mailbox receives a new message, the ESI phone system dials the first number for a set number of times. If it receives no response, the ESI phone system then dials a second number for a set number of times. If, again, there is no response, the ESI phone system dials the third number;... - Page 38 See “Virtual Mailbox Key,” page D.6. Message Recycle Bin (un-delete) See “Message Recycle Bin,” page D.9. Available only on IVX X-Class or IVX E-Class with “Generation II • Feature Set II” system software. For more information, contact your ESI Reseller. D.14...
-
Page 39: Optional Voice Mail Feature: Q & A Mailboxes
User’s Guide Voice mail operation Optional voice mail feature: Q & A mailboxes Important: This is a special, optional feature not explained in the tutorial. Be sure to get your Q & A mailbox numbers from the Administrator. Q & A (question and answer) mailboxes allow you to ask callers for more detailed information, such as on an employment questionnaire or a survey. - Page 40 Voice mail operation User’s Guide 1 Select question Select the desired question number, 1–10. the ESI phone system will play the question and give you the option to perform one of the following: 1 Record question Begin recording at the tone; press 1 to stop. The new question automatically replaces the old one with that question number.
-
Page 41: Esi Feature Phone Operation
(a.) how many lines you have and (b.) which Feature Phone that you’re using. Note: An ESI Cordless Handset’s display is similar to that of the 24-Key Feature Phone; one difference is that a Cordless Handset doesn’t show line usage. -
Page 42: Keys
As an example, a blinking red key is a call ringing at another station; blinking green signifies ringing at your station. (See also “Line keys,” page F.11.) Note: Each ESI Cordless Handset has only red LEDs, and only on its four programmable feature keys. The illumination activity (such as blinking) otherwise is similar to that described above. - Page 43 If your phone system is using ESI Presence Management, your phone’s MUTE/DND key won’t turn amber when you exit the building using your electronic key; for more details, refer to the ESI Presence Management User’s Guide (ESI part # 0450-0793). If you’re not sure whether your system is using ESI Presence Management, consult your System Administrator.
-
Page 44: Dial Tone
These soft keys, located under the display, include ESI-DEX, PROGRAM and scroll keys ( Along with spoken and displayed commands, they guide you through the use of Esi-Dex (page F.2), various programming activities and controlling the volume of your phone’s handset and speaker. -
Page 45: Direct Station Selection
Installer has programmed. If your phone system is using ESI Presence Management, your phone’s MUTE/DND key won’t turn amber when you exit the building using your electronic key; for more details, refer to the ESI Presence Management User’s Guide (ESI part # 0450-0793). - Page 46 ESI Feature Phone operation User’s Guide Supervised transfer — announcing the caller to the called person 1. While connected to an outside call, press a station key (or press TRANSFER and then dial the extension number) and wait until the called person answers.
-
Page 47: Transferring An Internal Call
2. Announce the caller (e. g., “Hello; I’ve got Bill on the line and I’m transferring him to you now.”) 3. Hang up. Available only if system is using “Generation II • Feature Set II” system software (consult your ESI Reseller for more details). -
Page 48: Conference Calling
“Hold/exclusive hold operation,” page E.13), you can add that caller, as well, to the conference by pressing CONF, retrieving the call from hold (or exclusive hold) and pressing CONF again. (Continued) If you’re using an ESI Cordless Handset, use the TRANS/CONF/PRG key each time these instructions tell you to use CONF. -
Page 49: Call Forwarding
(usually to your mailbox). In addition, you can temporarily call-forward all of your calls to another station or another user’s mailbox. On the 24-Key Feature Phone or an ESI Cordless Handset: 1. Dial 5 6 5. 2. Dial the extension number (or VOICE MAIL and then the mailbox number) to which the system should forward all calls. - Page 50 2. Press to cancel. Your system may not support this feature, or your extension may not be allowed to have this feature. Contact your ESI Reseller for more information. You must press 1 to answer the forwarded call (just as with off-premises “reach-me”; see page D.3).
- Page 51 (e.g., your cell phone when you’re away from the office), you can view his Caller ID when you have set either call forwarding/off-premises or call forwarding/no-answer/off-premises. Your system may not support this feature, or your extension may not be allowed to have this feature. Contact your ESI Reseller for more information.
-
Page 52: Call Waiting
You can call, or transfer a call to, another station that is in use (as indicated by the fact that its station key, if one exists for it on your ESI Feature Phone, is glowing red). This generates a call waiting tone in the other station’s earpiece and puts a call waiting indication on the bottom line of that station’s display, as... -
Page 53: Hold/Exclusive Hold Operation
To retrieve a held call To retrieve a held call from the same ESI Feature Phone where it was put on hold, press HOLD again and dial the appropriate line number (using the display for reference). To retrieve a held call from any idle ESI Feature Phone on the system, press HOLD and dial the appropriate line number. -
Page 54: Exclusive Hold
Exclusive hold To place a call on exclusive hold To place a call on exclusive hold on an ESI Feature Phone, press HOLD for at least one second. The display will briefly appear as follows . . . Cordless Handset or... -
Page 55: Paging
Paging through phones Press PAGE 0 to page through all of the ESI Feature Phone speakers. Press PAGE and then enter a programmed paging zone, such as 1 or 2 (see the System Administrator for a list of page zones). -
Page 56: Optional Features
If your station has been designated to receive live outside calls — i.e., those that have neither come through the auto attendant nor been transferred — your ESI Feature Phone will: (a.) Display that you are receiving an outside call (b.) Ring with a double cadence (internal calls ring with a single cadence). -
Page 57: Special Keys
To release (disconnect), hold down the hookswitch for one second. To hang up when using an ESI Cordless Handset, press TALK or put the handset in its charging cradle. A special service your phone company may offer. See your administrator for further details. -
Page 58: Esi-Dex
(Not available on ESI Cordless Handsets or 12-Key Feature Phone.) Esi-Dex (“easy Dex”) is a powerful feature that lets you access and auto-dial stored names and numbers. You may access names and numbers from as many as four different Dexes (i.e., indexes):... - Page 59 Auto-dialing using Esi-Dex . . . On the 24-Key Feature Phone 1. While your station is idle (or just after receiving dial tone), repeatedly press ESI-DEX to select the desired Dex: Notes: System Dex and Location Dex aren’t available on every system.
- Page 60 Caller ID method (on either Feature Phone) Whenever a Caller ID name appears on your LCD display (while talking on an incoming call or during message retrieval) press ESI-DEX to automatically store the name and number in your Personal Dex. The display confirms:...
- Page 61 6. Press # to confirm the entry. Manual method (on the 48-Key Feature Phone) 1. While your station is idle (or just after receiving dial tone), press ESI-DEX. This causes the Esi-Dex menu to appear, as shown: Note: Your display may differ, depending upon the availability of certain Dexes on your system.
- Page 62 Deleting names from your Personal Dex . . . On the 24-Key Feature Phone 1. While your station is idle (or just after receiving dial tone), repeatedly press ESI-DEX to select the Personal Dex: 2. Choose the desired name from the Personal Dex, using one of two methods.
- Page 63 Special keys . . . On the 48-Key Feature Phone 1. While your station is idle (or just after receiving dial tone), press ESI-DEX. This causes the Esi-Dex menu to appear, as shown: 2. Press PER to choose the Personal Dex.
- Page 64 Let’s say you’re on a call with the XYZ Company — XYZ COMPANY appears on your display — and you wish to save the name and number for future use. Just press ESI-DEX. Your display will confirm that the information has been stored.
-
Page 65: Override Ring
Use of the Override Ring Key also overrides any outside dial tone preference (see page F.11) that may have been set for your station. See “Programmable feature keys,” pp. C.2–C.3, for full details. The override ring feature has no effect on calls ringing in from a hold recall, a queued line or an Esi-Link channel. -
Page 66: Message Monitor Mode (Live Call Screening)
Not all headsets are compatible with your ESI Feature Phone; contact your ESI Reseller for a list of compatible models. Once a headset is plugged into an ESI Cordless Handset, audio is automatically transferred to the headset, so there is no need to program a headset key if using a Cordless Handset. -
Page 67: Outside Dial Tone Preference
Notes: Dialing 9 (or 8 or 71–76) to be assigned a line automatically is always available. Each ESI Cordless Handset has only red LEDs, and only on its four programmable feature keys. The illumination activity (such as blinking) otherwise is similar to that described above. -
Page 68: Optional Features
Mute/DND F.16 (DND only) Voice mail F.17 Override ring key Record F.17 Quick Switch F.17 Account codes F.18 (Continued) 599 on IVX X-Class, 199 on IVX E-Class. If you don’t know which system you’re using, consult your System Administrator. F.12... -
Page 69: Manual Day/Night Mode
Headset key (Code 564) Note: It’s unnecessary to program this key on an ESI Cordless Handset; one simply plugs in or unplugs a headset as desired. This key provides for easy connecting to/disconnecting from calls when operating in headset mode (see “Headset operation,”... -
Page 70: Call Forward/No-Answer Key
User’s Guide Call-forward/no-answer key (Code 567) Note: Not available on an ESI Cordless handset. Enables or disables the call-forwarding/no-answer feature. When this feature is enabled and someone calls your station but receives no answer, the call will go to the destination you’ve programmed (for more details, see page E.10). - Page 71 • To delete a record, press 7 while the record is on the display. • To store the record in your Personal Dex, press ESI-DEX. To finish, press the Caller ID key again (or press RELEASE). (Continued) Not applicable to a 48-Key Feature Phone, which shows both the number and (if included in the Caller ID record) the name.
-
Page 72: Virtual Answer Keys
If phone is idle (on-hook) — Puts the phone into do-not-disturb (DND) mode, sending callers directly to your voice mailbox Note: When programmed on an ESI Cordless Handset, this key performs only the DND function; to mute or “un-mute” an ESI Cordless Handset, use the keys on its side. -
Page 73: Voice Mail
Override ring (Code 580) The override ring feature lets you place a call — station-to-station, outside line or Esi-Link — or leave a voice message when another call is ringing. For full details on use of this feature, see “Override ring,”... -
Page 74: Account Codes
Feature Phone glows solid green; this indicates that you can perform a Quick Switch. To transfer the call to your Cordless Handset: 1. Press the Quick Switch Key. This “blind-transfers” the call to the ESI Cordless Handset, causing it to ring, while simultaneously disconnecting the desktop Feature Phone. -
Page 75: Remote Ip Feature Phone
Remote IP Feature Phone Remote IP Feature Phone Your Remote IP Feature Phone will operate like a regular ESI Feature Phone, with these exceptions: 1. Channel availability display The display on an idle Remote IP Feature Phone will show channel availability, rather than... -
Page 76: Troubleshooting
IP Feature Phone. Contact your ESI Reseller. Remote Phone The remote phone may be defective. Contact your Reseller or use Esi-Test to test all connects but doesn’t of the Remote IP Feature Phone’s capabilities. (Esi-Test is part of the Esi-Tools Users’... -
Page 77: Using Esi-Link
Esi-Link is an optional feature that networks multiple ESI telephone systems (or locations) and IP Gateways (see page H.9) across an IP-based network. With Esi-Link, a multi-site business can integrate up to 100 of its locations, using the latest VoIP (voice over IP) technologies. Inter-office calls, transferring outside calls, moving voice messages and even accessing outside lines at remote locations are all features you can use over Esi-Link. -
Page 78: Programmable Feature Keys And Esi-Link: An Introduction
Programmable feature keys and Esi-Link: an introduction With Esi-Link, you assign dialing information to your ESI Feature Phone’s programmable feature keys in the usual way — i.e., if a remote location station or mailbox is to be assigned to a programmable feature key, enter the location number followed by the station’s extension number or the mailbox number. -
Page 79: Dialing An Esi-Link Location
Phone Phone The boxes on the second line of the display show there are a total of six Esi-Link channels active at your location. The first two Esi-Link remote channels are busy, and the rest are idle and available for new calls. -
Page 80: Using Feature Keys With Esi-Link
Outside callers can be transferred to remote location extensions, departments, and mailboxes. Note: To avoid poor voice quality on a transferred call, Esi-Link doesn’t allow an outside call coming from one location to be transferred or forwarded to another (or third) location. In the event a call must be transferred to another location, use the hold feature (see page H.5). - Page 81 If the remote location system has an overhead paging system connected to it, you can page there by dialing the location number followed by the overhead paging port number (599 on IVX X-Class or 199 on IVX E-Class). After hearing the connect tone, you may make your announcement. If you frequently page that location, you can program a feature key with the location number followed by the overhead paging port number —...
- Page 82 Quick Groups can include both local and remote location extensions, departments and mailboxes that are assigned as station keys on your phone. Note: You can use only programmed local or remote Esi-Link station keys to select the additional mailboxes for Quick Groups.
-
Page 83: Other Esi-Link Features
“jump” to the first location name that begins with one of the letters on that dial key. 3. Press ESI-DEX again. The phone will display the remote location’s Station Dex, where you can select a station or department, just as you would using the Station Dex for your location. - Page 84 Using Esi-Link User’s Guide Call forwarding Here’s how to program call forwarding to a remote location extension, mailbox, or department. On the 24-Key Feature Phone 1. Either: (a.) Press a programmed call-forwarding key and a programmable feature key you have already set for the desired destination (whether it is an extension, a mailbox or a department).
-
Page 85: Dialing Into An Esi Ip Gateway
4. To add a third call to the conference, repeat steps 1–3. Dialing into an ESI IP Gateway If your organization’s Esi-Link network includes one or more ESI IP Gateways at remote locations, the method of dialing will change slightly, depending on how the IP Gateway is connected to the phone system at that location. - Page 86 Using Esi-Link User’s Guide (This page included for pagination purposes only.) H.10...
-
Page 87: Acd Agent Operation
Calls go to the logged-on agent who has been idle for the longest time. If all logged-on agents are busy, the ESI phone system places the calls in a holding queue and automatically connects the longest- holding call when an agent becomes available. While holding, callers hear periodic prompts to continue to hold. -
Page 88: Wrap Mode
ACD agent operation User’s Guide Wrap mode If you have paperwork or other wrap-up activities after a call, you'll appreciate the system's wrap mode. While you're logged on as an agent, pressing the programmed wrap key (or placing the call on exclusive hold) prior to disconnecting from a call will set your station in wrap mode —... -
Page 89: Display Indications
A call is ringing. The display shows the Caller ID information and the ACD department name — in this case, SALES. A call is ringing via Esi-Link from the HOUSTON location for the TECH SUPPT department (the user may be logged into either one or two ACD departments;... -
Page 90: While Logged On: No Dnd, Monitor Mode, Call Forward, Or Programming
ACD agent operation User’s Guide This shows how many calls are queued in the two ACD departments where the user is logged on. A wait (WT) countdown timer indicates the length that the longest-holding call has been holding. Pressing the NXT soft key while this appears takes the user to the next display indication. -
Page 91: Acd Administrator Key
Note: On newer or updated systems, it is possible for an ACD administrator to be logged into up to four departments at once, depending on ESI system type. Consult your Installer or System Administrator to confirm whether this is available on your particular ESI system. - Page 92 ACD agent operation User’s Guide (This page included for pagination purposes only.)
-
Page 93: Analog Stations
On internal station-to-station calls, the Caller ID display will show the extension number as the calling number, and the station name as the caller’s name. On Esi-Link calls, the Caller ID display will show the location number and extension as the calling number, and the remote location’s station name and “short name”... -
Page 94: Transferring Calls
Analog stations User’s Guide Transferring calls Transferring outside calls While connected to an outside call, FLASH and dial the extension number. Hang up immediately to perform a blind transfer, wait until the called person answers, announce the caller and then hang up. If the transferred-to person does not answer, FLASH to be reconnected to the original caller. -
Page 95: Call Forwarding
Lift the handset, dial 5 6 5 and dial the extension number (or # and the mailbox number) to which the system should forward all calls. Note: If the forwarded-to station is busy or does not answer a forwarded call, the ESI phone system will return the call to your mailbox. -
Page 96: Paging
“John, you have a call on line 1. John, pick up line 1, please.” Overhead paging Station number 199 is designated as the overhead paging port. If the ESI phone system has been connected to an overhead paging system, you can page by dialing 1 9 9 and making your announcement after the tones. -
Page 97: Message Waiting Indication
If your system is using ESI Presence Management, consult the ESI Presence Management User’s Guide (ESI part # 0450-0793) to learn about additional, special functionality that may be available to you. If you’re not sure whether your system is using ESI Presence Management, consult your System Administrator. - Page 98 Analog stations User’s Guide Functions available during analog station voice mail message retrieval Note: Functions tinted light gray, below, either change or are not available when you’re using an ESI Feature Phone (see page D.5). Function Description Pause Pauses for one minute or until 1 is pressed again.
-
Page 99: Analog Station Programming
User’s Guide Analog stations Analog station programming After logging into your mailbox (pressing followed by the mailbox number), dial 5 to program. 1 Select personal greeting Select the desired greeting number: 1, 2 or 3. The system will prompts to re-record, delete, hear, or select as the current greeting by pressing #. -
Page 100: Pager Notification
User’s Guide Off-premises message delivery The ESI phone system can be programmed to deliver messages to an off-premises phone and/or to page you when your voice mailbox receives a message. You can set the phone number (cell phone, home number, another extension, etc.), the pager number and a delay time (the period that the system is to wait before attempting to deliver the message/page). - Page 101 User’s Guide Analog stations 6 Off-premises message delivery Delivery options Delivery to phone number only Notify pager only Call phone first, then page Call phone and page at the same time No off-premises delivery Phone delivery Enter phone number Enter the phone number followed by # (24 digits maximum). Do not include an outside line access code (i.e., don’t add 9, 8 or 71–76) before the number.
- Page 102 Analog stations User’s Guide Urgent messages You can have all new messages delivered as explained in the previous discussion or only those marked as urgent. If you have enabled urgent messages as part of user programming, you must include, in your personal greeting, instructions to the caller to press 2 to mark the message as urgent.
-
Page 103: Index
Index keys. See Volume/scroll keys IP Gateway. See Esi-Link Leaving messages, D.2 Administrator display, I.5 LEDs, E.2 Agent log-on/off key, I.1 Line keys, F.11 Display indications, I.3 Private line, F.11 LED indicator, I.2 Live call screening (Message monitor mode), F.10 Wrap mode, I.2... - Page 104 www.esi-estech.com...