Table of Contents
Advertisement
Quick Links
Advertisement
Chapters
Table of Contents

Related Manuals for Sagem MF 3260


Summary of Contents for Sagem MF 3260
- Page 1 FAX 3240 MF 3260 User Manual...
-
Page 2: Dear Customer
• Functions list • Journal (30 SMS or fax transmissions) You can connect the MF 3260 to your computer (PC • Entries and groups in the telephone book with Microsoft Windows® 98 SE · 2000 · ME · XP), and •... -
Page 3: Table Of Contents
Fax Reception ....21 * Depending on country and telephone network Sorted Print-Outs ....22 * * MF 3260 Table of Contents Table of Contents... -
Page 4: Safety Instructions
Chapter Safety Instructions Safety Instructions In order to avoid possible dangers, damage or malfunc- device, you must immediately pull the mains cable out of tions, please heed the following safety instructions for the the power socket. Have your fax machine examined by setup and operation of your fax machine. - Page 5 Chapter Safety Instructions Th e fax function will not operate during power ¿ failure. Never open the toner cartridge. If toner dust es- ¿ capes, you should avoid allowing it to contact your skin and eyes. Store both new and used cartridges in a place where they will not come into the hands of chil- dren.
-
Page 6: Overview
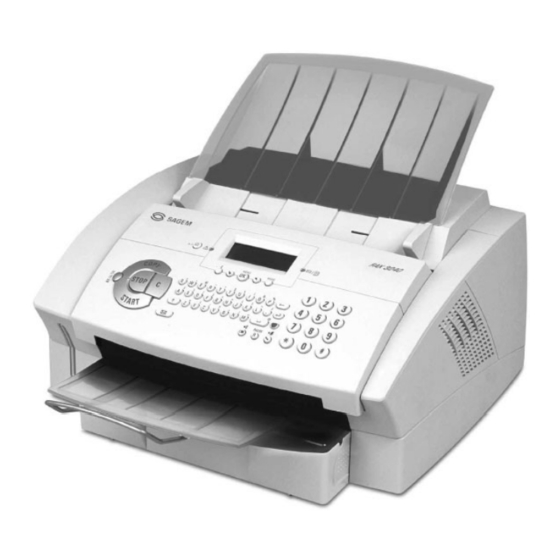
Document guide Document feed slot Cover Operation panel with LCD display Document outlet Print-out and fax outlet (extendable) Paper tray Opening for Plug’n’Print card Toner cartridge Connections on the Rear Side External device Telephone cable USB port (MF 3260) Mains Cable... -
Page 7: Operation Panel With Lcd Display
Chapter Overview Operation Panel with LCD Display Symbols on the LCD Display — SFINE resolution confi gured — Access telephone Green Lamp —It fl ash- » — PHOTO resolution confi gured book functions es whenever an SMS message — FINE resolution confi gured has arrived or when a docu- Red lamp —If the lamp... -
Page 8: Package Contents
Pull the print-out and fax outlet tray out of the paper tray cover. Mains cable Telephone cable (specific to each country) User manual Attaching the Document outlet tray Insert the document outlet tray into the two openings under the operation panel. Installation guide Installation CD (MF 3260) -
Page 9: Toner Cartridge
Plug’n’Print card provided. In order to guarantee a good print quality, ¡ use only original SAGEM toner cartridges. Other toner cartridges can cause damage to the fax machine. Use of other toner cartridges also voids the guarantee. - Page 10 Chapter 1. Installation Store opened or used toner cartridges in their original Once you have removed the protection strip, Æ packing or in a plastic bag in order to prevent toner do not shake the toner cartridge any more. dust from escaping. Dispose of old toner cartridges Otherwise, it is possible that toner dust will be by turning them in at specialised shops or at a waste released into the air.
-
Page 11: Paper
Chapter 1. Installation 11 It may take a moment to update the cartridge. When Pressing C will return you to the previous menu step; the process is completed, the following appears on pressing STOP will return you to the root menu. the display: Paper action completed / remove card... -
Page 12: Special Telephone Connections
Chapter 1. Installation If you would like to print on an input sheet (for Special Telephone example, forms or stationery), place the input sheet face down in the paper tray, with the top of the page Connections toward the rear. ISDN Systems Your fax machine is an analogue fax machine (Group 3). -
Page 13: Additional Devices
Chapter 1. Installation You can connect additional devices to separate sockets on Additional Devices the same line even if they are in diff erent rooms You can connect other devices to your PTT line apart In GB from your fax machine, for example, cordless telephones, answering machines or modems. -
Page 14: Settings
Chapter 2. Settings Confi rm with OK. Pressing C will return you to the 2. Settings previous menu step; pressing STOP will return you to the root menu. When needed, your fax machine can print out lists Entering Your Telephone containing the most important functions and settings of the machine. -
Page 15: Ring Tone
Chapter 2. Settings Entering the PIN Code Ring Tone Press MENU/OK, and OK. Volume answer code Select with and confi rm with ¾ With the function 18, you can set the volume of the OK. Enter a four-digit PIN code. ring tone. -
Page 16: Energy Saving Mode
Chapter 2. Settings Enter the code again for confi rmation purposes, then Setting the Fax Reception press OK. Pressing C will return you to the previous menu step; pressing STOP will return you to the Mode root menu. If you have already saved a code, the device will ask you Th e built-in fax switch makes it possible to send and to provide the old code fi... - Page 17 Chapter 2. Settings recognises a fax signal, it will automatically receive the fax transmission. If you do not have an answering machine connected or if a connected answering machine does not accept the call, the fax machine will take over the call after a predetermined number of rings and automatically receive any possible fax transmission being sent.
-
Page 18: Telephone Book
Chapter 3. Telephone Book Enter the initial letters or select the entry you would 3. Telephone Book like to change with . Confi rm with OK. ¾ Change the stored name, the number and the trans- With the key, you can access the telephone book mission speed. -
Page 19: Chain Dialling
Chapter 3. Telephone Book You can also obtain a print-out of the tele- Editing a Group ¡ phone book by pressing , then selecting ¨ help page: 4 directory Press with ¾ Confi rm with OK. Th e list is printed. modify Select with... -
Page 20: Fax
Chapter 4. Fax Inserting Documents 4. Fax Separate the documents by fanning them ¡ As much as possible, use fax documents printed with out, then align them by tapping the edge darker coloured text (black or dark-blue). Yellow, orange of the stack gently against a fl at surface. Th is will and green are not suitable. -
Page 21: Manually Sending A Fax
Chapter 4. Fax Redial list or caller list: To select a number from Transmission Report the redial list, press . To select a º ¾ number from the caller list, press the blue key and Your fax machine will print you a transmission report— º... -
Page 22: Sorted Print-Outs
Chapter 4. Fax Sorted Print-Outs Broadcast Transmissions If your fax machine receives fax transmissions with multi- You have two options for sending a fax transmission to ple pages, it will sort the pages as it prints them out. Th e several recipients: You can either enter the numbers of pages that were received last will be dispensed fi... -
Page 23: Time-Deferred Sending
Chapter 4. Fax Time-Deferred Polling Time-Deferred Sending Press MENU/OK, and OK. With this function, you can send fax transmissions at a later time—within a 24-hour period. For example, you Enter the number from which you would like to poll can use this feature to take advantage of better telephone a fax or select an entry from the telephone book, the rates or to send a fax to a recipient who can be reached redial list or the caller list. -
Page 24: Journal
Chapter 4. Fax Enter the fax number. Add a dialling pause to the number Immediate Job Execution by pressing the blue key along with R/PAUSE. Now en- ter the direct dial number, the sub-address or the code, Press MENU/OK, and OK. Select the job that for example R/PAUSE you would like to execute immediately by pressing... -
Page 25: Copier
Chapter 5. Copier Push the document guide inwards, so that it lies level on 5. Copier the documents. You can copy documents with your fax machine. You have two diff erent options available for copying. It is pos- sible either to make copies automatically or to adjust the copies through your own settings. -
Page 26: Sms
Chapter 6. SMS Redial list: Press , then select the desired º 6. SMS number from the redial list by pressing . Press ¾ . Th e fax machine will now send the SMS message. (Short Message Service) Caller list: To select a number from the caller list, press the blue key and . -
Page 27: Printing Sms Messages
Chapter 6. SMS Printing SMS Messages Sending SMS Messages to E-Mail or Fax If you have turned the automatic printing function off , use this function to print your SMS messages. (Depending on country and telephone network) print SMS Press , select with and con-... -
Page 28: Sms Settings
Chapter 6. SMS Sending SMS Messages to a User Account Turning Off the Automatic Printing Some SMS reception devices can manage several user ac- Received SMS messages are printed out automatically. counts. You can send an SMS message to a specifi c user You have the option of turning this function off... -
Page 29: Text2Fax
Chapter 6. SMS Confi rm with OK. Pressing C will return you to the Text2Fax previous menu step; pressing STOP will return you to the root menu. (Depending on country and telephone network) Sending of SMS notifi cations may involve ¡... -
Page 30: Pc Connection
7. PC Connection double-click.) Th e C S window appears on the screen. (MF 3260) You can install or uninstall C S or load the user manual for P P. Click on B C to view the fi les on the installation CD. Th is Requirements opens a Windows®... -
Page 31: Uninstalling The Software
Chapter 7. PC Connection Next you will be asked to accept the licensing conditions. Only after the restart, connect the laser fax machine Click on Y. to your PC with a typical USB cable. Th e USB port of your device can be found on the rear side. Uninstalling the Software Close all open programs and applications before begin- Th e program can now commence with the installation. -
Page 32: Using The Companion Suite
Chapter 7. PC Connection After rebooting has occurred, removal of the C To edit the telephone book entries, select the laser fax S from your computer will be complete. machine. You can add new entries or groups to your telephone book and edit or delete these entries as well as printing out a list of all entries. -
Page 33: Settings
Click on the S button to modify the basic set- tings of your fax machine. Among other setting, you You can access your MF 3260 from any program and use can enter your name and number, set the date and time,... -
Page 34: Scanning
Chapter 7. PC Connection Click in the Print menu on P to edit the Driver as your scanner. Th e Twain Driver selection printer settings. You can set whether to print in letter or window then appears, as described below. landscape format and how many pages should be printed on a single sheet. -
Page 35: Troubleshooting
Chapter 8. Troubleshooting Installation / New Toner Cartridge. If you have 8. Troubleshooting inadvertently pressed STOP, you can start the re- charging process by pressing MENU/OK, new black and OK and then selecting with . Confi rm with OK. ¾ Paper or Document Jams If a document jam should occur in the front area: Work Your fax machine is equipped with sensors that quickly... -
Page 36: Appendix
Chapter Appendix Calling Line Identification Presenta- from 9,600 to 33,600 bps—are currently Appendix tion (CLIP): see Caller Identifi cation most standard. Group 4 fax machines are digital devices that function exclusively on Chain Dialling: Before the dialling process ISDN systems. Th ey have a maximum begins, you can freely combine and edit transfer speed of 64,000 bps. -
Page 37: Abbreviations
Chapter Appendix specifi c times (for example after 30 trans- missions). Abbreviations Memory: If there is no paper or toner in Answering Machine your fax machine, the machine will store incoming fax transmissions in its memory. bps: Bits per second (transfer rate) SMS messages are stored in the SMS CCITT: Comite Consultatif International Telephonique et Telegraphique (forerun-... - Page 38 Chapter Appendix Sender Identification: Th e telephone V.22 bis – maximum 2,400 bps number and name of the sender as well V.27 ter – maximum 4,800 bps as the date and time of the fax transmis- V.29 – maximum 9,600 bps sion appear in the upper margin of each V.32 bis –...
-
Page 39: Functions List
Chapter Appendix Functions List 1 Installation parameters country ....14 ....28, 29 List of the available countries Settings for sending and receiving SMS language... -
Page 40: Technical Data
..relative humidity 20 – 80 % ....non-condensing PC Connection (MF 3260) Emissions ..corresponds to EN 55022 Class B Connection Type . -
Page 41: Guarantee
Th e following sentence SAGEM. Th e repair and delivery costs will be invoiced to the applies to purchases of equipment for the customer’s trade, busi- customer. -
Page 42: Index
Chapter Appendix Copy ... . . groups ..software ..Index adjust copies ..insert documents . - Page 43 Chapter Appendix Number Profiles page header ..save new entry ..enter ... scan ... print list of settings .
-
Page 44: United Kingdom
Telephone: 02 07 - 536 54 00 Hereby, SAGEM Communication Austria GmbH, de- Fax: 02 07 - 519 50 24 clares that this SAGEM LF 3240 or LF 3260 is in compli- ance with the essential requirements and other relevant provi- sions of Directive 1999/5/EC.