Table of Contents
Advertisement
Quick Links
Advertisement
Table of Contents

Related Manuals for Bosch DS7446KP


Summary of Contents for Bosch DS7446KP
- Page 1 DS7446KP User Guide Keypad...
- Page 2 DS7446KP | User Guide | Command Quick Reference Command Quick Reference Command Command Page Type Basic Turn the System All On [On] or [# Command][1] Arming Turn the System [Perimeter] or Commands Perimeter Only On [# Command][2] Advanced Turn All Areas On...
-
Page 3: Table Of Contents
DS7446KP | User Guide | Command Quick Reference Command Command Page Type Change PIN [# Command][5][5] Commands Change Another User’s PIN [# Command][5][6][1] Change Another User’s [# Command][5][6][2] Authority Level Change Another User’s Area [# Command][5][6][3] Assignment Delete a User’s PIN... - Page 4 DS7446KP | User Guide | Contents Contents System Information................6 Purpose of Document ..............6 Keypad Overview ................7 Keypad Layout..................7 Keypad Tones ................... 11 System Status Messages..............12 Keypad Commands ................13 Basic System Arming Commands..........13 Turn the System All On..............13 Turn the System Perimeter Only On ..........
- Page 5 DS7446KP | User Guide | Contents 10.0 PIN Commands ................25 10.1 Change PIN ..................25 10.2 Change or Add a User PIN ............. 25 10.3 Delete a User PIN................27 10.4 Renew One-Time PINs..............28 10.5 Enable Installer PIN ................. 28 11.0...
-
Page 6: System Information
DS7446KP | User Guide | 1.0 System Information 1.0 System Information Alarm Company: Telephone Number: 2.0 Purpose of Document This document shows you how to use and maintain your security system. It covers all of the commands you can perform from this keypad. -
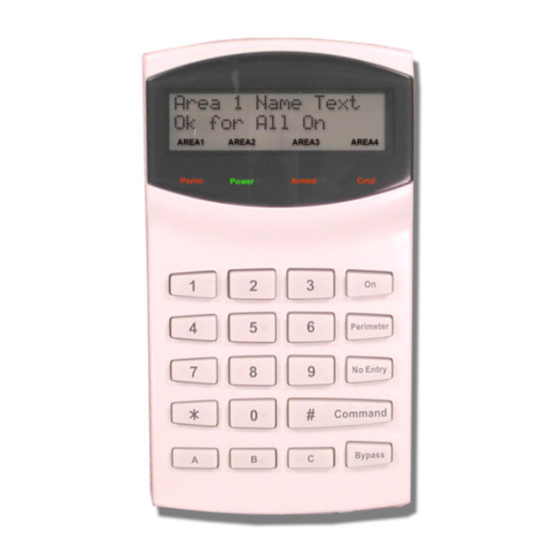
Page 7: Keypad Overview
DS7446KP | User Guide | 3.0 Keypad Overview 3.0 Keypad Overview Keypad Layout Figure 1: Keypad Layout Area 1 Name Text OK for All On AREA 1 AREA 2 AREA 3 AREA 4 Power Armed Perim Perimeter No Entry Command... - Page 8 DS7446KP | User Guide | 3.0 Keypad Overview Depending on your system’s programming, your keypad might display an area icon below the second line of text. Table 1: Area Icon Functions State Function On Steady A user is operating the keypad outside of its home area using the [#][5][0] (Move to Area) command.
- Page 9 DS7446KP | User Guide | 3.0 Keypad Overview Table 2: System Status Indicators Indicator State Description Perim On Steady Area is armed Perimeter Only or Partial On with Entry Delay. Slow Flash Area is armed Perimeter Only or Partial On without Entry Delay.
- Page 10 DS7446KP | User Guide | 3.0 Keypad Overview Table 3: Keys Keys Function 1,2,3,4,5,6,7,8,9,0 Use the numeric keys to enter information such as user PINs and command key sequences. Press this key to turn your system All On. Perimeter Press this key to turn your system Perimeter Only On.
-
Page 11: Keypad Tones
DS7446KP | User Guide | 3.0 Keypad Overview Keypad Tones Table 4: Keypad Tones Tone (Tone Diagram) Description Fire Alarm When a fire zone goes into alarm, the keypad sounds the Fire Alarm tone. Enter PIN to silence. Burglary Alarm... -
Page 12: System Status Messages
DS7446KP | User Guide | 3.0 Keypad Overview System Status Messages Refer to Table 5 for descriptions of the system messages that can appear on the keypad’s display. Table 5: System Status Messages Keypad Display Description There are no system troubles. -
Page 13: Keypad Commands
DS7446KP | User Guide | 4.0 Basic System Arming Commands Keypad Commands After entering a command, the keypad might ask you to enter your PIN to continue. After you enter your PIN, follow the instructions that appear on the keypad’s display to perform the command. -
Page 14: Advanced System Arming Commands
DS7446KP | User Guide | 5.0 Advanced System Arming Commands 5.0 Advanced System Arming Commands Turn All Areas On [# Command][8][0] Use this command to turn all areas within your system All On. Your system must be split into more than one area to use this command. -
Page 15: Bypass Or Unbypass Zones
DS7446KP | User Guide | 5.0 Advanced System Arming Commands Bypass or Unbypass Zones [Bypass] or [# Command][0] Use this command to bypass one or more zones before turning the system For example, your kitchen was just painted and you want to leave the windows open, but you need to turn your system on. -
Page 16: Turn The System On With No Exit Tone
DS7446KP | User Guide | 5.0 Advanced System Arming Commands Turn the System On with No Exit Tone Refer to Table 8 Turning the system on with no Exit Tone silences the Exit Tone, and doubles the Exit Delay timer. -
Page 17: System Disarming Commands
DS7446KP | User Guide | 6.0 System Disarming Commands 6.0 System Disarming Commands Turn the System Off PIN entry Enter your PIN to turn the system off. To prevent an alarm, enter through a designated entry door, such as the front door. -
Page 18: Emergency Commands
DS7446KP | User Guide | 7.0 Emergency Commands Emergency Commands Your system might be programmed to produce different sounding tones to distinguish fire alarms and burglary alarms. Refer to Table 4 on page 11 for descriptions of the alarm tones. -
Page 19: A, B, And C Keys
DS7446KP | User Guide | 7.0 Emergency Commands A, B, and C Keys [A], [B], or [C] [A] Key = [B] Key = [C] Key = Your keypad’s [A], [B], and [C] keys are special emergency keys that generate alarms as programmed by your alarm company. -
Page 20: Test Commands
DS7446KP | User Guide | 8.0 Test Commands 8.0 Test Commands System Test [# Command][4][1] Use this command to determine if certain system components operate as expected. Your alarm company determines which components can be tested using this command. Table 9: Available System Tests... -
Page 21: System Status Commands
DS7446KP | User Guide | 9.0 System Status Commands 9.0 System Status Commands View Faulted Zones Use this command to locate faulted zones in your system. The keypad display scrolls through all faulted zones. When the zones return to normal or are bypassed, the system is ready to turn on. -
Page 22: View System Troubles
DS7446KP | User Guide | 9.0 System Status Commands View System Troubles [# Command][4][2] Use this command to view system troubles. Refer to Table 10 for a list of some system trouble messages. Table 10: System Trouble Messages Keypad Display Cause for Message There is no AC main supply. -
Page 23: View History Log
DS7446KP | User Guide | 9.0 System Status Commands View History Log [# Command][8][5] Use this command to view the events stored in your system’s history log. Events include alarms, trouble conditions, and tamper conditions. The top line of the log shows the event description. The bottom line alternates between the event’s time and date, and the event’s area, device... - Page 24 DS7446KP | User Guide | 9.0 System Status Commands Table 11 shows the characters that the history log uses to communicate certain information. Table 11: History Log Display Descriptions History Log Display Description Area number Zn## Zone number Dv## Device number...
-
Page 25: Command][5][5]
DS7446KP | User Guide | 10.0 PIN Commands 10.0 PIN Commands If the keypad sounds the Error tone when you enter a user number, the user number does not exist in your system. If this is correct, you must add this user number before using the following commands to change the user’s PIN, authority level,... - Page 26 DS7446KP | User Guide | 10.0 PIN Commands Follow these steps to add a new user PIN: 1. Assign one or more areas to the new user. Press [# Command][5][6]. b. Press [3] to assign one or more areas to the new user.
-
Page 27: Command][5][8]
DS7446KP | User Guide | 10.0 PIN Commands Table 13: Authority Level Commands Level Available Commands 10.3 Delete a User PIN [# Command][5][8] Use this command to delete a user’s PIN. If there is no PIN for the selected user, the keypad sounds the Error tone. -
Page 28: Command][5][3]
DS7446KP | User Guide | 10.0 PIN Commands 10.4 Renew One-Time PINs [# Command][5[3] One-time PINs can turn the system off only once. This PIN is typically given to someone who needs temporary access to the building, such as a maintenance crew or a baby-sitter. -
Page 29: Command][6][1]
DS7446KP | User Guide | 11.0 Optional Commands 11.0 Optional Commands 11.1 Chime Mode [# Command][6][1] – Enable Chime Mode [# Command][6][2] – Select Chime Tone [# Command][6][3] – Select Chime Zones Chime Mode, when turned on, sounds a tone whenever the system is off and a chime zone, such as a door or window, is faulted. -
Page 30: Change Skeds
DS7446KP | User Guide | 11.0 Optional Commands 4. Press [#][Command] after you select a Chime tone. The selected tone sounds for all Chime zones. 5. Press [# Command][6][1] to enable Chime Mode. Press [1] to turn Chime Mode on Press [2] to turn Chime Mode off 6. -
Page 31: Command][5][4]
DS7446KP | User Guide | 11.0 Optional Commands Table 16: Sked Day Selections Day of Week Symbol Sunday Monday Tuesday Wednesday Thursday Friday Saturday All Days To use the All Days command, press [8]. An “A” appears in the display under “8.” The sked is now active every day of the week. -
Page 32: Command][4][9]
DS7446KP | User Guide | 11.0 Optional Commands 11.4 Keypad Volume Adjust [# Command][4][9] Use this command to adjust the volume of your keypad’s sounder for non- alarm tones. This command does not change the volume for alarm tones. [*]+[1] increases the volume [*]+[4] decreases the volume 11.5... -
Page 33: Command][8][2]
DS7446KP | User Guide | 11.0 Optional Commands 11.7 Auto Forward [# Command][8][2] – Enable Auto Forward [# Command][8][3] – Auto Forward On Setup [# Command][8][4] – Auto Forward Off Setup Auto Forward allows you to forward incoming calls to a telephone number of your choice after you turn the system All On. -
Page 34: Command][4][3]
DS7446KP | User Guide | 11.0 Optional Commands 6. Press [Bypass]. You can now enter the telephone number that all incoming calls are forwarded to when you turn your system off. This number can be the number for the telephone line that your system is connected to. Refer to Table 17 on page 33 for special key functions. -
Page 35: Reference Materials
DS7446KP | User Guide | 12.0 Reference Materials 12.0 Reference Materials 12.1 About Your Security System 12.1.1 Overview Your security system includes a telephone line seizure feature. Your alarm company can program your system to send reports over the phone line to an ARC. You cannot use your phone when the system is sending reports to the ARC. - Page 36 DS7446KP | User Guide | 12.0 Reference Materials Smoke detectors cannot detect smoke in chimneys, walls, or roofs, or smoke blocked by a closed door. They cannot detect smoke or fire on a level of the building different from the one on which they are located.
- Page 37 DS7446KP | User Guide | 12.0 Reference Materials If the alarm was accidentally sounded, silence the bell, reset the detectors, and immediately notify your alarm company that there is no emergency situation. Figure 3: Smoke Detector Locations = Smoke detector Install a smoke detector on each level, including basements, but excluding crawl spaces and unfinished attics.
- Page 38 DS7446KP | User Guide | 12.0 Reference Materials 12.1.4 Maintenance and Service This security system requires very little maintenance. However, test the system weekly to ensure it works correctly. If you notice a change in operation during normal use or testing, call for service as soon as possible.
-
Page 39: Zone Locations
DS7446KP | User Guide | 12.0 Reference Materials 12.2 Zone Locations Use Table 18 to list the building location that each zone in your system protects. For example, if Zone 1 is located in the kitchen, write “Kitchen” on the corresponding line in the column labeled “Location.”... -
Page 40: Glossary
DS7446KP | User Guide | 12.0 Reference Materials 12.3 Glossary Alarm A facility where trained personnel monitor your security system 24 hours a day. Your security system Receiving Center (ARC): might be programmed to contact the ARC during alarm conditions, which enables ARC personnel to dispatch the proper authorities. - Page 41 DS7446KP | User Guide | 12.0 Reference Materials Perimeter To turn on part of the zones in the system. Your Only: alarm company determines Perimeter Only zones. PIN: A PIN (Personal Identification Number) is a unique number assigned to each user that identifies him or her to the system.
- Page 42 DS7446KP | User Guide | 12.0 Reference Materials Index A, B, C Key Operation ..... 19 Outputs Area Toggle..........31 All Areas Off ........17 All Areas On ........14 Partial On Move to Area ......... 32 Select Partial On Zones ..... 14 Auto-Forward Off Setup ........
- Page 43 DS7446KP | User Guide | Index History Log........23 Zone Troubles .......21 View Alarm Memory....... 22 Faulted Zones....... 21 Bosch Security Systems | 12/04 | 4998149924B...
- Page 44 For technical support, please contact: © 2004 Bosch Security Systems 4998149924B...