Table of Contents
Advertisement
Quick Links
Cash Register
Cash Register
Cash Register
Cash Register
Cash Register
ECR 5500
ECR 5500
ECR 5500
ECR 5500
ECR 5500
INSTRUCTIONS
INSTRUCTIONS
INSTRUCTIONS
INSTRUCTIONS
INSTRUCTIONS
INSTRUCTIONS D'EMPLOI
INSTRUCTIONS D'EMPLOI
INSTRUCTIONS D'EMPLOI
INSTRUCTIONS D'EMPLOI
INSTRUCTIONS D'EMPLOI
BEDIENUNGSANLEITUNG
BEDIENUNGSANLEITUNG
BEDIENUNGSANLEITUNG
BEDIENUNGSANLEITUNG
BEDIENUNGSANLEITUNG
INSTRUCCIONES DE USO
INSTRUCCIONES DE USO
INSTRUCCIONES DE USO
INSTRUCCIONES DE USO
INSTRUCCIONES DE USO
Advertisement
Table of Contents

Related Manuals for Olivetti ECR 5500


Summary of Contents for Olivetti ECR 5500
- Page 1 Cash Register Cash Register Cash Register Cash Register Cash Register ECR 5500 ECR 5500 ECR 5500 ECR 5500 ECR 5500 INSTRUCTIONS INSTRUCTIONS INSTRUCTIONS INSTRUCTIONS INSTRUCTIONS INSTRUCTIONS D'EMPLOI INSTRUCTIONS D'EMPLOI INSTRUCTIONS D'EMPLOI INSTRUCTIONS D'EMPLOI INSTRUCTIONS D'EMPLOI BEDIENUNGSANLEITUNG BEDIENUNGSANLEITUNG BEDIENUNGSANLEITUNG BEDIENUNGSANLEITUNG BEDIENUNGSANLEITUNG...
- Page 2 PUBLICATION ISSUED BY: Olivetti Tecnost S.p.A. 77, Via Jervis - 10015 Ivrea (TO) Italy Copyright © 2003, by Olivetti All rights reserved...
- Page 3 mark affixed to the product certifies that the product satisfies the basic quality requirements. Your attention is drawn to the following actions that could compromise the characteristics of the product: • incorrect electrical supply; • incorrect installation; incorrect or improper use, or, in any case, not in accordance with the warnings given in the User Manual supplied with the product;...
- Page 4 WARNING: THIS EQUIPMENT MUST BE EARTHED. ATTENTION: CETTE UNITE DOIT ETRE CONNECTEE A LA TERRE. ACHTUNG: DIESES GERÄT MUSS EINEN ERDUNGSANSCHLUSS HABEN. ATENCION: ESTE EQUIPO DEBE ESTAR CONECTADO A UNA TOMA DI TIERRA. APPARATET MÅ KUN TILKOPLES JORDET STIKKONTACT. APPARATEN SKALL ANSLUTAS TILL JORDAT NÄTUKKAT. LAITE ON LITTETTÄVÄ...
- Page 5 • possibility of programming the departments with a tax status, single/ Preface multiple item sale status, a preset price and an identification caption; The electronic cash register described in this manual is designed to help • possibility of activating a non-print, paper saving mode where the cash your business function smoothly by providing efficient register operations register does not print customer sales receipts but still keeps track of and accurate management reports.
-
Page 6: Table Of Contents
Table of Contents PRINTER COMPARTMENT ......... 10 Thermal Paper Roll ............10 GETTING ACQUAINTED WITH YOUR Loading Thermal Paper ..........11 CASH REGISTER ............1 QUICK START ............. 12 Standard Accessories ............. 2 Helpful Hints for a Successful Start-Up ......13 Using this Manual ............ - Page 7 PLU Programming Dump Report ........26 MANAGEMENT REPORTS .......... 54 Foreign Currency Exchange Rate Programming ... 27 X Position Report ............54 Defining Foreign Currency Descriptors ......27 Z Position Report ............54 Programming System Options ........29 Clerk Report ..............54 Programming a Manager Password ......
-
Page 8: Getting Acquainted With Your Cash Register
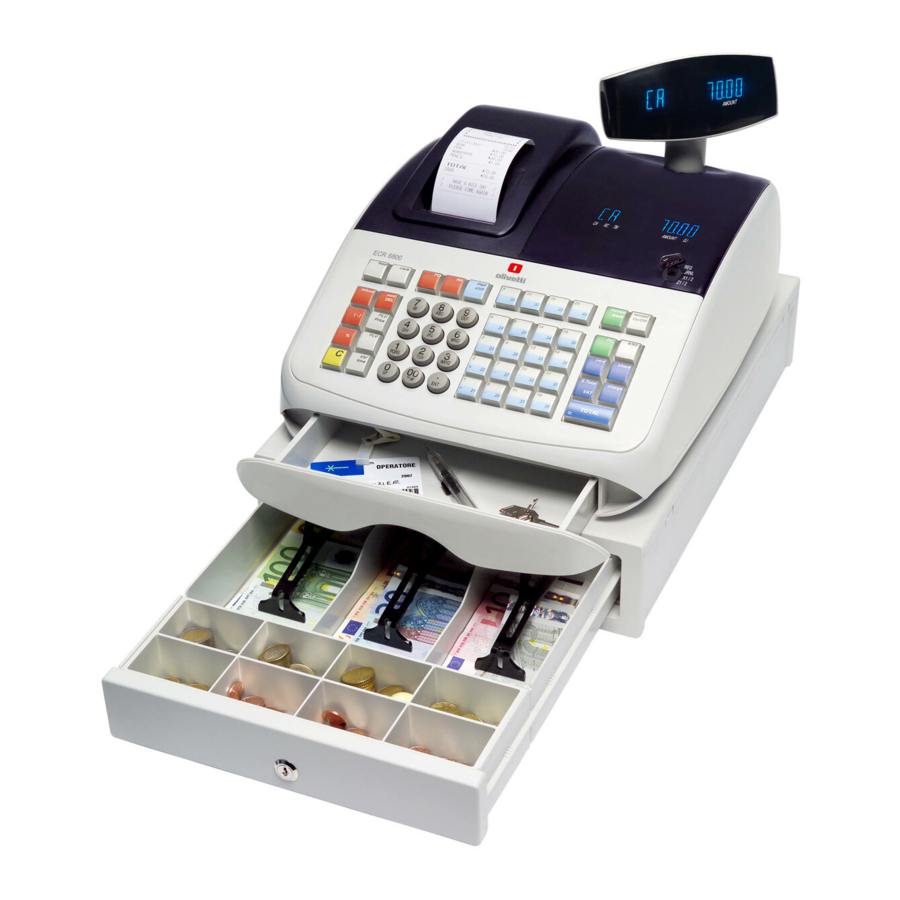
Getting Acquainted with Your Cash Register The figure below gives an overall view of your cash register. 1. Customer Display 8. Printer and Management Control Switch 2. Operator Display Compartment Lock 3. Keypad 9. Customer Receipt Output Window 4. Cash Drawer 10. -
Page 9: Standard Accessories
Standard Accessories Using this Manual Your cash register comes with the following items: Your cash register manual is organized for easy reference. The front portion contains general information on all the features and functions of the • One black plastic journal winder spindle cash register. -
Page 10: Unpacking And Setting Up The Cash Register
Unpacking and Setting Up the Cash Register Maintaining the Cash Register NOTE: Please read this section carefully before attempting to program Provided below is information on how to maintain your cash register. the cash register or perform sales transactions. NOTE: Before cleaning the cash register, make sure it is powered off As soon as you receive the cash register, open its shipping carton and and/or unplugged from the wall outlet. -
Page 11: The Keypad
The Keypad Your cash register is equipped with a 36-key keypad by means of which you can perform all cash register functions. The figure below shows the keypad layout. dept dept clerk shift shift feed void #/NS 4/12 8/16 3/11 7/15 card ref/-... -
Page 12: Keypad Functions
10. [Ref/-] (Dual function: Coupon and Refund) - When used as the Keypad Functions coupon key, subtracts an amount from an item or the sales total, such 1. [Feed] (Paper Feed) - Advances the receipt or journal paper one line as a coupon deduction. -
Page 13: The Control System
Depending on the desired operation, slide the control switch to the 19. [Amt Tend/TOTAL] (Amount Tendered/TOTAL) - Totals exact cash following positions: transactions, computes change and totals transactions that are split tendered with check or credit card and cash together. This key is used The cash register is turned off and cannot be used. -
Page 14: Deposit Drawer
E (Error) Indicates when an error is made during operation or Deposit Drawer when programming the cash register. An error tone sounds This extra drawer provides sufficient space for miscellaneous items. to alert the operator. S (Sub-total) Indicates that the amount shown is the subtotal of a transaction, including sales tax if applicable. -
Page 15: Error Conditions
Partial Reset Error Conditions A Partial Reset operation just clears the cash register's working memory. The Error Alarm 1. Unplug the cash register from the electrical outlet. The error alarm warns of an operator error (usually when a wrong key 2. -
Page 16: Voiding Errors
Voiding Errors Inserting/Replacing Batteries NOTE: Before inserting the batteries, make sure that the cash register is Once an entry is printed, the [C] key cannot be used to clear an error. plugged into the power socket and that the control switch is set to Press the [Void] key to correct an error already registered. -
Page 17: Printer Compartment
3. Remove the battery compartment cover by pressing on the arrow 7. Reposition the journal winder spindle, then reposition, close and lock impressed on the cover and lifting upwards, as shown by the arrows in the printer compartment cover. the figure. 4. -
Page 18: Loading Thermal Paper
5. Insert the edge of the paper into the paper slot as shown below. Loading Thermal Paper Proceed as follows to load the cash register with paper. 1. Make sure the cash register is plugged into a grounded power outlet. 2. -
Page 19: Quick Start
8. Pass the edge of the customer receipt through the receipt window on 4. Set the current time using the 24-hour (military) format and then the compartment cover. pressing [Qty/Time]. Also in this case single digits must be preceded by a zero. For example, to set 1:05 P.M., type [1305] and then press the [Qty/Time] to store your entry. -
Page 20: Helpful Hints For A Successful Start-Up
9. When programming is complete, exit the program mode by sliding the Cash Register Programming control switch to the OFF position. 10. To ring up a sales, slide the control switch to the R1 or R2 position (R1 This cash register can be programmed to tailor its features according to winds a journal record on the spindle, R2 gives you customer receipts your specific needs. -
Page 21: Making Changes To Cash Register Programming
NOTE: Program all the desired features at the same time in order to In case an error condition cannot be cleared, perform one of the three create a single receipt of all selections. Keep the receipt in a safe cash register reset operations explained in the section entitled Cash place for future reference. -
Page 22: Assigning Clerk Names
Programming a Secret Code Linked to a Clerk Entering a Clerk Number/Secret Code Before Cash Number Register Operations 1. Open the printer compartment and slide the control switch to the PRG Proceed as follows to enter a defined Clerk number and related secret position. -
Page 23: Date And Time
4. With reference to the Character Code Table in the Appendix, type the 4. Program another feature or exit program mode by sliding the control string of character codes to define the letters of a name and then press switch to the OFF position. the [Check] key. -
Page 24: Receipt Header
6. Repeat steps 3, 4 and 5 if you wish to program the remaining three Receipt Header programmable header lines. Your cash register is programmed to print a courtesy header enclosed in 7. Exit from this programming sequence by pressing the a box delimited by asteriscs, on all customer receipts when the control [Amt Tend/TOTAL] key. -
Page 25: Decimal Point Position
Decimal Point Position Setting a Fixed VAT Rate Proceed as follows to program a fixed tax rate: The decimal point setting is preset to the x.xx format. This format can be changed, as needed, to one of the other settings below. 1. -
Page 26: Fraction Rounding For Vat Calculation
Fraction Rounding for VAT Calculation Printing VAT Information on Customer Receipts Fraction rounding is used to round figures with decimals up or down to With the aim of satisfying the more diverse fiscal requirements, this cash the nearest whole numbers and is used for percent tax calculations. register model can be programmed to print a wide range of VAT-related By default the cash register is configured to round VAT figures a fraction information on the customer sales receipt. - Page 27 Provided below is an example sales receipt with the information that is Printing the Taxed Sales Totals Split per Rate (TL VAT) printed as a result of this cash register setting. 1. Slide the control switch to the PRG position. 2.
- Page 28 Printing the Sum of the Taxed Sales Totals (TOTAL TL VAT) Printing the Taxable Sales Totals without VAT per each Rate (T W/O VAT) 1. Slide the control switch to the PRG position. 1. Slide the control switch to the PRG position. 2.
-
Page 29: Programming Departments
Printing the Sum of the Taxable Sales Totals without VAT Programming Departments (TL W/O VAT) A total of 16 departments are available on your cash register. Each 1. Slide the control switch to the PRG position. department can represent a category of merchandise. For example, 2. -
Page 30: Naming Departments
Linking a Multiple/Single Item Cash Sale, Tax Status 2. Switch the cash register to the department name definition mode by pressing the [#/NS] key repeatedly until displaying the message and Item Price to a Department "d01" indicating the first customizable department. Proceed as follows: 3. -
Page 31: Price Look-Ups (Plus)
Programming PLU Status Price Look-Ups (PLUs) The PLU status programming procedure should only be performed if A total of 200 Price Look Up (PLU) codes are available on this cash you are interested in the Open PLU Price (Sub-department) option. register. -
Page 32: Naming Plu Items
To define PLU names, proceed as follows: Programming PLU Prices Proceed as follows to program a PLU item price: 1. Slide the control switch to the PRG position. 1. Slide the control switch to the PRG position. 2. Switch the cash register to the PLU name definition mode by pressing the [#/NS] key to display the message "P001"... -
Page 33: Plu Programming Dump Report
3. Slide the control switch to the OFF position to exit the program mode. PLU Programming Dump Report Shown below is an example PLU dump report. If a large number of PLUs are created (bear in mind that up to 200 PLUs can be programmed), a separate receipt can be printed indicating Time all the PLUs programmed. -
Page 34: Foreign Currency Exchange Rate Programming
4. Type the [decimal point position] of the converted amount (0-3 Foreign Currency Exchange Rate Programming digits after the decimal point). You can program up to four different foreign currency exchange rates so 5. Type the [exchange rate] using up to six digits without specifying that the cash register automatically calculates the price entered or any decimal point. - Page 35 4. With reference to the Character Code Table in the Appendix, type the Setting the Rounding Option string of character codes to define the letters of the descriptor to With reference to the section Programming System Options, by setting assign to the selected foreign currency and then press the [Check] Machine Condition 13 to the related value (1, 2 or 3), you can program the key.
-
Page 36: Programming System Options
Machine Settings Programming System Options Condition Your cash register's system options programming feature includes 23 12 0 = Zero price entry not allowed options for the operation of the cash register. Each of the functions 1 = Zero price entry allowed described in this section is already set upon delivery of the cash register to meet the most frequent requirements. -
Page 37: Programming A Manager Password
Changing the Cash Register's Standard Settings Defining the Z Mode Manager Password Proceed as follows if you wish to change any of the standard machine Proceed as follows to define a manager password that grants access to settings indicated in the previous table: the Z mode: 1. -
Page 38: Using The Cash Register In A Password Protected Mode
In the calculator mode, the operational keys are limited to the following: Using the Cash Register in a Password Protected Mode Operation Using the Password to Access the Z Management Clear [Amt Tend/TOTAL] Mode [Department 1/9] + (Addition) If a manager password was defined to protect unauthorized access to [Department 5/13] - (Subtraction) the Z mode, proceed as follows to enter the specific password so that... -
Page 39: The Non-Print Mode
Assigning the Calculator Mode Password Activating the Non-Print Mode Proceed as follows to assign a password that prevents unauthorized Proceed as follows to activate the non-print mode: access to the functions provided by the calculator mode: 1. Slide the control switch to the PRG position. 1. -
Page 40: Machine Programming Report
Machine Programming Report Transaction Examples As you program the cash register's different features according to your specific needs, the values that you define are printed on the paper tape. It This section provides examples on how to complete different types of is suggested that you store this programming printout in a safe place so transactions. -
Page 41: Sample Receipt
Sample Receipt Standard Transactions The following sample receipt shows where general transaction Registering a Single Item Sale with Change Tender information is printed on a customer receipt. Up to seven digits can be used for the amount of the entry. Customer receipt header on 4 lines Example: Register a £1.00 item in Department 1 (programmed at a 5.5% with max. - Page 42 Registering a Multiple Item Sale with Exact Cash Registering a Multiple Item Sale with Exact Cash Tender in Local Currency Tender in Euro Example: Register a £2.50 item to Department 1, a £.50 item to Depart- Example: Register a £10.00 item to Department 1, a £20.00 item to ment 5 and a £1.65 item to Department 16, with an exact tender of £4.65.
- Page 43 Registering a Sale of Multiple Items at Same Cost Registering a Multiple Department Sale with Payment and Change Tender Up to three digits can be used for the quantity multiplied. Example: Register a £69.99 item to Department 1 (programmed at a Example: Multiply two items costing £1.50 and register the sale to 5.5% VAT rate), a £5.99 item to Department 4 (programmed at a 20% Department 1.
- Page 44 Registering a Multiple Department Sale with Payment in Euro and Change Tender in Local Currency Example: Register a £69.99 item to Department 1 (programmed at a 5.5% VAT rate), a £5.99 item to Department 4 (programmed at a 20% VAT rate) and a £3.50 item to Department 9 (programmed without VAT).
- Page 45 Registering a Charge Transaction Split Cash/Charge Tendering Charge transactions are counted and registered to the charge total in the Example: Register a £10.00 item and a £15.00 item to Department 2. financial report. Split the amount tendered between £20.00 cash and £5.00 charge in Local currency.
- Page 46 Split Cash/Charge Tendering in Euro Check Tendering Example: Register a £8.00 item and a £12.00 item to Department 3. Split Example: Register a £70.00 item paid by check to Department 4. the amount tendered between 10.00e cash and 18.38e charge. Proceed as follows: Proceed as follows: 1.
- Page 47 Check Tender with Change in Local Currency Card Tendering Example: Register a £120.00 item to Department 2 and a £50.00 item to Example: Register a £19.50 item to Department 4, a £2.50 item to Department 3. Complete the transaction with payment using a credit or Department 5 and a £5.00 item to Department 14.
- Page 48 Check Tender in Euro with Change in Local Currency Split Check/Cash Tender in Local Currency Example: Register a £19.50 item to Department 4, a £2.50 item to Example: Register a £24.00 item to Department 1, a £36.00 item to Department 5 and a £5.00 item to Department 13. Compute the change in Department 3 and a £4.00 item to Department 4.
- Page 49 Split Check Tender in Local Currency/Cash Tender in Euro Example: Register a £18.00 item to Department 2, a £24.00 item to Department 3 and a £2.50 item to Department 4. Split the tender between a £20.00 check and 34.77e cash. Proceed as follows: 1.
-
Page 50: Minus (-) Key Transactions
Registering a Multiple (-) Reduction Minus (-) Key Transactions Example: Register a £.12 reduction on a £2.50 item to Department 1, Registering a (-) Reduction (Coupon) a £2.60 item to Department 3, a £.60 reduction on a £4.50 item to Up to 7 digits can be used for the amount of the transaction. -
Page 51: Percent Discount (-%) Transactions
Percent Discount (-%) Transactions Discounting the Total Sale You can call up a programmed discount rate during the transaction by pressing the [-%] key. If a percent discount rate is not programmed, type in the discount rate before pressing the [-%] key. Up to four digits can be used for the discount percentage (0-99.99%). - Page 52 Discounting the Total Sale by Using a Random Discount Rate Up to four digits can be used for the discount percentage (0-99.99). You MUST enter two digits after the decimal position. Example: Register a 20% discount to a sales transaction. Compute the change tender.
- Page 53 Discounting (-%) Individual Items using the Programmed Discount Rate Example: Register a programmed 10% discount on a £3.00 item to Depart- ment 5, and a £2.50 item to Department 4. Compute the change tender. Proceed as follows: 1. Type [300] and press the [Department 5/13] key. 2.
- Page 54 Discounting Individual Items using Programmed and Random Discount Rates Up to four digits can be used for the discount percentage (0-99.99). You MUST enter two digits after the decimal position. Example: Register a £2.50 item to Department 1, apply the programmed Programmed discount rate discount to a £3.50 item to Department 15 and apply a discount rate of 3% with calculated discount...
-
Page 55: Plu Codes
Discounting (-%) One Item Using the Programmed PLU Codes Discount Rate Registering a Sales Transaction Using Preset PLU Example: Register a programmed 10% discount to a £.99 cash transac- Codes tion to Department 5. In order to be able to use this feature, PLU codes must have been Proceed as follows: previously set. - Page 56 Overwriting a Preset PLU Price in a Sub-Department Preset for an Open PLU Price Example: Overwrite the preset PLU 6 with £3.50. Computer change for a £5.00 tender. Proceed as follows: Preset PLU 1. Type [6] and then press the [PLU] key to define the PLU to be price overwritten.
-
Page 57: Voids And Refunds
Voids and Refunds Voiding a Previous Entry at the End of a Sale Voiding the Previous Entry in the Middle of a Sale Example: Register a £1.50 item to Department 1, a £2.59 item to Example: Void a £2.50 entry erroneously made to Department 2. Then Department 4, a £5.99 item to Department 3. - Page 58 Refunding a Single Item Example: Refund a £1.00 item in Department 1. Proceed as follows: 1. Press the [Ref/-] key. 2. Type the amount to be refunded [100] and press the Incorrect price entry [Department 1/9] key. The amount refunded is displayed. 3.
-
Page 59: Other Transactions
Refunding Multiple Items Other Transactions Example: Refund a £4.99 item to Department 4 and three £2.00 items to Registering Money Received on Account Department 5. Up to 7 digits can be used for registering money received on account. Proceed as follows: Example: Register £200.00 received on account. - Page 60 Registering an Identification Number to a Transaction Registering a No Sale Up to 7 digits can be used for the identification number. This entry can This operation opens the cash drawer and prints a no sale receipt. The be made prior to any operation. The identification number is not added activity is registered to the activity counter in the financial report.
-
Page 61: Management Reports
Management Reports Clerk Report The Clerk Report lists the number of transactions and sales totals for each Clerk. At the end of the receipt you are given the sales total of all clerks. Transaction data is maintained in the memory of the cash register as long as the battery back-up system is in effect. -
Page 62: All Plu Report
All PLU Report The All PLU Report lists all transaction information pertaining to the use of the PLU codes by all the Clerks on a particular cash register. This Date report provides the number of times a particular PLU is used and the X report identifier totals for that number. -
Page 63: And Z Financial Report
X and Z Financial Report Consecutive receipt number Date Z counter NOTE: Once a "Z" reading is taken, it cannot be duplicated so be sure to Z report identifier Department 1 activity counter have plenty of paper in the cash register. Department number Proceed as follows to print an X or Z financial report: or assigned name... -
Page 64: Balancing Formulas
Clearing the Grand Total (+) Net sales (+) Minus Total Proceed as follows if you wish to clear the Grand Total: (+) -% Total 1. Slide the control switch to the PRG position. (+) Return Total (+) Void Total 2. Type , type and then press the key. -
Page 65: Appendix
Shown below is your cash register's Character Code Table. Appendix Character Code Table The Character Code Table shown below indicates all the codes representing the characters which your cash register is capable of printing. You need to use this table when programming Clerk, PLU item, department names, currency descriptors or the header on the customer receipt. -
Page 66: Totalizers And Counters Table
Totalizers and Counters Table Cash Register Specifications and Safety The following table reports the Z/X totalizers and counters for the Technical Characteristics different cash register features. Listed below are the technical characteristics of this cash register model. Type: Electronic cash register with thermal printer, 16 departments and 200 PLU settings Displays: 9-digit operator and client Vacuum Florescent Displays... - Page 67 Code 506626 P...