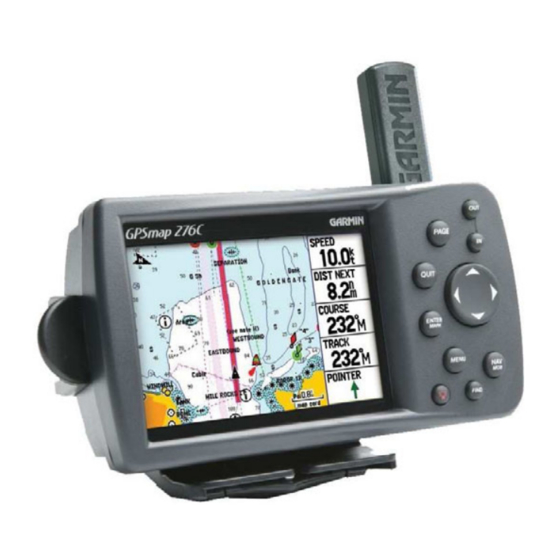
Garmin GPSMAP 276C Owner's Manual
Garmin chartplotting receiver owners manual gpsmap 276c
Hide thumbs
Also See for GPSMAP 276C:
- Owner's manual (136 pages) ,
- Quick reference manual (2 pages) ,
- Declaration of conformity (1 page)
Table of Contents
Advertisement
Quick Links
Advertisement
Table of Contents

Related Manuals for Garmin GPSMAP 276C


Summary of Contents for Garmin GPSMAP 276C
- Page 1 GPSMAP 276C...
- Page 2 Information in this document is subject to change without notice. Garmin reserves the right to change or improve its products and to make changes in the content with- out obligation to notify any person or organization of such changes or improvements. Visit the Garmin Web site (www.garmin.com) for current updates and supplemental information concerning the use and operation of this and other Garmin products.
-
Page 3: Introduction
Preface Thank you for choosing the Garmin GPSMAP 276C. The GPSMAP 276C utilizes the proven perfor- mance of Garmin GPS and full-featured mapping to create an unsurpassed portable marine navigation chartplotter. Please take a moment now to compare the contents of this package with the packing list on the outside of the box. -
Page 4: Table Of Contents
Learning about the Keypad ... 2 Charging the GPSMAP 276C... 3 Information about the Charge Mode... 3 Turning On the GPSMAP 276C ... 4 Initializing the GPSMAP 276C ... 4 Adjusting the Backlight and Volume... 5 Using the GPSMAP 276C ... 6 Understanding the Features... - Page 5 Using Waypoints... 28 Creating and Using Waypoints ... 28 Marking Your Present Position ... 28 Creating Waypoints Graphically... 29 Additional Options for Creating Waypoints. 30 Waypoint Menu Options... 32 Reviewing and Editing Waypoints ... 33 Points Tab ... 35 ‘User’ tab ... 35 ‘Proximity’...
- Page 6 Physical Specifi cations... 90 Performance ... 90 Power... 90 Care Information ... 91 Cleaning the Unit ... 91 Storing the GPSMAP 276C... 91 Immersing the Unit in Water... 91 Accessories... 92 Standard Accessories ... 92 Optional Accessories ... 92 Wiring and Interfacing ... 94 Connecting the Power/Data Cable ...
-
Page 7: Getting Started
The GPSMAP 276C is an all-in-one, versatile, color chartplotter and automobile navigator — perfect for land or water. This portable GPS navigator features a 256-color TFT display that is easy to read in bright sun along with a built-in basemap and auto routing to provide you with turn-by-turn directions. -
Page 8: Learning About The Keypad
Getting Started Unit Overview Learning about the Keypad Press the IN key to adjust the map scale to show a smaller area with more detail (zoom in). Press the OUT key to adjust the map scale to show a larger area with less detail (zoom out). Press the PAGE key to cycle the unit through the main pages in sequence and return the dis- play from a submenu page. -
Page 9: Charging The Gpsmap 276C
Information about the Charge Mode Applying external power to the GPSMAP 276C automatically starts the unit for full operation. If the battery is present and needs to be charged, the external power source charges the unit while it is in use. -
Page 10: Turning On The Gpsmap 276C
Initializing the GPSMAP 276C As soon as you turn the GPSMAP 276C on, it begins searching for satellites in your area and should acquire a fi x within a few minutes. At the top of the screen, the unit displays the status as “Acquiring Satellites.”... -
Page 11: Adjusting The Backlight And Volume
ENTER/MARK QUIT If you are using the optional External Speaker with 12/24-Volt Adapter Cable with the GPSMAP 276C, you may want to adjust the volume level of the speaker. To adjust the speaker volume: 1. Press and quickly release the POWER key. -
Page 12: Using The Gpsmap 276C
Scroll Bar Understanding the Features The GPSMAP 276C unit’ s advanced keypad system is designed to allow fast, convenient selection of navigation options and data entry. As you progress through this Owner’s Manual, you will often be di- rected to press a specifi c interface key or highlight a fi eld on the screen. When you are directed to press a key, you should press and quickly release the key. -
Page 13: Selecting Options And Entering Data
Selecting Options and Entering Data You may select and activate options and enter data to customize your GPSMAP 276C to fi t your personal needs. This requires movement of the cursor, which is identifi ed in this manual as highlighting, selecting, or choosing an item in a list or a fi... -
Page 14: Using Additional Map Data
Optional Garmin Data Cards and MapSource CD-ROMs enhance the versatility of your GPSMAP 276C. With optional MapSource City Select data, you can view listings of nearby restaurants, lodging, shopping centers, attractions and entertainment, and even retrieve addresses and phone numbers for any listed location. -
Page 15: Simulated Basic Navigation
From the GPS Options Menu you can also enter a New Location to simulate from. For example, if you are interested in using the GPSMAP 276C in your boat near San Diego but you live in Los Angeles, you can select the San Diego coast as your New Location. Simply select ‘New Location’ from the GPS Tab Options Menu and press ENTER/MARK . -
Page 16: Simulating Navigation
To simulate navigation to the destination in Marine Mode: 1. Follow the steps above to fi nd a destination tide station. The GPSMAP 276C switches to the Map Page. A magenta line shows the direct route from your current location to your ‘Go To’ destination. If desired, press to adjust the zoom level. - Page 17 To simulate navigation to the destination in Automotive Mode: 1. Follow the steps above to fi nd a destination city. The GPSMAP 276C switches to the Map Page. A magenta line shows the auto route from your current location to your ‘Go To’ destination. If desired, press to adjust the zoom level.
-
Page 18: Main Pages: Marine Mode And Automotive Mode
‘Navigation” section for more information on navigation options. The Marine Mode is the default mode for the GPSMAP 276C. This manual fi rst addresses the page, such as the Map Page, as displayed in the Marine Mode. The manual then describes the page as shown Automotive Mode. -
Page 19: Marine Mode Page Sequence
Marine Mode Page Sequence Map Page Compass Page (Marine Mode) (Marine Mode) Automotive Mode Page Sequence Map Page Optional Compass Page (Automotive Mode) (Automotive Mode) To show the Compass Page or Highway Page: 1. Press MENU twice to display the Main Menu. 2. -
Page 20: Basic Operation
Basic Operation Finding an Item Find Menu without additional BlueChart or MapSource maps installed Naviad search result list Using the Find Menu The Find Menu allows you to easily search the stored waypoints and points of interest. You can access the Find Menu by pressing the FIND key. After you press FIND , the unit searches for items from your current location or from another location on the map. -
Page 21: Viewing The Information Page
To fi nd an item from another location through the Map Page: From the Map Page, use the ARROW KEYPAD 2. Using the ARROW KEYPAD, highlight the desired category from the list and press 3. Using the highlight the desired item from the list and press ARROW KEYPAD, item’s information page automatically opens, allowing you to save the item as a waypoint, show the item on the map, or automatically create a route (Go To) the item. -
Page 22: Recently Found Items
Basic Operation Finding an Item Recently Found Page: Find History Find Menu Options when the unit is navigating Recently Found Items The Recently Found page displays a list of the items you have searched for or gone to recently. Press to display the Options Menu for the ‘Recently Found Items’. -
Page 23: Navigating In Marine Mode
Going to a Destination in Marine Mode Press the NAV/MOB key in on any page to begin navigating to a destination. There are four ways to navigate to a destination: Go To Point, Navigate Route, Navigate Track (TracBack), and MOB (Man OverBoard) navigation. -
Page 24: Navigate Route
Basic Operation Navigating in Marine Mode Waypoint Review Page Activating a Go To using the Find Menu Select Route Select desired route from list To activate a ‘ Go To’ from the Find Menu: 1. Press the key. NAV/MOB 2. Use the ARROW KEYPAD to highlight ‘Go To Point’... -
Page 25: Navigate Track (Tracback Navigation)
Navigate Track ( TracBack Navigation) The TracBack function allows you to retrace your path using the track log automatically stored in the receiver’ s memory, which eliminates the need to store waypoints along the way. TracBack routes are created by reducing your track log into a route of up to 300 turns and activating an inverted route along those points. -
Page 26: Man Overboard (Mob)
Man OverBoard confi rmation screen Once a TracBack has been activated, the GPSMAP 276C divides the track into segments called ‘ legs’. Up to 300 temporary ‘turns’ are created to mark the most signifi cant features of the track in order to duplicate your exact path as closely as possible. -
Page 27: Navigating In Automotive Mode
Going to a Destination in Automotive Mode Press the NAV/MOB key in on any page to begin navigating to a destination. Automotive Mode pro- vides the basic options as offered while navigating in Marine Mode, as well as several other options that are especially helpful while you are navigating in Automotive Mode. -
Page 28: Navigate Route
Basic Operation Navigating in Automotive Mode Add/Edit Vias Page Add/Edit Vias Page showing a via point before the destination Navigate Route The ‘Navigate Route’ option allows you to easily select a route from a list. Refer to the ‘Navigating in Marine Mode”... -
Page 29: Using Routes
Creating a Route The Garmin GPSMAP 276C lets you create and store up to 50 reversible routes, with up to 300 waypoints each. Routes can be created in two ways. The fi rst way is to select waypoints from the Find Menu, allowing you to see a list of the route points as you create the route. -
Page 30: Route Tab Options Menu
Basic Operation Using Routes Route Review Page Options Menu Creating a new route on the map To create a route graphically: 1. Press the key twice to display the Main Menu Page. Use the MENU ‘Route’ from the vertical list of tabs. 2. -
Page 31: Active Route Page
Active Route Page Whenever you have activated a route in the GPSMAP 276C, the Active Route Page shows each point (waypoint or map item) of the active route. The current destination point, the ‘active’ point, is marked with an arrow icon. As you navigate a route, the list automatically updates to indicate the next ‘active’... -
Page 32: Route Review Options Menu
Basic Operation Using Routes Route Review Options Menu Editing the route on the map Route Review Options Menu By pressing MENU on the Route Review Page, the following menu options are available: Activate – begins navigation of the route. Edit on Map – allows you to edit the route on the map. Insert Waypoint –... -
Page 33: Following A Route
To add points to the route using the Route Review Page and the Find Menu: 1. Press twice to open the Main Menu. Use the MENU 2. Use the ARROW KEYPAD to select the desired route and press 3. Use the to highlight the spot in the route that you want to add the new point. -
Page 34: Using Waypoints
New Waypoint Page Creating and Using Waypoints The Garmin GPSMAP 276C stores up to 3000 alphanumeric waypoints with a user-defi ned icon, comment, elevation, depth, and temperature available for each waypoint. Waypoints can be created us- ing three basic methods: •... -
Page 35: Creating Waypoints Graphically
When you move the cursor over a map item, you will see a highlighted description of that item. The GPSMAP 276C uses the map item text shown on the cartography as the default name and symbol for the new waypoint. -
Page 36: Additional Options For Creating Waypoints
Basic Operation Using Waypoints Points Tab Options Menu Creating a waypoint through the Points Tab of the Main Menu To change the location of a waypoint, highlight the character you want to change in the Location fi eld. Press UP or DOWN on the ARROW KEYPAD to change the character. - Page 37 To create a new waypoint by projecting its location: A waypoint may also be created by “ projecting” the distance and bearing from a specifi c location to a new location. 1. Create a waypoint using your favorite method (discussed in previous sections). The new waypoint is created with the next available waypoint number and the receiver’s last know position as the default name and position.
-
Page 38: Waypoint Menu Options
Basic Operation Using Waypoints Average Location Page Select Route Tab After selecting ‘Append to Route’ from the Options Menu, the Select Route Tab opens for you to select the route to add this waypoint to. Waypoint Menu Options As well as ‘ Project Location’, two additional options are available by pressing MENU on the New Waypoint and New Map Waypoint Pages: ‘Average Location’... -
Page 39: Reviewing And Editing Waypoints
Reviewing and Editing Waypoints Once you have created and stored a waypoint, it may be modifi ed, reviewed, renamed, moved, or deleted at any time through the Waypoint Review and Waypoint Edit Pages. To access the Waypoint Review Page: 1. Use the to highlight the desired waypoint on the Map Page. - Page 40 Basic Operation Using Waypoints Waypoint Review Page Waypoint Edit Page To change the other waypoint elements: 1. Highlight the desired fi eld and press ENTER/MARK 2. Use the ARROW KEYPAD to edit/enter the data. Press On the Waypoint Review and Waypoint Edit Pages, you may also delete the selected waypoint, view the waypoint on the map, and move the waypoint on the map.
-
Page 41: Points Tab
Points Tab The Points Tab of the Main Menu features two tabs, ‘User’ and ‘Proximity’, that let you manage a large number of waypoints quickly and effi ciently. The tabs also provide a continuously updated proximity waypoint alarm function that can be used to defi ne an alarm circle around things like submerged hazards or shallow waters. - Page 42 Basic Operation Using Waypoints User Points Options Menu The following options are available by pressing MENU in the ‘User’ tab: Create Waypoint – creates a new waypoint (see the previous pages). Delete Waypoint – deletes selected waypoint from list and any route in which it was used. Delete By Symbol –...
- Page 43 To delete waypoints by distance: 1. From the ‘User’ tab, highlight the waypoint to be deleted and press 2. Highlight ‘Delete By Distance’ and press ENTER/MARK 3. Select ‘Less Than’ or ‘More Than’ and enter the desired distance using the 4.
-
Page 44: Proximity' Tab
Basic Operation Using Waypoints ‘Proximity’ tab ‘Proximity’ tab The ‘Proximity’ tab of the Points Tab lets you defi ne an alarm circle around a stored waypoint position. The alarm circle can be used to help you avoid reefs, rocks, or restricted waters. Up to ten waypoints may be listed with a maximum alarm radius of 99.99 nautical miles, statute miles, or kilome- ters. - Page 45 The following options are available by pressing MENU on the ‘Proximity’ tab of the Points Tab: Remove Point – removes selected waypoint from the proximity list. Remove All – removes all waypoints from the proximity list. To clear one or all proximity waypoint(s) from the list: 1.
-
Page 46: Main Pages
Position mode pans the cartography to keep the present position marker within the display area. The position marker is the black triangle vehicle icon on the Map Page. The GPSMAP 276C always powers up in the position mode, with the last known loca- tion centered on the map display. -
Page 47: Panning The Map With The Cursor
Panning the Map with the Cursor The cursor allows you to pan away from your present position and scroll to other map areas around the world (even outside of your current detail coverage). As you pan past the edge of the current map display, the screen actively scrolls to provide continuous map coverage (keep in mind that the vehicle icon stays in your present location and may not be visible on the display screen when you pan the map). -
Page 48: Main Pages
Main Pages Map Page Panning the Map Map feature highlighted Map Feature Information Page To view additional details about an on-screen waypoint or map item: 1. With the desired waypoint or map item highlighted, press 2. If the item is a waypoint, a Waypoint Review Page appears, showing details such as name, symbol, coordinates, elevation, and depth. -
Page 49: Selecting Map Scales And Additional Maps
The system has a built-in worldwide database to 20 mi, with more detailed coverage available through the use of the optional BlueChart or MapSource data. The GPSMAP 276C displays cartography as long as there is chart information available for the range you have selected. -
Page 50: Map Page Options Menu
Main Pages Map Page Map Page Options Menu ( Marine Mode) Measure Distance Map Page Options Menu The Options Menu on the Map Page provides access to functions and features of the Map Page, as well as layout options for the page. The data window, located at the right side of the display, provides a user-selectable layout of various types of useful data. - Page 51 Change Data Fields – allows you to specify the type of data displayed in each data fi eld on the page. Refer to the Appendix for a complete list of all data fi elds used in the GPSMAP 276C. Data Card Information – shows information about the detailed map data stored on the data card, and allows you to select which maps are displayed or not displayed on the Map Page.
- Page 52 Main Pages Map Page Data Card Information Page Map Family Information Page To review/change data card information: 1. Access the Map Page and press MENU 2. From the Options Menu highlight ‘Data Card Information’ and press 3. The fi rst page shows the Map Families that are stored on the data card and whether they are set to be shown on the Map Page.
-
Page 53: Map Page Setup Menu
Map Page Setup Menu The Map Page Setup Menu uses a “fi le tab” system, making it easier for you to fi nd the various set- tings for confi guring the map display. The following table outlines the fi le tab names and the settings available in each tab: General –... -
Page 54: General' Tab
Main Pages ‘General’ tab Detail – Most, More, Normal, Less, Least: controls how much map detail is displayed. This setting only Map Page applies to any map feature set to ‘Auto’. Those features that have a specifi ed scale or that are turned ‘Off’ are unaffected by this setting. -
Page 55: Line' Tab
‘ Line’ tab Heading Line – Off, Distance, Time: turns the Heading Line off, or confi gures it for distance or time. The Heading Line projects (using time or distance) from the position marker (triangle vehicle icon) show- ing your current heading. Bearing Line –... -
Page 56: Marine' Tab
Auto: BlueChart maps are drawn using symbols similar to the NOAA/NIMA standard. Non- BlueChart maps are drawn using traditional Garmin symbols. • Garmin: All maps are drawn using traditional Garmin symbols. • NOAA: All maps are drawn using a symbol set similar to NOAA/NIMA. -
Page 57: Road' Tab
‘ Road’ tab Freeway, Highway, Local Road, Local Road Name, Railroad – controls the text size and zoom scale for roads. Text – Off, Small, Medium, and Large: controls the screen size of the name. Zoom – Auto, Off, 20 ft. to 800 nm/mi: sets the maximum scale at which the roads appear on the screen. -
Page 58: Compass Page
Main Pages Compass Page Compass Page ( Marine Mode) Compass Page ( Automotive Mode) Using the Compass Page The Compass Page is standard in Marine Mode and optional in Automotive Mode. During active navigation, the Compass Page guides you to your destination with digital data fi eld readouts and a graphic compass display with a bearing pointer. -
Page 59: Compass Page Options Menu
Compass Page Options Menu The Options Menu on the Compass Page allows you to customize the Compass Page to your prefer- ences in both Marine and Automotive modes. Like the Map Page, the Compass Page features user- selectable data fi elds on the right side of the display. Each data fi eld may be confi gured to display any one of several data options, and the data window layout may be customized to change the actual size of the data displayed. -
Page 60: Highway Page
Main Pages Highway Page Highway Page ( Marine Mode) Highway Page ( Automotive Mode) Highway Page Overview Whenever a ‘Go To’, ‘TracBack’ or ‘Route’ has been activated, the Highway Page provides digital and graphic steering guidance to the destination. The right side of the Highway Page features user-selectable data fi... -
Page 61: Highway Page Options Menu
To change the highway perspective scale: • Press to zoom in. • Press to zoom out. Highway Page Options Menu The Highway Page Options Menu allows you to defi ne the data fi elds and select which waypoints and track are displayed on screen. The data window, located at the top of the page, provides Highway Page options allows you to defi... -
Page 62: Active Route Page: Marine Mode
Options Menu Active Route Page Whenever you have activated a route in the GPSMAP 276C, the Active Route Page shows each point (waypoint or map item) of the active route, with the point name, Course, Distance, and several other fi elds of information. The current destination point, the ‘active’ point, is marked with an arrow icon. As you navigate a route, the list automatically updates to indicate the next ‘active’... -
Page 63: Current Route Page: Automotive Mode
Current Route Page Whenever you have activated a route in the GPSMAP 276C set in Automotive Mode, the Active Route Page shows each turn of the active route, with the distance to the turn, the street name, and estimated time to arrival and time of arrival. As you navigate a route, the turn list automatically updates to indicate the next turn at the top of the list. -
Page 64: Position Data Page: Marine Mode
Main Pages Position Data Page: Marine Mode Position Data Page ( Marine Mode) ‘Waypoint’ is selected as the ‘Nearest Type’. The Coronado, CA waypoint is the nearest waypoint. Position Data Page ( Marine Mode) Options Menu Understanding the Position Data Page The Position Data Page provides a quick reference for the important data you want to display while navigating a route in Marine Mode. -
Page 65: Trip Computer Page: Automotive Mode
Reset the Trip Computer before beginning a trip. If you make frequent stops, leave the GPSMAP 276C powered on in order to receive satellites. This allows the unit to accurately measure elapsed time during the trip. -
Page 66: Main Menu
Display – adjusts various aspects of the display, such as backlight timeout and intensity. Sound – sets the volume level, voice language, attention tone, and beeper action. Setup – provides several tabs to setup the GPSMAP 276C to suit your needs. , then move... -
Page 67: Gps Tab
As soon as the GPSMAP 276C has collected the necessary data from the best satellites in view to calculate a fi x, the status fi eld indicates the status. The unit then updates the position, date and time. -
Page 68: Receiver Status
Receiver Not Usable: The receiver is unusable, possibly due to interference or abnormal satellite conditions. Turn the unit off and back on to reset. • Simulating GPS: The receiver is in simulator mode. • GPS Off: The GPS receiver is turned off. -
Page 69: Differential Field
Differential Field Differential receiver status is indicated in the bottom left fi eld of the page and will show one of the following conditions: • None: No optional beacon receiver is attached or enabled in the Comm tab (Main Menu) or WAAS is turned Off. -
Page 70: Route Tab
As discussed in the “Using Routes” section of this manual, the Route Tab displays the routes you have created in your GPSMAP 276C unit. For complete information on routes, refer to the “Using Routes” topic that appears in the “Basic Operation” section in this manual. -
Page 71: Points Tab
Points Tab Overview The Points Tab of the Main Menu features two tabs, ‘User’ and ‘Proximity’, that let you manage a large number of waypoints quickly and effi ciently. For complete information about creating, editing, and deleting waypoints, refer to the “Using Waypoints” topic that appears in the “Basic Operation” section in this manual. -
Page 72: Track Tab
GPSMAP 276C uses this information to allow you to navigate using the saved track. The track log starts recording as soon as the GPSMAP 276C gets a location fi x. For the best results, clear the track log before you start traveling because when the track log is full, the new track points overwrite the oldest track points. -
Page 73: Active' Tab
‘ Active’ tab The ‘Active’ tab allows you to save and clear the track log as well as set up how the unit records tracks. Record Mode – ‘Wrap’ records over the oldest tracks when the track log reaches 100%. ‘Fill’ records a track log until the track log is full (100%). - Page 74 Main Menu Track Tab Saving a portion of the track log Track Review Page To save a portion of the track log: 1. Press the key twice to open the Main Menu. MENU 2. Use the ARROW KEYPAD to highlight the Track Tab, then highlight the ‘Active’ tab to the right. 3.
-
Page 75: Saved' Tab
To restore the ‘Active’ tab defaults: 1. Press the key twice to open the Main Menu. MENU 2. Use the ARROW KEYPAD to highlight the Track Tab, then highlight the ‘Active’ tab to the right. 3. Press MENU 4. Press ENTER/MARK to restore the ‘Active’... -
Page 76: Alarms Tab
Main Menu Alarms Tab Alarms Tab: ‘Nav’ tab Using the Alarms Tab The Alarms Tab of the Main Menu allows you to defi ne alarm settings. To access the Alarms Tab of the Main Menu: 1. Press MENU twice to open the Main Menu. 2. -
Page 77: Nav' (Navigation) Alarms
To restore alarm defaults: 1. Press twice to open the Main Menu. MENU 2. Use the ARROW KEYPAD to open the Alarms Tab. 3. Press MENU 4. Select ‘Restore Default’ to restore the defaults of the current tab. Select ‘All Alarm Defaults’ to restore all tabs in the Alarms Tab to the factory defaults. -
Page 78: System' Alarms
Main Menu ‘ System’ Alarms Clock – sets an alarm based on the unit’ s clock. Select ‘On’ and then enter a specifi c time that you want Alarms Tab the alarm to sound. The unit must be on for the clock alarm to work. Ext. -
Page 79: Celestial Tab
Using the Celestial Tab The Celestial Tab of the Main Menu displays data for the tide, Sun & Moon information, and hunting and fi shing information. You may display this data for your current position, a position from the map, or a waypoint location. - Page 80 Main Menu Celestial Tab Celestial Tab: ‘Tide’ tab ‘Tide’ tab Options Menu To view a tide chart for a different tide station: 1. From the ‘Tide’ tab, highlight the ‘At’ fi eld and press opens showing the Tide Stations. 2. Press and select ‘Near Current Location’, ‘Near Current Route’, Near Other’...
-
Page 81: Sun & Moon' Tab
‘Sun & Moon’ tab The ‘Sun & Moon’ tab provides you with sun rise/set and moon rise/set times. A graphic display of the moon phase is also displayed. You may view sun and moon information for any date or location. You can also use the play, fast forward, and stop buttons to view an animation of the ‘Sun &... -
Page 82: Hunt & Fish' Tab
Main Menu Celestial Tab Celestial Tab: Hunt & Fish Tab New Location Options ‘ Hunt & Fish’ tab The ‘Hunt & Fish’ tab provides you with predictions of the good and best times to hunt and fi sh in a selected location on a specifi... -
Page 83: Message Tab
Viewing the Message Tab The Message Tab of the Main Menu displays a list of messages generated by your GPSMAP 276C. Use the ARROW KEYPAD to scroll the entire list of messages on the ‘Log’ tab. You can also use the ‘Log Filter’... -
Page 84: Display Tab
Main Menu Display Tab Main Menu: Display Tab Main Menu displayed as Text Only Adjusting the Display using the Display Tab The Display Tab of the Main Menu allows you to set several features of the display, such as what pages to display in the Main Page Sequence and how long the backlight stays on. -
Page 85: Sound Tab
Adjusting the Unit’s Sound The Sound Tab of the Main Menu allows you to customize the sounds your GPSMAP 276C makes to suit your needs. Beeper – sets the beeper to chime during keypresses and alarms (‘Key and Alarm’) or on ‘Alarms Only’. -
Page 86: Setup Tab
The Setup Tab has several tabs containing different types of information for you to customize your GPSMAP 276C. Use the ARROW KEYPAD to scroll to the RIGHT and LEFT to view all of the tabs. To view the Setup Tab: 1. -
Page 87: Road Routing' Tab
‘Road Routing’ tab To open the ‘Road Routing’ tab, press the MENU key twice to open the Main Menu. Select ‘Setup’ from the vertical tab list. Then select ‘Road Routing’ from the row of tabs along the top of the page. Route Preference –... -
Page 88: Guidance' Tab
Main Menu Setup Tab ‘Guidance’ tab of the Setup Tab ‘Timers’ tab of the Setup Tab ‘Guidance’ tab To open the ‘Guidance’ tab, press the MENU key twice to open the Main Menu. Select ‘Setup’ from the vertical tab list. Then select ‘Guidance’ from the row of tabs along the top of the page. Off-Route Recalculation –... -
Page 89: Time' Tab
‘Time’ tab The ‘Time’ tab allows you to set the time format and zone. You can also set the unit to conform to Daylight Savings. The current time and date is displayed at the bottom of the page. To open the ‘Time’ tab, press the MENU key twice to open the Main Menu. Select ‘Setup’ from the vertical tab list. -
Page 90: Location' Tab
For more information about using paper maps with your Garmin unit, refer to “Using a Garmin GPS with Paper Land Maps”, available for download at http: //www.garmin.com/manuals/UsingaGarminGPSwithPaperLandMaps_Manual.pdf. -
Page 91: Owner' Tab
This can be very helpful if your GPSMAP 276C is ever misplaced. To open the ‘Owner’ tab, press the MENU key twice to open the Main Menu. Select ‘Setup’ from the vertical tab list. -
Page 92: Com 1' And 'Com 2' Tabs
NMEA device, a DGPS beacon receiver, a personal computer, or another Garmin GPSMAP 276C. If a DGPS receiver is used, WAAS capability is automatically turned off. To open the Com 1 or ‘COM 2’ tab, press the MENU key twice to open the Main Menu. Select ‘Setup’... - Page 93 If ‘ GARMIN DGPS’ or ‘ RTCM In/NMEA Out’ format is selected, additional fi elds are provided to control a Garmin differential beacon receiver directly from your GPSMAP 276C. You may have the unit automatically scan for the DGPS beacon signal or you can enter the beacon frequency and bit rate on the unit and the information will be used to tune the beacon receiver.
- Page 94 Main Menu Setup Tab ‘COM 2’ tab of the Setup Tab with GARMIN DGPS selected The ‘Status’ fi eld displays one of the following: • Tuning: Unit is attempting to tune to the specifi ed frequency and bit rate. •...
- Page 95 Advanced NMEA Output Setup If you are going to interface the GPSMAP 276C with another piece of equipment (such as a radar or autopilot), the unit needs to be set to output NMEA data. The NMEA data can be customized to shorten the update time from the unit.
-
Page 96: Appendix
Appendix Specifi cations Physical Specifi cations Size: 5.7” W x 3.2” H x 1.9” D (14.5 x 8.1 x 4.8 cm) Weight: 13.6 ozs (.39 kg) Display: 3.75” diagonal (9.5 cm) Transfl ective, 256-color display with backlighting (480 x 320 pixels) Case: Fully-gasketed, high-impact plastic alloy, waterproof to IEC... -
Page 97: Care Information
MapSource). Immersing the Unit in Water The GPSMAP 276C is waterproof to IEC Standard 60529 IPX7. It can withstand immersion in 1 meter of water for 30 minutes. Prolonged submersion can cause damage to the unit. After submersion, be certain to wipe and air dry the unit before reuse or charging. -
Page 98: Accessories
In addition to the standard accessories included with your GPSMAP 276C, the optional accessories listed on the next page are designed to enhance the operation of the GPSMAP 276C. To obtain replacement parts and optional accessories, contact your Garmin Dealer, Garmin Customer Support in the U.S.A. - Page 99 PC Interface Cable – Connects your GPSMAP 276C to a serial port on your computer. Cigarette Lighter Adapter – Allows you to connect the GPSMAP 276C to a vehicle’ s electrical system. Programmable Data Cards – Blank data cards available in 8 MB, 16 MB, 32 MB, 64 MB, and 128 MB sizes.
-
Page 100: Wiring And Interfacing
GPGSA, GPGSV, GPGLL, GPBOD, GPRTE, and GPWPL. The following are the Proprietary Sentences for NMEA 0183, version 3.01 output: PGRME, PGRMZ, and PSLIB. The GPSMAP 276C also includes NMEA input with support for the BWC, DBT, DPT, MTW, VHW, and XTE sentences. -
Page 101: Map Datums And Location Formats
The most common format is latitude and longitude, which is utilized by all Garmin units. You may choose to change the location format to use with other coordinate systems in Location Preferences. UTM/UPS (Universal Transverse Mercator/Universal Polar Stereographic) are easy-to-use metric grids that are found on most USGS topographic quadrangle maps. -
Page 102: Map Datum List
Appendix Map Datum List Adindan Adindan- Ethiopia, Mali, Senegal, Sudan Afgooye Afgooye- Somalia AIN EL ABD ‘70 AIN EL ANBD 1970- Bahrain Island, Saudi Arabia Anna 1 Ast ‘65 Anna 1 Astro ‘65- Cocos I. ARC 1950 ARC 1950- Botswana, Lesotho, Malawi, Swaziland, Zaire, Zambia ARC 1960 Kenya, Tanzania... - Page 103 Obsrvtorio ‘66 Observatorio 1966- Corvo and Flores Islands (Azores) Old Egyptian Old Egyptian- Egypt Old Hawaiian Old Hawaiian- Mean Value Oman Oman- Oman Ord Srvy GB Old Survey Great Britain- England, Isle of Man, Scotland, Shetland Isl., Wales Pico De Las Nv Canary Islands Potsdam Potsdam-Germany...
-
Page 104: Time Offsets
Appendix Time Offsets The chart below gives an approximate UTC (Universal Time Coordinate) time offset for the various longitudinal zones. Check with local charts for more detailed information. If you are in daylight savings time, add one hour to the offset. Longitudinal Zone Offset W180.0º... -
Page 105: Messages
Cant Unlock Maps: No applicable unlock code for one or more maps was found. All MapSource map are not accessible. Database Error: Internal problem with the unit. Contact your dealer or Garmin Customer Service to have the unit repaired. Deep Water: The water is deeper than the amount set in the Deep Water Alarm. - Page 106 Appendix Route Truncated: Uploaded route from another device has more than 50 waypoints. Route Waypoint Memory Full: No additional route waypoints can be saved. Messages Shallow Water: The water is shallower than the amount set in the Shallow Water Alarm. Track Already Exists: A saved track with the same name already exists.
-
Page 107: Loran Td Setup
Setup TD fi eld, the active waypoint information will refl ect those changes. Since the GPSMAP 276C does not rely on the LORAN signal for navigation, it can reference a different GRI chain and/or secondary stations and still navigate to the location stored in memory. - Page 108 Because of this, the unit can navigate to a TD coordinate anywhere in the world. You must know your GRI chain number, secondary stations to create a LORAN TD position. For more information please read our LORAN TD Position Format Handbook, available at the Garmin Web site, at www.garmin.com/support/userManual.html. ENTER/MARK...
-
Page 109: Garmin Data Cards
Installing and Removing Data Cards The GPSMAP 276C uses an optional Garmin data cards to display digital charts and maps on-screen or save user data. Install the data card in the card slots located on the bottom of the unit. Install or remove the data card at any time, whether the unit is on or off. -
Page 110: Waas And Dgps
2–3 meters. For more information, go to http://gps.faa.gov/Programs/WAAS/ waas.htm. NOTE: If you are using the GPSMAP 276C outside of the U.S.A., it is recommended that you turn off WAAS for the most accurate location fi x. -
Page 111: Data Field Options
Appendix Data Field Options Accuracy— Estimated position accuracy in feet or meters. Battery Timer— The estimated time left on the battery (before it will need to be recharged. Bearing—The direction from your current location to a destination. Course—The direction from your starting location to a destination. Course to Steer—... - Page 112 Appendix Data Field Options Power—(Marine and Automotive Only) Display the power indicator icon: Battery, External Power, or Charging. Speed—Display rate of travel in miles/kilometers/nautical miles per hour. Sunrise—The time at which the sun rises on this day. Sunset—The time at which the sun sets on this day. Time—The time for the selected time zone.
-
Page 113: Compliance, License, And Warranty Information107
FCC Compliance The GPSMAP 276C complies with Part 15 of the FCC interference limits for Class B digital devices FOR HOME OR OFFICE USE. These limits are designed to provide more reasonable protection against harmful interference in a residential installation, and are more stringent than “outdoor” requirements. -
Page 114: Software License Agreement
FOLLOWING SOFTWARE LICENSE AGREEMENT. PLEASE READ THIS AGREEMENT CAREFULLY. Garmin grants you a limited license to use the software embedded in this device (the “Software”) in binary ex- ecutable form in the normal operation of the product. Title, ownership rights, and intellectual property rights in and to the Software remain in Garmin. -
Page 115: Limited Warranty
Garmin retains the exclusive right to repair or replace the unit or software or offer a full refund of the purchase price at its sole discretion. SUCH REMEDY SHALL BE YOUR SOLE AND EXCLUSIVE REMEDY FOR ANY BREACH OF WARRANTY. -
Page 116: Safety Information
fi re or explosion. CAUTION: Use the GPSMAP 276C at your own risk. To reduce the risk of unsafe operation, care- fully review and understand all aspects of this Owner’ s Manual – and thoroughly practice operation using Simulator Mode prior to actual use. - Page 117 WARNING: For use in vehicles, it is the sole responsibility of the owner/operator of a vehicle with the GPSMAP 276C installed to place and secure the device so it will not interfere with the vehicle operat- ing controls and safety devices, obstruct the driver’ s view of driving conditions, or cause or personal injury in the event of an accident.
-
Page 118: Index
Index Symbols Antenna 1 Append Route 32 24-hour format 83 Arrival 2D 61, 62 Alarm 71 3D 61, 62 ARROW KEYPAD 2 Ask Me My Preference 81 Attention Tone 79 Accessories 92, 93 AutoLocate 62 Accuracy Alarm 72 Automotive Mode 2, 10, 11, 12, 13, 21, Circle 48 22, 40, 44, 52, 54, 57, 59, 80 Acquiring Satellites 62... - Page 119 Fishing 76 Hunt & Fish Tab 76 Following a Route 27 Fuel fl ow rates 27 Icons 78 Information Page 15, 42 Garmin Data Cards 103 Initialize 4 Garmin Data Transfer 86 Insert Waypoint 26 GARMIN DGPS 86, 87 Interfacing 94...
- Page 120 Index Language 79, 80 Message Tab 77 Lat/Lon 105 Points Tab 65 Latitude 105 Route Tab 64 LCL 73 Setup Tab 80, 81, 82, 83, 84, 85, Legs Track 20 Sound Tab 79 Light Sectors 50 Track Tab 66, 67, 68, 69 Limited Warranty 109 Main Pages 12–13 Lithium-ion 1, 3...
- Page 121 Off Road 81 Connector 1, 61 On-Screen Button 6 Key 2 Options 7 Preferences Orientation 48 Location 95 OUT Key 2 Product Support 108 Overview 1 Project Location 31, 32 Overzoom 43 Proximity 38, 39 Owner Information 85 Alarms 38 Points Tab 38, 65 Waypoint 38 PAGE Key 2...
- Page 122 Index Shorter Distance 81 Show Map 34 Temperature 83 Signal Strength 61 Text Language 80 Bars 4 Text Out 86 Simulate 9, 10, 11, 63, 80 Tide Chart 74 GPS 62 Tide Station 14, 74 Navigation 10, 11 Information 73 Software Version 80 Tide Tab 73 Sonar Alarms 72...
- Page 124 For the latest free software updates (excluding map data) throughout the life of your Garmin products, visit the Garmin Web site at www.garmin.com. © Copyright 2004 Garmin Ltd. or its subsidiaries Garmin International, Inc. 1200 East 151 Street, Olathe, Kansas 66062, U.S.A.