Table of Contents
Advertisement
Quick Links
Download this manual
See also:
Service Notes
REFERENCE MANUAL
Before using this unit, carefully read the sections entitled: "USING THE UNIT SAFELY" and "IM-
PORTANT NOTES" (REFERRENCE MANUAL p. 2; p. 8). These sections provide important infor-
mation concerning the proper operation of the unit. Additionally, in order to feel assured that
you have gained a good grasp of every feature provided by your new unit, REFERRENCE MAN-
UAL should be read in its entirety. The manual should be saved and kept on hand as a conve-
nient reference.
Copyright © 1999 ROLAND CORPORATION
All rights reserved. No part of this publication may be reproduced in any form without the
written permission of ROLAND CORPORATION.
Advertisement
Chapters
Table of Contents

Related Manuals for Roland Groovebox MC-307


Summary of Contents for Roland Groovebox MC-307
- Page 1 UAL should be read in its entirety. The manual should be saved and kept on hand as a conve- nient reference. Copyright © 1999 ROLAND CORPORATION All rights reserved. No part of this publication may be reproduced in any form without the...
- Page 2 Refer a long period of time at a high volume level, or at all servicing to your retailer, the nearest Roland a level that is uncomfortable. If you experience Service Center, or an authorized Roland any hearing loss or ringing in the ears, you should distributor, as listed on the "Information"...
- Page 3 ......................the unit. • Before using the unit in a foreign country, consult ......................with your retailer, the nearest Roland Service 107c Center, or an authorized Roland distributor, as • Never handle the AC adaptor or its plugs with listed on the "Information" page.
-
Page 4: Table Of Contents
What is the Turntable Emulation? ....................25 Synchronizing the Turntable and the BPM ................25 Use the slider control to synchronize the MC-307’s BPM setting with the turntable..25 Changing the Tone with the Knobs during Playback (REALTIME MODIFY) ....... 26 Selecting a Part Subject to Modification .................. - Page 5 Contents Calling up Patterns from the Keyboard Pads (Pattern Call).............. 37 Using the Pattern Call function....................37 Registering a Pattern Set ......................37 Saving a Pattern Set ........................38 Playing Back Phrases from the Keyboard Pads (RPS) ................ 38 What is RPS (Real-time Phrase Sequencing)? ................38 Using the Keyboard Pads to Play Back Patterns ..............
- Page 6 Saving Data on an External Sequencer (BULK DUMP) ............129 Recording the data of all MC-307 data on an external sequencer........130 Restoring data for all MC-307 data from a MIDI sequencer back to the MC-307....130 Checking the amount of unused internal memory(MEMORY INFORMATION) .... 130 Restoring the Factory Settings (FACTORY RESET)...............
- Page 7 Contents Synchronization with an External MIDI Device..............136 Appendices..................139 Troubleshooting..................140 Error Message List................142 Parameter List ..................143 Preset Patch List.................155 STYLE/MOTIF/BEAT PATTERN Correspondence Chart ....158 Preset Rhythm Set List...............159 Waveform List ..................167 Preset Pattern List ................170 RPS Pattern List..................176 RPS Set List..................186 Transmit/Receive Setting List............192 Main Specifications ................193 MIDI Implementation................194...
-
Page 8: Important Notes
In addition to the items listed under “USING THE UNIT of data that was stored in another MIDI device (e.g., a SAFELY” on page 2, please read and observe the sequencer) once it has been lost. Roland Corporation following: assumes no liability concerning such loss of data. -
Page 9: Features Of The Mc-307
Leading-edge Patch Sets The MC-307’s carefully selected 800 sounds and 40 rhythm sets are just what you need for today’s dance scene, and include great sounds from vintage instruments such as the TB-303, JUNO, JUPITER and TR-808/909. From the day you purchase the MC-307, you will be enjoying cutting-edge sounds that cannot be obtained on any other synthesizer. -
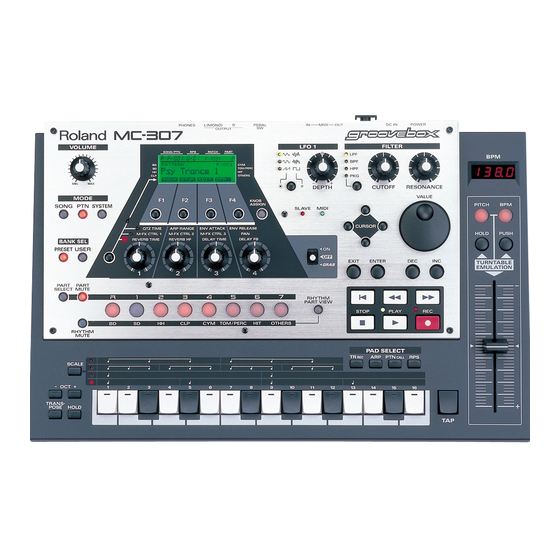
Page 10: Front And Rear Panels
Switch the operating mode of the MC-307. received from the MIDI IN connector. The Slave 3. BANK SEL Buttons (PRESET and indicator will light when the MC-307 is set to the Slave USER) setting (P. 119 ). Select patterns and tones. - Page 11 Front and Rear Panels 12. EXIT Button 24. HOLD Button Mainly used to return to the previous screen. Pressing this button is equivalent to pressing and holding down a keyboard pad, except you can release 13. ENTER Button the pad. Use this to execute an operation.
-
Page 12: Rear Panel
3. MIDI OUT Connector This transmits MIDI messages from the MC-307 to external MIDI devices. In addition, if still at the factory settings, data arriving at MIDI IN is also transmitted. -
Page 13: Chapter 1 Introducing The Mc-307
MC-307’s controllers and sequencer. Performance data from an external MIDI device can also play the sound generator. The sound generator of the MC-307 is able to produce up to 64 SOUND MODULE SEQUENCER notes simultaneously, more than enough for playing... -
Page 14: The Controller Section
(separately sold) that can be connected to the rear panel. You can efficiently operate the MC-307 by using the controls By operating these, you can perform or apply effects. appropriate for the goal you have in mind. Refer to the... -
Page 15: Canceling The Previous Operation (Undo/Redo)
Chapter 1 Introducing the MC-307 Canceling the Previous Operation Confirming Performance of (Undo/Redo) Rhythm Part (Rhythm Part View) For songs and patterns, editing (track and microscopic For the rhythm part (PART R), a graphical display is editing) and recording operations can be canceled. -
Page 16: Metronome Settings
2. Press [F4 (BPM)] button. When Factory Reset is executed, the data in the MC-307’s memory is lost. If there is any data in the MC-307 that you 3. Press [CURSOR (up/down)] buttons to move the cursor do not want to delete, use the Bulk Dump operation (P. 129) over to “METRO NOME.”... -
Page 17: Chapter 2 Basic Of Pattern Playback
Pattern that is played back. Playing Back Patterns Procedure The MC-307 is a sequencer that plays back patterns and adds 1. Press [PTN] button. changes to the playback method. This type of sequencer is The pattern playback screen appears. -
Page 18: Changing Bpm (Tempo)
Chapter 2 Basic of Pattern Playback Playing Back at the Tempo Set for the Viewing the number of measures in a Pattern pattern In order to play back patterns at the BPM (tempo) set up for The measure number and the rhythm can be indicated on the the respective patterns, select a pattern while no pattern is display. -
Page 19: Muting Parts And Rhythm Tones
Chapter 2 Basic of Pattern Playback Muting rhythm tones individually your own sense of rhythm, even if you don’t know the settings value. Musical instruments used in Part R can be muted individually. These instruments are muted by instrument Procedure type such as bass drum (BD) and snare drum (SD). -
Page 20: Transposing During Playback
Chapter 2 Basic of Pattern Playback Muting all parts in a single step "MR" is displayed in the center of the screen. The following operation mutes all parts associated with [R], [1] to [7] buttons. Procedure 1. While holding down [PART MUTE] button, press 4. -
Page 21: Selecting Sounds
Selecting Patch/Rhythm Set sets are available? - “Preset Patch List” (P. 155) The MC-307’s Patterns are composed of up to eight Parts, - “Preset Rhythm Set List” (P. 159) and different Patches (Part1 - 7: Patches, Part R = Rhythm set)can be selected for each Part. -
Page 22: Changing The Settings Of Each Part
Chapter 2 Basic of Pattern Playback Changing the settings of 5. Press [ENTER] button. The screen contains patches in the selected category. each part 6. Select a patch using [VALUE] dial or [INC/DEC] buttons. You can modify the settings of each part to change how the pattern will sound. -
Page 23: Saving A Pattern
The screen for specifying the pattern to be saved and the destination pattern appears. On the MC-307, the following parameters are saved for each pattern. These parameters are collectively referred to as the The pattern is saved under the pattern number selected “Setup parameters.”... -
Page 24: Chapter 3 Giving Variation To Pattern Playback
Chapter 3 Giving Variation to Pattern Playback Playing Back with Keyboard Shifting the Keyboard Range in One-Octave Steps (Octave Shift) Pads Octave Shift is a function that shifts the pitch of the keyboard Using the Keyboard Pads to Play Sounds pads in one-octave units. -
Page 25: Using With Turntable(Turntable Emulation)
If not lit, press one or both buttons to turn the function, lighting the button or buttons. Decreases Increases 4. If the MC-307’s playback is running slower than the the BPM the BPM turntable’s, press the [PUSH] button to speed up the performance. -
Page 26: Changing The Tone With The Knobs During Playback (Realtime Modify)
The tone can be modified during playback using the knobs 2. Press the [FILTER] button. on the MC-307 panel. In addition, the items subject to The filter type can be selected each time this button is modification can be changed using the four assignable knobs pressed. -
Page 27: Adding Character To The Sound (Resonance)
An LFO waveform can be selected each time this button is pressed. For details, see Range of settings described later. Using the MC-307 with the Resonance Limiter settings (P. 115) value too high may cause output at excessively high 4. Turn the [DEPTH] knob under the [LFO1] button. -
Page 28: Changing Other Parameters (Assignable Knobs)
Chapter 3 Giving Variation to Pattern - FILTER: Changes the cutoff frequency of the filter. Procedure - AMP: Changes the amplifier volume level. 1. Press the button to the left of the assignable knobs. Each time you press it, “>” in the figure comes on in LFO Waveform sequence. - Page 29 Chapter 3 Giving Variation to Pattern 8. Select a parameter using the [VALUE] dial or the [INC/ * In TR-REC (P. 68) and “Changing the Settings for Each Part” (P. 22), the above assignments cannot be used (the DEC] buttons, then press [ENTER] button. assignable knobs have other special functions when used for The function of the selected parameter is assigned to the TR-REC and Part settings).
- Page 30 Chapter 3 Giving Variation to Pattern • VELO (VELOCITY) PTCH (PITCH) Group: • CRSE (COARSE TUNE) * *Before operating "QTZ Group" parameters or "ARP Group" parameters,turn on the Quantize or Arpeggiator functions • FINE (FINE TUNE) respectively. AMP (AMP) Group: ENV (ENVELOPE) Group: •...
-
Page 31: Playing Back In Arpeggio (Arpeggiator)
Chapter 3 Giving Variation to Pattern Playing Back in Arpeggio Available Settings (Arpeggio style list): (Arpeggiator) What is an Arpeggiator? This is a function that lets you play arpeggios merely STYLE Description by continuing to press a keyboard pad. The rhythm will be divided in quarter You can play phrases that use the component notes of a notes. -
Page 32: Making More Detailed Settings
Chapter 3 Giving Variation to Pattern Making More Detailed Settings STYLE Description Set up more refined settings items for the selected style. First, BOUND BALL A style suggestive of a bouncing ball. select a style as instructed in the previous section, “Selecting Arpeggiator style,”... - Page 33 Chapter 3 Giving Variation to Pattern Sequence of the notes in the chord MOTIF Description (MOTIF) BASS+CHORD The lowest of the notes you play will Specifies the order in which the notes of the chord will be 1–5 sound, and the remaining notes will sound sounded.
-
Page 34: Saving Arpeggio Settings (Arpeggio Write)
0–100. keyboard, as well as from the keyboard pads. Range: 0–100 - refer to "Playing back arpeggio on the MC-307 using an Higher settings will strengthen the sense of groove. Lower external MIDI keyboard "(p. 134). -
Page 35: Adding Swing To The Rhythm (Shuffle Quantize)
Adding Swing to the Rhythm different-feeling grooves to a pattern. (Shuffle Quantize) The MC-307 contains 71 different types of quantization templates, each of which contains a different set of playback By applying Shuffle Quantize, you can adjust the timing of timing and velocity (dynamics) data. - Page 36 Chapter 3 Giving Variation to Pattern 1. Referring to Steps 1-5 in the Grid Quantize operation, Settings Range: open the settings window, and select the part to be quantized. (P. 34) 16 Beat Dance type 01: DANCE-NM-L.AC exact/low dynamics 02: DANCE-NM-H.AC exact/high dynamics 03: DANCE-NM-L.SW exact/light swing...
-
Page 37: Calling Up Patterns From The Keyboard Pads (Pattern Call)
Chapter 3 Giving Variation to Pattern Calling up Patterns from the Keyboard Pads (Pattern Call) 8 Beat Pops type 37: POPS-NM-L.AC exact/low dynamics The keyboard pads can be used as buttons for selecting 38: POPS-NM-H.AC exact/high dynamics patterns rather than keys. This function is referred to as 39: POPS-NM-L.SW exact/light swing Pattern Call. -
Page 38: Saving A Pattern Set
Back Patterns 6. Specify characters using the [VALUE] dial or the [INC/ On the MC-307, phrases assigned to each of the 16 keyboard DEC] buttons. pads are handled as one “RPS Set.” You are free to re-assign The following characters can be selected: the contents of an RPS set, and 60 sets can be stored. -
Page 39: Registering Phrases In Keyboard Pads
[VALUE] dial or the [INC/DEC] buttons. Maximum simultaneous RPS playback Assign patterns to keyboard pads. Even while a pattern is playing back, the MC-307 can play back up to 8 phrases simultaneously. However, if 4. Hold down[RPS] button, and press Keyboard pad you phrases with large amounts of data are played back want to assign a pattern. -
Page 40: Setting Up A Part For Rps
Chapter 3 Giving Variation to Pattern PATCH (RPS Part Patch) playback will use the M-FX settings of the pattern that is selected at that time. This means that what you hear when the Select the Patch of the part. RPS plays back may be somewhat different from the original Range: phrase. -
Page 41: Saving The Settings Of An Rps Set
Chapter 3 Giving Variation to Pattern Saving the Settings of an RPS Set Once an RPS set is created and saved, you can readily use it next time on by simply invoking it. First, refer to the previous section, “Registering a pattern set,”... -
Page 42: Chapter 4 Setting Effects
- The effect is not applied when the GRAB switch is The Setup Menu screen appears. positioned at OFF if the MC-307 has been set to use the GRAB switch. To always make the effect take 3. Press the [F2 (REV] button. -
Page 43: M-Fx To Rev Level
Chapter 4 Setting Effects 4. Use the [F3 (Down)] or [F4 (Up)] button to select the Adjusting the overall reverb volume (REVERB OUTPUT LEVEL) screen containing the following parameters you want to set. You can adjust the overall volume of reverb for the eight parts (rhythm part and parts 1–7). -
Page 44: Delay (Add Echoes To The Sound)
4. Use the [F3 ( )] and [F4 ( )] button to select the screen positioned at OFF if the MC-307 has been set to use containing the following parameters you want to set. the GRAB switch. To always make the effect take effect, put the GRAB switch at ON. -
Page 45: Delay Output Level
200–1000, effects switch (refer to "Applying Multi-Effects for Each Part * On the MC-307, it is not possible to set a delay time longer (Part M-FX Switch)" (p. 46)) turned off. than 1000 ms (1 second). When the delay time is synchronized... -
Page 46: Multi-Effects (M-Fx)
M-FX is applied will not be heard. - The effect is not applied when the GRAB switch is positioned at OFF if the MC-307 has been set to use the GRAB switch (P. 34). To always make the effect take effect, put the GRAB switch at ON. -
Page 47: Selecting The Multi-Effects Type
Chapter 4 Setting Effects Selecting the Multi-Effects Type Available Settings: Procedure M-FX TYPE Description 1. Press the [PTN] button. 4BAND EQ modify the tone The screen for playing patterns appears. SPECTRUM add character to the sound 2. Press the [F2 (STUP] button. ENHANCER add sparkle to the sound 3. -
Page 48: Defining Parameters In Detail
Chapter 4 Setting Effects Defining Parameters in Detail 1. 4 Band EQ (Modify the tone) This is a 4 band (high, midrange x 2, low) stereo equalizer. Defines the Multi-effects settings and their parameters in detail. Procedure The following procedure is common to all types of Multi- effects. - Page 49 Chapter 4 Setting Effects 2. Spectrum 3. Enhancer (Add Character to the Sound) (Add Sparkle to the Sound) This is a type of filter, which modifies the tonal character by By controlling the overtones of the high frequency range, this boosting or cutting specific frequencies.
- Page 50 Chapter 4 Setting Effects 4. Overdrive (Distort the Sound Mildly) 5. Distortion (Distort the Sound Severely) This simulates the soft distortion that occurs when you raise the gain of a vacuum tube amp. The effect also contains an This effect produces a more severe distortion than the amp simulator, and produces the natural distortion that is Overdrive effect.
-
Page 51: Noise Generator
Chapter 4 Setting Effects 6. Lo-Fi 7. Noise Generator (Simulate a “Lo-Fidelity” Sound) (Add Various Types of Noise) This effect intentionally degrades the audio quality to In addition to a Lo-Fi effect, this effect also generates various simulate a Lo-Fi sound. It is particularly effective on drums. types of noise such as hum, pink noise, and disk noise. - Page 52 Chapter 4 Setting Effects 8. Radio Tuning Noise Type Table (Simulate a Radio Being Tuned) Disc Disc This effect simulates the sound of a radio being tuned. Pink (50Hz) (60Hz) Disc Available Settings: - RADIO DETUNE [CTRL 1] Specifies the frequency being tuned. Range: 0–127 - NOISE LEVEL [CTRL 2] Specifies the volume of the tuning noise.
- Page 53 Chapter 4 Setting Effects 9. Phonograph 10. Compressor (Simulates an Old Record) (Make the Volume Level More Consistent) This effect mutes the tone and adds disc noise to simulate the sound of music played on an old record player. This effect suppresses loud volume levels and boosts soft volume levels, making the volume more consistent.
- Page 54 Chapter 4 Setting Effects 11. Limiter 12. Slicer (Smooth Out Irregularities in Volume) (Apply Successive Cuts to the Sound) This effect compresses the sound when it exceeds a specified By applying successive cuts to the sound, this effect turns a volume level, thus preventing distortion.
- Page 55 Chapter 4 Setting Effects 13. Tremolo 14. Phaser (Modulate the Sound) (Cyclic Changes in Volume) By adding a phase-shifted sound to the original sound, this This effect cyclically modulates the volume to create tremolo. effect modulates the sound to add depth and a sense of rotation.
- Page 56 Chapter 4 Setting Effects 15. Chorus (Add Spaciousness and Range: D100:0W–D0:100W Depth to the Sound) - OUTPUT LEVEL [CTRL 8] Specifies the output volume from the stereo chorus. This effect creates an impression of multiple sound sources in Range: 0–127 unison (Chorus effect), giving spaciousness and depth to the sound.
- Page 57 Chapter 4 Setting Effects Specifies the output volume from the Space-D effect. - OUTPUT LEVEL [CTRL 8] Range: 0–127 Specifies the output volume from the Tetra Chorus effect. Range: 0–127 17. Tetra Chorus (Layer Chorus Sounds to Add Spaciousness) 18. Flanger This effect layers four chorus sounds to produce even more (Add Metallic Resonance to the Sound) depth and spaciousness than a conventional chorus.
- Page 58 Chapter 4 Setting Effects 19. Step Flanger Available Settings: (Add Metallic Resonance to the Sound OFF: A filter will not be used. While Changing the Pitch in Steps) LPF: The frequency range above the cutoff frequency will be cut. This is a flanger that changes the pitch of the sound in steps. HPF: The frequency range below the cutoff frequency The frequency of pitch change can also be synchronized to will be cut.
- Page 59 Chapter 4 Setting Effects 20. Short Delay 21. Auto PAN (Automatically Move the (Add Echoes to the Sound) Stereo Location) This is a short delay which allows you to set the left and right This effect automatically moves the stereo location of the delay times independently.
-
Page 60: Feedback Pitch Shifter
Chapter 4 Setting Effects 22. Feedback Pitch Shifter effect. (Skew the Pitch) Range: 0–127 This effect shifts the pitch of the original sound and layers it 23. Reverb (Add Reverberation) with the original sound. It can be used to play unison lines at an interval of an octave or fifth, or to layer a slightly pitch- This effect adds reverberation and ambiance to the sound, shifted with the original sound to create a chorus effect. -
Page 61: Gated Reverb
Chapter 4 Setting Effects 24. Gated Reverb 25. Isolator (Cuts Off a Specific Range) (Sharply Cut the Reverberation) An equalizer which cuts the volume greatly, allowing you to This is a type of reverb, in which the reverberation is cut off add a special effect to the sound by cutting the volume in varying ranges. -
Page 62: Switching An Effect Function On And Off In Real Time (How To Use The Grab Switch)
GRAB switch featured on the Roland DJ-2000 buttons. Professional DJ Mixer. Since the MC-307 features an even To enable the GRAB switch, set it to ON. To disable it, set greater number of onboard effects, you can now create it to OFF. -
Page 63: Chapter 5 Creating Your Own Patterns And Songs
Play it (Realtime Recording) - MEASURE LENGTH: Specifies the length of the pattern. This lets you use the MC-307’s keyboard pads or an external Range: 1–32 MIDI keyboard for recording performances. * Although Patterns can be lengthened after they have been recorded, the settings cannot be used to shorten Patterns. -
Page 64: Selecting A Patch
Chapter 5 Creating Your Own Patterns and 4. Press the [F1]–[F4] buttons below the category you * You can select a patch for a recording part here, see next “Selecting a patch to use from all lists” and “Selecting a patch selected. - Page 65 (refer to Playing Back in Arpeggio (Arpeggiator) (p. 31).) 2. During recording, press [REC] button. The [REC] indicator flashes to indicate that the MC-307 is 2. Press the [HOLD] button. in the Rehearsal mode.
- Page 66 [FILTER] button, [LF01 DEPTH], [LFO1] button (wave select) or Assignable knobs [1] through [4]. Turning these 3. Set the MC-307 to the Recording mode. knobs in Step 5 allows you to specify the parameters used (refer to Recording Your Music as You Play it (Realtime with them to be erased.
-
Page 67: Recording Changes In Bpm
Chapter 5 Creating Your Own Patterns and Recording changes in BPM 4. Press the [F4 (PRM4)] button. 5. Using the [CURSOR (up/down)] buttons, move the You can record the operations used to change the BPM while cursor to RHY VIEW. playing music. -
Page 68: Recording Data Entered In Sequence
Part R is selected. 3. Press the [F1 (PATCH)] button. 4. Rotate the [VALUE] dial or press [INC/DEC] to select The MC-307 is ready for recording. You can play back the Rhythm Set. your music in a loop. Make the preparations for recording 11. -
Page 69: Recording Mode
Mute button, refer to P. 159. Procedure 14. Upon selection of rhythm tones, press the [TR-REC] button second time to return the MC-307 to the 1. Press the [PACH] button. Recording mode. The “RHYTHM” screen appears. (Now, the keyboard pads have been switched back to the mode in which you set the note input timing.) - Page 70 Inputting Only the Timing at a Single Pitch Procedure 6. Upon selection of note, press the [TR-REC] button second time to return the MC-307 to the Recording Before recording, first make all the necessary settings. mode. 1. Referring to Steps 1-9 in “TR-REC for Rhythm Parts” (P.
- Page 71 Chapter 5 Creating Your Own Patterns and Change the pitch of a note you input. The note will be deleted. When you finish inputting the timing, use the following * By pressing the [F1 (CLR)] button, you can delete all notes procedure to input the pitch or chord.
-
Page 72: Individually Editing Performance Data (Micro Edit)
CAUTION: The data in any patterns you’ve edited will be Available Settings: lost if the MC-307’s power is turned off. If you wish to keep the pattern that you created, you must use the Pattern Write - Note name: C-1–G9 operation. - Page 73 F7, and the MC-307 * The MC-307 is capable of receiving bulk dumps from the MC- will calculate the correct number automatically. 505 . On the other hand, the MC-505 may fail to receive the bulk dumps from the MC-307 due to differences in the number of patches.
-
Page 74: Modifying Performance Data Values
Chapter 5 Creating Your Own Patterns and Modifying Performance Data 6. Determine the insertion position using the [VALUE] dial or the [INC/DEC] buttons. Values Changes existing data settings. Procedure 1. Press the [PTN] button. 2. Using the [VALUE] dial or the [INC/DEC] buttons, Insert the data. -
Page 75: Deleting Musical Data (Delete Event)
Chapter 5 Creating Your Own Patterns and Deleting Musical Data Viewing Desired Performance (Delete Event) Data Only (View Filter) Specify the data to be deleted and execute Delete Event. With this function, you can view specific data to facilitate searching for the desired performance data. Procedure Procedure 1. -
Page 76: Editing Patterns (Pattern Edit)
CAUTION: The data in any patterns you’ve edited will be [CURSOR] buttons, and then select the data to be copied lost if the MC-307’s power is turned off. If you wish to keep from the copy source data using the [VALUE] dial or the the pattern that you created, you must use the Pattern Write [INC/DEC] buttons. -
Page 77: Erasing Unwanted Data (Erase)
Chapter 5 Creating Your Own Patterns and Erasing Unwanted Data (Erase) 18. Press the [F4 (EXEC)] button. Copying is executed and, upon completion, the normal Erases part (or all) of a pattern. display reappears. Procedure Select a pattern for which Erase is to be executed. Available Settings: 1. -
Page 78: Deleting Unwanted Measures (Delete Measure)
Chapter 5 Creating Your Own Patterns and Deleting Unwanted Measures To do so, move the cursor to “NOTE RANGE” by pressing the [CURSOR (down)] button before entering the range using (Delete Measure) the [VALUE] dial or the [INC/DEC] buttons. This operation deletes unwanted measures from a pattern, and * *** moves any subsequent measures toward the beginning to close the gap. -
Page 79: Inserting Blank Measures (Insert Measure)
Chapter 5 Creating Your Own Patterns and Inserting Blank Measures FOR: 1–32 (Maximum) (Insert Measure) Transposing the Pitch (Transpose) A blank measure is inserted in the Pattern between the specified measure and the measure following it. If you wish to add more Transposes the note number (pitch) for each part in a pattern. -
Page 80: Modifying The Strength Of Notes (Change Velocity)
Chapter 5 Creating Your Own Patterns and Modifying the Strength of Notes VALUE: -99–0– +99 (Change Velocity) NOTE RANGE: C -1–G 9 * If this operation would result in a velocity greater than 127 (or This operation modifies the velocity (strength) of the notes less than 1), the result will be limited to 127 (or 1). -
Page 81: Shifting The Timing Slightly (Shift Clock)
Chapter 5 Creating Your Own Patterns and 12. Press the [F4 (OK)] button. 10. Press the [F4 (OK)] button. A screen asking you whether or not you want to execute A screen asking you whether or not you want to execute Change Gate Time appears. -
Page 82: Thinning Out Unneeded Data (Data Thin)
- C-AFT: Channel Aftertouch This allows you to use the memory of the MC-307 more efficiently. Creating a Quantized Pattern Procedure (Edit Quantize) Select the pattern for which Data Thin is to be executed. -
Page 83: Converting The Note Timing Of A Pattern (Reclock)
Chapter 5 Creating Your Own Patterns and 9. Press the [F4 (EXEC)] button. normal display will reappear. The Edit Quantize operation will be carried out, and the normal display will reappear. Available Settings: PATTERN SIZE: Converting the Note Timing of a - HALF (Timing values will be halved) Pattern (Reclock) - DOUBLE (Timing values will be doubled) -
Page 84: Playing And Recording Songs
Chapter 5 Creating Your Own Patterns and Playing and Recording By pressing [ ] button, you can return to the beginning of the song. Also, you can press [ ] button while the song is Songs stopped to return to the beginning. A set of patterns that are connected in the order of playback Currently playing step and pattern number is called a “song.”... -
Page 85: Recording A Song
Chapter 5 Creating Your Own Patterns and Recording a Song settings. This will not affect the original pattern in any way, since the setup parameters for each pattern are Enter patterns one by one and specify the order in which stored as part of the song data. -
Page 86: Editing Songs (Song Edit)
Chapter 5 Creating Your Own Patterns and Editing Songs (Song Edit) Copying a Song (Song Copy) You can copy song data to another song. This function is useful for playing two or more songs in sequence or for Clearing All Steps combining two or more songs. -
Page 87: Saving The Song
If you modified a song setting but do not want to save it, you can use it as it is the next time you power up the MC-307 as long as you do not execute this function. -
Page 88: Chapter 6 Making Original Patches
Chapter 6 Making Original Patches 8. Press the [CURSOR (right/left)] buttons to move the You can create desired patches by changing various parameters for creating tones (tone parameters). This cursor below the tone number (T-1 to T-4) for which you operation is referred to as patch editing (or rhythm editing). -
Page 89: Changing The Pitch (Pitch And Envelope)
Chapter 6 Making Original Patches WAVE: GAIN 4. Press the [CURSOR (up)] button, then press [F2 (PICH)] button. This boosts the waveform. Raising this setting 6 dB will double the gain. If you are using the booster to distort the sound, setting this to the maximum value will be effective. - Page 90 Chapter 6 Making Original Patches Coarse Tune value for both tones and then use Fine Tune to With positive (+) settings, the pitch will change more greatly create a slight pitch difference between the two tones, the as you play the keyboard more strongly. With negative (-) sound will appear more spacious (the Detune effect).
-
Page 91: Changing The Brightness Of Sounds (Filter And Envelope)
Chapter 6 Making Original Patches 4. Press the [CURSOR (up)] button, then press [F3 (FLTR)] Specifies the time until the next pitch level is reached. You can make settings for the four parameters TIME 1–4. button. Higher settings will result in a longer time until the next pitch level is reached. - Page 92 Chapter 6 Making Original Patches FILTER: CUTOFF - PKG (Peaking Filter): This filter enhances audio signals with frequencies Specifies the frequency at which the filter will begin to affect around the cutoff frequency. It will emphasize the mid- the frequency components of the waveform (the Cutoff range, and is useful for creating a distinctive sound.
- Page 93 Chapter 6 Making Original Patches FILTER: RESONANCE - PKG (Peaking Filter) As this value is increased, the frequency area that is This setting emphasizes the overtones in the region of the emphasized will rise. As this value is decreased, the cutoff frequency, adding character to the sound.
- Page 94 Chapter 6 Making Original Patches F-ENV (FILTER ENVELOPE) parameters F-ENV: TIME KEY FOLLOW This setting causes the filter envelope times (TIME 2/3/4) to F-ENV: ENV DEPTH (ENVELOPE DEPTH) be affected by the location of the keyboard pad that you This setting adjusts the depth of the filter envelope. press.
-
Page 95: Changing The Volume Level And Localization (Amp And Envelope)
Chapter 6 Making Original Patches Changing the Volume Level and - A-ENV: VELO CURVE, VELO SENS, VELO TIME 1, 4, TIME KEY FOLLOW, TIME 1–4, LEVEL 1–3 Localization (AMP and ENVELOPE) * See the following sections for descriptions of the setting ranges and contents of the respective parameters. - Page 96 Chapter 6 Making Original Patches AMP: RANDOM PAN SW cannot exceed the maximum level. This setting causes the stereo location to change randomly Bias Level Bias Level each time a note is played. All four indicators will be blinking, and the Random Pan Switch will be turned on.
-
Page 97: Applying Cyclic Changes To The Sound (Lfo 1/2)
The LFO (Low Frequency Oscillator) provides cyclic quickly will cause TIME4 to be faster. With negative (-) oscillations to sounds. The MC-307 is equipped with two settings, releasing the keyboard more quickly will cause oscillators, LFO 1 and LFO 2, each of which can be used to TIME4 to be slower. - Page 98 Chapter 6 Making Original Patches - LFO1/2: WAVEFORM, RATE, TEMPO SYNC, KEY independently for these three. SYNC, FADE MODE, DELAY TIME, FADE TIME, LFO1/2: TEMPO SYNC OFFSET, PITCH DEPTH, FILTER DEPTH, AMP DEPTH, This parameter synchronizes the LFO modulation frequency PAN DEPTH to the tempo of the pattern.
-
Page 99: Defining Parameters Affecting The Entire Patch(Common/Solo, Porta)
Chapter 6 Making Original Patches Defining Parameters Affecting LFO1/2: FADE TIME the Entire Patch Specifies the time over which the LFO amplitude will reach the maximum (minimum) after the Delay TIME has elapsed. (COMMON/SOLO, PORTA) Higher settings will produce longer times. “COMMON:”... - Page 100 Chapter 6 Making Original Patches LOW, VELO RANGE UP, VELO CROSS FADE modulates it with tone 2 (4), and mixes the result with the filtered sound of tone 2 (4). - SOLO: SOLO SW, SOLO LEGATO - TYPE 9: This type passes the filtered sound of each tone through a ring modulator to create new overtones.
- Page 101 Chapter 6 Making Original Patches COMMON: VELO RANGE SWITCH (VELOCITY When this is “OFF,” equal temperament will be used. As the RANGE SWITCH) value is increased, the pitch difference between the high range and low range will increase. Specifies whether or not the Velocity Range settings will be enabled.
-
Page 102: Setting Up Controllers (Control Mod, Bend And Aft)
Range: OFF, ON messages are sent when the modulation controller on an PORTAMENTO:SW external MIDI keyboard is operated. (On the MC-307, the Turn this on when you wish to use portamento. controller can also be used for effects other than vibrato.) Range: OFF, ON “BEND:”... - Page 103 Chapter 6 Making Original Patches 7. Press the [CURSOR (right/left)] buttons to move the destination. cursor below the tone number (T-1 to T-4) for which you Range: -63– +63 want to define the parameter. With positive (+) settings, higher values will allow greater control.
-
Page 104: Saving A Patch
Chapter 6 Making Original Patches Saving a Patch [F2 (DEL)]: Delete the character at the cursor location. All parameters explained in connection with patch editing can be saved. How "ENV TIME 1–4 and LEVEL 1–3" of this chapter are related to the "A, D, S, R" * If you turn off the power without saving the patch, the edited of chapter 3 patch will be lost. -
Page 105: Editing Rhythm Sets
Chapter 6 Making Original Patches Editing Rhythm Sets and contents of the respective parameters. A rhythm set assigns a different tone to each keyboard pad. WAVE parameters The R part can be used to play multiple rhythm instrument sounds by itself. WAVE: Here’s how to edit each tone. -
Page 106: Changing The Pitch (Pitch And Envelope)
Chapter 6 Making Original Patches time as the closed hi-hat sound. To simulate this, you can and contents of the respective parameters. specify the same mute group number for both hi-hat sounds. Range: OFF, 1–31 PITCH parameters PITCH: COARSE TUNE Changing the Pitch (PITCH and Adjust the pitch of each tone in semitone steps. -
Page 107: Changing The Brightness Of Sounds (Filter And Envelope)
Chapter 6 Making Original Patches Changing the Brightness of P-ENV: VELO TIME SENS (VELOCITY TIME SENSE) Sounds (FILTER and ENVELOPE) This parameter lets your playing velocity the overall time of FLTE” lets you make settings that affect the brightness of the the entire Pitch Envelope. -
Page 108: Filter Parameters
Chapter 6 Making Original Patches FILTER parameters frequency area to be heard. Level FILTER: TYPE Select the type of filter. Frequency Range: - OFF: CUTOFF=0 CUTOFF=64 CUTOFF=127 The filter will not be applied (all filter indicators are - HPF (High Pass Filter) dark). - Page 109 Chapter 6 Making Original Patches FILTER: RESONANCE F-ENV (FILTER ENVELOPE) parameters Adding a Distinctive Character to the Sound (Resonance) F-ENV: ENV DEPTH (ENVELOPE DEPTH) This setting emphasizes the overtones in the region of the This setting adjusts the depth of the filter envelope. cutoff frequency, adding character to the sound.
-
Page 110: Changing The Volume Level And Localization (Amp And Envelope)
Chapter 6 Making Original Patches F-ENV: LEVEL1–4 (ENVELOPE LEVEL1–4) PAN DEPTH - A-ENV: Specifies the cutoff frequency at each level. You can make VELO SENS, VELO TIME SENS, TIME1–4, LEVEL1–3 settings for the four parameters, Level 1–4. Raising this setting will also raise the cutoff frequency. * See the following sections for descriptions of the setting ranges and contents of the respective parameters. -
Page 111: Changing The Rate Of The Pitch Change (Bend)
Chapter 6 Making Original Patches Changing the Rate of the Pitch between strongly played and softly played notes will gradually increase. Change (BEND) With positive (+) settings, the volume will increase as you Specifies the amount of pitch change (in semitone units) that play more strongly on the keyboard. -
Page 112: Adjusting The Effects For Each Rhythm Tone (Send Level)
Chapter 6 Making Original Patches Adjusting the Effects for Each Rhythm Tone Reverb Level is raised. Rhythm Tone (SEND LEVEL) - “Applying M-FX/Specifying the Output Destination for Each Part (Part M-FX SW)” (P. 23) In the RHY TONE (RHYTHM TONE), the levels of effects to “Adjusting the Overall Reverb Volume (Reverb Level) be applied can be set up individually (on/off settings for M- “(P. -
Page 113: Saving A Rhythm Set
Chapter 6 Making Original Patches Saving a Rhythm Set Copying and Initializing Settings This operation is used to save all parameters covered describing rhythm set editing. The parameters described in this chapter can be copied or * To save the rhythm set with modified settings, follow the initialized. -
Page 114: Chapter 7 Environment Configuration And Application With Midi
Configuration (System) Generater OUTPUT jack Here you can make settings that affect the operation of the entire MC-307, such as tuning and the synchronization Specifying how patches will be method. switched (PATCH REMAIN) * It is not possible to enter these set-up screens while a pattern This specifies whether the sound that was being heard at the or song is being played back. -
Page 115: Master Tune
“VOISE RESERVE P - *.” ( * = Part Name) Tuning the entire system (MASTER TUNE) This adjusts the tuning of the MC-307’s sound generator. The display shows the frequency of the A4 note. Select the destination part. Procedure 6. - Page 116 Chapter 7 Environment Configuration and Scale Tune switch (SCALE TUNE SW) This switch activates/deactivates the Scale Tune function. Procedure 1. Press the [SYSTEM] button, then the [F1 (SYS)] button. 6. Press the keyboard pad associated with the key subject to The selection screen for system settings appears.
-
Page 117: Settings Concerning The Display And Controllers
Chapter 7 Environment Configuration and Settings Concerning the Display 5. Use the [CURSOR (up/down)] buttons to move the cursor to “PAD VELOCITY.” and Controllers * It is not possible to enter these set-up screens while a pattern or song is being played back. 6. -
Page 118: Pedal Polarity
Chapter 7 Environment Configuration and Setting up the polarity of the pedal 7. Operating the [GRAB] switch turns the effect on/off. (PEDAL POLARITY) Range: OFF, ON Select the polarity of the pedal. Parameter Type: Backup parameters If you are using a pedal with inverted polarity (so the pedal functions in a way opposite from what you expect), select “REVERSE.”... -
Page 119: Sequencer-Related Settings
Chapter 7 Environment Configuration and Sequencer-Related Settings 5. Use the [CURSOR (up/down)] buttons to move the cursor to “AUTO CHECKSUM.” * It is not possible to enter these set-up screens while a pattern or song is being played back. Setting up the volume level of the 6. - Page 120 Chapter 7 Environment Configuration and 3. Press the [F3 (SEQ)] button. indicator will light. One of the SYSTEM: SEQ set-up screens appears. Parameter Type: Backup parameters 4. Press the [F2 (PRM2)] button. Transmitting synchronization 5. Use the [CURSOR (up/down)] buttons to move the messages (SYNC OUT) cursor to “ARPEGGIO SYNC.”...
- Page 121 On the MC-307 you can specify the playback timing of the phrase, so it will play back in precise synchronization with the pattern.
-
Page 122: Rhy View
Chapter 7 Environment Configuration and Using the RHYTHM PART VIEW button 3. Press the [F3 (SEQ)] button. as the MUTE CTRL part button One of the SYSTEM: SEQ set-up screens appears. (RHY VIEW) 4. Press the [F4 (PRM4)] button. There is a special “MUTE CTRL part” that is used to record 5. -
Page 123: Midi-Related Settings
307’s keyboard pads. Using this function enables different System Exclusive Procedure messages to be received by more than one MC-307 unit at the 1. Press the [SYSTEM] button, then the [F1 (SYS)] button. same time. The selection screen for system settings appears. - Page 124 2. Press the [CURSOR (up)] button to access the screen for Parameter Type: Backup parameters items 1–4. - refer to Playing back arpeggio on the MC-307 using an external MIDI keyboard (p. 134). 3. Press the [F4 (MIDI)] button. * If the Remote Keyboard Switch is “ON,” you can play 4.
- Page 125 (EDIT TX/RX) MC-307. * If you want the MC-307 to receive MIDI messages that were This specifies the type of MIDI message that will be used to transmitted from the knobs/sliders to an external device (and...
-
Page 126: Local Tx Sw
Chapter 7 Environment Configuration and Disconnecting the keyboard pads from Reception settings for each type of the internal sound generator MIDI message (LOCAL TX SW) Procedure You can specify how MIDI messages from the controller 1. Press the [SYSTEM] button, then the [F1 (SYS)] button. section (the keyboard pad, knobs, pedals etc.) will be sent to The selection screen for system settings appears. -
Page 127: Arpeggiator Settings
Chapter 7 Environment Configuration and Transmission settings for each type of Transmission settings of Mute Control MIDI message part Transmission Setting of Mute Control part, to internal sound Procedure source (I), to MIDI OUT connector (E) or both (B) 1. Press the [SYSTEM] button, then the [F1 (SYS)] button. Procedure The selection screen for system settings appears. -
Page 128: Useful Functions (Utilities)
Chapter 7 Environment Configuration and Useful Functions (Utilities) 8. Press the [F4 (OK)] button. The “ARE YOU SURE?” message appears for confirmation. * It is not possible to enter these set-up screens while a pattern 9. Press [F4 (EXEC)] button. or song is being played back. -
Page 129: Saving Data On An External Sequencer (Bulk Dump)
BULK DUMP. * The bulk data are transmitted with the device ID number set * The MC-307 is capable of receiving bulk dumps data from the up in the procedure for setting the device ID number (P. 123). MC-505. On the other hand, the MC-505 may fail to receive... -
Page 130: Recording The Data Of All Mc-307 Data On An External Sequencer
Before you begin, use a MIDI cable to connect the MIDI OUT The “3 BULK DUMP” screen will appear. of the MC-307 to the MIDI IN of the external sequencer. 3. Press the [F3 (BULK)] button. 4. Press the [F4 (RX AL)] button The “ARE YOU SURE?”... -
Page 131: Restoring The Factory Settings (Factory Reset)
- Song refer to Saving the Song (p. 87). (FACTORY RESET) - Arpeggiator This operation can restore all settings of the MC-307 to those refer to Saving Arpeggio Settings (Arpeggio Write) (p. factory default settings. 34). Caution: If any valuable data reside in the MC-307 main... -
Page 132: Advanced Operation Using Midi
Without MIDI, it would not be possible to use - Part 5: Ch. 5 an external keyboard to play the MC-307, or to use the MC- - Part 6: Ch. 6 307 to record and play back a performance played on an - Part 7: Ch. -
Page 133: Using With An External Midi Device
REMOTE KEYBOARD = ON 2. Match the MC-307’s RPS control channel to the transmission channel of the external MIDI keyboard (P. This setting enables the part selected on the MC-307 to be 124). used as the recording part (regardless of the transmission channel of the external MIDI keyboard). - Page 134 MIDI IN MIDI Interface Thru = ON Computer * If you wish to connect a computer and play the MC-307 from a MIDI sequencer program etc., you will need to use a MIDI interface appropriate for your computer. Procedure 1. Turn on the Thru function of your MIDI sequencer software.
- Page 135 R of the MC-307 to be played back. Setting it to MIDI channels 1 to 7 enables patches selected with part 1 to 7. 2. Set the local TX switch for each part of the MC-307 to “EXT” (P. 126). These settings enables playback information to be transmitted from the MIDI OUT connector.
-
Page 136: Synchronization With An External Midi Device
(including MUTE CTRL) of the pattern to be used to 2. Press the [ ] button on the MC-307. “INT” (P. 23). This setting enables the MC-307 to output Returns to the beginning of pattern. only MIDI clocks and start/stop information from the MIDI OUT connector. - Page 137 Making playback on two units of the MC-307 to be synchronized Two MC-307 units can be connected to each other, and used to play different patterns in synchronization. The playback unit is referred to as “Master” and the unit to be synchronized “Slave.”...
-
Page 139: Appendices
Appendices... -
Page 140: Troubleshooting
No Sound Transmit the correct Bank Select and Program Change messages (P. 72). The power of the MC-307 or connected devices is not turned on. Notes Drop Out - Turn on the power. - Confirm that the AC adaptor is connected correctly. - Page 141 Tone M-FX SW settings to “ON” (P. 112). The display is difficult to Pitch Is Incorrect read The tuning of the MC-307 or of the external MIDI sound generator is incorrect. The LCD CONTRAST setting could be inappropriate. Check the tuning setting (Refer to Tuning the entire - Set the contrast to an appropriate value.
-
Page 142: Error Message List
It is possible that the contents of internal memory have been REC OVERFLOW damaged. More recording data was received at once than the MC-307 was able Try executing the Factory Reset operation (P. 131). If this does to process. not resolve the problem, contact a nearby Roland service center. -
Page 143: Parameter List
Parameter List Patch Parameter WAVE: [PTN]+[F1 (PACH)]+[F1 (EDIT)]+[F1 (WAVE)]+[F1 (WAVE)] (P. 88) Parameter Parameter Name Setting Value *WAVE: Wave Select Wave Select A001 - 254, B001 - B251, C001 - C236 *WAVE: Tone SW Tone Switch OFF, ON *WAVE: Wave Gain Wave Gain -6, 0, +6, +12 FXM:... - Page 144 Parameter List TONE n TIME2[D] Time1 (Decay Time) 0 - 127 (n = 1 - 4) TONE n TIME3 Time3 0 - 127 (n = 1 - 4) TONE n TIME4[R] Time4 (Release Time) 0 - 127 (n = 1 - 4) TONE n Level1 Level1 -63 - +63...
- Page 145 Parameter List VOICE PRIORITY* Voice Priority LAST, LOUDEST KEY RANGE LOWER * Key range Lower C-1 - UPR KEY RANGE UPPER * Key range Upper LWR - G9 VELO RANGE SW* Velocity Range Switch OFF, ON VELO RANGE LOW Velocity Range Lower 1 - UPR VELO RANGE UP Velocity Range Upper...
- Page 146 Parameter List Rhythm Set Parameter WAVE:, KEY: [PTN]+[F1 (PACH) ]+[F1 (EDIT) ]+[F1 (WAVE) ]+[F1 (WAVE) ] (P. 105) Parameter Parameter Name Setting Value WAVE: Wave Select A001 - 254, B001 - B251, C001 - 236 TONE SWITCH Rhythm Tone Switch OFF, ON WAVE GAIN Wave Gain...
- Page 147 Parameter List A-ENV: [PTN]+[F1 (PACH) ]+[F1 (EDIT) ]+[F4 (AMP) ]+[F2 (AENV) ] (P. 110) Parameter Parameter Name Setting Value VELO SENS Velocity Sence -100 - +150 VELO TIME SENS Velocity Time Sence Time1 (Attack Time) 0 - 127 Time2 0 - 127 Time3 (Decay Time) 0 - 127 Time4 (Release Time)
- Page 148 Parameter List 11 LIMITER, 12 SLICER, 13 TREMOLO, 14 PHASER, 15 CHORUS, 16 SPACE-D, 17 TETRA CHORUS, 18 FLANGER, 19 STEP FLANGER, 20 SHORT DELAY, 21 AUTO PAN, 22 FB PITCH SHIFTER, 23 REVERB, 24 GATE REVERB, 25 ISOLATOR M-FX [PTN]+[F2 (STUP) ]+[F4 (M-FX) ]+[F4 (PRM) ] (P.
- Page 149 Parameter List HIGH GAIN High Gain -15 - +15 OUTPUT Output MONO, STEREO OUTPUT LEVEL Output Level 0 - 127 M-FX: 7 NOISE Parameter Parameter Name Setting Value NOISE TYPE Noise Type 1 - 18 NOISE LEVEL Noise Level 0 - 127 NOISE FILTER Noise Filter LO-FI LEVEL...
- Page 150 Parameter List M-FX: 13 TREMOLO Parameter Parameter Name Setting Value LFO TYPE LFO Type TRI, TRP, SIN, SAW1, SAW2, SQR DEPTH Depth 0 - 127 LOW GAIN Low Gain -15 - +15 RATE Rate 0.1 - 10.0, 1* HIGH GAIN High Gain -15 - +15 OUTPUT LEVEL...
- Page 151 Parameter List M-FX: 18 FLANGER Parameter Parameter Name Setting Value PRE DELAY Pre Delay Time 0.0 - 100 DEPTH Depth 0 - 127 FEEDBACK Feedback Level 0 - +98 RATE Rate 0.1 - 10.0, 1* PHASE Phase 0 - 180 FILTER TYPE Filter Type OFF, LPF, HPF...
- Page 152 Parameter List OUTPUT PAN Output Pan L64 - 63R PRE DELAY Pre Delay Time 0.0 - 100 MODE Pitch Shifter Mode 1 - 5 FEEDBACK Feedback Level 0 - +98 LOW GAIN Low Gain -15 - +15 HIGH GAIN High Gain -15 - +15 BALANCE Effect Balance...
- Page 153 Parameter List GROOVE Parameter Parameter Name Setting Value TEMPLATE Groove Template 01 - 71 TIMING Timing Strength 0 - 100 % VELOCITY Velocity Strength 0 - 100 % SHUFFLE Parameter Parameter Name Setting Value TEMPLATE Shuffle Template 1/12,1/24 TIMING Timing Strength 0 - 100 % System Parameter SYSTEM: SOUND...
- Page 154 Parameter List SYSTEM: SEQ [SYSTEM]+[F1 (SYS) ]+[F3 (SEQ) ]+[F4 (PRM4) ] (P. 122) Parameter Parameter Name Setting Value RHY VIEW Rhythm View Button NORMAL, MUTE CTRL TAP SW Tap Switch OFF, ON TAP RESOLUTION Tap Resolution SYSTEM: MIDI [SYSTEM]+[F1 (SYS) ]+[F4 (MIDI) ]+[F1 (CMN) ] (P. 123) Parameter Parameter Name Setting Value...
-
Page 155: Preset Patch List
Preset Patch List Preset A (CC#0 = 81, CC#32 = 0) Preset B (CC#0 = 81, CC#32 = 1) No. Name No. Name No. Name No. Name 001 Lead TB 1 065 Dist Lead 3 001 Strong Brass 065 NU-NRG Str 002 Dist TB 1 066 Mosquito 002 You Can Fly... - Page 156 Preset Patch List Preset C (CC#0 = 81, CC#32 = 2) Preset D (CC#0 = 81, CC#32 = 3) No. Name No. Name No. Name No. Name 001 X-Org/Nz 065 Timpani 001 Kalimba 065 MutePandeiro 002 X-Pizz/Rng 066 Steel Drum 002 Bagpipes 066 Open Surdo 003 White Noise...
- Page 157 Preset Patch List Preset E (CC#0 = 83, CC#32 = 0) Preset F (CC#0 = 83, CC#32 = 1) No. Name No. Name No. Name No. Name Dist TB 6 P-Up Synth Bottle Keep Happy Hit 2 Acid Lead NRG Sweep Def Filter Rave Hit Acid TB 2...
-
Page 158: Style/Motif/Beat Pattern Correspondence Chart
STYLE/MOTIF/BEAT PATTERN Preset G (CC#0 = 83, CC#32 = 2) No. Name Beats Kick Voice Menu Cymbal2 Menu PurePhat Snr R&B Kick Tom 2 Menu AsiaGng Menu LoFi Snare BD reso Ride Percus3 Menu Clap 3 Menu Spray SD Future Kick Percus4 Menu Snare 7 Menu Plastic BD 2... -
Page 159: Preset Rhythm Set List
Preset Rhythm Set List * The Rhythm Group column shows the button that can be pressed to mute that rhythm tone. P: A 01-26 (CC#0 = 81, CC#32 = 0), P: B 01-26 (CC#0 = 83, CC#32 = 0), User: 01-20 (CC#0 = 85, CC#32 = 0) P: A01 P: A02 P: A03... - Page 160 Preset Rhythm Set List P:06 P:07 P: A08 P: A08 P: A08 Rhythm Group Techno 2 Techno 3 Hardcore Ambient House 1 Note No. TR808 Kick 5 Plastic BD 3 TR909 Kick 5 TR909 Kick 5 TR808 Kick 5 TR707 Kick 1 Plastic BD 4 Gabba Kick Wet Kick...
- Page 161 Preset Rhythm Set List P: A11 P: A12 P: A13 P: A14 P: A15 Rhythm Group House 2 Jungle Drum'n'Bass1 Drum'n'Bass2 Hip-Hop 1 Note No. Wet Kick TR909 Kick 3 Roll Kick TR909 Kick 3 Lo-Fi Kick 1 Plastic BD 2 Lo-Fi Kick 2 Analog Kick Lo-Fi Kick 2...
- Page 162 Preset Rhythm Set List P: A16 P: A17 P: A18 P: A19 P: A20 Rhythm Group Hip-Hop 2 Funk Electro Jazz Brush Note No. TR707 Kick 1 TR707 Kick 2 TR808 Kick 1 Lo-Fi Kick 1 Video Kick Optic Kick West Kick TR808 Kick 5 Hip Kick...
- Page 163 Preset Rhythm Set List P: A21 P: A22 P: A23 P: A24 P: A25 Rhythm Group Disco Ragga Rock Industrial Ethnic Note No. TR707 Kick 2 Analog Kick Optic Kick TR909 Dst BD Open Surdo TR808 Kick 3 TR707 Kick 2 TR909 Kick 4 Lo-Fi Kick 2 Mute Surdo...
- Page 164 Preset Rhythm Set List P: A26 P: B01 P: B02 P: B03 P: B04 Rhythm Group Reverse DR-110&220 TR-505&626 TR-707&727 Techno 4 Note No. Ele Kick DR110 Kick Hip Kick Optic Kick HipHop Kick2 Turbo Kick DR110 Kick TR505 Kick Lo-Fi Kick 1 Wet Kick TOM/PERC...
- Page 165 Preset Rhythm Set List P: B05 P: B06 P: B07 P: B08 P: B09 Rhythm Group NU-NRG Hard House Drum'n'Bass3 Breakbeats Hip-Hop 3 Note No. TR909 Kick 5 TR909 Kick10 Hall Kick 2 HipHop Kick1 HipHop Kick3 Plastic BD 3 TR909 Kick 6 HipHop Kick3 Hall Kick 2...
- Page 166 Preset Rhythm Set List P: B10 P: B11 P: B12 P: B13 P: B14 Rhythm Group Trip-Hop R&B Electro 2 Monde World Perc Note No. TR909 Kick10 TR909 Kick 9 Toy Kick MG Attack Bendir TR909 Kick 7 HipHop Kick1 TR909 Kick 7 Amsterdam BD Wadaiko...
-
Page 167: Waveform List
Waveform List Group-A Name Name Name Name Name TB Dst Saw Ac Bass Trumpet Dist Hit TR808 Tom TB Dst Sqr 1 Voco Bass Mute Trumpet Thin Beef TR606 Tom TB Dst Sqr 2 Fingered Bs Soprano Sax Tekno Hit TR606 CmpTom TB Reso Sqr1 Pick Bass... - Page 168 Waveform List Group-B Name Name Name Name Name SHKR+ MENU R8 Brush CHH TR707 Clap Rap Snare ElectroSnr 2 808 Maracas Jungle Hat Cheap Clap Jungle Snr 1 Synth Snare Maracas PHH MENU Funk Clap Antigua Snr Roll Snare Cabasa Up TR909 PHH 1 Little Clap Real Snare...
- Page 169 Waveform List Group-C Name Name Name Name Name MG Big Lead Str Attack Hoo! TablaBaya 7 TR626 China JP Hardcore Lo-Fi RoomTp Hey! 2 TablaBaya 8 TR626 CupCym JP Hoover Smear Hit 1 UDU POT MENU ASIAGNG MENU JP Seq.Synth Smear Hit 2 Udu Pot 1 Asian Gong 1...
-
Page 170: Preset Pattern List
CD-ROM or equivalent means. The sound recordings contained in this product are the original works of Roland Corporation. Roland is not responsible for the use of the sound recordings contained in this product, and assumes no liability for any infringement of any copyright of any third party arising out of use of the sounds, phrases and patterns in this product. - Page 171 Ambient 4 Cappadocia Productions Ambient 5 Cappadocia Productions Ambient 6 HEIGO TANI Dream Trance 1 B.U.S Dream Trance 2 Roland Corporation Dream Trance 3 B.U.S Dream Trance 4 B.U.S Dream Trance 5 B.U.S Dream Trance 6 HEIGO TANI Dream Trance 7...
- Page 172 Preset Pattern List House Pattern No. Pattern Name Measure Length Programmer Garage House 1 Roland Corporation Garage House 2 Soulmates Graphica Garage House 3 Soulmates Graphica Garage House 4 B.U.S Garage House 5 Roland Corporation Garage House 6 Soulmates Graphica Garage House 7 B.U.S...
- Page 173 DJ KENT HipHop East 2 DJ KENT HipHop East 3 DJ KENT HipHop East 4 DJ KENT HipHop East 5 Roland Corporation HipHop East 6 DJ KENT HipHop East 7 DJ KENT HipHop East 8 DJ KENT HipHop East 9...
- Page 174 Preset Pattern List Drum'n'Bass Pattern No. Pattern Name Measure Length Programmer Artcore 1 Roland Corporation Artcore 2 Roland Corporation Artcore 3 Roland Corporation Artcore 4 Cappadocia Productions Artcore 5 Cappadocia Productions JazzStep 1 HEIGO TANI JazzStep 2 HEIGO TANI JazzStep 3...
- Page 175 Reggae 4 presto Reggae 5 presto Latin Pattern No. Pattern Name Measure Length Programmer Salsa 1 Roland Corporation Samba 1 Roland Corporation Merengue 1 Roland Corporation Merengue 2 Roland Corporation ChaCha 1 Roland Corporation ChaCha 2 Roland Corporation Mambo 1...
-
Page 176: Rps Pattern List
RPS Pattern List RPS Drum Pattern (Used Rhythm Patrt) Name Measures RPS set Keyboard Pad Techno Drums 1 Trance 1 Techno Drums 2 Trance 1 Techno Drums 3 Trance 2 Techno Drums 4 Trance 2 Techno Drums 5 NU-NRG Techno Drums 6 NU-NRG Techno Drums 7 Minimal... - Page 177 RPS Pattern List Name Measures RPS set Keyboard Pad B.Beats Drums 2 BreakBeats Jazz Drums 1 Jazz Jazz Drums 2 Jazz Lounge Drums 1 Lounge Lounge Drums 2 Lounge Reggae Drums 1 Reggae Reggae Drums 2 Reggae Latin Rhythm 1 Latin 1 Latin Rhythm 2 Latin 1...
- Page 178 RPS Pattern List Name Measures RPS set Keyboard Pad HipHop Bass 1 HipHop East HipHop Bass 2 HipHop East HipHop Bass 3 G-Funk HipHop Bass 4 G-Funk HipHop Bass 5 Abstract HipHop Bass 6 Abstract HipHop Bass 7 R&B HipHop Bass 8 R&B DnB Bass 1 Drum ’n’...
- Page 179 RPS Pattern List Name Measures RPS set Keyboard Pad Ride Cymbal 3 Lounge Crash Fill 1 Trance 1 Crash Fill 2 NU-NRG Crash Fill 3 HappyHardcore Crash Fill 4 Gabba Crash Fill 5 Dream Trance Crash Fill 6 House Crash Fill 7 Garage Crash Fill 8 Garage...
- Page 180 RPS Pattern List Name Measures RPS set Keyboard Pad Snare Fill 30 BreakBeats Snare Fill 31 BreakBeats Snare Fill 32 Jazz Snare Fill 33 Jazz Snare Fill 34 Lounge Snare Fill 35 Reggae Snare Fill 36 Reggae Rim Fill 1 Detroit Techno Rim Fill 2 R&B...
- Page 181 RPS Pattern List Name Measures RPS set Keyboard Pad Piano Chord 8 Reggae Piano Chord 9 Latin 1 Piano Chord 10 Latin 1 Piano Chord 11 Latin 2 Piano Chord 12 Latin 2 Piano Seq 1 Dream Trance Piano Seq 2 Progressive House Piano EFX Drum ’n’...
- Page 182 RPS Pattern List Name Measures RPS set Keyboard Pad Vox 2 R&B Vox 3 Drum ’n’ Bass 1 Vox Lead Lounge Voice Riff 1 Gabba Voice Riff 2 Gabba Brass 1 Jazz Brass 2 Latin 1 Brass 3 Latin 1 Brass 4 Latin 2 Brass 5...
- Page 183 RPS Pattern List Name Measures RPS set Keyboard Pad Synth Riff 4 Trance 2 Synth Riff 5 NU-NRG Synth Riff 6 NU-NRG Synth Riff 7 NU-NRG Synth Riff 8 NU-NRG Synth Riff 9 Minimal Synth Riff 10 Minimal Synth Riff 11 Minimal Synth Riff 12 Detroit Techno...
- Page 184 RPS Pattern List Name Measures RPS set Keyboard Pad Synth Seq 17 Dream Trance Synth Seq 18 Dream Trance Synth Seq 19 Garage Synth Seq 20 Chicago House Synth Seq 21 Progressive House Synth Seq 22 Progressive House Synth Seq 23 Progressive House Synth Seq 24 Abstract...
- Page 185 RPS Pattern List Name Measures RPS set Keyboard Pad SFX 24 Chicago House SFX 25 Chicago House SFX 26 US House SFX 27 UK House SFX 28 UK House SFX 29 Progressive House SFX 30 HipHop East SFX 31 HipHop East SFX 32 HipHop East SFX 33...
-
Page 186: Rps Set List
RPS Set List 1. Trance 1 Synth Riff 6 Synth Riff 7 Name Meas. Keyboard Pad Synth Riff 8 Techno Drums 1 SFX 5 Techno Drums 2 SFX 6 Techno Bass 1 Techno Bass 2 SFX 7 Snare Fill 1 Snare Fill 2 4. - Page 187 RPS Set List Industry Fill 1 BD Fill 4 9. Gabba Industry Fill 2 Name Meas. Keyboard Pad Tom Fill 1 Techno Drums 17 Vox 1 Techno Drums 18 Synth Riff 13 Techno Bass 17 Guitar Riff 1 Techno Bass 18 Synth Seq 7 BD Fill 6 SFX 11...
- Page 188 RPS Set List Synth Seq 13 House Bass 4 Synth Seq 14 Perc.Fill 4 Synth Seq 15 Crash Fill 7 Synth Riff 25 Snare Fill 16 SFX 19 Crash Fill 8 SFX 20 Piano Chord 2 Piano Chord 3 Synth Riff 27 12.
- Page 189 RPS Set List SFX 26 E.Piano Chord 1 E.Piano Chord 2 SFX 30 17. UK HardHouse SFX 31 Name Meas. Keyboard Pad Guitar Chord 1 House Drums 9 SFX 32 House Drums 10 HipHop Hit 1 House Bass 9 Phono Noise House Bass 10 Snare Fill 21 20.
- Page 190 RPS Set List HipHop Drums 8 Synth Seq 27 HipHop Bass 7 SFX Hit 10 HipHop Bass 8 SFX Hit 11 Noise Fill Voice Fill 25. BreakBeats Rim Fill 2 Name Meas. Keyboard Pad OHH Fill 1 B.Beats Drums 1 Piano Chord 5 B.Beats Drums 2 Strings 3...
- Page 191 RPS Set List Ride Cymbal 3 30.Latin 2 Crash Fill 12 Name Meas. Keyboard Pad E.Piano Chord 6 Latin Rhythm 3 Strings 4 Latin Rhythm 4 Guitar Chord 6 Latin Bass 3 Vox Lead Latin Bass 4 Organ Lead Perc.Fill 9 Synth Lead 11 Perc.Fill 10 SFX 41...
-
Page 192: Transmit/Receive Setting List
Transmit/Receive Setting List Parameter EDIT TX/RX Value MODE1 (Default) MODE2 PITCH COARSE TUNE EXCLUSIVE CC#21 16 - 112 Center=64) *1 FINE TUNE CC#77 CC#77 14 - 114 (Center=64) *1 FILTER FILTER TYPE EXCLUSIVE CC#34 0 - 4 *1 CUTOFF CC#74 CC#74 0 - 127 *1 RESONANCE... -
Page 193: Main Specifications
Main Specifications MC-307: groovebox Turntable Emulation block - Turntable Emulation slider - Turntable PUSH/HOLD button SOUND GENERATOR SECTION GRAB Switch Maximum Polyphony: ..........64 voices Parts:............24 (Main: 8, RPS: 16) CONNECTORS Patches Headphones Jack - Preset: ................800 Output Jack (L (MONO), R) - User: ................ -
Page 194: Midi Implementation
* If the Remote Keyboard Switch is ON, the message will have the same effect as when a note is released on the MC-307’s keyboard. This means that you can control the * Adjust the stereo location over 128 steps, where 0 is far left, 64 is center, and 127 is far arpeggiator and RPS from an external MIDI keyboard. -
Page 195: Program Change
MIDI Implementation * If the Remote Keyboard Switch is ON, operation will be the same as when the switch pedal of the MC-307 is operated. * The Part Reverb Send Level will change. Sound Controller2 (Controller number 71) Effect 4 (Reverb Send Level)(Controller number 94) -
Page 196: System Exclusive Messages
= ID number: This is the ID number (manufacturer ID) that specifies the Channel Pressure 0 (off) manufacturer whose exclusive message this is. Roland’s manufacturer Modulation 0 (off) ID is 41H.ID numbers 7EH and 7FH are defined in an expansion of the... -
Page 197: Control Change
00 00H - 7F 7FH (bank.1 - bank.16384) The only GS exclusive messages received by the MC-307 are Scale Tune settings (P. 116). * This message is not transmitted if Tx Program Change Switch parameter or Tx Bank Data Set 1 Select Switch parameter is OFF. - Page 198 41H, dev, 3AH, 12H, aaH, bbH, ccH, ddH, sum Byte Remarks Exclusive status ID number (Roland) device ID (dev: 10H–1FH) model ID (MC-307 Quick) command ID (DT1) address (Status/Channel) address/Data H Data L Data E checksum EOX (End Of Exclusive)
- Page 199 2nd byte 3rd byte manufacturer whose exclusive message this is. Roland’s manufacturer ID is 41H.ID numbers 7EH and 7FH are defined in an expansion of the MIDI standard as Universal Non- realtime messages (7EH) and Universal Realtime Messages (7FH).
- Page 200 MIDI Implementation 4. Data transmission (Sequencer section) 1 Recorded messages are transmitted during playback. 2 If the Through parameter is ON, messages received (except for System Common messages System Realtime messages) will transmitted. 3 Messages that are generated and transmitted 3.1 Messages automatically generated by the system Channel Mode messages...
- Page 201 0 - 120 00 26 | 0aaa aaaa | Delay Feedback Level 0 - 98 * Parameter values enclosed in < > have no meaning for the MC-307. 00 27 | 0000 00aa | Delay Output Assign 0 - 2...
- Page 202 MIDI Implementation prm1 Radio Detune 0 - 127 prm5 Phase 0 - 90 0 - 180 prm2 Noise Level 0 - 127 prm6 Step Rate 0 - 125 0.05 - 10.00,*2 prm3 Low Gain 0 - 30 -15 - +15 prm7 Balance 0 - 100...
- Page 203 MIDI Implementation 1-3.Patch 00 41 | 000a aaaa | Pitch Envelope Depth 0 - 24 (-12 - +12)| 00 42 | 0aaa aaaa | Pitch Envelope Velocity Sens 0 - 125 00 43 | 0000 aaaa | Pitch Envelope Velocity Time1 0 - 14 +——————————————————————————————————————————————————————————————————————————————+ 00 44 | 0000 aaaa | Pitch Envelope Velocity Time4...
- Page 204 2:OFF, LPF, BPF, HPF, PKG 2. GS (Model ID=42H) 3:OFF, ON, <Reserved, Reserved>, RHY Note) In order for quick exclusive messages to be received correctly by the MC-307, the starting address of the +——————————————————————————————————————————————————————————————————————————————+ message must be the starting address of each part.
- Page 205 MIDI Implementation Address block map 2. Supplementary material The following is an outline of the address map for Exclusive messages Decimal/Hexadecimal table Address(H) Block Sub Block Reference =========== ==================== =========================== ========= MIDI uses 7-bit hexadecimal values to indicate data values and the address and size of 00 00 00 00 +——————————————————+........+———————+ exclusive messages.
- Page 206 74H | 53 | 35H | 85 | 55H | 117 | 75H | Roland exclusive messages (RQ1, DT1) are transmitted with a checksum at the end of the 54 | 36H | 86 | 56H | 118 | 76H |...
- Page 207 (1) Exclusive status (2) ID number (Roland)(3) Device ID (17) (4), (5) Model ID (MC-307)(6) Command ID (RQ1)(7) EOX When the checksum is calculated in the same way as in <Example 2>, we have the following message to be transmitted: F0 41 10 00 0B 11 01 00 00 00 00 00 19 1A 4C F7.
-
Page 208: Midi Implementation Chart
Date : Oct. 27, 1999 Model MC-307 MIDI Implementation Chart Version : 1.00 Sound Generator section Transmitted Recognized Remarks Function… Basic Default 1—7, 10 Channel Changed 1—7, 10 Default Mode 3 Mode Mode 3, 4 (M=1) Messages Altered **************** Note 0—127... - Page 209 Date : Oct. 27, 1999 Model MC-307 MIDI Implementation Chart Version : 1.00 Sequencer section Transmitted Recognized Remarks Function… There is no basic channel. Basic Default 1—7, 10 1—7, 10 Channel Changed Default Mode 3 Mode OMNI OFF, POLY...
-
Page 210: Index
Index Numerics DEVICE ID ..............123 Distortion .................50 4 Band EQ ................48 Edit Quantize ..............82 ACCENT RATE ..............34 EDIT TX/RX ..............125 AFT .................102 EFFECT SW ..............114 AMP .................95, 110 Enhancer ................49 ENVELOPE ............95, 110 ENVELOPE ..............89 Arpeggiator .............31, 127 Erase .................77 ACCENT RATE ............34 External MIDI Device ..........133 Detailed Settings ............32... - Page 211 Index M-FX TO DLY LEVEL ...........45 Transpose ..............79 M-FX TO REV LEVEL ...........43 Pattern Set ................37 Micro Edit ................72 PC ..................72 NOTE ................72 PEDAL ASSIGN ............117 MIDI Channels .............132 PEDAL POLARITY ............118 MIDI connectors ............132 Phaser ................55 MIDI RX SW ..............125 Phonograph ..............53 MOD ................102 PITCH ..............89, 106...
- Page 212 Index Saving Undo .................15, 131 Arpeggiator ...............34 Utilities ................128 Pattern ................23 Saving Settings ..............14 View Filter ...............75 SCALE TUNE ...............116 VOICE RESERVE ............115 SCALE TUNE SW ............116 SEND LEVEL ..............112 SEQ OUT .................23 WAVE ..............88, 105 Setup Parameter ............147 Waveform ..............167 setup parameters ............23 WRITE ................131 Shift Clock ...............81...
- Page 213 Information When you need repair service, call your nearest Roland Service Center or authorized Roland distributor in your country as shown below. PANAMA POLAND LEBANON SINGAPORE AFRICA AFRICA Productos Superiores, S.A. P. P. H. Brzostowicz A. Chahine & Fils Swee Lee Company Apartado 655 - Panama 1 UL.
- Page 215 For the U.K. IMPORTANT: THE WIRES IN THIS MAINS LEAD ARE COLOURED IN ACCORDANCE WITH THE FOLLOWING CODE. BLUE: NEUTRAL BROWN: LIVE As the colours of the wires in the mains lead of this apparatus may not correspond with the coloured markings identifying the terminals in your plug, proceed as follows: The wire which is coloured BLUE must be connected to the terminal which is marked with the letter N or coloured BLACK.
- Page 216 01904601 ’00-2-C3-21N...