Table of Contents
Advertisement
Owner's Manual
Owner's Manual
(this document)
(this document)
Read this first. It explains the basic things you need to know in order
Read this first. It explains the basic things you need to know in order
to use the MC-101.
to use the MC-101.
PDF Manual
PDF Manual
(download from the Web)
(download from the Web)
5
5 Reference Manual
Reference Manual
This explains all parameters of the MC-101.
This explains all parameters of the MC-101.
1.
Enter the following URL in your computer.
http://www.roland.com/manuals/
Before using this unit, carefully read "USING THE UNIT SAFELY"
will be available for immediate reference.
© 2019 Roland Corporation
To obtain the PDF manual
2.
and "IMPORTANT NOTES"
(p. 20)
Owner's Manual
Choose
"MC-101"
as the product name.
. After reading, keep the document
(p. 23)
where it
(s)
Advertisement
Table of Contents

Related Manuals for Roland MC-101


Summary of Contents for Roland MC-101
- Page 1 PDF Manual (download from the Web) (download from the Web) 5 Reference Manual Reference Manual This explains all parameters of the MC-101. This explains all parameters of the MC-101. To obtain the PDF manual Choose “MC-101” as the product name.
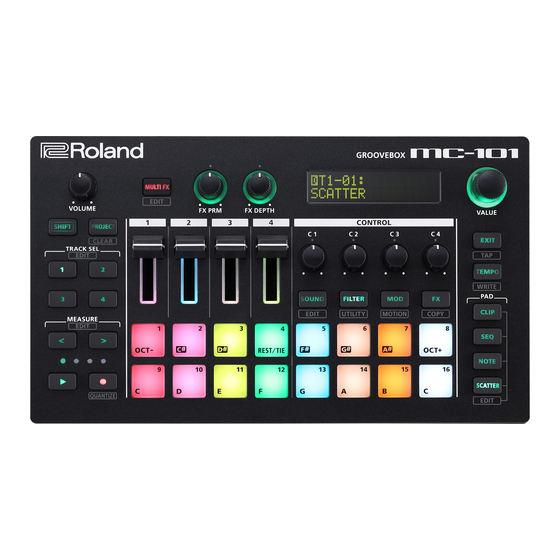
- Page 2 Panel Descriptions [PROJECT] button Top Panel Accesses the project menu screen. Here you can load a project and make settings for it. When used together with the [SHIFT] button, this func- tions as the [CLEAR] button. By using the [CLEAR] button together with other but- tons, you can clear the recorded contents of the step sequencer or the contents of a phrase.
- Page 3 Panel Descriptions button (play/stop) Control Section Starts or stops playback. [C1]–[C4] knobs button (rec) Necessary functions are assigned to these knobs de- pending on the operation. Turns on/off recording of your performance using the pads. [SOUND] button If you hold down the [SHIFT] button and press the Assigns the...
- Page 4 Panel Descriptions [FX] button [EXIT] button Assigns the [C1]–[C4] knobs to control the FX parameter Returns to the previous screen. of track 1–4. In some screens, cancels the currently-executing func- If you hold down the [SHIFT] button and press the [FX] tion.
- Page 5 Panel Descriptions PAD [SEQ] button Front Panel Switches the pads to SEQ mode (p. 15). In SEQ mode, you can use the lit pads to step-record a melody or step- record drums. If you hold down the [SHIFT] button and press the [SEQ] button, you can then make settings related to SEQ mode.
- Page 6 * To prevent malfunction and equipment failure, always turn down the volume, and turn off all the units before making any connections. [POWER] switch MIDI port & “Turning the MC-101 On” Connect MIDI devices. (p. 7) Close the battery cover. SD card * If you handle batteries improperly, you risk explosion and fluid leakage.
- Page 7 USB MIDI and USB audio data. You must install the USB driver when connecting this unit to your computer. For details, refer to Readme.htm in Power-on your equipment in the order of MC-101 the downloaded file. 0 connected equipment.
- Page 8 An Overview of the MC-101 MC-101 System Setting Project Project Setting User Sample Track Mix Master Multi Effect Equalizer Compressor Track 1–4 Reverb Tone/ MASTER FX Setting Track 1–4 Drum Kit/ Looper Chorus/ Delay Track 1–4 Types of track and their internal structure...
- Page 9 An Overview of the MC-101 The MC-101 can simultaneously play back up to four Track type: Tone independent tracks. Clip setting: This contains the name of the clip, and information and settings for the clip. You can assign up to 16 clips to each track, and switch Tone: This contains settings for the sound.
- Page 10 An Overview of the MC-101 What is a Project? What is the Browser? On the MC-101, data for one song is managed as a unit This lets you select the material that you need for the called a “project. ”...
- Page 11 An Overview of the MC-101 Master FX Setting USER SAMPLE The MC-101 is equipped with five master effects. User samples used by tones and drum kits. Settings for these effects are saved in the project. Reverb Adds reverberation to the sound.
- Page 12 Performing and Producing Press the [p](play/stop) button. Loading and Playing a Project The project plays. On the MC-101, data for one song is handled as a unit Switching Clips called a “project. ” Projects are saved on the SD card. (CLIP Mode)
- Page 13 Performing and Producing Selecting a Tone or Drum Kit Loading a Clip from SD Card Press the PAD [NOTE] button. Stop playback the project. The pads are assigned to NOTE mode. Make sure that the [p] button is blinking. If the [p] button is lit, press the [p] button...
- Page 14 Performing and Producing Use the [VALUE] dial to select the clip that you Recording a Pad Performance want to import, and press the [VALUE] dial. Use the [VALUE] dial to select the import-destina- tion, and press the [VALUE] dial. Performing with the Pads (NOTE Mode) By using the NOTE mode of the pads, you can perform using the illuminated pads.
- Page 15 Performing and Producing About the Step Sequencer Using Scatter (SCATTER Mode) The phrase data included in a clip is played back by the “Scatter” is a beat-synchronized effect. It lets you add a step sequencer for each track. sense of digital groove to the playback sound. By setting pad mode to SEQ, you can check and edit the content that is played back by each step.
- Page 16 Making Various Settings Editing Settings Returning to the Factory Settings (Factory Reset) Here’s how to edit the settings of this unit. Here’s how to return the settings of this unit to their factory-set state. Hold down the [SHIFT] button and press the [FILTER] button.
- Page 17 & https://www.roland.com/support/ * If you want to back up the contents of the SD card included with the MC-101 to your computer, use your computer to save the contents on other media. 4 5 6 Remove the screws of the SD card protector (rear panel).
- Page 18 Making Various Settings Replace the SD card. Attach the SD card protector as necessary. * Never turn off the power or remove the SD card while the SD card is being accessed. Hold down the [SHIFT] button and press the [FILTER] button.
- Page 19 Main Specifications Roland MC-101: Groovebox Power Supply Ni-MH Battery ,Alkaline x 4, or obtained via USB port (AA, HR6) (AA, LR6) (USB bus power) Current Draw 500 mA Ni-MH battery : Approx. 4.5 hours Expected battery (AA, HR6) life under continu- Alkaline : Approx.
- Page 20 • Damp (e.g., baths, washrooms, on Be sure to contact your dealer, may cause short circuits, faulty wet floors); or are a Roland service center, or an operation, or other malfunctions. • Exposed to steam or smoke; official Roland dealer.
- Page 21 • When using a rechargeable or exhibits a marked change in performance. battery and a charger, make sure For a list of Roland service centers and Disconnect all cords/cables before moving the unit to use only the combination of official Roland dealers, refer to the Roland...
- Page 22 USING THE UNIT SAFELY CAUTION CAUTION Handle batteries carefully Keep small items out of the reach of children If used improperly, batteries To prevent accidental ingestion may explode or leak and of the parts listed below, always cause damage or injury. In the keep them out of the reach of interest of safety, please read small children.
- Page 23 • Roland assumes no liability concerning the • If operating this unit on batteries, please use restoration of any stored content that has • Depending on the material and temperature alkaline batteries, Ni-MH batteries.
- Page 24 (the sound waveform data, style data, • Prevent the device from getting wet. accompaniment patterns, phrase data, audio loops and image data) is reserved by Roland • Do not disassemble or modify the device. Corporation. • Purchasers of this product are permitted to...