Konica Minolta bizhub C224 Quick Start Manual
Bizhub c554/c454/c364/c284/c224 quick assist guide
Hide thumbs
Also See for bizhub C224:
- Installation manual (29 pages) ,
- User manual (1 page) ,
- Quick assist manual (278 pages)
Table of Contents
Advertisement
Quick Links
Advertisement
Table of Contents

Related Manuals for Konica Minolta bizhub C224


Summary of Contents for Konica Minolta bizhub C224
- Page 1 Quick Start Guide This guide describes basic machine procedures and setting methods used to configure each function. It introduces important functions that make it easier to use this machine. This guide also contains notes and precautions that should be followed in order to use this machine.
-
Page 2: Table Of Contents
Table of contents Introduction Environmental Information......................1-2 Energy Star®............................1-2 What is an ENERGY STAR® Product? ....................1-2 Environmental benefits of power management ................. 1-2 Recycled Paper..........................1-2 Duplex printing........................... 1-2 Safety information........................... 1-3 Warning and precaution symbols ...................... 1-3 Meaning of symbols........................... - Page 3 About this machine ......................... 2-5 2.2.1 Optional components (bizhub C554/C454) ..................2-5 2.2.2 Optional components (bizhub C364/C284/C224)................2-7 2.2.3 Name of parts (MFP) (bizhub C554/C454) ..................2-9 Front side ............................2-9 Rear side ............................2-10 2.2.4 Name of parts (MFP) (bizhub C364/C284/C224) ................2-11 Front side ............................
- Page 4 Operation flow............................ 3-2 Checking the cable connection ......................3-3 Checking network settings of this machine ..................3-3 Installing the printer driver ......................... 3-4 Printing data............................3-7 Types of printer drivers ........................3-8 3.1.2 Required settings and basic operations (For Mac OS) ..............3-9 Preparation flow ..........................
- Page 5 Copy Function ..........................3-58 Basic operations ..........................3-58 User authentication.......................... 3-60 Registering a destination ......................3-61 3.5.1 Registering an address book ......................3-61 Using the Control Panel to register an address book..............3-61 Using a computer to register a one-touch destination ..............3-64 3.5.2 Information required to register a destination..................
-
Page 6: Introduction
Introduction... -
Page 7: Environmental Information
Environmental Information Introduction This [Quick Start Guide] uses illustrations to describe operating procedures for the most commonly used functions in an easy-to-understand way. Start by using this manual to become proficient with the useful functions that this machine offers. For details on the various functions, refer to the User’s Guides on the User’s Guide CD included with this machine. -
Page 8: Safety Information
Safety information Safety information This section contains detailed instructions on the operation and maintenance of this machine. To achieve op- timum utility of this device, all operators should carefully read and follow the instructions in this manual. Please read the following section before connecting the machine to the supply. It contains important infor- mation related to user safety and preventing equipment problems. - Page 9 Safety information Power cord • Do not scratch, abrade, place a heavy object on, heat, twist, bend, pull on, or damage the power cord. Use of a damaged power cord (exposed core wire, broken wire, etc.) could result in a fire or breakdown. Should any of these conditions be found, immediately turn OFF the power switch, unplug the power cord from the power outlet, and then call your authorized service representative.
- Page 10 Safety information Grounding WARNING • Connect the power cord to an electrical outlet that is equipped with a grounding terminal. Installation WARNING • Do not place a flower vase or other container that contains water, or metal clips or other small metallic objects on this product. Spilled water or me- tallic objects dropped inside the product could result in a fire, electrical shock, or breakdown.
- Page 11 Safety information Actions in response to troubles WARNING • Do not keep using this product, if this product becomes inordinately hot or emits smoke, or unusual odor or noise. Immediately turn OFF the pow- er switch, unplug the power cord from the power outlet, and then call your authorized service representative.
- Page 12 Safety information Papers CAUTION • Do not use stapled paper, conductive paper (such as silver paper or car- bon paper) or treated heat-sensitive/inkjet paper, otherwise a fire may re- sult. When the Fax is not installed: Before successive holidays CAUTION •...
-
Page 13: Regulation Notices
This device must be used with a shielded interface cable. The use of non-shielded cables is likely to result in interference with radio communications and is prohibited under CISPR rules and local rules. GS Certfication This product is GS-certified for the Konica Minolta branded model bizhub C554, bizhub C454, bizhub C364, bizhub C284 and bizhub C224. Laser safety This is a digital machine which operates using a laser. -
Page 14: Internal Laser Radiation
Regulation notices Internal laser radiation Maximum Average Radiation Power: 11.2 μW (bizhub C554) / 9.4 μW (bizhub C454) / 7.4 μW (bizhub C364) / 6.0 μW (bizhub C284/C224) at the laser aperture of the print head unit. Wavelength: 770-800 nm This product employs a Class 3B laser diode that emits an invisible laser beam. -
Page 15: For Denmark Users
Regulation notices For Denmark users ADVARSEL Usynlig laserstråling ved åbning, når sikkerhedsafbrydere er ude af funktion. Undgå udsættelse for stråling. Klasse 1 laser produkt der opfylder IEC60825 sikkerheds kravene. Dansk: Dette er en halvlederlaser. Laserdiodens højeste styrke er 15 mW og bølgelængden er 770-800 nm. For Finland, Sweden users LOUKAN 1 LASERLAITE KLASS 1 LASER APPARAT... -
Page 16: Laser Safety Label
Regulation notices Laser safety label A laser safety label is attached to the outside of the machine, as shown below. *only for the U.S.A. Ozone release Locate the Machine in a Well-Ventilated Room A negligible amount of ozone is generated during normal operation of this machine. An unpleasant odor may, however, be created in poorly ventilated rooms during extensive machine operations. -
Page 17: For Eu Member States Only
Regulation notices For EU member states only This symbol means: Do not dispose of this product together with your household waste! Please refer to the information of your local community or contact our dealers re- grading the proper handling of end-of-life electric and electronic equipments. Re- cycling of this product will help to conserve natural resources and prevent potential negative consequences for the environment and human health caused by inappropriate waste handling. -
Page 18: Caution Notations And Labels
Caution notations and labels Caution notations and labels Safety precaution notations and labels appear on this machine at the following positions.Be very careful that an accident does not occur when operations such as removing paper jams and staple jams are performed. NOTICE Do not remove caution labels or notations. -
Page 19: Special Notice To User
If trouble is experienced with this equipment FK-511, for repair or warranty information, please contact the Konica Minolta dealer location where you purchased this equipment. If the equipment is causing harm to the telephone network, the telephone company may request that you disconnect the equipment until the problem is resolved. -
Page 20: For New Zealand
Special Notice to User Connection to party line service is subject to state tariffs. Contact the state public utility commission, public service commission or corporation commission for information. If you home has specially wired alarm equip- ment connected to the telephone line, ensure the installation of FK-511 does not disable you alarm equip- ment. -
Page 21: For Europe
Special Notice to User For Europe The Facsimile has been approved in accordance with Council Decision 1999/5/ EC for pan-European single terminal connection to the public switched telephone network (PSTN). However, due to differences between the individual PSTNs provided in different countries, the approval does not, of itself, give an unconditional assurance of successful operation on every PSTN network terminal point. -
Page 22: Space Requirements
Space requirements Space requirements To ensure that machine operation, consumables replenishing, part replacement, and regular maintenance can easily be performed, adhere to the recommended space requirements detailed below. bizhub C554/C454 100-3/8 (2548) 49-1/16 (1246) 7-5/16 9-3/8 16-7/8 34-11/16 (881) 49 (1244) 32-3/16 (818) (185) (238) -
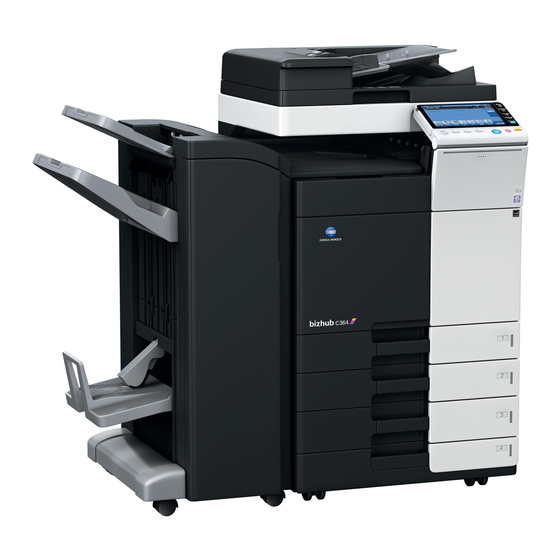
Page 23: Bizhub C364/C284/C224
Space requirements bizhub C364/C284/C224 62-7/8 (1597) 48-13/16 (1240) 16-7/8 26 (660) 36-7/8 (937) 31-15/16 (812) (428) bizhub C364/C284/C224 + DF-624 + PC-210 + FS-534 + SD-511 Unit: inch (mm) 48-13/16 (1240) 43-9/16 (1107) 16-7/8 6-11/16 36-7/8 (937) 31-15/16 (812) (428) (170) bizhub C364/C284/C224 + DF-624 + PC-210 + FS-533 Unit: inch (mm) -
Page 24: Operation Precautions
Operation precautions Operation precautions To ensure the optimum performance of this machine, observe the precautions described below. Power source The power source requirements are as follows. Voltage fluctuation: Maximum ± 10% (at 110 V/120 to 127 V/220 to 240 V AC) Frequency fluctuation: Maximum ±... -
Page 25: Legal Restrictions On Copying
Legal restrictions on copying Legal restrictions on copying Certain types of originals must never be copied with the purpose or intent to pass copies of such originals off as the originals. The following is not a complete list, but is meant to be used as a guide to responsible copying. <Financial Instruments>... -
Page 26: About This Machine
About This Machine... -
Page 27: Introduction To User's Guide
Introduction to User's Guide About This Machine Introduction to User's Guide The user's guide of this product consists of two booklet manuals and the "User's Guide CD". The booklet manuals describe basic machine procedures and frequently asked questions. If you want to learn about more detailed functions or operation methods, refer to the User's Guide included in the "User's Guide CD". -
Page 28: User's Guide Cd
Introduction to User's Guide 2.1.2 User's Guide CD The "User's Guide CD" is provided with this machine. Select a desired function on the top page (Home), and check the details of the function. Selecting [Introduction] on the top page (Home) allows you to view detailed methods for using the User's Guide. -
Page 29: Operating Environment
Introduction to User's Guide Operating environment Item Specifications Supported Operating Systems Windows XP (SP3), Windows Vista (SP2), Windows 7 (SP1) Mac OS X10.4/10.5/10.6/10.7 Supported Web browsers Windows: Internet Explorer 6.x/7.x/8.x/9.x, Firefox 3.x/4.x Mac OS: Safari 3.1 or later /4.x/5.x • We recommend that you use the latest Web browser that is com- patible with your operating system to help you use this machine more conveniently and comfortably. -
Page 30: Optional Components (Bizhub C554/C454)
About this machine About this machine 2.2.1 Optional components (bizhub C554/C454) Various optional components can be added to meet your office requirements. bizhub C554/C454/C364/C284/C224... - Page 31 About this machine Name Description Main unit Scans the original in the scanner section, and prints a scanned im- age in the printer section. Required to use the fax function. Fax Kit FK-511 Authentication Unit AU- Working Table WT-506 is required as a stand. 102 (Biometric Type) Working Table WT-506 is required as a stand.
-
Page 32: Optional Components (Bizhub C364/C284/C224)
About this machine 2.2.2 Optional components (bizhub C364/C284/C224) Various optional components can be added to meet your office requirements. bizhub C554/C454/C364/C284/C224... - Page 33 About this machine Name Description Main unit Scans the original in the scanner section, and prints a scanned im- age in the printer section. Used to fix the loaded originals. Original Cover OC-511 Reverse Automatic Doc- Automatically feeds and scans originals by page. ument Feeder DF-624 Scans the front and back sides of the sheet at the same time.
-
Page 34: Name Of Parts (Mfp) (Bizhub C554/C454)
About this machine 2.2.3 Name of parts (MFP) (bizhub C554/C454) Front side Name Description Use the Touch Panel or buttons on this panel to operate this ma- Control Panel chine. Original Tray Load the original. Used to operate the Touch Panel. Stylus Pen Bypass Tray Used to load custom-size paper or special paper. -
Page 35: Rear Side
About this machine Rear side The illustration shows the main unit that contains the Heater and Fax Kit. The shape of the power cord varies depending on the sales region. The Heater is provided as an optional unit depending on the sales areas. Name Telephone Jack 1/2 (LINE PORT 1/2) Jack for connecting a telephone (TEL PORT1/2) -
Page 36: Name Of Parts (Mfp) (Bizhub C364/C284/C224)
About this machine 2.2.4 Name of parts (MFP) (bizhub C364/C284/C224) Front side Name Description Use the Touch Panel or buttons on this panel to operate this ma- Control Panel chine. Original Tray Load the original. Used to operate the Touch Panel. Stylus Pen Bypass Tray Used to load custom-size paper or special paper. -
Page 37: Rear Side
About this machine Rear side The illustration shows the main unit that contains the Heater and Fax Kit. The shape of the power cord varies depending on the sales region. The Heater is provided as an optional unit depending on the sales areas. Name Telephone Jack 1/2 (LINE PORT 1/2) Jack for connecting a telephone (TEL PORT1/2) -
Page 38: Name Of Parts (Optional Units)
About this machine 2.2.5 Name of parts (Optional units) This section shows the names of distinctive parts for each optional unit that can be installed in this machine. Finisher FS-535, Saddle Stitcher SD-512, Punch Kit PK-521 (bizhub C554) Name Output Tray Punch Kit Punch Scrap Box Staple Cartridge... - Page 39 About this machine Name Staple Cartridge Folding Output Tray 2-14 bizhub C554/C454/C364/C284/C224...
-
Page 40: Job Separator Js-602 (Bizhub C554)
About this machine Job Separator JS-602 (bizhub C554) Name Output Tray bizhub C554/C454/C364/C284/C224 2-15... -
Page 41: Z Folding Unit Zu-606 (Bizhub C554)
About this machine Z Folding Unit ZU-606 (bizhub C554) Name Z Folding/Conveyance Unit Punch Scrap Box 2-16 bizhub C554/C454/C364/C284/C224... -
Page 42: Post Inserter Pi-505 (Bizhub C554)
About this machine Post Inserter PI-505 (bizhub C554) Name Lower Tray Upper Tray Control Panel Reference For details on how to use the Control Panel, refer to the User's Guide CD. bizhub C554/C454/C364/C284/C224 2-17... -
Page 43: Finisher Fs-533, Punch Kit Pk-519
About this machine Finisher FS-533, Punch Kit PK-519 Name Staple Cartridge Punch Kit Output Tray Tray Extension 2-18 bizhub C554/C454/C364/C284/C224... -
Page 44: Job Separator Js-506
About this machine Job Separator JS-506 Name Output Tray bizhub C554/C454/C364/C284/C224 2-19... -
Page 45: Finisher Fs-534, Saddle Stitcher Sd-511, Punch Kit Pk-520
About this machine Finisher FS-534, Saddle Stitcher SD-511, Punch Kit PK-520 Name Output Tray Staple Cartridge Punch Scrap Box Saddle Stitcher 2-20 bizhub C554/C454/C364/C284/C224... - Page 46 About this machine Name Punch Kit Staple Cartridge Folding Output Tray bizhub C554/C454/C364/C284/C224 2-21...
-
Page 47: Large Capacity Unit Lu-301/Lu-204
About this machine Large Capacity Unit LU-301/LU-204 Reference For details, refer to the User's Guide CD. 2-22 bizhub C554/C454/C364/C284/C224... -
Page 48: Power Supply
Power supply Power supply This machine provides two power switches: Power key on the Control Panel and Main Power Switch on the machine. Under normal conditions, operate the Power key of the control panel. Use Main Power Switch to restart this machine. 2.3.1 Turning the power on and off Turn the power on and off only when necessary, for example, when the administrative settings are changed... -
Page 49: Operating The Power Key
Power supply 2.3.2 Operating the Power key When not operating this machine for a long period of time, for example, after working, press the Power key to shift to the power save mode. The machine mode changes to the following different modes depending on how the Power key is pressed. Pressing the Power key during operation changes to the Sub Power OFF mode. -
Page 50: Manually Switching To The Power Save Mode
Power supply Manually switching to the power save mode To manually switch to the low power or sleep mode before the machine shifts to the power save mode, change the settings of the Power key on the Control Panel to [Power Save]. Tap [Utility], and select [Administrator Settings] - [System Settings] - [Power Supply/Power Save Settings] - [Power Key Setting]. -
Page 51: Control Panel
Control Panel Control Panel This machine provides a sliding Control Panel. The hard keys required for basic operations are arranged on the front side, and the keys used for settings or registrations on the rear side. 2.4.1 Name of parts Name Description Various screens and messages are displayed. - Page 52 Control Panel Name Description Turns the power on or off. The key lamp lights up or flashes blue Power when the power is turned on, and orange when the power is turned off. • In the Administrator Settings, you can add the function for man- ually switching to the power save mode to the Power key.
-
Page 53: Touch Panel
Touch Panel Touch Panel 2.5.1 Main Menu Press the Menu key on the Control Panel to display the main menu. In the main menu, you can configure settings such as frequently used functions or a shortcut key for jumping to each mode. Layout of main menu Name Description... -
Page 54: Customizing The Main Menu
Touch Panel Customizing the main menu The main menu can be extended to two screens as necessary. Up to 23 keys can be assigned to two main menu screens which can be switched. In addition, you can specify your favorite background pattern. Reference For details, refer to the User's Guide CD. -
Page 55: Flick
Touch Panel Flick Make a slight fillip while sliding your finger on the screen. This action is used to scroll an address or job list and feed thumbnail-view pag- Drag Slide your finger on the screen while touching it. This action is used to move a display position on an application or preview screen. -
Page 56: Entering Characters
Touch Panel 2.5.3 Entering characters When entering characters to register an address or program, use the keyboard screen displayed on the Touch Panel. When typing in "Group1": To type in uppercase letters or symbols, tap the [Shift] key. % If you mistyped, tap [ ] or [ ] to move the cursor to the character you want to clear, then tap the [Delete] key. -
Page 57: Jobs
Jobs Jobs 2.6.1 Job screen A job refers to an operation such as printing, sending, receiving, or saving. When you tap [Job List] in the main menu or the main screen of each mode, the Job screen appears. In the Job screen, you can view a list or history of a job currently being executed or print a sending-receiving result report. -
Page 58: Loading Paper
Loading Paper Loading Paper 2.7.1 Loading paper in Tray 1 to Tray 4 Up to 500 sheets of plain paper can be loaded into each tray.Tray3 and Tray4 are optional. Applicable paper types Plain paper, single-side-only paper, thin paper, special paper, thick paper, letterhead, colored paper, and re- cycled paper How to load paper Pull out the tray. -
Page 59: Lct (Built-In)
Loading Paper 2.7.2 LCT (built-in) Up to 2500 sheets of plain paper can be loaded into the LCT (built-in). The LCT (built-in) is an option. Applicable paper types Plain paper, single-side-only paper, thin paper, special paper, thick paper, letterhead, colored paper, and re- cycled paper How to load paper Pull out the tray. -
Page 60: Loading Paper Into The Large Capacity Unit
Loading Paper 2.7.3 Loading paper into the Large Capacity Unit Up to 3000 sheets of plain paper can be loaded into Large Capacity Unit LU-301, and up to 2500 sheets of plain paper into Large Capacity Unit LU-204. The Large Capacity Unit is an option. Applicable paper types Plain paper, single-side-only paper, thin paper, special paper, thick paper, letterhead, colored paper, recy- cled paper... -
Page 61: Bypass Tray
Loading Paper 2.7.4 Bypass Tray Use the Bypass Tray when printing on a paper size other than for paper trays, or printing on envelopes or transparencies. To use the Bypass Tray, load paper and specify the paper type. Applicable paper types Plain paper, single-side-only paper, special paper, thick paper, postcard (4 e 6 (A6 Card)), transparency, let- terhead, colored paper, envelope, label sheets, index paper, recycled paper, and banner paper Applicable paper sizes... - Page 62 Loading Paper Specify the paper type. Tap [Paper]. Select [#], then tap [Change Tray Setting]. Select the paper type. bizhub C554/C454/C364/C284/C224 2-37...
- Page 63 Loading Paper Specify the paper size. % For Auto Detect [Auto Detect] detects the paper size automatically when standard-size paper is loaded into a tray. % For Standard Size [Standard Size] is available when loading a postcard or standard-size paper for overseas. 2-38 bizhub C554/C454/C364/C284/C224...
- Page 64 Loading Paper % For Custom Size % For Wide Paper bizhub C554/C454/C364/C284/C224 2-39...
- Page 65 Loading Paper 2-40 bizhub C554/C454/C364/C284/C224...
-
Page 66: Basic Settings And Operations
Basic Settings and Operations... -
Page 67: Print Function
Print Function Basic Settings and Operations Print Function 3.1.1 Required settings and basic operations (For Windows OS) Print data created on your computer via the network. This section describes how to configure standard print settings using the installer. Preparation flow The following describes a preparation flow to print data. -
Page 68: Checking The Cable Connection
Print Function Checking the cable connection Check that a LAN cable is connected to the LAN port of this ma- chine and the green LED is on. Checking network settings of this machine Tap [Utility], and select [Device Information]. Check that the IP address is displayed. •... -
Page 69: Installing The Printer Driver
Print Function Installing the printer driver Use the installer to install the printer driver. This operation requires administrator privileges for your computer. Insert the printer driver CD-ROM into the CD-ROM drive of the computer. Click [Printer Install]. Proceed with the procedure according to the on-screen instructions. This automatically searches for the appropriate network and displays printers and MFPs that are com- patible with the printer driver. - Page 70 Print Function Select this machine from the list. % If multiple identical models are displayed, check the IP address to select an appropriate one. For details on how to check the IP address of this machine, refer to page 3-3. Select the check boxes of the printer drivers to be installed.
- Page 71 Print Function Click [Finish]. bizhub C554/C454/C364/C284/C224...
-
Page 72: Printing Data
Print Function Printing data Open the data you want to print using the application software. In the [File] menu, click [Print]. Select the installed printer driver, and click [Print]. Tips Clicking [Preferences] can change the setting of the printer driver as required. If user authentication is enabled in this machine, specify the required data such as the user name and password. -
Page 73: Types Of Printer Drivers
Print Function Types of printer drivers Select a printer driver that will meet your printing requirements. Driver type Description This is a standard driver for printing general office documents. Among the three drivers, this driver provides the fastest printing speed. This driver is effective to exactly print data that is created using PostScript-com- patible application software from Adobe or other vendors. -
Page 74: Required Settings And Basic Operations (For Mac Os)
Print Function 3.1.2 Required settings and basic operations (For Mac OS) Print data created on your computer via the network. This section describes how to configure a printer driver, for the OS X 10.6 environment, Bonjour connection, and use of metric-size paper as major conditions. Preparation flow The following describes a preparation flow to print data. -
Page 75: Checking The Cable Connection
Print Function Checking the cable connection Check that a LAN cable is connected to the LAN port of this ma- chine and the green LED is on. Checking network settings of this machine Tap [Utility], and select [Device Information]. Check that the IP address is displayed. •... - Page 76 Print Function % The Bonjour name is displayed on the printer driver as a connected device name. For "Bizhub C364 (5A:0C:4B)", "Bizhub C364" indicates the product name, and "(5A:0C:4B)" indicates the last three bytes of the MAC address. % To change the Bonjour name, tap [Bonjour Name], and enter the name using the displayed key- board.
-
Page 77: Installing The Printer Driver
Print Function Installing the printer driver Use the installer to install the printer driver. This operation requires administrator privileges for your computer. Insert the printer driver CD-ROM into the CD-ROM drive of the computer. Select the target printer driver, and copy it to the desktop. Example: /Driver/OS_10_6_x/Letter/bizhub_C364_106.pkg (Printer driver for OS X 10.6) % When ordinarily using metric-sized paper, select a printer... - Page 78 Print Function bizhub C554/C454/C364/C284/C224 3-13...
- Page 79 Print Function Click [Install]. When a prompt message appears to ask you to enter the name and password, type in the name and password of the user with administrator privileges. Click [Close]. 3-14 bizhub C554/C454/C364/C284/C224...
-
Page 80: Adding And Configuring A Printer Driver
Print Function Adding and configuring a printer driver Set up your computer so that data can be printed using the installed printer driver. This operation requires administrator privileges for your computer. In the Apple Menu, click [System Preferences] - [Print & Fax]. Click [+]. - Page 81 Print Function Check that the printer driver is displayed. Select the installed optional units. 3-16 bizhub C554/C454/C364/C284/C224...
-
Page 82: Printing Data
Print Function Printing data Open the data you want to print using the application software. From the [File] menu, select [Print]. Select the Bonjour name of this machine. Tips If necessary, you can change the settings of the printer driver. bizhub C554/C454/C364/C284/C224 3-17... -
Page 83: Scan-To-Send Function
Scan-to-Send function Scan-to-Send function 3.2.1 Various transmission methods The original data scanned by this machine can be sent and saved using a variety of methods. Sending data to your computer (SMB Send) Send scanned data to a computer on the network. Once settings are configured, you can send data easily. For details, refer to page 3-20 and page 3-30. -
Page 84: Various Methods For Transmitting And Saving Data
Scan-to-Send function Various methods for transmitting and saving data In addition to the above, data can be sent and saved in various methods. Select the appropriate one to meet your needs. Issuing a scan instruction from a computer (Web service function) Saving data to a User Box on the HDD (Save in User Box) Sending to an FTP server (FTP TX) Sending to a WebDAV server (WebDAV Send) -
Page 85: Sending Data To Your Windows Computer (Smb Send)
Scan-to-Send function 3.2.2 Sending data to your Windows computer (SMB Send) Send scanned data to a computer on the network. Once settings are configured, you can send data easily. Preparation flow The following describes a preparation flow for sending scanned data. For details, refer to the relevant page. This preparation is not required the second time or subsequent times. -
Page 86: Checking The Cable Connection
Scan-to-Send function Checking the cable connection Check that a LAN cable is connected to the LAN port of this ma- chine and the green LED is on. Checking network settings of this machine Tap [Utility], and select [Device Information]. Then, check that the IP address is displayed. •... -
Page 87: Checklist
Scan-to-Send function Checklist While making notes in the checklist shown below, check computer information and configure settings for preparation. The completed checklist is used for Store Address. Name Entry column Detail Host Address Host name or IP address to which the scanned data is sent page 3-22 File Path Name of the dedicated folder to receive the scanned data... -
Page 88: Configuring Your Computer
Scan-to-Send function Check the user name, and write it down in the User ID column of the checklist. % In the example shown below, "taro.yamada" is displayed as the user ID. Configuring your computer Create a new folder, and enable the sharing settings. This operation requires administrator privileges for your computer. - Page 89 Scan-to-Send function Only for Windows XP, check the folder options. % Double-click the folder, select [Tools] - [Folder Options...] then click the [View] tab. % Clear the [Use simple file sharing (Recommended)] check box. Configure the setting to share the folder created in Step 2. Right-click on the folder, then click [Proper- ties].
- Page 90 Scan-to-Send function Click the [Sharing] tab, then click [Advanced Sharing]. % For Windows XP, [Advanced Sharing] does not appear. Select the [Share this folder] check box, then click [Permissions]. Select [Everyone] from the [Group or user names:] list, then select all of the [Allow] check boxes. bizhub C554/C454/C364/C284/C224 3-25...
-
Page 91: Registering Destinations
Scan-to-Send function Registering destinations While checking the created checklist, register the folder for receiving the scanned data as an address book of this machine. Tap [Utility], and select [One-Touch/ User Box Reg.] - [Create One-Touch Destination] - [Address Book (Public)] - [PC (SMB)]. Tap [New]. - Page 92 Scan-to-Send function While checking the checklist, enter the user ID and password you wrote down. While checking the checklist, enter the host address and file path you wrote down. % When not specifying a folder, enter a slash "/" for the file path. When specifying a folder, enter only the folder name without slash "/".
-
Page 93: Sending The Original
Scan-to-Send function Sending the original Load the original. Tap [Scan/Fax]. Select a destination. 3-28 bizhub C554/C454/C364/C284/C224... - Page 94 Scan-to-Send function Check the setting if necessary. % Tap [Check Setting] to check the setting. % You can also check the setting using the keys displayed on the Touch Panel. % To change the setting, tap the desired key on the Touch Panel. Settings Description [Simplex/Duplex]...
-
Page 95: Sending Data To Your Mac Computer (Smb Send)
Scan-to-Send function 3.2.3 Sending data to your Mac computer (SMB Send) Send scanned data to a computer on the network. Once settings are configured, you can send data easily. Preparation flow The following describes a preparation flow for sending scanned data. For details, refer to the relevant page. This preparation is not required the second time or subsequent times. -
Page 96: Checking The Cable Connection
Scan-to-Send function Checking the cable connection Check that a LAN cable is connected to the LAN port of this ma- chine and the green LED is on. Checking network settings of this machine Tap [Utility], and select [Device Information]. Check that the IP address is displayed. •... -
Page 97: Checklist
Scan-to-Send function Checklist While making notes in the checklist shown below, check computer information and configure settings for preparation. The completed checklist is used for Store Address. Name Entry column Detail Host Address IP address to which the scanned data is sent page 3-32 File Path Name of the dedicated folder to receive the scanned data... -
Page 98: Configuring Your Computer
Scan-to-Send function Configuring your computer Create a new folder, and enable the sharing settings. This operation requires administrator privileges for your computer. Create a new folder, and write down the folder name in the File path column of the checklist. Enable the folder sharing settings. - Page 99 Scan-to-Send function Under [Shared Folders:], click [+]. Select a new folder. Click the new folder to check the access right. If the access right is changed to [Read & Write], the setting is completed. 3-34 bizhub C554/C454/C364/C284/C224...
-
Page 100: Registering Destinations
Scan-to-Send function Registering destinations While checking the created checklist, register the folder for receiving the scanned data as an address book of this machine. Tap [Utility], and select [One-Touch/ User Box Reg.] - [Create One-Touch Destination] - [Address Book (Public)] - [PC (SMB)]. Tap [New]. - Page 101 Scan-to-Send function While checking the checklist, enter the user ID and password you wrote down. While checking the checklist, enter the host address and file path you wrote down. % When not specifying a folder, enter a slash "/" for the file path. When specifying a folder, enter only the folder name without slash "/".
-
Page 102: Sending The Original
Scan-to-Send function Sending the original Load the original. Tap [Scan/Fax]. Select a destination. bizhub C554/C454/C364/C284/C224 3-37... - Page 103 Scan-to-Send function Check the setting if necessary. % Tap [Check Setting] to check the setting. % You can also check the setting using the keys displayed on the Touch Panel. % To change the setting, tap the desired key on the Touch Panel. Settings Description [Simplex/Duplex]...
-
Page 104: Transmit The Scanned Data Via E-Mail (E-Mail Tx)
Scan-to-Send function 3.2.4 Transmit the scanned data via E-mail (E-mail TX) Send scanned data as an E-mail attachment. This function allows you to receive data at an outside location, which is useful when a quick measure is re- quired. Preparation flow The following describes a preparation flow for sending scanned data. -
Page 105: Checking The Cable Connection
Scan-to-Send function Checking the cable connection Check that a LAN cable is connected to the LAN port of this ma- chine and the green LED is on. Checking network settings of this machine Tap [Utility], and select [Device Information]. Check that the IP address is displayed. •... -
Page 106: Configuring The E-Mail Transmission Environment
Scan-to-Send function Configuring the E-mail transmission environment Tap [Utility], and select [Administrator Settings] - [Network Settings] - [E-Mail Settings]. % For information on the default administrator password, refer to the [Quick Assist Guide]. Tap [E-Mail TX (SMTP)]. Select [ON] to enable E-mail TX (SMTP) settings and E-mail TX function. bizhub C554/C454/C364/C284/C224 3-41... -
Page 107: Configuring Administrator Information
Scan-to-Send function Enter the SMTP server address. Configuring administrator information Tap [Utility], and select [Administrator Settings] - [Administrator/Machine Settings] - [Administrator Reg- istration]. Enter the required information, then tap [OK]. 3-42 bizhub C554/C454/C364/C284/C224... -
Page 108: Sending The Original
Scan-to-Send function Sending the original Load the original. Tap [Scan/Fax]. Enter a destination. bizhub C554/C454/C364/C284/C224 3-43... - Page 109 Scan-to-Send function Check the setting if necessary. % Tap [Check Setting] to check the setting. % You can also check the setting using the keys displayed on the Touch Panel. % To change the setting, tap the desired key on the Touch Panel. Settings Description [Simplex/Duplex]...
-
Page 110: Fax Function
Fax Function Fax Function 3.3.1 Required settings and basic operations This section describes the settings required to send and receive a fax via a telephone line as well as the basic operations. Preparation flow The following describes a preparation flow to send a fax. For details, refer to the relevant page. This preparation is not required the second time or subsequent times. -
Page 111: Checking The Cable Connection
Fax Function Checking the cable connection Check that a modular cable is connected to the LINE port of this ma- chine. 3-46 bizhub C554/C454/C364/C284/C224... -
Page 112: Registering Transmission Information
Fax Function Registering transmission information Tap [Utility], and select [Administrator Settings] - [Fax Settings] - [Header Information]. Enter the sender information, then tap [OK]. • Sender settings • Sender Fax No. Settings Enter the name to be displayed as a sender. Enter the fax number to be displayed as a sender. -
Page 113: Selecting The Dialing Method
Fax Function Selecting the dialing method Tap [Utility], and select [Administrator Settings] - [Fax Settings] - [Line Parameter Setting]. Tap [Dialing Method]. For the push-button type, select [PB], and for the dial-pulse type, select [10pps]. If you do not know the type of the dialing method: If you do not know the type of the dialing method, operate push buttons of your phone. -
Page 114: Sending The Original
Fax Function Sending the original Load the original. Tap [Scan/Fax]. Enter a destination. bizhub C554/C454/C364/C284/C224 3-49... - Page 115 Fax Function Check the setting if necessary. % Tap [Check Setting] to check the setting. % You can also check the setting using the keys displayed on the Touch Panel. % To change the setting, tap the desired key on the Touch Panel. [Color], [File Type], and [E-mail Settings] are not available when sending to a fax number.
-
Page 116: Sending A Fax Directly From A Pc (Pc-Fax Tx)
Fax Function 3.3.2 Sending a fax directly from a PC (PC-FAX TX) You can send a fax to the destination fax machine in the same manner as you print out data created on your computer. Advantages to send a fax directly from a computer Realizing paper saving Completing fax operations without leaving your desk Offering clear images by sending data directly from a computer... -
Page 117: Checking The Cable Connection
Fax Function Checking the cable connection Check that a modular cable is connected to the LINE port of this machine. Check that a LAN cable is connected to the LAN port of this machine and the green LED is on. 3-52 bizhub C554/C454/C364/C284/C224... -
Page 118: Checking Network Settings Of This Machine
Fax Function Checking network settings of this machine Tap [Utility], and select [Device Information]. Check that the IP address is displayed. • For IPv4 environment • For IPv6 environment If no IP address is displayed, you need to configure the network. Tap [Utility], and select [Administrator Settings] - [Network Settings] - [TCP/IP Settings]. -
Page 119: Installing The Fax Driver
Fax Function Installing the fax driver Use the installer to install the fax driver. This section describes how to configure the standard print settings. This operation requires administrator privileges for your computer. Insert the printer driver CD-ROM into the CD-ROM drive of the computer. - Page 120 Fax Function Select this machine from the list. Select a fax driver. Click [Install]. bizhub C554/C454/C364/C284/C224 3-55...
-
Page 121: Sending Data
Fax Function Click [Finish]. Sending data Create data to be sent using application software. From the [File] menu, select [Print]. Select the fax driver of this machine, and click [Print]. % Clicking [Preferences] can change the setting of the printer driver as required. 3-56 bizhub C554/C454/C364/C284/C224... - Page 122 Fax Function % If user authentication is enabled in this machine, specify the required data such as the user name and password. Enter the destination [Name] and [FAX Number]. % To send data to more than one destination, repeat this step. % Clicking [Add from Address Book] can retrieve the registered destinations of this machine.
-
Page 123: Copy Function
Copy Function Copy Function Basic operations The following describes the basic operations to make a copy. If user authentication is enabled, the login screen appears. Tap the keyboard icon, enter the required items, then tap [Login] or press Access. % If IC card or biometric authentication is enabled, refer to page 3-60. Load the original. - Page 124 Copy Function Check the basic settings. % Check the output image configured as specified while viewing the output illustrations displayed on the Touch Panel. % Tapping [Check Setting] can check detailed settings. % To change the setting, tap the desired key on the Touch Panel. Settings Description [Original Type]...
-
Page 125: User Authentication
Copy Function User authentication You can perform authentication by user or group in this machine. Installing optional units enables IC card or biometric authentication. If IC card authentication is enabled, pass or place the IC card over or on the card reader of the authentication unit. If biometric authentication is enabled, put your finger on the finger vein reader of the authentication unit. -
Page 126: Registering A Destination
Registering a destination Registering a destination 3.5.1 Registering an address book The fax and scan-to-send functions can register the frequently used destinations as address books. This sec- tion explains an example to register an address book to which a fax is sent. Using the Control Panel to register an address book Select a destination type, and register destination information. - Page 127 Registering a destination Enter the destination name you want to register. % Tap [Name], and enter the destination name using the displayed keyboard. % For [Sort Character], enter the same name as [Name]. % This sets the appropriate index for the name, which you entered into [Name], to [Index]. To change the setting, tap [Index].
- Page 128 Registering a destination What is an index? This is used as an index of a registered destination. Tap the Index key to narrow down a target desti- nation. If [Favorite] is selected as an index, the destination appears in the basic screen of the transmission screen after it has been registered in the address book;...
-
Page 129: Using A Computer To Register A One-Touch Destination
Registering a destination Using a computer to register a one-touch destination In addition to using the Control Panel, address books can be registered from a computer using the utility software, Web Connection. NOTICE When using Internet Explorer in the IPv6 environment, you need to correct the hosts file in advance. For de- tails, refer to the User's Guide CD. - Page 130 Registering a destination Select the type of the destination you want to register. Enter the required information such as the name, fax number, and index. bizhub C554/C454/C364/C284/C224 3-65...
-
Page 131: Information Required To Register A Destination
Registering a destination 3.5.2 Information required to register a destination The items to be entered or the number of screens required to register a destination vary depending on the transmission type. This section describes specific information required to register a destination. Tips Setting items that can generally be used with defaults are omitted in this table. -
Page 132: Registering A Group
Registering a destination 3.5.3 Registering a group Several address books can be registered as a group. This function is useful when you have jobs involving sending data to specified members at periodic intervals. Registering a new group Tap [Utility], and select [One-Touch/ User Box Reg.] - [Create One-Touch Destination] - [Group]. Tap [New]. - Page 133 Registering a destination Select destinations to be grouped. Display and select the target address book on the destination selection screen. The following two meth- ods can be used to search for a destination. % Search by index: Searches for the target destination name using an index. % Search by registration number: Searches for the target destination using a registration number.
-
Page 134: Retrieving A Registered Destination
Registering a destination 3.5.4 Retrieving a registered destination Retrieve an address book or group to specify it as a destination to which data is sent. Retrieving a destination Tap [Scan/Fax]. The destinations, which are categorized into [Favorite] when registering indexes, are displayed on the basic screen. -
Page 135: Specifying A Destination
Registering a destination Specifying a destination In addition to retrieving a registered destination, a destination can be specified in various methods. Direct Input Directly enter a destination using the keyboard screen or keypad. Job History Specify a target destination in the job history (latest five destinations) on the scan/fax screen. -
Page 136: Using A Usb Memory Device
Using a USB memory device Using a USB memory device 3.6.1 Printing data in a USB memory device Data saved in the USB memory device can be printed. This function is useful when printing data created on a computer that is not connected to the network. Available USB memory device Compatible with USB version 2.0/1.1 interface Formatted in FAT32... - Page 137 Using a USB memory device Select data to be printed, and tap [Print]. Check print settings. 3-72 bizhub C554/C454/C364/C284/C224...
- Page 138 Using a USB memory device Press the Start key. NOTICE Do not disconnect the USB memory device during data printing. bizhub C554/C454/C364/C284/C224 3-73...
-
Page 139: Saving The Scanned Data In The Usb Memory Device (External Memory)
Using a USB memory device 3.6.2 Saving the scanned data in the USB memory device (External memory) The data scanned on this machine can be saved to the USB memory device, so it is convenient when printing data created on a computer that is not connected to the network. Available USB memory device Compatible with USB version 2.0/1.1 interface Formatted in FAT32... - Page 140 Using a USB memory device Select [Save Document] and [ON]. Tap [OK]. Reference For information on the default administrator password, refer to the [Quick Assist Guide]. bizhub C554/C454/C364/C284/C224 3-75...
-
Page 141: Saving Data In The Usb Memory Device
Using a USB memory device Saving data in the USB memory device Load the original. Connect a USB memory device to this machine. NOTICE Do not insert the USB memory device into the USB port close to the rear panel of this machine. Do not use a USB device other than a flash-memory device. - Page 142 Using a USB memory device Check the file name. If necessary, check the setting to save data. % Tap [Check Setting] to check the setting. % To change a file name, tap the keyboard icon. % You can also check the setting using the keys displayed on the Touch Panel. % To change the setting, tap the desired key on the Touch Panel.
-
Page 143: Using The Guidance Function
Using the guidance function Using the guidance function 3.7.1 Guidance screen This machine provides the guidance function to display the description of a function on the screen and view an operation procedure with moving images. If you have any questions during operation, try to use this guidance function. Getting help on the currently displayed screen: Select [Function] on the Help Menu to display the guidance screen. - Page 144 Using the guidance function Narrow down the information you want to know. bizhub C554/C454/C364/C284/C224 3-79...
- Page 145 Using the guidance function Name Description [Exit] Returns to the main menu. [To Menu] Returns to the Help Menu. [Close] Returns to the preceding screen. 3-80 bizhub C554/C454/C364/C284/C224...
-
Page 146: Getting Help On The Desired Function Or Procedure
Using the guidance function Getting help on the desired function or procedure: Open the Help Menu, and select a menu depending on an objective to display the guidance screen. Press the Guidance key. Select a menu. bizhub C554/C454/C364/C284/C224 3-81... - Page 147 Using the guidance function Narrow down the information you want to know. 3-82 bizhub C554/C454/C364/C284/C224...
-
Page 148: Help Menu List
Using the guidance function Tapping [Go to function] opens the setting screen of a target function, enabling you to configure the settings immediately. Help Menu list The Help Menu provides the following information: Name Description [Function] Tap this button to display the guidance menu that has been sorted according to the function names to be displayed on the screen. - Page 149 Using the guidance function 3-84 bizhub C554/C454/C364/C284/C224...
-
Page 150: Advanced Functions
Advanced Functions... -
Page 151: Using Advanced Functions
Using advanced functions Advanced Functions Using advanced functions 4.1.1 What are advanced functions? Various functions for further enhancement of the MFP operability are expressed as advanced functions in this manual. This machine provides the following advanced functions. Tips To use an advanced function, you need to register i-Option or associate with the PageScope My Panel Manager application. -
Page 152: Registering The I-Option License
Using advanced functions 4.1.3 Registering the i-Option license To add an optional function to this machine, you need to purchase i-Option and register its license. Tips The Upgrade Kit UK-204 is required to use i-Option. For details on how to purchase or install an optional unit, contact your service representative. Preparation flow The following describes a preparation flow to use advanced functions. -
Page 153: Registering The I-Option License
Using advanced functions Registering the i-Option license Register the request code and the contents of the token certificate on the Web site of the License Manage- ment Server (LMS). Tap [Utility], and select [Administrator Settings] - [Forward] - [License Settings] - [Get Request Code]. % For information on the default administrator password, refer to the [Quick Assist Guide]. - Page 154 Using advanced functions Access the Web site of the License Management Server (LMS). Enter the [MFP Serial Number], then click [Next]. % The URL is described in the token certificate. Enter the [Token Number], select the option you want to register from the [Product Description] list, then click [Add].
-
Page 155: Enabling The I-Option Function
Using advanced functions Enter the [MFP Serial Number] and [Request Code], then click [Generate License Code]. The license code and function code are issued. Tips The issued license code and function code are required to enable i-Option. You should write them down on a memo pad, etc. -
Page 156: Configuring Each Function
Using advanced functions Enter the license and function codes you wrote down. Select [Yes], then tap [OK]. This machine restarts automatically. Configuring each function Configure the required settings for each advanced function. Reference For details on the required setting items for each advanced function, refer to the User's Guide CD. bizhub C554/C454/C364/C284/C224... -
Page 157: Using The Voice Guidance
Using the Voice Guidance Using the Voice Guidance 4.2.1 Required Settings and Procedures Using the voice guidance, you can confirm explanations of screens, keys, and key-related operations by voice. The voice guidance is available on the Enlarge Display screen, Guidance screen, and Accessibility Settings screen, and useful to assist operations or prevent this machine from operating incorrectly. -
Page 158: Enabling The Voice Guidance Function
Using the Voice Guidance Enabling the voice guidance function Register the function and license codes in this machine. Then, configure settings to start the voice guidance. Enable the i-Option function. Tap [Utility], and select [Administrator Settings] - [Forward] - [License Set- tings] - [Install License]. -
Page 159: Specifying The Volume And Speed
Using the Voice Guidance Enable the voice guidance. Tap [Utility], and select [Administrator Settings] - [Forward]. Specifying the volume and speed Specify the volume or speed to read out. Tap [Accessibility], and select [ ] - [Voice Guidance Settings]. Specify the volume or speed. % [Volume]: Use [Higher] or [Lower] to adjust the volume. -
Page 160: Operating The Voice Guidance
Using the Voice Guidance % [Voice Speed]: Select the speed to read out. Operating the voice guidance Press Voice Guide on the screen that supports the voice guid- ance. % The following screens support the voice guidance. • Enlarge Display screen •... - Page 161 Using the Voice Guidance Use the keypad to operate the voice guidance. % For information on the keypad operations, refer to page 4-13. % Position the voice cursor at the key you want to hear the guidance for. % Determine the position of the voice cursor. % Reading out starts.
-
Page 162: Keypad Operations For Voice Guidance
Using the Voice Guidance Keypad operations for voice guidance For the voice guidance, use the keypad to perform various operations. Description Reads out the explanation of a function assigned to each key. Reads out the explanation of the currently displayed screen. Reads out the setting items configured by the currently displayed function. - Page 163 Using the Voice Guidance 4-14 bizhub C554/C454/C364/C284/C224...
- Page 164 Index...
-
Page 165: Index By Item
Index by item Index Index by item Saving the scanned data .......... 3-74 Search ............... 3-69 Address Book ............3-61 Sender Fax No. Settings ........... 3-47 Advanced Functions ...........4-2 Sender settings ............3-47 Sleep mode ............... 2-24 Control Panel .............2-26 SMB Send ............3-20 3-30 Copy function ............3-58 Sub Power OFF ............ - Page 166 http://konicaminolta.com Printed in China Copyright A161-9564-00 2012. 2 2012...