Table of Contents
Advertisement
Advertisement
Table of Contents

Related Manuals for DigiTech JAMMAN SOLO


Summary of Contents for DigiTech JAMMAN SOLO
- Page 1 Looper/Phrase Sampler Owner’s Manual...
- Page 2 10. No user serviceable parts inside. Refer all servicing to qualified service personnel. Servicing is required when European Contact: Your local DigiTech Sales and Service Office or the apparatus has been damaged in any way, such as Harman Music Group...
-
Page 3: Table Of Contents
Description of Controls ....2 Changing Loop Tempo ........25 Pedal Tempo Mode ........26 Setup 1- Amp Input ......8 Loop / Single Phrases........28 Setup 2 - Amp Loop .......9 Rhythm Type ..........30 Setup 3 - MP3/Aux Input ....10 Deleting Individual Loop Phrases ....32 Using the JamMan Solo Looper ..11 ®... - Page 4 1. The warranty registration card must be mailed within ten days after purchase date to validate this warranty. 2. DigiTech warrants this product, when used solely within the U.S., to be free from defects in mate- rials and workmanship under normal use and service.
- Page 5 SD memory card expansion slot for another 99 locations that can store over 16 hours of loops! The JamMan Solo also has USB connectivity and can sync to DigiTech’s free JamManager software download that organizes and saves your loops to PC or Mac, and lets you quickly create JamLists to take to your gig.
-
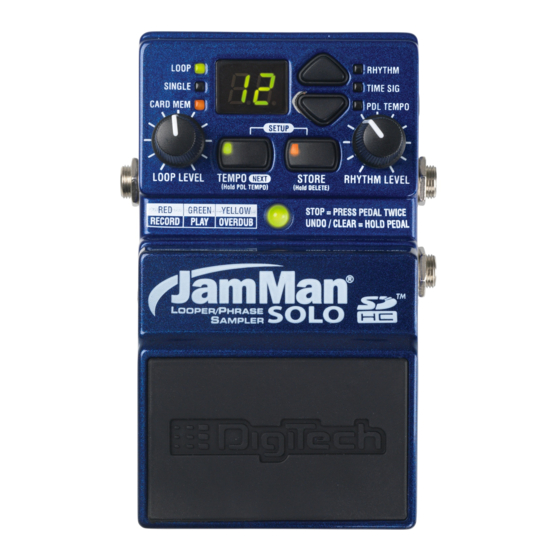
Page 6: Description Of Controls
Description of Controls 1. Card Memory LED This red LED lights when you are selecting loop memories on the optional SD/SDHC 1 2 3 4 5 6 memory card. When this LED is off, loops are being selected from the JamMan ®... - Page 7 4. Display 7. Rhythm LED The main purpose for the Display is to This red LED will light when selecting the show the currently selected loop memory Rhythm guide track to record and play with. location. It also shows information during 8.
- Page 8 10. Pedal Tempo LED This red LED lights when Pedal Tempo Mode is enabled. In Pedal Tempo Mode, any new loop location can have the tempo set by tapping the Pedal Switch. Setting Pedal Tempo Mode is explained on page 26. 11.
- Page 9 ® footswitch for remotely selecting loop Loop Librarian software, downloadable at memories, tapping in the loop tempo, and www.digitech.com. undo and clear functions. 18. Tempo Button This button can be pressed multiple times to set the tempo for a new loop...
- Page 10 or change the tempo of an existing loop. The first downbeat of the measure flashes red and the other beats flash green. If the tempo for an existing loop is changed, the loop plays back at the new tempo without any change of pitch.
- Page 11 21. Pedal Switch Release Pins Depress these pins to remove the Pedal Switch and access the SD memory card slot. When the Pedal Switch (16) is removed, it exposes the SD card slot. 22. SD Memory Card Slot The JamMan Solo is compatible with ®...
-
Page 12: Setup 1- Amp Input
Setup 1- Amp Input Connect your guitar to the JamMan Solo’s Instrument input. Connect the JamMan™ Solo’s output to the Connect optional amp’s input. FS3X to the JamMan Solo’s Footswitch input. -
Page 13: Setup 2 - Amp Loop
Setup 2 - Amp Loop Connect the amp Loop Send to the JamMan™ Solo’s Instrument Input. Connect your guitar Connect the JamMan to the amp’s input. Solo’s Output to the amp Loop Return. -
Page 14: Setup 3 - Mp3/Aux Input
Setup 3 - MP3/Aux Input Connect your headphones to the JamMan Solo’s Output. ® Connect your portable CD/MP3 player to the JamMan Solo’s Aux Input. NOTE: All audio signals connected to the Aux input are summed to mono. -
Page 15: Using The Jamman ® Solo Looper
Using the JamMan Solo Looper ® The JamMan Solo is designed to be very simple to use right out of the box. The ® following section explains how to use the JamMan Solo. The JamMan Solo has 35 minutes of total built-in loop memory storage and can be expanded using an optional SD/SDHC memory card. -
Page 16: Select A Memory Location
Select a Memory Location The DISPLAY will show the memory The JamMan Solo has two banks of loop ® memory, internal and optional external location number as these buttons are card memory. There are 99 memory pressed. locations available in each of these banks for a total of 198 memories when an When Loop 99 is reached, pressing optional SD/SDHC memory card is... -
Page 17: Create A Loop (Pdl Tempo Led Is Off)
Create a Loop (PDL TEMPO LED is off) Select an empty memory Once you are finished location using the LOOP recording, the LOOP LED SELECT buttons (the will be lit green indicating LOOP and SINGLE LEDs a phrase has been will be off). -
Page 18: Create A Loop, With Tempo Count-In (Pdl Tempo Led Is On)
Create a Loop, with Tempo Count-in (PDL TEMPO LED is on) Refer to page 26 to enable the Pedal Press the PEDAL SWITCh again and there will be a single measure Tempo feature on the JamMan Solo. ® count-in indicated by the flashing TEMPO button and STATUS Select an empty memory location using the LOOP SELECT buttons... - Page 19 Create a Loop, with Tempo Count-in (PDL TEMPO LED is on) Once you are finished recording, the LOOP LED will now be lit indicating a phrase has been recorded. The STORE button will also be lit, indicating the phrase must be stored to memory to be recalled later.
-
Page 20: Add Overdubs To A Loop
Add Overdubs to a Loop Once a loop phrase is recorded, you can add overdubs over the top of it. Overdubs can only be recorded to Loop phrases and not to Single phrases. If a phrase has had the tempo changed, it must first be stored to memory before overdub recording can proceed. -
Page 21: Undo/Redo Overdubs
Undo/Redo Overdubs You can undo your last overdub anytime playback/overdub, press the PEDAL the current loop number selection SWITCh 2 times quickly to stop playback remains unchanged. If you change your and continue holding it for 2 seconds until mind after undoing an overdub, you can the STATUS LED flashes red. -
Page 22: Recording From An Mp3 Or Cd Player
Recording From an MP3 or CD Player The JamMan Solo can record directly from an MP3 or CD player. This feature is useful ® for learning and practicing new songs. Note that the JamMan Solo will convert stereo signals to mono when recording. To record from an MP3 or CD player, follow these steps: Connect your MP3 or CD player’s output to the JamMan Solo’s AUX INPUT jack. - Page 23 Recording From an MP3 or CD Player 3 4 5...
-
Page 24: Storing Phrases
Storing Phrases Anytime a change is made to a loop memory location (Rhythm Type, Tempo, Time Signature, Record, Overdubs etc.) the Store button will immediately light indicating that the changes will be lost unless a store procedure is performed before selecting a new loop memory location or turning off the power. -
Page 25: Copy A Loop To A Different Memory Location
Copy a Loop to a Different Memory Location Stop any playback Use the LOOP SELECT buttons to Select a memory activity by pressing the location that contains a select an empty memory PEDAL SWITCH two location (the LOOP and SINGLE loop that you want to times quickly. -
Page 26: Time Signature
Time Signature The JamMan Solo is capable of recording When you access Time Signature of ® in different Time Signatures. The default a previously recorded loop, the Time time signature for empty loops is 4/4. To Signature will appear in the DISPLAY, set up a different Time Signature, follow the but it cannot be changed. - Page 27 Time Signature Select a new memory location. (The LOOP and Use the LOOP SELECT SINGLE LEDs will be off.) button to change the Time Signature. You can select from 2 to 15 beats per measure. This means Press the TEMPO and if you want to record in STORE buttons 5/4 time, select .
-
Page 28: Setting A Loop Tempo For Recording
Setting a Loop Tempo for Recording Before you begin recording a phrase, you may want to set a tempo at which you want to record the loop at. Setting the tempo in an empty loop memory location automatically starts playing the rhythm guide track (Rhythm Level must be turned up to hear it). You can use the rhythm guide track as a metronome for recording against to help keep a consistent tempo of your performance. -
Page 29: Changing Loop Tempo
Changing Loop Tempo Once a loop phrase is recorded and stored to memory, you can speed up or slow down the playback of the phrase without changing its pitch. Storing a changed tempo is permanent and once completed, the original tempo cannot be restored. To change a loop’s tempo, follow these steps: Select a previously recorded Loop phrase To return to the original... -
Page 30: Pedal Tempo Mode
Pedal Tempo Mode PEDAL SWITCh two The Pedal Tempo feature lets you set the Press the tempo of an empty memory location or more times to set the tempo you hands-free using the PEDAL SWITCh want to record at. The TEMPO before you record. - Page 31 Pedal Tempo Mode Pedal Tempo only works with empty loop memories. It cannot be used to modify the tempo of an existing loop (the TEMPO button must be used to change the tempo of an existing loop). To globally turn off the Pedal Tempo feature, disable it in the Setup menu.
-
Page 32: Loop / Single Phrases
Loop / Single Phrases Any phrase recorded into the JamMan Press and hold the TEMPO and ® Solo can be played in two ways: either as STORE buttons simultaneously to a continuous Loop, or as a Single “one- enter the Setup menu. The LOOP shot”... - Page 33 Loop / Single Phrases Single phrases cannot have overdubs added to them. Slow repeated presses of the PEDAL SWITCh will just restart the Single phrase playback from the beginning. Pressing the PEDAL SWITCh quickly two times will briefly restart the phrase and then stop Single phrase playback.
-
Page 34: Rhythm Type
Rhythm Type The JamMan Solo has 9 Rhythm guide Press the TEMPO (NEXT) button ® until the RhYThM LED begins tracks you can select from. These range flashing.The DISPLAY will now show from a simple click metronome to high indicating the default Rhythm Type quality drum samples as the rhythm guide. - Page 35 Rhythm Type If the memory location is empty, press the PEDAL SWITCh to begin recording. If the memory location contains a loop, press the PEDAL SWITCh two times quickly to stop playback, then press the STORE button twice to save the new Rhythm Type. Rhythm Types oF –...
-
Page 36: Deleting Individual Loop Phrases
Deleting Individual Loop Phrases The JamMan Solo uses both internal ® NOTE: If the DISPLAY shows memory and optional external SD/SDHC , you have held the STORE memory cards for the storage of loop button too long and need to abort this files. - Page 37 Deleting Individual Loop Phrases WARNING: Deleting a loop from a memory location is irreversible and will erase any recorded information that resides here. Use the Delete function with caution. NOTE: If when you try to delete a loop from SD card the display flashes CP during step 4, the SD copy protection switch is in the “Locked”...
-
Page 38: Erase All Loop Phrases (Internal Memory)
Erase All Loop Phrases (Internal Memory) The JamMan Solo uses both internal memory and optional external memory for the ® storage of loop files. You can delete all loops from internal memory or from external memory without having to delete them one at a time. To delete all loops from internal memory, follow these steps: Press the STORE button again. -
Page 39: Erase All Loop Phrases (Sd/Sdhc Memory Card)
Erase All Loop Phrases (SD/SDhC Memory Card) To delete files from an optional SD/SDHC memory card, the JamMan Solo has two ® types of card erase procedures: Erase All Loops and Format SD Card. The Erase Loops procedure only erases JamMan Solo loop data. All other data and files on the card are left untouched. -
Page 40: Using Optional Sd/Sdhc Memory Cards
Using Optional SD/SDhC Memory Cards The JamMan Solo offers 35 minutes of Depress either of the two PEDAL ® total built-in loop memory storage. You SWITCh RELEASE PINS fully using can increase the loop memory by installing the 1/4” plug on a guitar cable. an optional SD/SDHC memory card into PEDAL SWITCh Lift and remove the... - Page 41 Using Optional SD/SDhC Memory Cards Warning: Make sure the SD card is fully inserted before replacing the pedal switch to avoid possible damage to the SD card.
-
Page 42: Formatting Sd Cards
Formatting SD Cards It is recommended any memory card that seconds. The DISPLAY will show indicating the card is being is inserted into the JamMan Solo for ® formatted. the first time should be formatted using the JamMan Solo’s format procedure. To NOTE: If when you try to format an SD format an SD/SDHC Card in the JamMan card the display flashes CP during step 3,... -
Page 43: Unformattted Cards
Unformattted Cards If a memory card is inserted into the the card is being formatted. Once completed, the JamMan Solo will JamMan Solo that does not have a ® return to normal operation. valid format, the JamMan Solo will not recognize it and the DISPLAY will read . -
Page 44: Optional Fs3X Footswitch
Optional FS3X Footswitch The optional FS3X Footswitch gives you hands-free control over loop selection, tempo, and stop functions. Up Switch Down Switch Mode Switch This footswitch selects the This footswitch selects the When the selected loop next higher memory loca- next lower memory location. - Page 45 To use these three loops in a Multiple Loop Playback with FS3X performance, follow these steps: Another great feature of the JamMan ® Solo is its ability to play different loops Select Loop 1 (verse loop) and press back to back during performance using the PEDAL SWITCh.
-
Page 46: Jammanager Tm Librarian Software
Loop Librarian Management software is available as a free download from the If either the UP or DOWN footswitch DigiTech website. This application runs on the FS3X is pressed less than two on both Windows XP/Vista/7 and Mac OS seconds before the end of a playing... -
Page 47: Factory Restore
Factory Restore This procedure will return the JamMan Solo to its original factory settings. All internal ® loop memories will be reformatted and the original 10 loops that shipped with the JamMan Solo will be restored. Factory Restore does not affect any loops on the optional external SD memory card. -
Page 48: Specifications
Specifications Digital A/D/A Conversion: 24-bit Sampling Frequency: 44.1 kHz Loop File Format: 44.1 kHz, 16-bit (mono), uncompressed .wav file USB: 2.0 High Speed (USB 1.1 compatible) Connector Type: 5-pin mini-B Individual Loop Capacity: 10 minutes Internal Memory Capacity: 35 minutes total loop time (up to 99 loops total) External Memory Type: (optional) SD/SDHC up to 32GB External Memory Capacity:... - Page 49 50 Ohms minimum impedance, driven by mono signal. Output Impedance: 100 Ohms Maximum Output Level: +4 dBu Footswitch Input: Connector Type: 1/4” (Tip-Ring-Sleeve), compatible with optional DigiTech FS3X 3-button footswitch) Power Power: < 2 Watts Current Draw: < 200 mA Adapter: PS200R (Included), Output: 9.6VDC 300mA...
- Page 50 JamManager Librarian Software System Requirements Windows • XP Home/Pro (32), Vista (32/64), 7 (32/64) • OS X 10.5 or later • Pentium®/Athlon XP 1.5GHz or higher • Intel Core processor • 1GB RAM (2GB RAM recommended) • 1GB RAM (2GB RAM recommended) •...
- Page 52 DigiTech® 8760 South Sandy Parkway Sandy, Utah 84070 PH (801) 566-8800 FAX (801) 566-7005 www.digitech.com JamMan™ Solo Owner’s Manual 18-0815-A Printed in the USA DigiTech is a registered trademark of Harman International. ©2010 Harman International Industries, Incorporated. All rights reserved...