Table of Contents
Advertisement
Quick Links
Advertisement
Table of Contents

Related Manuals for DigiTech JAMMAN


Summary of Contents for DigiTech JAMMAN
- Page 1 Owner’s Manual Professional Audio Equipment...
-
Page 2: Safety Instructions
IMPORTANT SAFETY INFORMATION WarnInG for your ProtectIon reaD tHe foLLoWInG: KEEP THESE INSTRUCTIONS HEED ALL WARNINGS FOLLOW ALL INSTRUCTIONS the symbols shown above are internationally accepted symbols that THE APPARATUS SHALL NOT BE ExPOSED TO DRIPPING OR SPLASHING LIqUID warn of potential hazards with electrical products. the lightning flash AND NO OBjECT FILLED WITH LIqUID, SUCH AS vASES, SHALL BE PLACED ON THE with arrowpoint in an equilateral triangle means that there are dangerous APPARATUS... - Page 3 AstA approved to Bs1362. sandy, utah 84070, usA date: April 7, 2010 european contact: Your local digitech sales and service office or harman music Group If you want to dispose this product, do not mix it with general household waste. There is a...
- Page 4 Warranty We at DigiTech® are very proud of our products and back up each one we sell with the following warranty: 1. The warranty registration card must be mailed within ten days after purchase date to validate this warranty, or you can register via our website (www.digitech.com).
-
Page 5: Table Of Contents
Table of Contents Overview ..................1 Quick Start - Connections ............2 Quick Start - Looper ..............3 Quick Start - Delay ................8 Guided Tour - Front Panel .............12 Looper Controls ................... 12 Delay Controls ....................15 Footswitches ....................17 Guided Tour - Rear Panel ...............18 Making Connections ..............20 Signal Path ..................24 Delay Types and Parameters ............26... - Page 6 Storing/Copying Phrases ...............46 Store Changes to a Loop ................46 Copy a Loop to a Different Memory Location ........46 Time Signature ................48 Setting a Loop Tempo for Recording ...........50 Time Stretching a Loop ..............52 Time Stretch a Loop that is Stopped ............52 Time Stretch a Loop that is Playing ............
-
Page 7: Overview
A palette of 8 delay types offers tremendous flexibility in crafting virtually any delay sound. With 16 seconds of delay time, a tap tempo footswitch, and full morphing of the delay controls via the expression input, the JamMan Delay is in a class all its own. -
Page 8: Quick Start - Connections
Connect the JamMan Delay’s to the input of an Left (Mono) oUt amplifier. 2. Connect the Power Supply Start with your amplifier and the JamMan turned off. Turn the knobs all the way down on LooP LeVeL RHYtHM LeVeL the JamMan Delay. -
Page 9: Quick Start - Looper
Quick Start - Looper 1. Select an Empty Loop Press the buttons or the footswitches until LooP SeLect LooP UP/LooP DoWN and the LEDs are off. LooP SINgLe Press the Loop Select buttons..until these LEDs are off. - Page 10 Quick Start - Looper 2. Adjust Loop and Rhythm Levels Set the knob to 12 o’clock. Set the knob to the 9 LooP LeVeL RHYtHM LeVeL o’clock position. Set the LOOP LEVEL to 12 o’clock and the RHYTHM LEVEL knob to 9 o’clock...
- Page 11 Quick Start - Looper 3. Start Recording Press the (lower left) footswitch to start recording. While Rec/PLaY/oVeRDUb recording, the footswitch and LEDs will light red. Rec/PLaY/oVeRDUb RecoRD While recording, the Press the RECORD and REC/PLAY/OVERDUB REC/PLAY/OVERDUB LEDs light solid red. footswitch.
- Page 12 Quick Start - Looper 4. Start Loop Playback Press the footswitch while recording to set the loop point Rec/PLaY/oVeRDUb and start playing back from the beginning. The footswitch and Rec/PLaY/oVeRDUb LEDs light green. Adjust the knobs as needed. PLaY LooP LeVeL RHYtHM LeVeL Adjust the LOOP LEVEL and RHYTHM LEVEL knobs...
- Page 13 Quick Start - Looper 5. Stop Playback/Store the Loop Press the footswitch to stop playback, then press the teMPo/StoP LooP StoRe button twice to store the loop. Then press the First press the TEMPO/STOP LOOP STORE button twice footswitch to stop playback. to store the loop.
-
Page 14: Quick Start - Delay
Quick Start - Delay 1. Select a Delay Type. Step on a Delay footswitch to turn on the delay, then select a delay type. For this example, set the knob to tYPe aNaLog First, turn on a delay preset ...then set the TYPE knob by pressing a Delay footswitch... - Page 15 Quick Start - Delay 2. Adjust the Delay Level, Time, Repeats, and parameters. Set the knobs to 12 o’clock. DeLaY LeVeL, tIMe, RePeatS, MoDIfY 1 MoDIfY 2 Set these knobs to 12 o’clock.
- Page 16 Quick Start - Delay 3. Set the delay tempo with the Delay Tempo footswitch. Tap the footswitch at least two times to set a new delay tempo. DeLaY teMPo The last two footswitch tap intervals set the delay tempo. Tap the DELAY TEMPO footswitch at least two times to set the Delay Tempo.
- Page 17 Quick Start - Delay 4. Store the delay. Press the button, then press one of the flashing DeLaY StoRe DeLaY to store the delay settings to that footswitch. footSWItcHeS Press the DELAY STORE button..then press a DELAY FOOTSWITCH to store delay settings.
-
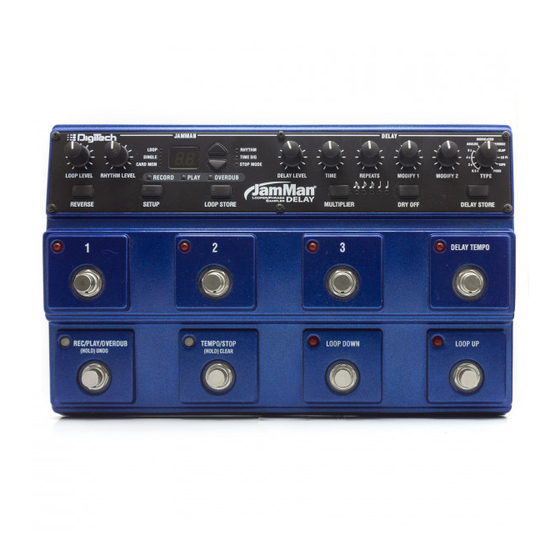
Page 18: Guided Tour - Front Panel
Guided Tour - Front Panel Looper Controls 5 6 7 8 9 10 11 12 13 14 15 16 17 18 Loop Store Button Used to store and copy recorded loops and changes to loop attributes to the memory card. Pressing and holding this button will initiate the deletion of the current loop memory. - Page 19 Controls the level of the Rhythm guide track. Card Memory LED This red LED is lit when you are selecting loop memories on the optional SD/SDHC memory card. When this LED is off, loops are being selected from the JamMan Delay’s internal memory. ® Single LED This yellow LED indicates the current phrase memory is set to playback only once when play is initiated.
- Page 20 Guided Tour - Front Panel loop memory location. It also shows information during store/copy procedures, during Time Signature and Rhythm Type setup, file deletion, and card formatting procedures. Loop Select buttons The Loop Select buttons are used for selecting different loop memories and making selections when in other modes (such as Time Signature, Rhythm Type, and Stop Mode).
-
Page 21: Delay Controls
Guided Tour - Front Panel Delay Controls Level Knob The Level knob controls the delay effect’s output level. Turn this knob clockwise to increase the output level, and counter-clockwise to decrease the output level. When Reverse Delay is selected, the Level knob behaves like a wet/ dry mix control. - Page 22 This button mutes the dry signal path through the JamMan Delay. ® Enable this button when running the JamMan Delay in a parallel effects loop where dry signal is already present. Press and hold this button for 2 seconds to enable or disable this feature.
-
Page 23: Footswitches
The Tempo footswitch is used to modify the delay time by tapping in the desired delay tempo. Looper Footswitches This row of 4 footswitches is used to control the JamMan Delay’s looper. The Rec/Play/Overdub footswitch initiates recording (LED lights red) and playing (LED lights green) of the loop phrase. When a phrase is playing back, it can be used to enable overdubbing (LED lights yellow) over the recorded phrase. -
Page 24: Guided Tour - Rear Panel
Guided Tour - Rear Panel 10 11 Left (Mono) Input Connect your instrument, additional pedal, or an amp effects send to this jack. Signals are heard at both outputs when only the Left (Mono) jack is used. Right Input Connect a second input to this jack for stereo operation. Left and Right inputs are processed separately through the stereo delay and looper effects and then fed to the Left and Right outputs to keep true stereo separation between channels. - Page 25 32GB in size for expanding the total amount of loop storage time available. Adding an SD card also increases the number of available loops from 99 to 198. New cards should be formatted in the JamMan Delay before use. The JamMan Delay comes equipped with 35 minutes of internal loop storage.
-
Page 26: Making Connections
Making Connections Mono Amp Input To Amp Input To Left (Mono) Input Mono Amp Input is the most common usage where the guitar plugs into the JamMan Delay’s Input and the Output connects to ® Left (MoNo) Left (MoNo) the amp input. The button should be OFF for this setup. - Page 27 The Amp Loop connection can be used if your amp has an effects loop. Connect the guitar to the amp’s input. Connect the amp loop’s Send jack to the JamMan Delay’s Input. Connect the JamMan Delay’s ® Left (MoNo) Left Output to the amp loop’s Return jack.
- Page 28 To rst Amp Input To second Amp Input To Left (Mono) Input The Mono Input / Stereo Amp option provides the best stereo imaging for the Modulation and Pong delay types. Connect the guitar to the JamMan ® Delay’s Input and connect the...
- Page 29 JamMan Delay in a stereo amp setup. This setup also provides ® the best stereo imaging for the JamMan Delay’s Modulation and Pong delay types. Connect the outputs of your stereo effects pedal to the JamMan Delay’s...
-
Page 30: Signal Path
D/A converter and then to the outputs. The dry signal in the JamMan Delay is a buffered analog path. This path has a Dry Off option for when the JamMan Delay is used in a parallel effects loop. The Dry Off button should be set to ON to prevent an unwanted second dry path from the JamMan Delay being mixed in with the parallel dry path of the loop. - Page 31 Signal Path...
-
Page 32: Delay Types And Parameters
500 millseconds to 2 seconds. NOTE: When both inputs are connected (stereo in), only the left input is processed through the delay. The dry path does maintain stereo separation. The JamMan Delay’s delay has a Tempo footswitch that can be used for ®... - Page 33 Delay Types and Parameters Each delay type has a common set of controls for setting up the delay (Delay Level, Time, and Repeats). There are also two custom controls (Modify 1, Modify 2) that offer added flexibility by controlling specific settings for each delay type. The table below shows what each these knobs control with each delay type.
-
Page 34: Storing And Recalling Delay Settings
Storing and Recalling Delay Settings The JamMan Delay’s delay settings can be stored to any of the numbered ® footswitches allowing instant recall of these settings during performance. When delay settings are modified by turning the knobs, the button will DeLaY StoRe light. - Page 35 Storing and Recalling Delay Settings...
-
Page 36: Setting Delay Time With The Delay Tempo Footswitch
Setting Delay Time with the Delay Tempo Footswitch The JamMan Delay’s delay has a Tempo footswitch that can be used for ® setting the delay time by tapping in the rhythm. Step on a to enable a delay preset. DeLaY footSWItcH... - Page 37 Setting Delay Time with the Delay Tempo Footswitch...
-
Page 38: Synchronizing Delay Tempo To Loop Tempo
Synchronizing Delay Tempo to Loop Tempo The JamMan Delay’s delay time can be synchronized with the Looper’s ® tempo. This is an extremely useful feature that allows the delay time to be automatically set based on the tempo of any loop that is playing. - Page 39 Synchronizing Delay Tempo to Loop Tempo...
-
Page 40: Using An Expression Pedal - Delay
Delay Level, Repeats, Time, and the Modify 1/2 settings. To use an expression pedal with the JamMan Delay’s delay, follow these steps: Begin with the JamMan Delay power disconnected. - Page 41 Using an Expression Pedal - Delay...
-
Page 42: Selecting A Loop
LED will flash as the loop is loaded LooP SINgLe from internal or optional card memory. Trying to store, copy, or change the loop tempo during this time is ignored (bu will be displayed indicating the JamMan Delay is busy loading a loop from memory). - Page 43 Selecting a Loop Loop Select buttons Loop Down Loop Up footswitch footswitch...
-
Page 44: Recording A Loop
This section explains how to record a phrase and play it back as a continuous loop. You should have an instrument or audio device connected to the 1/4” inputs before proceeding. NOTE: The maximum loop time the JamMan Delay can record or play is 10 minutes. Select an empty memory location using the... - Page 45 Recording a Loop...
-
Page 46: Recording Overdubs
Recording Overdubs Once a loop phrase is recorded, you can add overdubs over the top of it. Overdubs can only be recorded to Loop phrases and not to Single phrases. Use the butons or the footswitches LooP SeLect LooP UP/LooP DoWN to select a previously recorded Loop phrase, or use a newly recorded phrase that has not yet been stored. - Page 47 Recording Overdubs...
-
Page 48: Undo, Redo, And Clear
Undo, Redo, and Clear You can undo or redo an overdub anytime you remain in the current memory where the overdub was recorded. You can also use a footswitch to clear all unstored loop phrase audio. Note: Changing loops discards any unstored overdubs. Storing the overdubs will also remove the ability to undo or clear overdubs. - Page 49 Undo, Redo, and Clear Press and hold Press and hold to to undo or redo clear overdubs and an overdub. unstored phrases.
-
Page 50: Stop Modes
Stop Modes Loop Phrases can be stopped in three ways after the footswitch teMPo/StoP is pressed: • Stop ( St ): Stops the phrase immediately when Stop is pressed. • Finish ( Fi ): Finishes playing to the end of the phrase and stops after Stop is pressed. -
Page 51: Using Auto-Quantize Looping
Using Auto-Quantize Looping There are two ways you can record loops using the JamMan Delay, free- ® form looping or using the JamMan Delay’s Auto-Quantize feature. Free-form looping (see page 38) is the standard way loopers have been used since their inception. You initiate recording, play, and then set the loop point when you reach the end of your passage. -
Page 52: Storing/Copying Phrases
Storing/Copying Phrases Anytime a change is made to a loop memory location (Rhythm Type, Tempo, Time Signature, Record, Overdubs etc.) the button will immediately LooP StoRe light. This indicates that the changes will be lost unless a store procedure is performed before selecting a new loop memory location, turning off the power. - Page 53 Storing/Copying Phrases Store Changes to a Loop Copy a Loop to a Different Memory Location...
-
Page 54: Time Signature
Time Signature The JamMan Delay is capable of recording in different Time Signatures. A ® Time Signature must be set up prior to recording in a memory location. Once a phrase has been recorded, Time Signature cannot be changed. To set... - Page 55 Time Signature...
-
Page 56: Setting A Loop Tempo For Recording
Setting a Loop Tempo for Recording Before you begin recording a phrase, you may want to set a tempo at which you want to record the loop at. Setting the tempo in an empty loop memory location automatically starts playing the rhythm guide track (Rhythm Level must be turned up to hear the guide track). - Page 57 Setting a Loop Tempo for Recording...
-
Page 58: Time Stretching A Loop
Time Stretch a Loop that is Playing To time stretch a loop while it is playing requires an optional FS3X footswitch to be connected to the footswitch jack on the rear panel of the JamMan Delay. ®... - Page 59 Time Stretching a Loop Time Stretch a Loop that is Stopped Time Stretch a Loop that is Playing...
-
Page 60: Loop / Single Phrases
Loop / Single Phrases Any phrase recorded into the JamMan Delay can be played in two ways: ® Either as a continuous Loop, or as a Single “one-shot” sample. Single phrases are designed to play the recorded phrase only once and stop. - Page 61 Loop / Single Phrases...
-
Page 62: Rhythm Type
Rhythm Type The JamMan Delay’s guide track has 9 rhythm types to select from. These range ® from a simple click metronome to various drum samples as the rhythm guide (a tempo must be defined and the knob must be turned up to hear RHYtHM LeVeL the guide track). - Page 63 Rhythm Type...
-
Page 64: Using An Expression Pedal - Looper
PeDaL Set the switch to the Out position (Looper). exPReSSIoN aSSIgN Rock the expression pedal back and forth 2-3 times to calibrate the pedal with the JamMan Delay. Start playback of the looper by pressing the Rec/PLaY/oVeRDUb footswitch. Adjust the... - Page 65 Using an Expression Pedal - Looper...
-
Page 66: Deleting Individual Loop Phrases
Deleting Individual Loop Phrases The JamMan Delay has 99 memory locations and at some time you may need ® to delete the contents of a memory location so it may be reused or to free up memory. To delete a loop from a memory location, follow these steps: Select the phrase you want to delete using the buttons. - Page 67 Deleting Individual Loop Phrases...
-
Page 68: Erase All Loops - Internal Memory
Erase All Loops - Internal Memory The JamMan Delay uses both internal memory and optional external ® memory for the storage of loop files. You can delete all loops from internal memory or from external memory without having to delete them one at a time. - Page 69 Erase All Loops - Internal Memory...
-
Page 70: Using Optional Sd/Sdhc Memory Cards
® You can increase the loop memory by installing an optional SD/SDHC memory card in the memory card slot on the rear panel. The JamMan Delay is compatible with SD/SDHC card sizes up to 32GB for over 16 hours of total loop memory. -
Page 71: Formatting Sd Cards
JamMan Delay. Unformatted Cards If a memory card is inserted into the JamMan Delay that does not have a valid format, the JamMan Delay will not recognize it and the DISPLaY will read nF. The card must be formatted before the JamMan Delay can use it. To format the card, follow these steps:... -
Page 72: Erase All Loops - Memory Card
All other data and files on the card are left untouched. To erase all loops from an optional SD/SDHC memory card, follow these steps: Install an optional SD/SDHC memory card in the JamMan Delay’s memory card slot. Select a loop memory location that lights the LED. - Page 73 Erase All Loops - Memory Card...
-
Page 74: Optional Fs3X Footswitch
Optional FS3X Footswitch The optional FS3X Footswitch gives you hands-free control over loop selection, tempo, and stop functions. Mode Switch This footswitch is used for immediately undoing and redoing the last recorded overdub. Down Switch This footswitch is used to play the recorded phrase in reverse. Up Switch This footswitch can be used to set the tempo of a new loop or change the tempo (Time Stretch) of a stored loop. -
Page 75: Jammanager Tm Librarian Software
Librarian Software The JamManager loop librarian software is available as a free download from the DigiTech website. This application runs on both Windows XP/ Vista/7 and Mac OS X computer systems, and lets you archive and transfer loops between the JamMan Delay and your computer. -
Page 76: Specifications (Placeholder)
Loop Level knob set to 12 o’clock position Expression Input Connector Type: 1/4” Stereo (Tip-Sleeve) – compatible with a (Tip-Sleeve) Expression / passive Volume Pedal Footswitch Input Connector Type: 1/4” Stereo (Tip-Ring-Sleeve), compatible with optional DigiTech FS3X 3-button ® footswitch... - Page 77 USB Port • OS X 10.5 or later • Intel Core processor • 1GB RAM (2GB RAM recommended) • USB Port DigiTech® engineers are constantly working to improve the quality of our products. Specifications are therefore subject to change without notice.
- Page 80 Owner’s Manual 18-0687-A Delay ® Printed in the USA DigiTech and JamMan Delay are registered trademarks of HARMAN. All other product name and trademarks are the property of their respective owners, which are in no way associated with DigiTech. ©2010 HARMAN...