Table of Contents
Advertisement
Advertisement
Table of Contents

Related Manuals for DigiTech TRIO+ Band Creator+ Looper


Summary of Contents for DigiTech TRIO+ Band Creator+ Looper
- Page 1 OWNER’S MANUAL...
- Page 2 The foregoing is in lieu of all other warranties, expressed or implied, and DigiTech neither assumes nor authorizes any person to assume any obligation or liability in connection with the sale of this product. In no event shall DigiTech or its dealers be liable for special or consequential damages or from any delay in the performance of this warranty due to causes beyond their control.
-
Page 3: Table Of Contents
TABLE OF CONTENTS Introduction ..............1 Using Alternate Time & Adjusting Song Tempo..27 Using Alternate Time ................27 Adjusting Song Tempo..............27 Features .................2 Advanced Features .............28 Quick Start ..............3 Enabling A Drum Stick Count-In ...........28 Starting A Song With A Count-In ..........28 microSD Card Information ..........4 Recording A Loop With The Band Using A Count-In ..28 Supported microSD Cards ..............4... -
Page 4: Introduction
INTRODUCTION Thanks for choosing the DigiTech® TRIO+ Band Creator™ + Looper pedal. The TRIO+ is a simple-to-use guitar pedal that listens to the way you play and automatically generates bass and drum parts that match your song. Just plug your guitar into the TRIO+, press the BAND footswitch to teach the TRIO+ your chords and rhythm, then press the BAND footswitch again to start playing with your own personal band! Bass and drum levels can be adjusted for the perfect mix using the BASS and DRUMS knobs. -
Page 5: Features
• 1/8" (3.5 mm) Mini Headphone Output With Headphone Level Control • Up To 12 Songs With Loops Can Be Stored To A microSD Card (Included) • Additional Hands-Free Control Available Using An Optional DigiTech FS3X Footswitch • Dual Soft Touch Vacuum Switches •... -
Page 6: Quick Start
QUICK START To get up and running quickly with the TRIO+, see the TRIO+ Quick Start Guide that was included in the box or visit http://digitech.com/en-US/products/trio-plus#documentation. -
Page 7: Microsd Card Information
MICROSD CARD INFORMATION The TRIO+ autosaves your work onto the microSD card so you don’t need to worry about remembering to save parts and songs. To ensure that you don’t unexpectedly lose data, always stop the TRIO+ playback and wait at least 5 seconds without making changes to your songs before ejecting the microSD card or removing power to the pedal. -
Page 8: Connectors & User Interface
See 'Output Jack Operation' on page 15 for more information. CONTROL IN Jack Connect an optional DigiTech FS3X Footswitch to this jack for additional hands-free control. See 'Using An FS3X Footswitch' on page 32 for more information. USB Port This Mini USB port is used for updating the TRIO+'s firmware and connecting to the free TRIO Manager Software. - Page 9 HEADPHONE OUT Jack Connect a pair of headphones to this 1/8” (3.5 mm) mini jack. This output is optimized for headphones having an impedance of 60 Ohms or less. Note that the output jacks are auto-sensing and the AMP and MIXER outputs will be muted when a plug is connected to the HEADPHONE OUT jack.
-
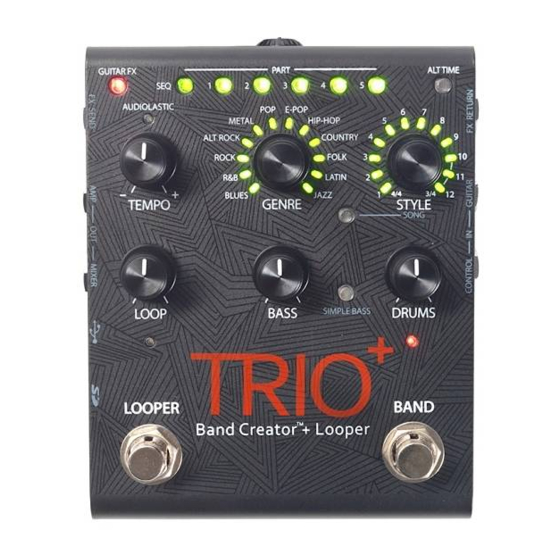
Page 10: User Interface
User Interface SEQUENCE Button Press this button to program the song sequence. Once a sequence is programmed, pressing this button will turn Sequence mode on or off. For more information on programming a song sequence, see 'Programming A Song Sequence' on page 21. PART Buttons The TRIO+ can learn up to 5 different song parts (for example, an intro, verse, chorus, bridge, and outro). - Page 11 TEMPO Knob & AUDIOLASTIC™ LED The TEMPO knob adjusts the TRIO+'s global playback tempo and was designed to adjust the tempo of a song after it is complete. See 'Adjusting Song Tempo' on page 27 for more information on adjusting the tempo of songs.
- Page 12 LOOP Knob Adjusts the level of your recorded loop and overdubs in the mix. When set to the 12 o'clock position, loop playback level will match the guitar input level (unity gain). 10. DRUMS Knob Adjusts the level of the drums in the mix. 11.
- Page 13 14. LOOPER Footswitch & LED Press this footswitch to record loops and overdubs. For more information on using the looper, see 'Recording Loops & Overdubs' on page 22. The LOOPER LED indicates the status of the looper for the selected song part. The following table describes the available states of the LOOPER LED.
- Page 14 15. BAND Footswitch & LED Pressing this footswitch changes the TRIO+'s state. It is used to teach the band, start and stop band and loop playback, and clear the band. See 'Teaching The TRIO+ Band' on page 17 for more information. The BAND LED indicates the status of the band for the selected song part.
-
Page 15: Making Connections/Applying Power
MAKING CONNECTIONS/APPLYING POWER To connect the TRIO+ pedal: Turn down the guitar amp or headphone volume. If connecting to a mixer, turn down the gain/trim control and lower the fader on the channel you’re connecting to. Make all connections to the TRIO+ as shown in 'Connection Diagrams' on page 13. Connect the included HARMAN power adapter to the TRIO+ POWER input connector then connect the other end to an available AC outlet and wait for the TRIO+ to boot. -
Page 16: Connection Diagrams
CONNECTION DIAGRAMS Amplifier Setup HARMAN PS0913DC (9VDC) Power Adapter Guitar Effects TRS CABLE FS3X Footswitch Optional Use only unbalanced TS instrument cables for audio connections. NOTE: When only the AMP OUT jack is used, an inverse cabinet emulation is added to the bass and drums signal. -
Page 17: Amplifier + Mixer Setup
Amplifier + Mixer Setup HARMAN PS0913DC (9VDC) Power Adapter Guitar Effects TRS CABLE Mixer Mixer FS3X Footswitch Optional Use only unbalanced TS instrument cables for audio connections. NOTE: When connected to both the MIXER and AMP OUT jacks, the guitar signal will be fed to the AMP output and the bass and drum parts will be fed to the MIXER output. -
Page 18: Output Jack Operation
OUTPUT JACK OPERATION The output jacks have an auto-sensing feature which allows the TRIO+ to automatically optimize the outputs for the application. The chart below describes how the TRIO+ will operate depending on which outputs are connected. Operation MIXER OUT AMP OUT HEADPHONE OUT Description... -
Page 19: Using Guitar Effects
USING GUITAR EFFECTS The TRIO+ provides two ways to add effects to your guitar signal: you can use the built-in effects and/or connect your favorite outboard effects to the FX Loop. Whichever way you decide to work, the effects will be applied to your guitar signal when playing or while recording loops and overdubs. -
Page 20: Teaching The Band & Working With Song Parts
TRIO+ interface. You also have the option of selecting parts by pressing and holding the BAND footswitch for 2 seconds or by using an optional DigiTech FS3X Footswitch. See 'Using An FS3X Footswitch' on page 32 for more information. Another option is to program a song sequence that will automatically switch between parts as the song plays. - Page 21 TIP: When completing the learning phase, press the LOOPER footswitch instead of the BAND footswitch to immediately begin recording your loop. Press the LOOPER footswitch again when done recording or wait for the song part to reach its end. TIP: If you make a mistake and want to immediately clear the part and re-teach the band, rather than pressing and releasing the BAND footswitch upon completion of the learning phase, hold it for 2 seconds then repeat steps 4-6 above.
-
Page 22: Clearing The Trio+ Band
Clearing The TRIO+ Band Clearing a song part allows you to re-teach the TRIO+ the part — for example, if you made a mistake during the last pass or wish to play something different for the part. NOTE: If a loop has been recorded with the band, the loop will be cleared and restored along with the band part. -
Page 23: Programming Song Part Intensities
Programming Song Part Intensities Each song part can be programmed for normal intensity (PART button is green — this is the default) or high intensity (PART button is red). Programming the chorus or bridge of your songs with a higher backing band intensity can help add dynamics, making your songs more exciting. -
Page 24: Programming A Song Sequence
Programming A Song Sequence Playback of the various parts that make up a song can be ordered and automated by creating a song sequence. This allows you to focus on your playing rather than manually switching song parts. To program a song sequence: Press the SEQ button (the button will begin flashing). -
Page 25: Recording Loops & Overdubs
RECORDING LOOPS & OVERDUBS The TRIO+'s built-in looper can be used as a traditional looper (with no backing band) or loops can be recorded with the backing band. Once the initial loop has been recorded, an unlimited number of overdubs can be recorded on top of it. -
Page 26: Recording Loops Without The Backing Band
When the part ends, the LOOPER LED will light solid green and the loop you just recorded will begin playing along with the band. If your guitar part ends before the song part, press the LOOPER footswitch to stop loop recording or keep your guitar silent until the part ends. TIP: To clear the loop so you can re-record it, follow the instructions described in 'Clearing Loops' on page 25. -
Page 27: Recording Overdubs
Recording Overdubs Overdub recording can be initiated while a loop is playing or from a stopped state. To record an overdub while a loop is playing: Press the LOOPER footswitch once to enable overdub recording (the LOOPER LED will turn solid amber). You can begin playing your overdubbed parts over the loop. -
Page 28: Undoing/Redoing The Last Recorded Loop/Overdub
Undoing/Redoing The Last Recorded Loop/Overdub The last recorded loop/overdub can be undone during playback. This provides a quick method for re-recording a loop or overdub on-the-fly. If a loop/overdub is undone by accident, it can be restored using the redo feature. To undo the last recorded loop/overdub: During playback, press and hold the LOOPER footswitch for 2 seconds until the LOOPER LED flashes briefly. -
Page 29: Recording Loops To An Entire Song Sequence
Recording Loops To An Entire Song Sequence It is possible to record all the initial loops to a song in one pass after all the song parts have been learned by the TRIO+ and a song sequence has been programmed. This can provide a more realistic experience and organic feel during the loop recording process. -
Page 30: Using Alternate Time & Adjusting Song Tempo
USING ALTERNATE TIME & ADJUSTING SONG TEMPO Using Alternate Time Pressing the ALT TIME button selects an alternate interpretation of the selected song part's tempo — usually this is either double or half the current tempo. If the TRIO+ can't find a suitable tempo and number of bars by halving or doubling, the alternate time will remain the same as the original timing. -
Page 31: Advanced Features
ADVANCED FEATURES Enabling A Drum Stick Count-In The TRIO+ has a drum stick count-in feature that can be used to perform the following functions: • Provide a 1-bar count-in before playing a song. • Record loops with the band that start on the first downbeat of a part. The count-in feature is a one-time operation, so it must be enabled each time you want to use it. -
Page 32: Providing Hints To The Trio+ When Teaching
guitar part ends before the song part, press the LOOPER footswitch to stop loop recording or keep your guitar silent until the part ends. When the part ends, the LOOPER LED will light solid green and the loop you just recorded will begin playing along with the band. TIP: To clear the loop so you can re-record it, follow the instructions described in 'Clearing Loops' on page 25. -
Page 33: Tempo Interpretation Using The Alt Time Button
To match a new part's tempo to the previous part using the metronome: If the band is playing, press the BAND footswitch to stop band playback. Using the PART buttons, select the part to which you want to teach or record the loop. If you're recording a loop, ensure the AUDIOLASTIC™... -
Page 34: Managing Songs
MANAGING SONGS Storing Songs The TRIO+ autosaves all songs and loops on the included microSD card. Up to 12 songs (each with up to 5 parts with loops) can be stored to an installed microSD card. See 'microSD Card Information' on page 4 for information on compatible microSD cards. -
Page 35: Using An Fs3X Footswitch
USING AN FS3X FOOTSWITCH An optional DigiTech FS3X Footswitch can be connected to the CONTROL IN jack for additional hands-free control. A TRS (tip-ring-sleeve) 1/4” cable must be used when TRS Cable connecting the FS3X to the TRIO+. When using an optional FS3X... -
Page 36: The Genres & Styles
THE GENRES & STYLES The DigiTech TRIO+ was designed to create the impression of playing with an actual rhythm section — a feeling that is very different than playing to static backing tracks. The styles will follow your own chord progression and transition between chords using an understanding of musical theory. - Page 37 Genre-Based Styles Style Knob Time Genre Feel Style Description Position Signature Mid tempo jazz blues. Sounds best at tempos between 65-120. Bass walks slowly between chords. More sparse style with Blues Even 8ths little decoration. Simple beat with straight kick and snare. Hats in the normal intensity section, switching to cymbals in the high intensity section.
- Page 38 Genre-Based Styles Style Knob Time Genre Feel Style Description Position Signature Slow Chicago-style blues. Sounds best at tempos between 60-115. Bass arpeggiates Blues Swing 8ths chords on 8th notes with the occasional busy fill. Simple swung beat with brush snare action. Lo-fi blues band.
- Page 39 Genre-Based Styles Style Knob Time Genre Feel Style Description Position Signature Blues waltz. Sounds best at tempos between 50-130. Bass rhythm is similar to blues style #11 with alternating root, 5th up, and 2nd Blues Swing 8ths down. Snare and hats in normal intensity section switching to snare and ride in the high intensity section.
- Page 40 Genre-Based Styles Style Knob Time Genre Feel Style Description Position Signature Electric funk. Sounds best at tempos between 70-125. Funky syncopated bass R&B Even 16ths with lots of chromatic walking and octave jumps. Straight funk drumming with brush snare in normal intensity section. '60s soul with tambourine.
- Page 41 Genre-Based Styles Style Knob Time Genre Feel Style Description Position Signature Classic rock. Sounds best at tempos between 60-110. Bass similar to rock style Rock Even 16ths #2 but slightly more spacious. Classic rock drums, with hats changing to cymbals and busier kick in the high intensity section.
- Page 42 Genre-Based Styles Style Knob Time Genre Feel Style Description Position Signature British invasion. Sounds best at tempos between 100-140. Slightly bluesy bass with lots of motion in transition bars. Straight Rock Even 8ths rock beat with steady snare and tight 16th note hats in the normal intensity section, changing to 8th note cymbals in the high intensity section.
- Page 43 Genre-Based Styles Style Knob Time Genre Feel Style Description Position Signature Jazz funk pop. Sounds best at tempos between 65-130. Grooving bass with small Alternative embellishments. Funky drums switching Even 16ths Rock between tight hats and snare in the normal intensity section to a looser hat and higher intensity snare in the high intensity section.
- Page 44 Genre-Based Styles Style Knob Time Genre Feel Style Description Position Signature Classic reggae. Sounds best at tempos between 75-100. Sparse bass sits on root Alternative and leaves a lot of room. Drums are carried Even 8ths Rock by hat groove and snare/side-stick pattern in the normal intensity section.
- Page 45 Genre-Based Styles Style Knob Time Genre Feel Style Description Position Signature Classic galloping metal drum pattern with heavy cymbal work in the high intensity Metal Even 8ths section. Energetic bass locks in with the kick and hi-hat patterns. '90s metal feel with hip-hop influence and flying cymbals.
- Page 46 Genre-Based Styles Style Knob Time Genre Feel Style Description Position Signature 6/8 blast style. The high intensity section double-times the hats and snare with the Metal Even 16ths kick for a bomb blast feel. Bass line is slower, with a simple groove. Heavy swung 3/4 style with a big splashy hat sound.
- Page 47 Genre-Based Styles Style Knob Time Genre Feel Style Description Position Signature Praise and worship-style pop. Sounds best at tempos between 55-110. Bass pins down the root of the chord on even 8ths Even 8ths with some octave jumps. Steady rock beat with hats and snare in the normal intensity section, cymbals added in the high intensity section.
- Page 48 Genre-Based Styles Style Knob Time Genre Feel Style Description Position Signature Straight pop waltz. Sounds best at tempos between 80-150. Slow bass plays the root and walks between chords with occasional Even 8ths large jumps. Sparse drum beat alternates tight hat and steady brush snare in the normal intensity section with ride cymbal and snare in the high intensity section.
- Page 49 Genre-Based Styles Style Knob Time Genre Feel Style Description Position Signature Modern indie synthpop from the US, light drum machine style disco beat with a looser E-Pop Even 8ths open-hat feel switching to a tight groove in the high intensity section. Bass alternates between short 8th notes and held notes.
- Page 50 Genre-Based Styles Style Knob Time Genre Feel Style Description Position Signature Modern '80s retro style with a fractured 6/8 feel. Arpeggiated bass and sparse E-Pop Even 8ths electronic drum pattern with tight kicks and syncopated hi-hat patterns becoming more driving in the high intensity section. Modern Scandinavian synth pop in 3/4.
- Page 51 Genre-Based Styles Style Knob Time Genre Feel Style Description Position Signature Percussion-heavy, slightly off-kilter drum groove with slowly walking bass. The high Hip-Hop Even 16ths intensity section has a heavier downbeat, with the hats pushing the beat forward more. Tight, modern funk style beat with layered snare and clap and slightly shuffling hats.
- Page 52 Genre-Based Styles Style Knob Time Genre Feel Style Description Position Signature Fast country ballad. Sounds best at tempos between 90-120. Bass on 1/2 notes playing root/5th/octave. Simple beat driven by Country Even 8ths slightly loose hats and rimshot or brush snare in the normal intensity section with cymbal and snare in the high intensity section.
- Page 53 Genre-Based Styles Style Knob Time Genre Feel Style Description Position Signature Western swing bebop. Sounds best at tempos between 60-110 or 160-200. Sparse bass sitting on the root with occasional 5ths and octaves and short walks between Country Swing 8ths chords.
- Page 54 Genre-Based Styles Style Knob Time Genre Feel Style Description Position Signature Country rock waltz. Sounds best at tempos between 50-110. Bass plays the root on the one with simple rhythmic embellishments. Subtle double-time hats and side-stick/ Country Straight 8ths brush snare on beats 2 and 3 in the normal intensity section, switching to cymbals and snare on beats 2 and 3 in the high intensity section.
- Page 55 Genre-Based Styles Style Knob Time Genre Feel Style Description Position Signature Steady swung beat with tambourine and brush snare beats. Tambourine switching to Folk Swing 8ths hats at higher tempos in the high intensity section. Bass on octave and 5ths, and walking between chords.
- Page 56 Genre-Based Styles Style Knob Time Genre Feel Style Description Position Signature Tango performed on snare and shaker in the normal intensity section with a slightly higher intensity in the high intensity section Latin Even 8ths with some percussive flourishes, and a subtle kick drum.
- Page 57 Genre-Based Styles Style Knob Time Genre Feel Style Description Position Signature Although there aren't jazz-style swung rhythms in traditional Latin styles, this style option was added for people who want Latin Swing 8ths some latin vibe to go with their swung rhythms.
- Page 58 Genre-Based Styles Style Knob Time Genre Feel Style Description Position Signature Smooth jazz with poppy rhythm. Sounds best at tempos between 70-130. Sparse staccato bass groove with octave jumps. Jazz Even 16ths Grooving drums, moving from tambourine and side-stick in the normal intensity section to hats and snare in the high intensity section.
- Page 59 Genre-Based Styles Style Knob Time Genre Feel Style Description Position Signature Slow swing ballad. Sounds best at tempos between 70-120. Bass walks up and down each chord with short transition fills. Jazz Swing 8ths Shuffling brush snare/side-stick and pedal hat keeping time in the normal intensity section.
-
Page 60: Trio Manager Software/Firmware Updates
The TRIO Manager Software can be used to backup and manage all your TRIO+ song data using a computer. It can also be used to update firmware. For the latest information on the TRIO Manager Software, please visit http:// digitech.com/en/products/trio-plus. -
Page 61: Specifications
Type: Unbalanced, 1/4" TS Impedance: 1 MΩ FX Return: Type: Unbalanced, 1/4" TS Impedance: 1 MΩ Control Input Type: 1/4" TRS (compatible with DigiTech FS3X) Outputs Amp Output: Type: Unbalanced, 1/4" TS Impedance: 1 kΩ Frequency Response: 25 Hz–20 kHz Mixer Output: Type: Unbalanced, 1/4"... - Page 62 Looper Bit Depth: 24-bit Sample Rate: 44.1 kHz Maximum Recording Time: 230 seconds per song part — based on a minimum 50 BPM and 48 bars per part Type: Mini-B SD Card Requirements Type: microSDHC, Class 10 Min/Max Storage Size: 8 GB/32 GB Physical Dimensions:...
- Page 63 TRIO+ Owner's Manual 5064509-B © 2017 HARMAN. All rights reserved. DigiTech is a registered trademark of HARMAN. Some TRIO+ styles licensed from PG Music Inc ®, makers of Band-in-a-Box ®. To learn more about Band-in-a-Box, visit http://pgmusic.com. Drum kit and acoustic bass recordings by Digital Sound Factory®.