
Related Manuals for Comelit People PL6731


Summary of Contents for Comelit People PL6731
- Page 1 People PL6731 F U L L T E C H N I C A L M A N U A L Join us in taking care of our planet...
- Page 2 | Table of contents | 5” People door entry monitor with video memo art. PL6731 for Simplebus 2 system People series colour door entry monitor for Simplebus 2 system Hands-free version with 5” / 16:9 screen. The door entry monitor can be programmed, even when switched off, via smartphone using the MyComelit app, which is available to download free of charge.
- Page 3 | Table of contents | Table of contents Description Front buttons - factory programming Side buttons Activating “Silent mode” Accessing and navigating menus Indicator LEDs Technical specifications Programming the user code Programming the user code via the MyComelit app Programming the user code using the dip-switches Installation Disassembling the door entry monitor Removing and fitting the connection terminals...
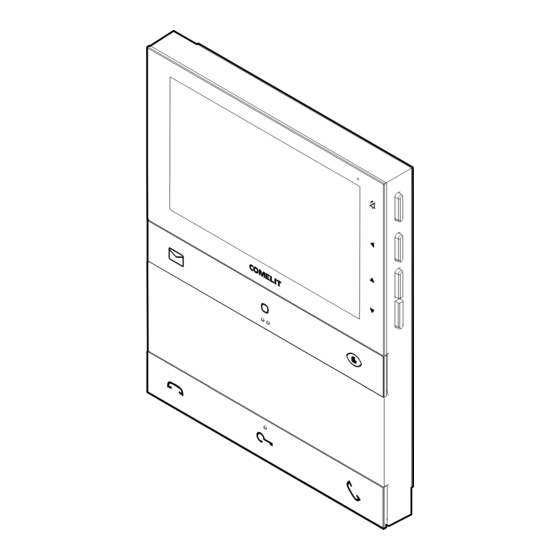
- Page 4 | Table of contents | Description 1. 5’’ / 16:9 LCD screen. 2. Mechanical side buttons. 3. Mechanical front buttons, with touch guides for sight impaired users on the middle buttons of each row. 4. NFC detection area, identified by a removable sticker. 5.
- Page 5 | Table of contents | Front buttons - factory programming Video memo f Press the button to view the recorded video. Generic actuator f Press the button to activate a generic actuator (art. 1256) or the relay for the external entrance panel.
-
Page 6: Side Buttons
| Table of contents | Side buttons Button for activating “Silent mode” Confirm button Menu access and navigation button Buttons for scrolling menus and selecting values Activating “Silent mode” f Press to activate/deactivate Silent mode. » The red LED indicates that the function is active. Accessing and navigating menus f Press one of the following buttons to access the user menu. - Page 7 | Table of contents | User menu options Select this menu to exit the user menu and scan the QR code to EX I T access the online documentation. Select this menu to access the log of recordings and to view them (up VI D E O M E M O to 30 video memos can be stored).
- Page 8 | Table of contents | √ The function must be authorised by the installer using the MyComelit app or via the installer menu on the door entry monitor. Select this menu to configure the function activation mode and to program the time bands for operation: MANUAL •...
-
Page 9: Indicator Leds
| Table of contents | Indicator LEDs Red LED Flashing: communication taking place. Flashing: incoming call/communication taking place. Flashing with door entry monitor in standby: “Door open” indication. White LED Lit steadily with door entry monitor in standby: “Auto lock-release on receipt of call”... -
Page 10: Technical Specifications
| Table of contents | Technical specifications 135 mm 23 mm GENERAL DATA Product weight 430 grams Product colour White RAL9003, Black RAL9005 Coating material type ABS, PMMA Surface mounting Yes Desk base mounting Yes, with specific accessory COMPATIBLE SYSTEMS Simplebus 2 audio/video with power supply unit art. -
Page 11: General Features
| Table of contents | SETTINGS Loudspeaker volume Yes Ringtone volume Yes Screen brightness Yes Screen contrast Yes Screen colour Yes NETWORK AND COMMUNICATION PROTOCOL User function programming via OSD menu Installer function programming via OSD menu Function programming via NFC and MyComelit app ENVIRONMENTAL AND CONFORMITY SPECIFICATIONS IP protection rating IP30... - Page 12 | Table of contents | Programming the user code A user code must be assigned to the door entry monitor. The user code can be programmed via the MyComelit app or using the dip-switches. << OR >> SOFTWARE VIA MYCOMELIT APP HARDWARE VIA DIP-SWITCH Programming the user code via the MyComelit app The door entry monitor has an NFC connection which means it can be programmed quickly and easily via the...
- Page 13 | Table of contents | 3. Enter the desired user code and press “WRITE”. User code User code MyComelit user code user code user code WRITE WRITE Bring your smartphone close to the door entry monitor 4. Bring your smartphone close to the NFC detection area of the door entry monitor (identified by its label) and make a circular motion until you feel it vibrate.
- Page 14 | Table of contents | if you want to program the user codes for other door entry monitors in sequence: 5.B Press "CONTINUE". Configuration complete! CONTINUE CONTINUE 6.B Select the desired increment interval. MyComelit MyComelit user code user code Select an increment 7.B Bring your smartphone close to the NFC detection area of the new door entry monitor (identified by its label) and make a circular motion until you feel it vibrate.
- Page 15 | Table of contents | Programming the user code using the dip-switches f Set the DIP-switches to ON to program a user code on the door entry monitor, as per Table of user codes. Example: code 4. TABLE OF USER CODES code DIP ON 1,2,3,4,5...
-
Page 16: Installation
| Table of contents | Installation Fixing points for use when installing in compatible boxes CLACK... - Page 17 | Table of contents | Disassembling the door entry monitor Removing and fitting the connection terminals CLACK...
- Page 18 | Table of contents | Connections PL6731 VIDEO ENTRY SYSTEM RISER CFP CFP 1214/2C 20 m max VIDEO ENTRY SYSTEM RISER CFP floor door call input Where multiple door-entry phones or door entry monitors have the same user code, connect the CFP button on one only;...
- Page 19 | Table of contents | Programming the door entry monitor The programming can be customised: • Using the MyComelit app via a smartphone • Using the installer menu on the door entry monitor << OR >> VIA MYCOMELIT APP VIA DOOR ENTRY MONITOR...
- Page 20 | Table of contents | Programming via installer menu √ The first time the door entry monitor is switched on, you will need to configure the device language; you will also be able to set the date and time if necessary. 1.
- Page 21 | Table of contents | D I S PL A Y B U T T O N F U N CT IO NS MENU By selecting this menu, the functions currently assigned to the buttons on the door entry monitor are displayed. The factory-set functions are as follows: B A C K P R OGR A MMED FU NCTI ON...
- Page 22 | Table of contents | EXAMPLE: PROGRAMMING THE INTERCOM FUNCTION TO OTHER APARTMENT 1. Press one of the following buttons to access the user menu. 2. Press for 5 sec to access the installer menu. 5 sec » A confirmation tone will sound and the following screen will appear. DISPLAY BUTTON FUNCTIONS INTERCOM ACTUATOR...
- Page 23 | Table of contents | T O O TH ER APARTMENT 5. Press to select » The menu will turn green. B ACK TO OTHER APARTMENT TO SAME APARTMENT 6. Press the confirm button. 7. Press to select the number you want to change. »...
- Page 24 | Table of contents | EXAMPLE: PROGRAMMING THE INTERCOM FUNCTION TO SAME APARTMENT 1. Press one of the following buttons to access the user menu. 2. Press for 5 sec to access the installer menu. 5 sec » A confirmation tone will sound and the following screen will appear. DISPLA Y BUTTON FU NCTIONS INTERCOM ACTUATOR...
- Page 25 | Table of contents | T O S AM E APARTMENT 5. Press to select » The menu will turn green. B ACK TO OTHER APARTMENT TO SAME APARTMENT 6. Press the confirm button. 7. Press the button to be associated with the function. is configured to activate another function, the MyComelit app should be used to restore the video memo function.
- Page 26 | Table of contents | INSTALLER MENU NAVIGATION TREE D I S PL A Y B U T T O N F U N CT IO NS Select this menu to view the functions currently assigned to the buttons on the door entry monitor. B A C K P RO GR A M M E D F U N C T I O N B U T TON...
- Page 27 | Table of contents | A D V AN C ED Select this menu to access the advanced settings. D A T E FO RMAT Select this menu to configure the date display format. DD/MM/YYYY MM/DD/YYYY YYYY/MM/DD M A I N /SE CONDARY Select this menu to configure the door entry monitor as Main (default) or Secondary.
- Page 28 | Table of contents | A D V AN C ED P A N I C CALL Select this menu to configure a button or the CFP input to transmit a priority call to the porter switchboard. PAIR WITH BUTTON PAIR WITH CFP INP UT S W I T CHB OARD CALL Select this menu to configure a button to make the call to standard or main porter...
- Page 29 | Table of contents | Programming via MyComelit app (vers. 2.0.0 or higher) The MyComelit app can be used to program the door entry monitor quickly and easily, even while it is switched off. When the MyComelit app is used to configure the door entry monitor, the language, date and time are set automatically.
-
Page 30: Intercom Function
| Table of contents | MAIN AND SECONDARY DOOR ENTRY MONITOR In systems with power supply unit art. 1210/1210A, one main door entry monitor and 3 secondary door entry monitors can be programmed for each apartment. In systems with power supply unit art. 4888C, 2 main door entry monitors and 2 secondary door entry monitors can be programmed for each apartment. - Page 31 | Table of contents | • Selective group intercom This is an intercom call to groups of several door entry monitors in the same apartment or another apartment identified by a dedicated intercom code, different from the user code. The door entry monitor button can be programmed with up to 3 different intercom codes to which the call will be made at once.
- Page 32 | Table of contents | Expansion diagrams PL6731 1216 CFP CFP 1214/2C 20 m max PL6731 PL6731 CFP CFP CFP CFP 1214/2C In systems with power supply unit art. 1210 or 1210A, a maximum of 1 main door entry monitor (P) and 3 secondary door entry monitors (S) can be programmed for each apartment.
-
Page 33: Wiring Diagrams
1214/2C 1210A UT2020 A MAX B MAX C MAX E MAX H MAX Art. 1216 Comelit Art. 4577/4579 1 mm² (Ø 1.2 260 m 130 m 130 m 50 m mm AWG 17) (850 feet) (425 feet) (425 feet) (164 feet) UTP5 cat. -
Page 34: Basic Diagram
| Table of contents | BASIC DIAGRAM 1216 PL6731 CFP CFP 1214/2C PL6731 CFP CFP 1214/2C 230V 1210A 1210 12 VAC/VDC 18 Ω MAX R GND NO NC UT2020 UT9200 (MAX 8) 20 m max. Local door-opener button. - Page 35 | Table of contents | DIGITAL ENTRANCE PANEL VARIANT WITH TOUCH-SCREEN MODULE ART. UT9270 Maximum 80 users 1210A 1210 12 VAC/VDC 18 Ω MAX R GND NO NC UT2020 UT2010VC UT9270 Max. 20 m. Local door-opener button. For systems with over 80 users, provide an additional power supply. VARIANT WITH SEPARATE POWER SUPPLY >...
- Page 36 1214/2C 4888C UT1020 1595 A MAX B MAX E MAX F MAX H MAX Art.1216 Comelit Art. 4577/4579 1 mm² 200 m 200 m 50 m 100 m (Ø 1.2 mm AWG 17) (650 feet) (650 feet) (165 feet) (330 feet) UTP5 cat.
- Page 37 | Table of contents | BASIC DIAGRAM 1216 PL6731 CFP CFP 1214/2C PL6731 CFP CFP 1214/2C 2 3 4 4888C 230V 1595 120-230 V 12 VAC/VDC 18 Ω MAX NO NC UT1020 UT9200 (MAX 25) 20 m max. Local door-opener button.
- Page 38 | Table of contents | Warning Intended use This Comelit product is designed and manufactured for use in the creation of audio and video communication systems in residential, commercial, industrial and public buildings. Installation All activities connected to the installation of Comelit products must be carried out by qualified technical personnel, with careful observation of the indications provided in the Manuals / Instruction sheets supplied with those products.
- Page 39 C E R T I F I E D M A N A G E M E N T S Y S T E M S w w w . c o m e l i t g r o u p . c o m 1st edition 01/2024 Via Don Arrigoni, 5 - 24020 Rovetta (BG) - Italy code 2G40003139...