Table of Contents
Advertisement
Available languages
Available languages
Quick Links
Advertisement
Chapters
Table of Contents

Related Manuals for Comelit Planux Memo Video


Summary of Contents for Comelit Planux Memo Video
- Page 1 IT - EN - FR - NL...
-
Page 3: Table Of Contents
ELIMINARE ATTUATORI..................18 DESCRIZIONE MONITOR ................... 5 TELECAMERE ..................... 19 FUNZIONE TASTI ....................5 AGGIUNGERE TELECAMERE ................19 MENU PLANUX MEMO VIDEO ................6 MODIFICA CODICE TELECAMERA ..............20 GUIDA CROMATICA .................... 6 ELIMINARE TELECAMERE ................. 20 INTERCOMUNICANTI ..................21 VIDEOFONIA AGGIUNGERE INTERCOMUNICANTE............... -
Page 4: Avvertenze
INTRODUZIONE AVVERTENZE Comelit Group S.p.A. declina ogni responsabilità per un utilizzo improprio degli apparecchi, per modifi che effettuate da altri a qualunque titolo e scopo, per l'uso di accessori e materiali non originali. Attenzione! Al fi ne di ridurre il rischio di guasti e scosse elettriche: •... -
Page 5: Descrizione Monitor
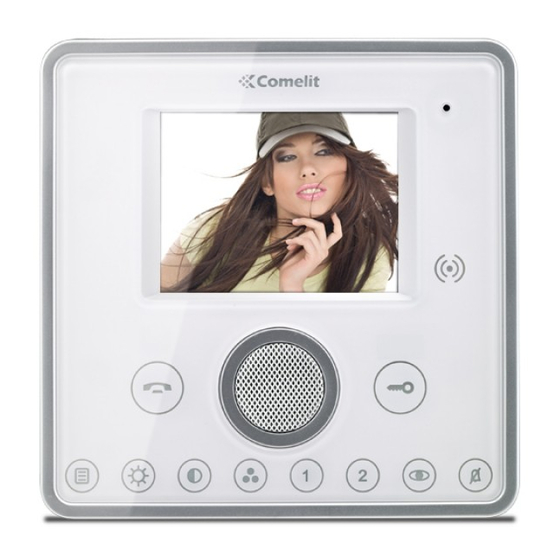
Tasto serratura: permette l’apertura della serratura associata. Sab 05/09/09 16:07 Tasto menu: permette di accendere o spegnere il monitor del Planux Memo Video. Tasto luminosità: permette la regolazione della Videofonia Setup luminosità dell'immagine di una comunicazione video. -
Page 6: Menu Planux Memo Video
INTRODUZIONE MENU PLANUX MEMO VIDEO GUIDA CROMATICA Per navigare attraverso il menu è suffi ciente toccare Le icone dei menu cambiano colore a secondo del con un dito l'icona della funzione desiderata. loro stato e della loro funzione: : indica che la funzione non è attiva. -
Page 7: Rispondere Ad Una Chiamata
Telecamere scheda SD sotto la cartella "Video" e possono essere visualizzate anche su pc con Windows Media Player. In assenza della scheda SD le registrazioni vengono Intercomunicanti Intercomunicanti salvate nella memoria del Planux Memo Video (MAX 2 registrazioni). Centralino principale... -
Page 8: Visualizzare Una Registrazione
IMPOSTA MELODIE Per gestire le melodie del Planux Memo Video, accedere al menu Videofonia > Imposta melodie . Selezionare il tipo di chiamata per cui si vuole modifi care la melodia premendo l'icona desiderata. -
Page 9: Regolazione Volumi
VIDEOFONIA REGOLAZIONE VOLUMI ATTUATORI Per regolare il volume della suoneria, dell'audio, dei Per visualizzare l'elenco degli attuatori presenti, tasti o dei toni d'allarme accedere al menu Videofonia accedere al menu Videofonia > Attuatori. > Regolazione volumi. Gio 05/09/09 - 16:07 0W Gio 21/06/12 - 16:07 0W Attuatore 1 Attuatore 1... -
Page 10: Rinominare Attuatori
VIDEOFONIA TELECAMERE Gio 05/09/09 - 16:07 0W Per visualizzare l'elenco delle telecamere presenti, accedere al menu Videfonia > Telecamere. Attuatore Generico Attuatore Generico Gio 05/09/09 - 16:07 0W Dispositivo non presente Telecamera 1 Telecamera 1 Telecamera 2 Telecamera 3 RINOMINARE ATTUATORI Telecamera 4 Premere l'icona e successivamente quella... -
Page 11: Rinominare Telecamere
VIDEOFONIA Con l'immagine a video, per tornare al menu toccare RINOMINARE TELECAMERE lo schermo; per visualizzare altre telecamere premere Premere l'icona e successivamente quella del nuovamente un'icona. gruppo di telecamere che si desidera rinominare. In caso non ci sia alcuna telecamera, compare la scritta "DISPOSITIVO NON PRESENTE". -
Page 12: Intercomunicanti
VIDEOFONIA INTERCOMUNICANTI RINOMINARE INTERCOMUNICANTI visualizzare l'elenco delle chiamate Premere l'icona e successivamente quella intercomunicanti presenti, accedere menu della chiamata intercomunicante che si desidera Videofonia > Intercomunicanti. rinominare. Gio 05/09/09 - 16:07 0W Gio 05/09/09 - 16:07 0W Nome Intercomunicante 1 Intercomunicante 1 Intercomunicante 2 Intercomunicante 3... -
Page 13: Descrizione Menu Setup
LINGUA Blocco tasti e touch È possibile modifi care la lingua dei menu del Conferma blocco tasti e Planux Memo Video scegliendo tra quelle installate. touch screen per 60 secondi? Lingua Accedere al menu Setup > Lingua. Imposta data e ora... -
Page 14: Imposta Data E Ora
SETUP INFORMAZIONI Confermare premendo l'icona Per visualizzare la versione del software installato Gio 05/09/09 - 16:07 0W accedere al menu informazioni. Gio 21/06/12 - 16:07 0W Blocco tasti e touch Blocco tasti attivato Regola volumi Lingua VERS. SW: 1.5 VERS. EE: 1.3.2 6214C Imposta melodie SB CODE: 5P RANGE: 0 - 0 Imposta data e ora... -
Page 15: Accesso Menu Avanzate
AVANZATE ACCESSO MENU AVANZATE DESCRIZIONE MENU AVANZATE Accedere al menu Setup > Avanzate. Gio 21/06/12 - 16:07 0W Inserire la password installatore che di default è 1961. Prog. Tasti Prog Tasti Gio 05/09/09 - 16:07 0W Conf. video segreteria Attuatori INSERIRE PASSWORD Telecamere... -
Page 16: Programmazione Tasti
PROGRAMMAZIONE TASTI Selezionare la funzione desiderata premendo l'icona a destra della stessa. Per programmare i tasti del Planux Memo Video accedere al menu Setup > Avanzate > Prog. Tasti. Gio 05/09/09 - 16:07 0W Selezionare il tasto che si vuole programmare ( Es. -
Page 17: Configurazione Video Segreteria
AVANZATE CONFIGURAZIONE VIDEO SEGRETERIA AGGIUNGERE ATTUATORI È possibile confi gurare la fuzione video segreteria Per aggiungere un attuatore premere l'icona in modo che vengano registrate tutte le chiamate videocitofoniche. Inserire il nome desiderato e premere l'icona accedere al menu Setup > Avanzate > Conf. video confermare. -
Page 18: Introduzione Modifica Codice Attuatore
AVANZATE MODIFICA CODICE ATTUATORE ELIMINARE ATTUATORI Per modifi care il codice di un attuatore premere Per eliminare un attuatore premere l'icona seguito l'icona seguito dall'icona dell'attuatore. dall'icona dell'attuatore. Gio 05/09/09 - 16:07 0W Gio 05/09/09 - 16:07 0W Att. generico Att generico Attuatore 1 Attuatore 2... -
Page 19: Telecamere
AVANZATE TELECAMERE AGGIUNGERE TELECAMERE Per gestire le telecamere accedere al menu Setup > Per aggiungere una telacamera premere l'icona Avanzate > Telecamere. Inserire il nome desiderato e premere l'icona Gio 05/09/09 - 16:07 0W confermare. Gio 05/09/09 - 16:07 0W Telecamera 1 Telecamera 1 Nome... -
Page 20: Modifica Codice Telecamera
AVANZATE MODIFICA CODICE TELECAMERA ELIMINARE TELECAMERE Premere l'icona seguito dall'icona della Premere l'icona seguito dall'icona della telecamera. telecamera. Gio 05/09/09 - 16:07 0W Gio 05/09/09 - 16:07 0W Telecamera 1 Telecamera 1 Telecamera 2 Telecamera 3 Telecamera 4 Inserire il codice desiderato usando la tastiera Confermare premendo l'icona numerica e premere l'icona per salvare. -
Page 21: Intercomunicanti
AVANZATE INTERCOMUNICANTI AGGIUNGERE INTERCOMUNICANTE Per gestire gli intercomunicanti accedere al menu Per aggiungere una chiamata intercomunicante Setup > Avanzate > Intercomunicanti. premere l'icona Inserire il nome desiderato e premere l'icona Gio 05/09/09 - 16:07 0W confermare. Gio 05/09/09 - 16:07 0W Intercomunicante 1 Intercomunicante 1 Nome... -
Page 22: Modifica Indirizzo Intercomunicante
AVANZATE MODIFICA INDIRIZZO INTERCOMUNICANTE ELIMINARE INTERCOMUNICANTE Premere l'icona seguito dall'icona della chiamata Premere l'icona seguito dall'icona della chiamata intercomunicante. intercomunicante. Gio 05/09/09 - 16:07 0W Gio 05/09/09 - 16:07 0W Intercomunicante 1 Intercomunicante 1 Intercomunicante 2 Inserire l'indirizzo desiderato usando la tastiera Confermare premendo l'icona numerica e premere l'icona per salvare. -
Page 23: Intercom Selettivo
AVANZATE INTERCOM SELETTIVO AGGIUNGERE INTERCOM SELETTIVO volta create, chiamate intercom Per aggiungere una chiamata intercom selettivo selettivo potranno essere trovate sotto il menu premere l’icona “Intercomunicanti” (vedi pagina 12). Inserire il nome desiderato e premere l'icona Per gestire le chiamate intercom selettivo accedere al confermare. -
Page 24: Eliminare / Modificare Intercom Selettivo
AVANZATE ELIMINARE / MODIFICARE IMPOSTAZIONE CODICE STAFFA INTERCOM SELETTIVO Ogni staffa del sistema viene identifi cata mediante il proprio codice; tale codice deve essere un numero Per eliminare o modifi care una chiamata intercom compreso tra 1 e 240. selettivo seguire le istruzioni a pag 21. Accedere al menu Setup >... -
Page 25: Impostazione Monitor Principale / Secondario
AVANZATE IMPOSTAZIONE MONITOR IMPOSTAZIONE INDIRIZZO MULTIPLO Attivando la funzione “Indirizzo multiplo” il monitor PRINCIPALE / SECONDARIO suonerà ogni volta che verrà chiamato un indirizzo Accedere al menu Setup > Avanzate > Indirizzi > simplebus compreso nel range impostato. Monitor. Accedere al menu Setup > Avanzate > Indirizzi > Sab 05/09/09 16:07 Indirizzo multiplo. -
Page 26: Calibrazione Touch
AVANZATE IMPOSTA INGRESSO CALIBRAZIONE TOUCH È possibile assegnare 2 diverse funzioni all’ingresso Nel caso in cui il touch screen non dovesse rispondere CFP-CFP presente sulla morsettiera della staffa: correttamente al tocco è possibile calibrarlo. • Chiamata fuori porta (CFP) Accedere al menu Setup > Avanzate > Calibrazione •... -
Page 27: Reset Configurazioni
Per un aggiornamento software del prodotto, videocitofoniche. rivolgersi al proprio installatore o direttamente al centro assistenza Comelit Group S.p.A.. Accedere al menu Setup > Avanzate > Reset confi gurazione. TEMPO TRASMISSIONE Gio 21/06/12 - 16:07 0W Il tempo di trasmissione determina la velocità con cui vengono inviati i comandi sulla linea dati. - Page 28 DESCRIPTION OF THE MONITOR ..............30 CAMERAS ......................44 KEY FUNCTIONS ....................30 ADDING CAMERAS ..................... 44 PLANUX MEMO VIDEO MENU ................31 MODIFYING A CAMERA CODE................45 GUIDE TO COLOURS ..................31 DELETING CAMERAS ..................45 INTERCOMS ......................46 DOOR ENTRY MONITORS ADDING AN INTERCOM..................
-
Page 29: Warnings
WARNINGS Comelit Group S.p.A. declines any responsibility for improper use of the apparatus, for modifi cations made by third parties for any reason or purpose, and for the use of accessories and materials which are not originals. Caution! In order to reduce the risk of faults and electric shocks: •... -
Page 30: Description Of The Monitor
Door lock key: opens the corresponding door lock. Sab 05/09/09 16:07 Menu key: switches the Planux Memo Video monitor on and off. Brightness key: adjusts the brightness of the Door entry monitors onitors Setup image displayed in a video message. -
Page 31: Planux Memo Video Menu
INTRODUCTION PLANUX MEMO VIDEO MENU GUIDE TO COLOURS To navigate the menu, simply use your fi nger to touch the The menu icons change colour depending on their status icon corresponding to the desired function. and function: : indicates that the function is not active. -
Page 32: Answering A Call
Cameras in the "Video" folder, and may also be viewed on a PC using Windows Media Player. If there is no SD card, the recordings will be saved in the Planux Memo Video Intercoms Intercoms device memory (MAX. 2 recordings). -
Page 33: Viewing A Recording
SETTING MELODIES To manage the Planux Memo Video melodies, access the Door entry monitors > Set melody menu. Select the type of call for which you wish to modify the melody by pressing the relevant icon. -
Page 34: Adjusting The Volume
DOOR ENTRY MONITORS ADJUSTING THE VOLUME ACTUATORS To adjust the ringtone, audio, key tone or alarm tone To view the list of actuators present, access the menu volume, access the Door entry monitors > Volume Door entry monitors > Actuators. adjustment menu. -
Page 35: Renaming Actuators
DOOR ENTRY MONITORS CAMERAS Thu 05/09/09 - 16:07 0W To view the list of cameras present, access the menu Door entry monitors > Cameras. Generic Actuator Generic Actuator Thu 05/09/09 - 16:07 0W Device not present Camera 1 Camera 1 Camera 2 Camera 3 RENAMING ACTUATORS... -
Page 36: Renaming Cameras
DOOR ENTRY MONITORS When a video image is displayed, to return to the menu RENAMING CAMERAS simply touch the screen; to view other camera images Press the icon followed by the icon corresponding to press an icon again. the group of cameras you wish to rename. If no camera is connected, the message “DEVICE NOT PRESENT”... -
Page 37: Intercoms
DOOR ENTRY MONITORS INTERCOMS RENAMING INTERCOMS To view the list of intercom calls present, access the Door Press the icon followed by the icon corresponding to entry monitors > Intercoms menu. the intercom call you wish to rename. Thu 05/09/09 - 16:07 0W Thu 05/09/09 - 16:07 0W Name Intercom 1... -
Page 38: Setup Menu Description
Thu 21/06/12 - 16:07 0W LOCKING THE KEYPAD AND TOUCH-SCREEN The Lock keypad and touch-screen function temporarily deactivates the Planux Memo Video keys and touch- Conditions screen. The functions are reactivated after 60 seconds, or on receipt of a call. -
Page 39: Setting The Date & Time
SETUP INFORMATION Confi rm by pressing the icon. To view the software version installed, access the Information menu. Thu 05/09/09 - 16:07 0W Thu 21/06/12 - 16:07 0W Adjust volumes Keypad locked Language VERS. SW: 1.5 VERS. EE: 1.3.2 6214C Set melodies SB CODE: 5P RANGE: 0 - 0 Intercom add. -
Page 40: Accessing Advanced Menus
ADVANCED ACCESSING ADVANCED MENUS ADVANCED MENUS DESCRIPTION Access the menu Setup > Advanced. Thu 21/06/12 - 16:07 0W Enter the installer password (set by default to 1961). Prog. Keys Prog Keys Thu 05/09/09 - 16:07 0W Conf. video memory Actuators ENTER PASSWORD Cameras Thu 21/06/12 - 16:07 0W... -
Page 41: Key Programming
KEY PROGRAMMING Select the desired function by pressing the icon to the right of it. To program the Planux Memo Video keys, access the menu Setup > Advanced > Prog. keys menu. Thu 05/09/09 - 16:07 0W Select the key you want to program (e.g. Key 1). -
Page 42: Video Memory Setup
ADVANCED VIDEO MEMORY SETUP ADDING ACTUATORS The video memory function can be set up so that all To add an actuator, press the icon. video entry phone calls are recorded. Enter the desired name and press the icon to confi rm. Access the menu Setup >... -
Page 43: Introduction Modifying An Actuator Code
ADVANCED MODIFYING AN ACTUATOR CODE DELETING ACTUATORS To modify the code of an actuator, press the icon To delete an actuator, press the icon followed by the followed by the actuator icon. actuator icon. Thu 05/09/09 - 16:07 0W Thu 05/09/09 - 16:07 0W Generic act. -
Page 44: Cameras
ADVANCED CAMERAS ADDING CAMERAS To manage the cameras, access the menu Setup > To add a camera, press the icon. Advanced > Cameras. Enter the desired name and press the icon to confi rm. Thu 05/09/09 - 16:07 0W Thu 05/09/09 - 16:07 0W Camera 1 Camera 1 Name... -
Page 45: Modifying A Camera Code
ADVANCED MODIFYING A CAMERA CODE DELETING CAMERAS Press the icon followed by the camera icon. Press the icon followed by the camera icon. Thu 05/09/09 - 16:07 0W Thu 05/09/09 - 16:07 0W Camera 1 Camera 1 Camera 2 Camera 3 Camera 4 Enter the desired code using the numerical keypad and Confi... -
Page 46: Intercoms
ADVANCED INTERCOMS ADDING AN INTERCOM To manage the intercoms, access the Setup > Advanced To add an intercom call, press the icon. > Intercoms menu. Enter the desired name and press the icon to confi rm. Thu 05/09/09 - 16:07 0W Thu 05/09/09 - 16:07 0W Intercom 1 Intercom 1... -
Page 47: Modifying An Intercom Address
ADVANCED MODIFYING AN INTERCOM ADDRESS DELETING AN INTERCOM Press the icon followed by the intercom call icon. Press the icon followed by the intercom call icon. Thu 05/09/09 - 16:07 0W Thu 05/09/09 - 16:07 0W Intercom 1 Intercom 1 Intercom 2 Enter the desired address using the numerical keypad Confi... -
Page 48: Selective Intercom
ADVANCED SELECTIVE INTERCOM ADDING A SELECTIVE INTERCOM Once created, Selective intercom calls can be found To add an Selective intercom call, press the icon. under the "Intercoms" menu (see page 37). Enter the desired name and press the icon to confi rm. To manage Selective intercom, access the menu Setup >... -
Page 49: Deleting / Modifyinga Selective Intercom
ADVANCED DELETING / MODIFYING SETTING THE BRACKET CODE A SELECTIVE INTERCOM Each bracket in the system is identifi ed by its own code; this code should be a number between 1 and 240. To delete or modify a selective intercom call, follow the instructions on page 46. -
Page 50: Setting A Monitor As Main / Secondary
ADVANCED SETTING A MONITOR AS MAIN / SETTING A MULTIPLE ADDRESS When the "Multiple address" function is activated, the SECONDARY monitor will ring every time a Simplebus address within Access the menu Setup > Advanced > Addresses > the set range is called. Monitor. -
Page 51: Calibrating The Touch-Screen
ADVANCED SET INPUT CALIBRATING THE TOUCH-SCREEN 2 different functions can be assigned to the CFP-CFP If the touch-screen does not respond correctly to touch input on the bracket terminal board: commands, it can be calibrated. • Floor door call (CFP) Access the menu Setup >... -
Page 52: Reset Configurations
Set date and time between one light switching on and the next. PRODUCT UPDATE Conditional commands Please contact your installer or the Comelit Group S.p.A. service centre for product software updates. Reset configuration Reset configuration Confi rm by pressing the icon. - Page 53 ÉLIMINER ACTIONNEURS.................. 68 DESCRIPTION MONITEUR ................. 55 CAMÉRAS ......................69 FONCTION TOUCHES ..................55 AJOUTER CAMÉRAS ..................69 MENU PLANUX MEMO VIDEO ................56 MODIFIER CODE CAMÉRA ................70 GUIDE CHROMATIQUE ..................56 ÉLIMINER CAMÉRAS ..................70 INTERCOMMUNICANTS ..................71 VISIOPHONIE AJOUTER INTERCOMMUNICANT ..............
-
Page 54: Avertissements
INTRODUCTION AVERTISSEMENTS La société Comelit Group S.p.A. décline toute responsabilité en cas de mauvais usage des appareils, pour des modifi cations effectuées par d'autres personnes pour n'importe quelle raison et pour l'utilisation d'accessoires et matériaux non d'origine. Attention ! Afi n de réduire le risque de pannes et les électrocutions : •... -
Page 55: Description Moniteur
Touche gâche : permet l'ouverture de la gâche y étant associée. Sam 05/09/09 16:07 Touche menu : permet d'allumer ou d'éteindre le moniteur du Planux Memo Video. Touche luminosité : permet de régler la luminosité Visiophonie Setup de l'image d'une communication vidéo. -
Page 56: Menu Planux Memo Video
INTRODUCTION MENU PLANUX MEMO VIDEO GUIDE CHROMATIQUE Pour naviguer dans le menu, il suffi t de toucher d'un doigt Les icônes des menus changent de couleur selon leur état l'icône de la fonction désirée. et leur fonction : : indique que la fonction n'est pas active. -
Page 57: Répondre À Un Appel
SD du dossier « Vidéo » et peuvent être également affi chés sur pc avec Windows Media Player. À défaut de la carte SD, les enregistrements sont sauvegardés dans la Intercommunicants Intercommunicants mémoire du Planux Memo Video (max. 2 enregistrements). Standard principal... -
Page 58: Visualiser Un Enregistrement
PROGRAMMER MÉLODIES Pour gérer les mélodies du Planux Memo Video, accéder au menu Visiophonie > Programmer mélodies. Sélectionner le type d'appel pour lequel on désire modifi er la mélodie en appuyant sur l'icône désirée. -
Page 59: Réglage Volumes
VISIOPHONIE RÉGLAGE VOLUMES ACTIONNEURS Pour régler le volume de la sonnerie, du son, des touches Pour affi cher la liste des actionneurs présents, accéder au et des tonalités d'alarme, accéder au menu Visiophonie > menu Visiophonie > Actionneurs. Réglage volumes. Jeu 05/09/09 - 16:07 0W Jeu 21/06/12 - 16:07 0W Actionn. -
Page 60: Renommer Actionneurs
VISIOPHONIE CAMÉRAS Jeu 05/09/09 - 16:07 0W Pour affi cher la liste des caméras présentes, accéder au menu Visiophonie > Caméras. Actionneur Générique Actionneur Générique Jeu 05/09/09 - 16:07 0W Dispositif pas présent Caméra 1 Caméra 1 Caméra 2 Caméra 3 RENOMMER ACTIONNEURS Caméra 4 Appuyer sur l'icône... -
Page 61: Renommer Caméras
VISIOPHONIE Toucher l'écran pour revenir au menu lorsque l'image est RENOMMER CAMÉRAS affi chée ; pour visualiser d'autres caméras, appuyer de Appuyer sur l'icône puis sur celle du groupe de caméras nouveau sur une icône. que l'on désire renommer. Si aucune caméra n'est présente, le message « DISPOSITIF PAS PRÉSENT »... -
Page 62: Intercommunicants
VISIOPHONIE INTERCOMMUNICANTS RENOMMER INTERCOMMUNICANTS Pour affi cher la liste des appels intercommunicants présents, Appuyer sur l'icône puis sur celle de l'appel accéder au menu Visiophonie > Intercommunicants. intercommunicant que l'on désire renommer. Jeu 05/09/09 - 16:07 0W Jeu 05/09/09 - 16:07 0W Intercommunicant 1 Intercommunicant 1 Intercommunicant 2... -
Page 63: Description Menu Setup
SETUP DESCRIPTION MENU SETUP Pour sélectionner la langue, appuyer sur l'icône correspondante. Pour accéder au menu setup, appuyer sur l'icône Jeu 05/09/09 - 16:07 0W dans le menu principal. Jeu 21/06/12 - 16:07 0W Italiano Langue English Pluie Blocage touches et écran tactile Français Régler date et heure Deutsch... -
Page 64: Configurer Date Et Heure
SETUP INFORMATIONS Confi rmer en appuyant sur l'icône Pour affi cher la version du logiciel installé, accéder au menu informations. Jeu 05/09/09 - 16:07 0W Jeu 21/06/12 - 16:07 0W Régler volumes Blocage touches activé Langue VERS. SW : 1.5 VERS. -
Page 65: Avancées
AVANCÉES ACCÈS MENU AVANCÉES DESCRIPTION MENU AVANCÉES Accéder au menu Setup > Avancées. Jeu 21/06/12 - 16:07 0W Saisir le mot de passe installateur qui par défaut est 1961. Prog. Touches Prog Touches Jeu 05/09/09 - 16:07 0W Conf. vidéo répondeur Actionneurs SAISIR MOT DE PASSE Caméras... -
Page 66: Programmation Touches
PROGRAMMATION TOUCHES Sélectionner la fonction désirée en appuyant sur l'icône située à droite. Pour programmer les touches du Planux Memo Video, accéder au menu Setup > Avancées > Prog. Touches. Jeu 05/09/09 - 16:07 0W Sélectionner la touche que l'on veut programmer (ex. -
Page 67: Configuration Vidéo Répondeur
AVANCÉES CONFIGURATION VIDÉO RÉPONDEUR AJOUTER ACTIONNEURS Il est possible de confi gurer la fonction vidéo répondeur de Pour ajouter un actionneur, appuyer sur l'icône manière à enregistrer tous les appels visiophoniques. Saisir le nom désiré et appuyer sur l'icône pour Accéder au menu Setup >... -
Page 68: Introduction Modification Code Actionneur
AVANCÉES MODIFICATION CODE ACTIONNEUR ÉLIMINER ACTIONNEURS Pour modifi er le code d'un actionneur, appuyer sur l'icône Pour éliminer un actionneur, appuyer sur l'icône puis sur puis sur l'icône de l'actionneur. l'icône de l'actionneur. Jeu 05/09/09 - 16:07 0W Jeu 05/09/09 - 16:07 0W Actionn. -
Page 69: Caméras
AVANCÉES CAMÉRAS AJOUTER CAMÉRAS Pour gérer les caméras, accéder au menu Setup > Pour ajouter une caméra, appuyer sur l'icône Avancées > Caméras. Saisir le nom désiré et appuyer sur l'icône pour Jeu 05/09/09 - 16:07 0W confi rmer. Jeu 05/09/09 - 16:07 0W Caméra 1 Caméra 1 Caméra 2... -
Page 70: Modifier Code Caméra
AVANCÉES MODIFIER CODE CAMÉRA ÉLIMINER CAMÉRAS Appuyer sur l'icône puis sur l'icône de la caméra. Appuyer sur l'icône puis sur l'icône de la caméra. Jeu 05/09/09 - 16:07 0W Jeu 05/09/09 - 16:07 0W Caméra 1 Caméra 1 Caméra 2 Caméra 3 Caméra 4 Saisir le code désiré... -
Page 71: Intercommunicants
AVANCÉES INTERCOMMUNICANTS AJOUTER INTERCOMMUNICANT Pour gérer les intercommunicants, accéder au menu Setup Pour ajouter un appel intercommunicant, appuyer sur > Avancées > Intercommunicants. l'icône Saisir le nom désiré et appuyer sur l'icône pour Jeu 05/09/09 - 16:07 0W confi rmer. Jeu 05/09/09 - 16:07 0W Intercommunicant 1 Intercommunicant 1... -
Page 72: Modifier Adresse Intercommunicant
AVANCÉES MODIFIER ADRESSE INTERCOMMUNICANT ÉLIMINER INTERCOMMUNICANT Appuyer sur l'icône suivie de l'icône de l'appel Appuyer sur l'icône suivie de l'icône de l'appel intercommunicant. intercommunicant. Jeu 05/09/09 - 16:07 0W Jeu 05/09/09 - 16:07 0W Intercommunicant 1 Intercommunicant 1 Intercommunicant 2 Saisir l'adresse désirée en utilisant le clavier numérique et Confi... -
Page 73: Intercom Sélectif
AVANCÉES INTERCOM SÉLECTIF AJOUTER INTERCOM SÉLECTIF Une fois créés, les appels intercom sélectif seront dans le Pour ajouter un appel intercom sélectif, appuyer sur l'icône menu « Intercommunicants » (voir page 62). Saisir le nom désiré et appuyer sur l'icône pour Pour gérer les appels intercom sélectif, accéder au menu confi... -
Page 74: Éliminer / Modifier Intercom Sélectif
AVANCÉES ÉLIMINER / MODIFIER INTERCOM RÉGLAGE CODE ÉTRIER SÉLECTIF Chaque étrier du système est identifi é par un code spécifi que composé d'un numéro entre 1 et 240. Pour éliminer ou modifi er un appel intercom sélectif, suivre les instructions fournies à la page 71. Accéder au menu Setup >... -
Page 75: Configuration Moniteur Principal / Secondaire
AVANCÉES CONFIGURATION MONITEUR PRINCIPAL / CONFIGURATION ADRESSE MULTIPLE À l'activation de la fonction « Adresse multiple », le moniteur SECONDAIRE sonne à chaque appel d'une adresse simplebus comprise Accéder au menu Setup > Avancées > Adresses > dans la plage confi gurée. Moniteur. -
Page 76: Calibrage Écran Tactile
AVANCÉES PROGRAMMER ENTRÉE CALIBRAGE ÉCRAN TACTILE Il est possible d'attribuer 2 différentes fonctions à l'entrée Si l'écran tactile ne répond pas correctement au toucher, il CFP-CFP présente sur la barrette de connexion de l'étrier : est possible de le calibrer. •... -
Page 77: Ràz Configurations
Pour une mise à jour logicielle du produit, s'adresser au visiophoniques. propre installateur ou directement au service après-vente Comelit Group S.p.A.. Accéder au menu Setup > Avancées > Reset confi guration. TEMPS DE TRANSMISSION Jeu 21/06/12 - 16:07 0W Le temps de transmission détermine la vitesse à... - Page 78 BESCHRIJVING VAN DE MONITOR ..............80 CAMERA'S ......................94 FUNCTIE VAN DE TOETSEN ................80 CAMERA'S TOEVOEGEN ................... 94 MENU PLANUX MEMO VIDEO ................81 CAMERACODE WIJZIGEN.................. 95 UITLEG VAN DE KLEUREN ................81 CAMERA'S VERWIJDEREN ................95 INTERCOMOPROEPEN ..................96 VIDEOFONIE INTERCOMOPROEP TOEVOEGEN ..............
-
Page 79: Waarschuwingen
INLEIDING WAARSCHUWINGEN Comelit Group S.p.A. is niet verantwoordelijk voor oneigenlijk gebruik van de apparatuur, voor wijzigingen die om welke reden dan ook door derden zijn aangebracht, en voor het gebruik van accessoires en materialen die niet door de fabrikant zijn aangeleverd. Let op! Neem het volgende in acht om het risico van storingen en elektrische schokken tot een minimum te beperken: •... -
Page 80: Beschrijving Van De Monitor
INLEIDING BESCHRIJVING VAN DE MONITOR FUNCTIE VAN DE TOETSEN Spreektoets: hiermee kan het gesprek met het entreepaneel worden in- of uitgeschakeld. Deuropenertoets: hiermee kan het bijbehorende slot Zat 05/09/09 16:07 worden geopend. Menutoets: hiermee kunt u de monitor van de Planux Memo Video in- of uitschakelen. -
Page 81: Menu Planux Memo Video
INLEIDING MENU PLANUX MEMO VIDEO UITLEG VAN DE KLEUREN Om door het menu te lopen raakt u met een vinger het De symbolen van de menu's veranderen van kleur op symbool van de gewenste functie aan. basis van hun status en van hun functie: : geeft aan dat de functie niet ingeschakeld is. -
Page 82: Een Oproep Beantwoorden
‘Video’ en kunnen ook op een pc met Windows Media Player worden afgespeeld. Als er geen SD- kaart geplaatst is, worden de opnames in het geheugen van Intercomoproepen Intercomoproepen de Planux Memo Video opgeslagen (max. 2 opnames). Hoofdcentrale... -
Page 83: Een Opname Weergeven
BELTOON INSTELLEN Ga naar het menu Videofonie > Beltoon instellen om de beltonen van de Planux Memo Video te beheren. Selecteer het type oproep waarvan u de beltoon wilt wijzigen door op het gewenste symbool te drukken. -
Page 84: Volumeregeling
VIDEOFONIE VOLUMEREGELING RELAIS Ga naar het menu Videofonie > Volumeregeling om Ga naar het menu Videofonie > Relais om de lijst met het volume van de beltoon, de audio, de toetsen of de aanwezige relais weer te geven. alarmtonen te regelen. Do 05/09/09 - 16:07 0W Do 21/06/12 - 16:07 0W Relais 1... -
Page 85: Naam Van De Relais Wijzigen
VIDEOFONIE CAMERA'S Do 05/09/09 - 16:07 0W Ga naar het menu Videofonie > Camera's om de lijst met aanwezige camera's weer te geven. Algemene relaissturing Algemene relaissturing Do 05/09/09 - 16:07 0W Apparaat niet aanwezig Camera 1 Camera 1 Camera 2 Camera 3 NAAM VAN DE RELAIS WIJZIGEN Camera 4... -
Page 86: Naam Van De Camera's Wijzigen
VIDEOFONIE Raak terwijl het beeld op het scherm wordt weergegeven NAAM VAN DE CAMERA'S WIJZIGEN het scherm aan om naar het menu terug te keren. Druk Druk op het symbool en vervolgens op het symbool van nogmaals op een symbool om andere camera's weer te de groep camera's waarvan u de naam wilt wijzigen. -
Page 87: Intercomoproepen
VIDEOFONIE INTERCOMOPROEPEN NAAM VAN DE INTERCOMOPROEPEN WIJZIGEN Ga naar het menu Videofonie > Intercomoproepen om de Druk op het symbool en vervolgens op het symbool van lijst met aanwezige intercomoproepen weer te geven. de intercomoproep waarvan u de naam wilt wijzigen. Do 05/09/09 - 16:07 0W Do 05/09/09 - 16:07 0W Naam... -
Page 88: Beschrijving Van Het Menu Set-Up
2 Scrollen door de pagina. Do 05/09/09 - 16:07 0W TAAL De taal van de menu's van de Planux Memo Video kan worden gewijzigd door een van de geïnstalleerde talen te Wilt u het toetsenbord en kiezen. Ga naar het menu Set-up > Taal. -
Page 89: Datum En Tijd Instellen
SET-UP INFORMATIE Bevestig uw keuze met het symbool Ga naar het menu informatie om de geïnstalleerde Do 05/09/09 - 16:07 0W softwareversie weer te geven. Do 21/06/12 - 16:07 0W Toetsenbordvergrendeling Volume instellen geactiveerd Taal VERS. SW: 1.5 VERS. EE: 1.3.2 6214C Beltonen instellen SB CODE: 5P RANGE: 0 - 0 Datum en tijd instellen... -
Page 90: Geavanceerd
GEAVANCEERD MENU GEAVANCEERD OPENEN BESCHRIJVING VAN HET MENU GEAVANCEERD Ga naar het menu Set-up > Geavanceerd. Do 21/06/12 - 16:07 0W Voer het wachtwoord van de installateur in (standaard 1961). Prog. Toetsen Prog Toetsen Do 05/09/09 - 16:07 0W Videogeheugen configureren Relais WACHTWOORD INVOEREN... -
Page 91: Toetsen Programmeren
Kies de gewenste functie door op het symbool rechts ernaast te drukken. Ga naar het menu Set-up > Geavanceerd > Toetsen programmeren om de toetsen van de Planux Memo Video Do 05/09/09 - 16:07 0W te programmeren. Selecteer de toets die u wilt programmeren (bv. toets 1). -
Page 92: Videogeheugen Configureren
GEAVANCEERD VIDEOGEHEUGEN CONFIGUREREN RELAIS TOEVOEGEN Het is mogelijk om de videogeheugenfunctie te confi gureren Om een relais toe te voegen, drukt op het symbool zodat alle video-intercomoproepen worden opgenomen. Voer de gewenste naam in en druk ter bevestiging op het Ga naar het menu Set-up >... -
Page 93: Inleiding Relaiscode Wijzigen
GEAVANCEERD RELAISCODE WIJZIGEN RELAIS VERWIJDEREN Om de code van een relais te wijzigen, drukt u op het symbool Om een relais te verwijderen, drukt op het symbool en vervolgens op het symbool van het betreffende relais. vervolgens op het symbool van het betreffende relais. Do 05/09/09 - 16:07 0W Do 05/09/09 - 16:07 0W Algemene relaissturing... -
Page 94: Camera's
GEAVANCEERD CAMERA'S CAMERA'S TOEVOEGEN Ga voor het beheer van de camera's naar het menu Set-up Druk op het symbool om een camera toe te voegen. > Geavanceerd > Camera's. Voer de gewenste naam in en druk ter bevestiging op het Do 05/09/09 - 16:07 0W symbool Do 05/09/09 - 16:07 0W... -
Page 95: Cameracode Wijzigen
GEAVANCEERD CAMERACODE WIJZIGEN CAMERA'S VERWIJDEREN Druk op het symbool en vervolgens op het symbool van Druk op het symbool en vervolgens op het symbool van de camera. de camera. Do 05/09/09 - 16:07 0W Do 05/09/09 - 16:07 0W Camera 1 Camera 1 Camera 2 Camera 3... -
Page 96: Intercomoproepen
GEAVANCEERD INTERCOMOPROEPEN INTERCOMOPROEP TOEVOEGEN Ga voor het beheer van de intercomoproepen naar het menu Druk op het symbool om een intercomoproep toe te Set-up > Geavanceerd > Intercomoproepen. voegen. Voer de gewenste naam in en druk ter bevestiging op het Do 05/09/09 - 16:07 0W symbool Do 05/09/09 - 16:07 0W... -
Page 97: Intercomadres Wijzigen
GEAVANCEERD INTERCOMADRES WIJZIGEN INTERCOMOPROEP VERWIJDEREN Druk op het symbool en vervolgens op het symbool van Druk op het symbool en vervolgens op het symbool van de betreffende intercomoproep. de betreffende intercomoproep. Do 05/09/09 - 16:07 0W Do 05/09/09 - 16:07 0W Intercomoproep 1 Intercomoproep 1 Intercomoproep 2... -
Page 98: Selectieve Intercom
GEAVANCEERD SELECTIEVE INTERCOM SELECTIEVE INTERCOM TOEVOEGEN Als u selectieve intercomoproepen hebt gemaakt, kunt u deze Druk op het symbool om een selectieve intercomoproep terugvinden in het menu Intercomoproepen (zie pagina 87). toe te voegen. Voer de gewenste naam in en druk ter bevestiging op het Ga voor het beheer van de selectieve intercomoproepen naar symbool het menu Set-up >... -
Page 99: Selectieve Intercom Verwijderen / Wijzigen
GEAVANCEERD SELECTIEVE INTERCOM VERWIJDEREN / GRONDPLAATCODE INSTELLEN WIJZIGEN Elke grondplaat van het systeem heeft een eigen code, bestaande uit een nummer tussen 1 en 240. Volg de instructies op pagina 96 om een selectieve intercomoproep te verwijderen of te wijzigen. Ga naar het menu Set-up >... -
Page 100: Hoofdmonitor / Secundaire Monitor Instellen
GEAVANCEERD HOOFDMONITOR / SECUNDAIRE MONITOR MEERVOUDIG ADRES INSTELLEN Als de functie “Meervoudig adres” is ingeschakeld, belt INSTELLEN de monitor telkens wanneer een Simplebus-adres wordt Ga naar het menu Set-up > Geavanceerd > Adressen > opgeroepen die binnen het ingestelde bereik valt. Monitor. -
Page 101: Touchscreen Kalibreren
GEAVANCEERD INGANG INSTELLEN TOUCHSCREEN KALIBREREN Er kunnen twee verschillende functies worden toegewezen aan Als het touchscreen niet correct op de aanraking reageert, de ingang CFP-CFP op het aansluitblok van de grondplaat: kan het worden gekalibreerd. • Etagebel (CFP) Ga naar het menu Set-up > Geavanceerd > Touchscreen •... -
Page 102: Configuraties Resetten
Met deze functie worden alle instellingen van de Voor het bijwerken van de software van het product kunt u video-intercom, verwijderd. contact opnemen met uw installateur of rechtstreeks met de klantenservice van Comelit Group S.p.A. Ga naar het menu Set-up > Geavanceerd > Confi guratie resetten. OVERDRACHTTIJD...