Husqvarna AUTOMOWER 320 NERA Operator's Manual
Hide thumbs
Also See for AUTOMOWER 320 NERA:
- Operator's manual (116 pages) ,
- Quick manual (8 pages) ,
- Quick manual (8 pages)

Related Manuals for Husqvarna AUTOMOWER 320 NERA


Summary of Contents for Husqvarna AUTOMOWER 320 NERA
- Page 1 Operator's manual ® HUSQVARNA AUTOMOWER 320/430X/450X NERA EN, English Read the operator's manual carefully and make sure that you understand the instructions before you use the product.
-
Page 2: Table Of Contents
Contents 5.4 To stop the product..........26 1 Safety 5.5 To set the product to OFF........26 1.1 Safety definitions...........3 5.6 To charge the battery.......... 26 1.2 General safety instructions........3 6 Maintenance 1.3 Safety instructions for installation......4 1.4 Safety instructions for operation......4 6.1 Introduction - maintenance........27 1.5 Safety instructions for maintenance...... -
Page 3: Safety
• If there is a risk of thunderstorm, Husqvarna or mental capabilities or lack of experience and recommends that the power supply and all the knowledge, if they have been given supervision... -
Page 4: Safety Instructions For Installation
26 . Husqvarna recommends to set the • The product must only be operated, maintained and repaired by persons that are fully conversant product to operate when the work area has no with its special characteristics and safety activity. -
Page 5: To Lift And Move The Product
1.7 To lift and move the product WARNING: The product must be set to OFF before you lift the product. The product is disabled when the indicator on the jog wheel goes off. CAUTION: Do not lift the product when it is parked in the charging station. -
Page 6: Introduction
The serial number and the product number are on the product rating plate and on the product carton. • Register your product on www.husqvarna.com. Enter the serial number of the product, the product number and the date of purchase to register your product. -
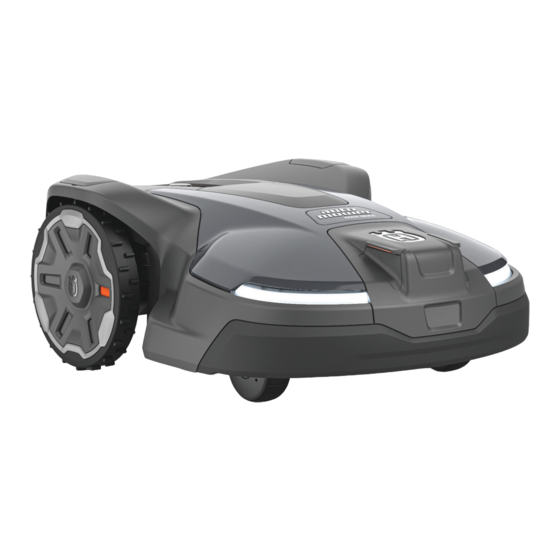
Page 7: Product Overview Automower ® 320/430X/450X Nera
® 2.4 Product overview Automower 320/430X/450X NERA Automower P21 320 NERA Automower P21 430X/450X NERA Product body 16. Blade disc Top cover 17. Skid plate Front wheels 18. Charging station Rear wheels 19. Hatch Radar 20. LED indicator of the charging station Headlights 21. -
Page 8: Symbols On The Product
The warranty will not be 34. Reference station applicable if the seal is broken. ® ® ™ 35. Husqvarna Automower EPOS Plug-in 2.5 Symbols on the product These symbols can be found on the product. Make sure Do not make modifications on the low- that you understand them. -
Page 9: Automower ® Access
® 2.8 Automower Access There is an error. Cutting height of the product. Cellular signal strength. Wi-Fi signal strength. • The display (A) shows the status bar and the main Symbols on the display on menu symbols. Refer to page 9 . •... - Page 10 ® 2.8.2 Menu structure overview in Automower Access ® 2.8.2.1 Symbols in the Automower Access menu Connect Cutting height Connect menu you can enable In the ® Bluetooth and make a pairing operation Cutting height menu you can adjust In the with your mobile device.
-
Page 11: Installation
320 NERA, make sure that you have Wi-Fi coverage in the work area if Note: ® you use the Automower Connect app remotely. Refer to www.husqvarna.com for more Automower ® Connect app on page Refer to information about installation. 16 . For Automower ®... - Page 12 3.4.2 To examine where to put the power • Keep a minimum of 150 cm / 60 in. of free space to the right and left of the center of the charging supply station. • Put the charging station near a power outlet. CAUTION: Make sure that the blades •...
- Page 13 To make the connection easier between the guide wire and the boundary wire, it is recommended to make an eyelet where the guide wire will be connected. Make the eyelet with approximately 20 cm / 8 in. of the boundary wire.
- Page 14 3.4.3.1 To put the boundary wire in a slope The product can operate in 50% slopes. Slopes that are too steep must be isolated with the boundary wire. The gradient (%) is calculated as the vertical height divided by the horizontal distance. Example: 10 cm / 100 cm = 10%.
- Page 15 Some obstacles are resistant to a collision, for example, Note: The boundary wire must be put as 1 loop trees or bushes that are more than 15 cm / 5.9 in. in around all of the work area (A + B). height.
-
Page 16: Installation Of The Product
® ft. With a guide wire installed through the passage, Install the Automower Connect app on your ® Automower Connect app the recommended minimum distance between the mobile device. Refer to on page 16 . boundary wires is 60 cm / 24 in. •... - Page 17 Connect app on your Do not attach the charging station to the mobile device. ground with the screws until the guide wire is Sign up for a Husqvarna account in the To install the guide wire on page installed. Refer to ®...
- Page 18 min 30 cm / 12” Cut the boundary wire 1-2 cm / 0.4-0.8 in. above each connector. 11. Connect the power supply cable to a 100-240V Push the right connector onto the metal pin on the power outlet. charging station with the mark "AR". Note: The product can be put in the charging Push the left connector onto the metal pin on the...
- Page 19 3.5.9 To bury the boundary wire or the Put the 2 ends of the boundary wire and the end of the guide wire into the coupler. guide wire Note: • Cut a groove in the ground with an edge cutter or a Make sure that you can see the ends straight shovel.
-
Page 20: Settings
4 Settings This chapter gives information about the settings for Days / week h / day Schedule settings ® the product that you can make in the Automower Connect app. All setting for the product are available in 07:00-18:00 / 7:00 ®... -
Page 21: Installation
Note: ECO mode to save energy and to prevent interference with other equipment, for example hearing loops or garage doors. Note: To start the product manually in the work area you must first enable the loop signal. 4.3.4.1 To enable the loop signal Set the product to ON. - Page 22 You can set the charging station signal min , avg or max . Note: Husqvarna recommends to set the charging max . It is usually better to move the station signal to charging station, than to decrease the range of the charging station signal.
-
Page 23: Accessories
4.7 Security Note: Drive Past Wire , If you change the distance for the distance will change along the boundary wire in all parts of the work area. 4.5 Accessories The security settings controls the PIN code, the GeoFence and other security functions. The correct PIN- Security code must be entered to get access to the menu. -
Page 24: Automower ® Connect
to stop the alarm and to start the product again. The • You can make work areas (A) and (B) in the GeoFence is only enabled when the product is set to installation where you can set a schedule and cutting height for each work area. -
Page 25: Operation
5 Operation The most frequently used operation settings are Note: If you will cut the main area after the battery is ® included in the Automower Access, refer to Main area mode before you charged, set the product to ® Automower Access on page 6 . -
Page 26: To Stop The Product
5.4 To stop the product Push the STOP button to make the product and the cutting motor stop. 5.5 To set the product to OFF Push the STOP button to stop the product. Enter the PIN code if it is necessary. Push the jog wheel for 3 seconds to set the product to OFF. -
Page 27: Maintenance
6 Maintenance 6.1 Introduction - maintenance It is important that the blade disc rotates easily and that the edges of the blades are not damaged. The usual lifetime of the blades are 3 to 6 weeks. The conditions WARNING: Set the product to OFF that follow can increase or decrease the lifetime of the before you do maintenance on the product. -
Page 28: Clean The Product
The product does not operate satisfactorily in slopes if the wheels are blocked with grass. Clean the product with a brush or running water from a water hose. Husqvarna recommends to use a special cleaning and maintenance kit. Speak to your Husqvarna servicing dealer for more information. -
Page 29: Battery
Make sure that WARNING: the blades are not damaged and can pivot freely. Husqvarna can only guarantee safety if you use Husqvarna 6.3.2 To clean the wheels original blades with the embossed crowned The product does not operate satisfactorily in slopes if H-mark logotype. - Page 30 Rotate the skid plate until the holes align with the screws for the blade. Remove the 3 screws. Remove the 3 blades and the screw. Attach 3 new blades and screws. Use Husqvarna original blades. Make sure that the blades can move freely. 30 - Maintenance...
-
Page 31: Troubleshooting
7.2 Fault messages The table below shows fault messages that can be shown in the app. Speak to your local Husqvarna representative if the same message shows frequently. - Page 32 Message Cause Action No loop signal There is no power in the charging station. Examine if the power supply unit or the low- The LED indicator on the charging station is voltage cable is damaged or not installed not on. correctly to the power outlet or the charging station.
- Page 33 Message Cause Action Lifted The lift sensor has been enabled because Make sure that the body of the product body the product has been lifted. can move freely around its chassis. Remove or make an island around objects that can cause the body to be lifted.
- Page 34 Message Cause Action Electronic problem Temporary electronic or firmware problem in Restart the product. the product. Loop sensor problem If the problem stays, speak to your approved servicing dealer. Tilt sensor problem Invalid sub-device combination STOP button prob- Connectivity problem Safety function faulty Invalid system config- uration...
- Page 35 Message Cause Action Temperature restric- The product does not operate if the battery The product starts to operate again when the tion temperature is too high or too low. temperature is between the set limits and the schedule settings let the product to operate. Make sure that the charging station is put in an area with protection from the sun.
-
Page 36: Information Messages
Messages menu in the Automower ® The table below shows information messages that can be found in the ® Connect app and in Automower Access. Speak to your local Husqvarna representative if the same message shows frequently. Message Cause Action Limited cutting height The cutting height adjustment cannot move. -
Page 37: Led Indicator Of The Charging Station For Boundary Wire Installation
Speak to your local Husq- varna representative. 7.5 Symptoms If the product does not operate as usual, follow the symptoms table below. Speak to your Husqvarna customer service if you cannot find the cause for the fault. Symptoms... -
Page 38: Finding Breaks In The Loop Wire
Symptoms Cause Action The product oper- The product searches for the charging sta- Usual operation for the product. The blade ates, but the blade tion, or is moving to the starting point. disc does not rotate when the product is disc does not rotate. - Page 39 Mowing the grass too low right after the installation can damage wire insulation. Damage to the insulation may not cause disruptions until several weeks or months later. CAUTION: Always select the maximum cutting height the first weeks after installation and then lower the height one step at a time every second week until the desired cutting height has been reached.
- Page 40 Continue until only a very short section of the wire remains which is the difference between a solid green light and a flashing blue light. Then follow instruction in step 5 below. If indicator lamp still flashes blue in step 3 above: Put AL and G1 back in their original positions.
-
Page 41: Transportation, Storage And Disposal
We recommend to put the product in the package of the product. You can also hang the product on a Close the hatch. Husqvarna wall hanger. Speak to your Husqvarna representative for more information about available Put the power supply unit and the top of the wall hangers. - Page 42 • For questions about how to remove the battery, To remove the battery on page 42 . refer to 8.5.1 To remove the battery Set the product to OFF. Put the product on its side. Remove the 6 screws for the battery cover. Push the 2 clips and remove the battery.
-
Page 43: Technical Data
9 Technical data 9.1 Technical data ® ® ® Dimensions Automower Automower 430X Automower 450X NERA NERA NERA Length, cm/in. 75/29.6 75/29.6 75/29.6 Width, cm/in. 54/21.4 54/21.4 54/21.4 Height, cm/in. 28/11.1 28/11.1 28/11.1 Weight, kg/lb 12.8 / 28 14.6 / 32 15.0 / 33 ®... - Page 44 ® ® ® Sound data Automower Automower 430X Automower 450X NERA NERA NERA Sound level, perceived, dB (A) Measured sound power noise level, dB (A) Noise emissions uncertainties, KWA dB (A) Sound pressure noise level at the operator’s ear, dB (A) ®...
- Page 45 Operating frequency band, MHz 2402-2480 Maximum transmitted power, dBm Husqvarna AB does not guarantee full compatibility between the product and other types of wireless systems such as remote controls, radio transmitters, hearing loops, underground electric animal fencing or similar. 9.1.1 Registered trademarks ®...
-
Page 46: Warranty
The blades and wheels are seen as disposable and are not covered by the warranty. If an error occurs with your Husqvarna product, please contact Husqvarna customer service for further instructions. Please have the receipt and the product’s serial number at hand when contacting Husqvarna customer service. - Page 47 2071 - 001 - 29.03.2023 Warranty - 47...
- Page 48 ® AUTOMOWER is a trademark owned by Husqvarna AB. © Copyright 2023 HUSQVARNA. All rights reserved. www.husqvarna.com Original instructions 1143082-26 2023-04-06...