3M DBI SALA EXOFIT X300 Series User Instructions
Full body harne
Hide thumbs
Also See for DBI SALA EXOFIT X300 Series:
- User instructions (41 pages) ,
- Manual (28 pages)
Table of Contents
Advertisement
Available languages
Available languages
Quick Links
;
For identification of product codes, refer to Table 1. See "Table 1 - Product Specifications" for more product information.
12
10
6
20
2
1
10
5
A
8
19
3
17
PARK
LANYARD
HERE, SEE
INSTRUCTIONS.
2
1
PARK
LANYARD
HERE, SEE
INSTRUCTIONS.
OSHA 1910.140
CSA Z259.10
OSHA 1926.502
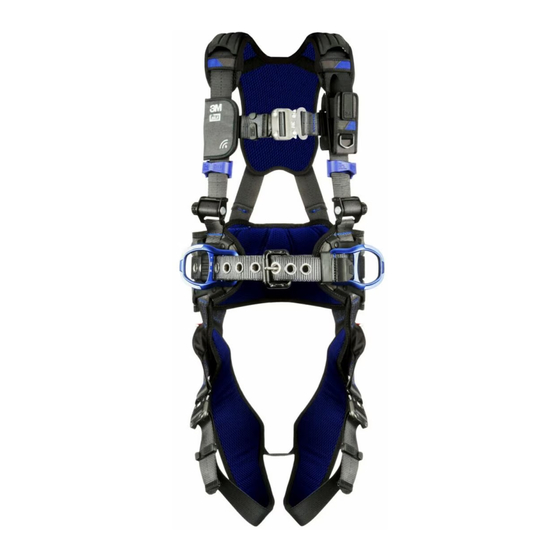
Figure 1 - Product Overview
16
Harness
Harness
Style
Model
1113000C
1113001C
1113004C
1113007C
1113010C
12
1113013C
9
1113030C
1113031C
1113034C
1113037C
1113040C
1113043C
1113045C
1113046C
1113049C
1113052C
1113055C
1113058C
14
1113061C
1113064C
1113067C
1113070C
1113073C
A
1113075C
1113076C
1113079C
1113082C
1113085C
1113088C
1113120C
1113121C
1113124C
1113127C
1113130C
1113133C
1113150C
1113151C
1113154C
1113157C
1113160C
1113163C
1113190C
PARK
LANYARD
HERE, SEE
INSTRUCTIONS.
1113191C
1113192C
1113193C
1113194C
3
4
PARK
LANYARD
HERE, SEE
INSTRUCTIONS.
PARK
LANYARD
HERE, SEE
INSTRUCTIONS.
EXOFIT™ SERIES X300
1
2
3
4
5
6
attachment Elements
5
7
6
PARK
LANYARD
HERE, SEE
INSTRUCTIONS.
Full BOdy HaRnESS
USER INSTRUCTIONS
5908049C R
7
8
9
10
11
12
13
14
Buckles and
adjusters
Other Elements
8
. C
Ev
15
16
17
18
19
20
Pads
9
© 3M 2022
Advertisement
Table of Contents

Related Manuals for 3M DBI SALA EXOFIT X300 Series


Summary of Contents for 3M DBI SALA EXOFIT X300 Series
- Page 1 1113192C 1113193C 1113194C PARK PARK LANYARD LANYARD HERE, SEE HERE, SEE INSTRUCTIONS. INSTRUCTIONS. PARK PARK LANYARD LANYARD HERE, SEE HERE, SEE INSTRUCTIONS. INSTRUCTIONS. © 3M 2022...
- Page 2 Figure 1 - Product Overview Harness Harness Buckles and Style Model attachment Elements adjusters Other Elements Pads 1113195C 1113196C 1113197C 1113199C 1113244C 1140126C 1140127C 1140128C...
- Page 3 Figure 1 - Product Overview Harness Harness Buckles and Style Model attachment Elements adjusters Other Elements Pads 1403098C 1403099C 1403100C 1403101C 1403102C 1403103C 1403104C 1403105C ...
-
Page 4: Safety Information
Never exceed the maximum free fall distance specified for your Fall Protection equipment. Do not use any Fall Protection equipment that fails inspection, or if you have concerns about the use or suitability of the equipment. Contact 3M Technical Services with any questions. -
Page 5: Product Overview
Always ensure you are using the latest revision of your 3M instruction manual. Visit www.3m.com/userinstructions or contact 3M Technical Services for updated instruction manuals. PRODUCT OVERVIEW: Figure 1 illustrates available harness models. Harness models are defined by their general construction and available features. -
Page 6: System Specifications
Before using this equipment, record the product identification information from the ID label in the “Inspection and Maintenance Log” at the back of this manual. Table 1 - Product Specifications System Specifications Each product model is certified to, or conforms with, the applicable standards and Standards: regulations listed within Figure 1. -
Page 7: Product Application
Hazards may include, but are not limited to: high heat, chemicals, corrosive environments, high voltage power lines, explosive or toxic gases, moving machinery, sharp edges, or overhead materials that may fall and contact the user or equipment. Contact 3M Technical Services for further clarification. - Page 8 MAKING CONNECTIONS: All connections must be compatible in size, shape, and strength. See Figure 4 for examples of inappropriate connections. Do not attach snap hooks and carabiners: To a D-ring to which another connector is attached. In a manner that would result in a load on the gate. Large-throat snap hooks should not be connected to standard- size D-Rings or other connecting elements, unless the snap hook has a gate strength of 16 kN (3,600 lbf) or greater.
-
Page 9: Installation
INSTALLATION OVERVIEW: Full body harnesses are to be used as part of a Fall Protection system. Ensure each component of your Fall Protection system is installed per the manufacturer instructions. PLANNING: Plan your Fall Protection system before installation. Account for all factors that may affect your safety before, during, and after a fall. - Page 10 Pads should remain largely in place and resist sliding. Figure 7 - Equipment Check CONNECTING THE BUCKLES: 3M Harnesses are equipped with a variety of buckles for fastening and adjusting harness straps. See Figure 8 for reference. See Figure 1 for which buckle types are on your harness.
- Page 11 To lengthen webbing, pull upwards on the buckle. Figure 8C - Pass-Through Buckles USING THE ADJUSTERS: 3M Harnesses are equipped with a pair of adjusters for modifying the shoulder straps. See Figure 9 for reference. See Figure 1 for which adjuster types are on your harness.
- Page 12 Instructions may vary per harness interface model. For more information on how to use your harness interface, see the manufacturer instructions for the harness interface or for the product it was provided with. Do not remove the backplate from the harness when installing a harness-mounted SRD. A.
- Page 13 Figure 10B - Carabiner Interface Figure 10C - Interface Loop Figure 10D - SRD Adapter...
- Page 14 ATTACHING THE WEIGHT DISTRIBUTION SYSTEM: Figure 11 illustrates attachment of the Weight Distribution System (WDS). When secured, the WDS lessens the stress caused by prolonged harness wear, moving the center of weight from your shoulders to the WDS on your back. To attach the WDS to a compatible harness: To remove the Weight Distribution System, follow this procedure in reverse.
- Page 15 DEPLOYING THE SUSPENSION TRAUMA STRAPS: Figure 12 illustrates deployment of the Suspension Trauma Straps. In the event of a fall, the Suspension Trauma Straps should be used by the fallen worker to alleviate suspension trauma. To deploy the Suspension Trauma Straps on your harness: Locate the Suspension Trauma Straps (A) on your harness.
-
Page 16: Maintenance, Service, And Storage
CLEANING: 3M product must be cleaned in accordance with 3M instructions. To clean the product, wash in a mild, bleach-free detergent and rinse with clean water. The product should afterwards be hung to air-dry. Water used for cleaning and temperatures used to air-dry must never exceed 130°F (54.4°C). -
Page 17: Labels And Markings
Warning: Increased free fall should be considered when using this product. RFID Tag LOCATION: 3M product covered in these user instructions is equipped with a Radio Frequency Identification (RFID) Tag. RFID Tags may be used in coordination with an RFID Tag Scanner for recording product inspection results. See Figure 14 for where your RFID Tag is located. - Page 18 Figure 14 - RFID Tag Location PARK PARK LANYARD HERE, SEE LANYARD HERE, SEE INSTRUCTIONS. INSTRUCTIONS. Figure 15 - Product Labels PARK LANYARD PARK LANYARD HERE, SEE INSTRUCTIONS. HERE, SEE INSTRUCTIONS. PARK LANYARD PARK LANYARD PARK LANYARD PARK LANYARD HERE, SEE HERE, SEE HERE, SEE INSTRUCTIONS.
-
Page 19: Inspection Procedure
Table 2 – Inspection and Maintenance Log Model Number (Serial Number): Date Purchased: Date of First Use: ··· This product must be inspected by the user before each use. Additionally, a Competent Person other than the user must inspect this equipment at least once each year. ···... - Page 20 1113192C 1113193C 1113194C PARK PARK LANYARD LANYARD HERE, SEE HERE, SEE INSTRUCTIONS. INSTRUCTIONS. PARK PARK LANYARD LANYARD HERE, SEE HERE, SEE © 3M 2022 INSTRUCTIONS. INSTRUCTIONS.
- Page 21 Figure 1 – présentation du produit Style modèle Boucles et harnais harnais Éléments de fixation ajusteurs autres éléments coussinets 1113195C 1113196C 1113197C 1113199C 1113244C 1140126C 1140127C...
- Page 22 Figure 1 – présentation du produit Style modèle Boucles et harnais harnais Éléments de fixation ajusteurs autres éléments coussinets 1403098C 1403099C 1403100C 1403101C 1403102C 1403103C 1403104C 1403105C ...
-
Page 23: Informations De Sécurité
Assurez-vous que la distance de chute est suffisante lorsque vous travaillez en hauteur. Ne modifiez jamais votre équipement de protection contre les chutes. Seul 3M ou les personnes autorisées par écrit par 3M peuvent effectuer des réparations d’équipement de 3M. -
Page 24: Présentation Du Produit
Assurez-vous de toujours utiliser la version la plus récente de votre manuel d’instructions de 3M. Visitez www.3m.com/ userinstructions ou contactez les services techniques de 3M pour obtenir des manuels d’instructions à jour. PRÉSENTATION DU PRODUIT : La figure 1 illustre les modèles de harnais offerts. Les modèles de harnais sont définis par leur structure générale et les fonctionnalités disponibles. -
Page 25: Spécifications Du Système
Avant d’utiliser cet équipement, veuillez consigner dans le « Journal d’inspection et d’entretien » au verso de ce manuel toutes les informations d’identification du produit qui se trouvent sur l’étiquette. Tableau 1 - Spécifications du produit Spécifications du système : Chaque modèle de produit est certifié... -
Page 26: Utilisation Du Produit
3M recommande une planche de siège, un siège de travail à suspension, une élingue de siège ou une sellette. Contactez les services techniques de 3M pour obtenir plus d’informations. - Page 27 EFFECTUER LES RACCORDEMENTS : Tous les raccordements doivent être compatibles en termes de taille, de forme et de résistance. Consultez la figure 4 pour voir des exemples de raccordements inappropriés. Ne fixez pas de crochets mousquetons ou mousquetons : À un anneau en D auquel un autre raccord est fixé. D’une manière telle à...
- Page 28 INSTALLATION APERÇU : Les harnais complets doivent être utilisés dans le cadre d’un système de protection contre les chutes. Assurez- vous que chaque composant de votre système de protection contre les chutes est installé conformément aux instructions du fabricant. PLANIFICATION : Planifiez votre système de protection contre les chutes avant l’installation. Tenez compte de tous les facteurs susceptibles d’avoir une incidence sur votre sécurité...
- Page 29 Figure 6A - Enfilement du harnais de style gilet HARNAIS DE STYLE CROISÉ : Les harnais « style croisé » comprennent des sangles de torse entrecroisées. Consultez la figure 6B à titre de référence. Mettez le harnais. Soulevez le harnais par son anneau en D dorsal. Glissez le harnais par-dessus votre tête pour mettre les sangles de torse, puis laissez le harnais pendre librement de vos épaules.
- Page 30 Figure 7 - Vérification de l’équipement RACCORDEMENT DES BOUCLES : Les harnais 3M sont équipés d’une variété de boucles pour attacher et ajuster les sangles du harnais. Consultez la figure 8 à titre de référence. Consultez la figure 1 pour savoir quels types de boucles se trouvent sur votre harnais.
- Page 31 Figure 8C - Boucles passer à travers UTILISATION DES AJUSTEURS : Les harnais 3M sont équipés d’une paire d’ajusteurs pour modifier les bretelles. Consultez la figure 9 à titre de référence. Consultez la figure 1 pour savoir quels types d’ajusteur se trouvent sur votre harnais. A. AJUSTEURS ROTATIFS (FIGURE 9A) 1.
- Page 32 Certains modèles de harnais couverts dans ces instructions incluent des fonctionnalités supplémentaires pour fixer les dispositifs autorétractables montés sur le harnais. Consultez comment ces fonctionnalités doivent être utilisées ci- dessous : • BOUCLE D’INTERFACE : La boucle d’interface (X) fait partie de la plaque arrière de certains modèles de harnais. La boucle d’interface sert de point de raccordement sécurisé...
- Page 33 Figure 10C - Boucle d’interface Figure 10D - Adaptateur à dispositif autorétractable FIXATION DU SYSTÈME DE RÉPARTITION DU POIDS : La figure 11 illustre la fixation du système de répartition du poids (SRP). Lorsqu’il est fixé, le système de répartition du poids réduit le stress causé par le port prolongé du harnais, en déplaçant le centre de poids de vos épaules vers le système de répartition du poids sur votre dos.
- Page 34 Figure 11 - Fixation du système de répartition du poids PARK PARK LANYARD LANYARD HERE, SEE INSTRUCTIONS. HERE, SEE INSTRUCTIONS.
- Page 35 DÉPLOIEMENT DES SANGLES DE SUSPENSION ANTI-TRAUMATISME : La figure 12 illustre le déploiement de sangles de suspension anti-traumatisme. En cas de chute, les sangles de suspension anti-traumatisme doivent être utilisées par le travailleur tombé pour atténuer le traumatisme de suspension. Pour déployer les sangles de suspension anti-traumatisme sur votre harnais : Localisez les sangles de suspension anti-traumatisme (A) sur votre harnais.
- Page 36 D’autres méthodes peuvent avoir des effets indésirables sur le produit ou l’utilisateur. NETTOYAGE : Le produit 3M doit être nettoyé conformément aux instructions de 3M. Pour nettoyer le produit, le laver avec un détergent doux sans javellisant et rincer à l’eau propre. Le produit doit ensuite être suspendu pour sécher à l’air.
-
Page 37: Glossaire Des Termes
Avertissement : Une chute libre accrue doit être prise en compte lors de l’utilisation de ce produit. ÉTIQUETTE DE radio-identification EMPLACEMENT : Le produit 3M couvert par ces instructions d’utilisation est équipé d’une étiquette de radio- identification. Les étiquettes de radio-identification peuvent être utilisées en coordination avec un lecteur d’étiquettes de radio-identification pour enregistrer les résultats d’inspection des produits. - Page 38 Figure 14 - Emplacement de l’étiquette de radio-identification PARK PARK LANYARD HERE, SEE LANYARD HERE, SEE INSTRUCTIONS. INSTRUCTIONS. Figure 15 – Étiquettes de produit PARK LANYARD PARK LANYARD HERE, SEE INSTRUCTIONS. HERE, SEE INSTRUCTIONS. PARK LANYARD PARK LANYARD PARK LANYARD PARK LANYARD HERE, SEE HERE, SEE HERE, SEE INSTRUCTIONS.
- Page 39 Table 2 – Journal d’inspection et d’entretien Numéro de modèle (numéro de série) : Date d’achat : Date de la première utilisation : ··· Ce produit doit être inspecté par l’utilisateur avant chaque utilisation. De plus, une personne qualifiée autre que l’utilisateur doit inspecter cet équipement au moins une fois par an.
- Page 40 LIMITED REMEDY: Upon written notice to 3M, 3M will repair or replace any product determined by défaut de fabrication en usine ou de matériaux, tel que déterminé par 3M. 3M se réserve le droit d’exiger le 3M to have a factory defect in workmanship or materials. 3M reserves the right to require product be retour du produit dans ses installations afi...