Table of Contents
Advertisement
Quick Links
Advertisement
Table of Contents

Related Manuals for Eastwood 55132


Summary of Contents for Eastwood 55132
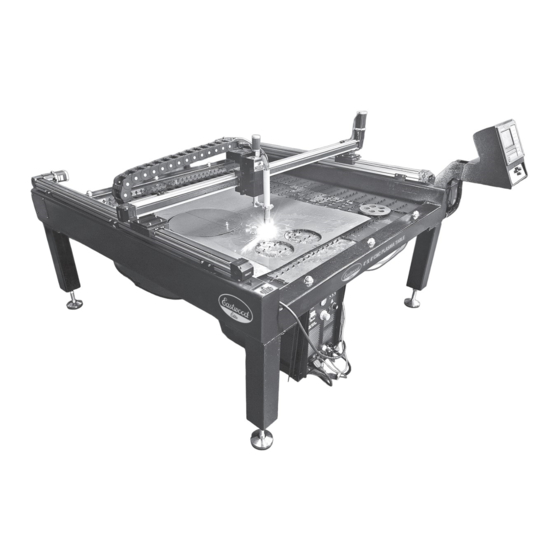
- Page 1 Item #55132 4' X 4' CNC PLASMA TABLE WITH CNC CUT 60 PLASMA CUTTER INSTRUCTIONS...
-
Page 2: Table Of Contents
True 4’ x 4’ cut area means you can cut out any project up to 48” in overall frame size. The included Eastwood Elite CNC Cut 60 Plasma Cutter has the capability to make clean, long duration cuts in to up 3/8” steel. Filling the integral waterbed prevents heat soak, warping, and reduces spark &... -
Page 3: Includes
FIG. B FIG. B FIG B (4) Height Adjustable Table Legs [a] (1) Plasma Cutter Shelf Bottom [b] (1) Plasma Cutter Shelf Left Side [c] (1) Plasma Cutter Shelf Right Side [d] To order parts and supplies: 800.343.9353 >> eastwood.com... - Page 4 PTFE Tape Roll [JJ] FIG D Eastwood CNC Cut 60 CNC Plasma Cutter Box, Includes: Eastwood CNC Cut 60 CNC Plasma Cutter with 6ft (1.85m) Cord [aa] Plasma Torch with Cable 12.3 ft (3.75m) [bb] Plasma Torch Wrench [cc] Plasma Torch Standoff [dd] Ground Clamp with Cable 9 ft (2.75m) [ee]...
-
Page 5: Safety Information
• Plasma cutting produces sparks which can be discharged considerable distances at high velocity igniting flammable or explosive vapors and materials. - Keep flammables a minimum of 6 feet [1.8m] away from the edge of the Eastwood Elite 4’ x 4 ’ CNC Plasma Table. - Page 6 PINCH AND CRUSH HAZARD! • The Eastwood Elite 4 x 4 Plasma Table is a heavy assembly 974 lbs. [442kg.] which can cause serious injuries if allowed to drop. The use of a Hoist or similar mechanical lifting equipment capable of lifting a minimum of 1000lbs [454kg.] is required. Lifting straps rated for a minimum of 1000lbs [454kg.] are required (not included).
-
Page 7: Cnc Plasma Cutting Glossary Of Terms
Acronym for Torch Height Controller, this communicates with the Cut Controller and is capable of automatically controlling Torch height to maintain good distance between the workpiece and the Torch. Torch The Plasma Cutting Torch Head is often described as “Torch” for simplification. To order parts and supplies: 800.343.9353 >> eastwood.com... -
Page 8: Cnc Plasma Table Set-Up
LOCATION • The Eastwood Elite 4’ x 4’ CNC Plasma Table must be located in an indoor area, on a firm, clean, level surface. Having a solid, level concrete floor is ideal. If the table is fully loaded with water and a 4’ x 4’ x 0.375” steel plate, total machine weight will be near 1725 lbs. [782kg]. -
Page 9: Plasma Table Set Up
[GG] into the key operated switch and rotating Down Down it clockwise (FIG 4). FIG. 2 FIG. 2 FIG. 3 FIG. 3 FIG. 4 FIG. 4 To order parts and supplies: 800.343.9353 >> eastwood.com... - Page 10 • After the start sequence, press any key to continue from the Eastwood Elite logo FIG. 5 FIG. 5 screen. Controls are covered in detail below, but if needed, use arrow keys to jog the torch to a suitable position for squaring.
-
Page 11: Waterbed
The Waterbed can be filled with tap water, however it can contain many minerals and impurities which may affect performance. Eastwood strongly recommends adding the Eastwood Plasma Cutting Fluid, #33863 1 Gal. or #33864 5 Gal., to the water in a 5:1 solution to eliminate corrosion and fungal build up. This additive also eliminates risk of explosion when cutting aluminum sheet by preventing the creation of hydrogen. -
Page 12: Main Cut Screen
• Upon powering up the table it will run through a series of diagnostic checks. • Once the Eastwood Elite logo Screen (FIG 9) is displayed, press any key to continue. • The first screen shown is the Main Cut Screen (FIG 10). From here all the other menus can be accessed. - Page 13 - Demo will run the Torch over the exact path of the cut. Demo speed FIG. 12 FIG. 12 can be changed with F4 and F5. - F8 is quick access to the pierce selector. To order parts and supplies: 800.343.9353 >> eastwood.com...
- Page 14 For example, inside would be used to cut out a circle. Whereas outside would be used to cut a hole in a panel. FIG. 15 FIG. 15 Eastwood Technical Assistance: 800.343.9353 >> tech@eastwood.com...
- Page 15 Rows is the number of horizontal rows top to bottom, and columns is the number of vertical left to right columns the array will make. The offset spacing parameter is also seen here. To order parts and supplies: 800.343.9353 >> eastwood.com...
- Page 16 • F6 is used to view and manually edit the G-code file loaded. • F7 reverses changes. • F8 saves changes. • X mirrors the part about the X-Axis, and Y mirrors the part about the FIG. 21 FIG. 21 Y-Axis. Eastwood Technical Assistance: 800.343.9353 >> tech@eastwood.com...
- Page 17 - Demo Run Speed – Speed used during demo cut mode. (mm/min or inch/min) - Cutting Type – Select cutting mode. • F2 Flame is for flame cut settings. The CNC plasma table is not configured for this cutting operation type so it is unused. To order parts and supplies: 800.343.9353 >> eastwood.com...
- Page 18 - Off Arc Before M08 – Time it will lock the height controller before turning off the arc. (Seconds, Default 0.00) - Watch Arc Enable – Enables real time monitoring of the arc voltage. (Default: Yes) - Use Cylinder THC – For other types of height controllers, keep unchecked. Eastwood Technical Assistance: 800.343.9353 >> tech@eastwood.com...
- Page 19 • F2 Flame and F4 Mark are settings for flame cutting operations and not used with plasma cutting. Eastwood does not recommend altering settings that we do not explicitly describe in the System menu (FIG 24) as this could cause the machine to become nonfunctional or function erratically .
- Page 20 F5 – DIAGNOSE • Eastwood does not recommend altering settings left not described in these menus without direction from Eastwood Technical personnel . • The diagnose (FIG 25) menu can be used to monitor inputs, outputs, and keyboard so that machine functionality can be tested.
- Page 21 Meaning, pressing “Plasma” again while holding a movement key will not stop the plasma cut. Zero F8 – ZERO This resets all path history and zeroes the coordinate system at the Torch’s current location. To order parts and supplies: 800.343.9353 >> eastwood.com...
-
Page 22: Main Cut Screen During Cutting
This option is not as useful as the others. [Y] ONLY RETURN simply returns the torch to the paused point, then the Start button can be used to continue the cut. Eastwood Technical Assistance: 800.343.9353 >> tech@eastwood.com... - Page 23 • Unused, for flame cutting. F7 - Head Add • Unused, for flame cutting. F8 – Zoom In • Toggles a zoomed picture of the cutting progress. Esc to exit zoom view. To order parts and supplies: 800.343.9353 >> eastwood.com...
-
Page 24: Operation Of The Torch Height Controller
F - The Dynamic Piece adjustment knob is not set up to be functional on the Eastwood CNC tables. G – Pressing MENU will cycle through the different menu options on the digital display. The default is the arc voltage display, the first press cycles to the “P”... -
Page 25: Display Settings
The third option is the “H” parameters, which are used to interface the cut controller with the Torch height controller. These should only be altered at direction of Eastwood Technical personnel. The last, “SYS”, is the system version number. To order parts and supplies: 800.343.9353 >> eastwood.com... -
Page 26: Maintenance And Repair
Main Cap Body Nozzles are available in different Nozzle sizes for different amperage ranges, as listed below: #55158 Eastwood CNC Plasma Torch Nozzles (30A) 20-Pack #55159 Eastwood CNC Plasma Torch Nozzles (35-60A) 20-Pack #55160 Eastwood CNC Plasma Torch Nozzles (65A-120A) 20-Pack Nozzle Guard Cap FIG. - Page 27 (FIG 39) and replaced if damaged. With good height settings and maintained consumables the Nozzle Guard Cap should last a long time. If damaged, a Nozzle Guard Cap Pack can be purchased #55157 Eastwood CNC Plasma Torch Nozzle Guard Cap, 5-Pack.
-
Page 28: Determining Consumable Condition
SEVERE WEAR – Nozzle Guard has sustained noticeable damage. Hole blockage or damage from arcing is present and slag may be permanently stuck to the guard. The Nozzle Guard should be replaced immediately to prevent shortened consumable life. Eastwood Technical Assistance: 800.343.9353 >> tech@eastwood.com... -
Page 29: Troubleshooting
Eastwood Technical Assistance: techelp@eastwood.com or 800.544.5118. Check for 60 PSI [4.13bar] during cut. On the Eastwood CNC Cut 60 the air Low supply air pressure to plasma unit toggle switch can be flipped on to check this. - Page 30 “Enter”. From here the limit sensors will be on the left side. Limit Alarm Switch the “Type” for the problem sensor from “NC” to “N0”. If this resolves Triggered the problem, contact Eastwood Technical Assistance: techelp@eastwood.com Randomly or 800.544.5118 for a replacement sensor. Failed wiring Check for damaged wiring to the problem sensor.
-
Page 31: Quick Guides
• Verify the workpiece is grounded. • At the Eastwood Elite logo screen press any key to continue to the main cut screen. • You are now at the main cut screen. Press key F1 for the shape library. Use the green arrow keys to change selection and F8 to select. -
Page 32: How To Utilize Demo Mode
• To output the path as G-Code for the Eastwood CNC Plasma Table, select “Post Process” in the “ACTIONS” box. This will generate the G-Code for the selected toolpath(s). Press the Post button and save it to the desired location. -
Page 33: Converting An Image Or .Pdf To .Dxf For Cutting
• Use Shift plus M again to switch back to Plasma Mode, and press Start. Now the program will resume with the updated settings. To order parts and supplies: 800.343.9353 >> eastwood.com... -
Page 34: Determining Machine Settings
0.00 0.10 0.25 gauge) [0.952] 0.050 (18 3000 0.00 0.10 0.25 gauge) [1.27] 0.0625 (16 2250 0.15 0.20 0.25 gauge) [1.59] 0.125 [3.18] 1100 0.30 0.50 0.30 0.25 [6.35] 0.30 0.375 [9.52] 0.75 0.30 Eastwood Technical Assistance: 800.343.9353 >> tech@eastwood.com... - Page 35 NOTES To order parts and supplies: 800.343.9353 >> eastwood.com...
- Page 36 If you have any questions about the use of this product, please contact The Eastwood Technical Assistance Service Department: 800.343.9353 >> email: tech@eastwood.com PDF version of this manual is available at eastwood.com The Eastwood Company 263 Shoemaker Road, Pottstown, PA 19464, USA 800.343.9353 eastwood.com © Copyright 2021 Eastwood Automotive Group LLC 8/21...