Eastwood MIG 175 Assembly & Operating Instructions
Hide thumbs
Also See for MIG 175:
- Assembly and operating instructions manual (13 pages) ,
- Instructions (4 pages) ,
- Service manual (21 pages)

Related Manuals for Eastwood MIG 175


Summary of Contents for Eastwood MIG 175
- Page 1 Part #12012 MIG 175 WELDER ASSEMBLY & OPERATING INSTRucTIONS PDF version available at eastwood.com/12012manual...
-
Page 2: Specifications
This warranty is void if the equipment has been subjected to improper installation, improper care or abnormal operations. WARRANTY PERIOD: All warranty periods begin on the date of purchase from Eastwood. Warranty Periods are listed below, along with the products covered during those warranty periods: 3 Year Warranty on Material, Workmanship, and Defects: •... -
Page 3: Duty Cycle
5. The electrode and work (or ground) circuits are electrically “hot” when the welder is on. Do not touch these “hot” parts with your bare skin or wet clothing. DO NOT TOUCH THE CONTACT TIP WITH THE UNIT TURNED “ON”. TURN THE UNIT OFF BEFORE CHANGING TIPS OR CLEANING THE NOzzLE. To order parts and supplies: 800.345.1178 >> eastwood.com... -
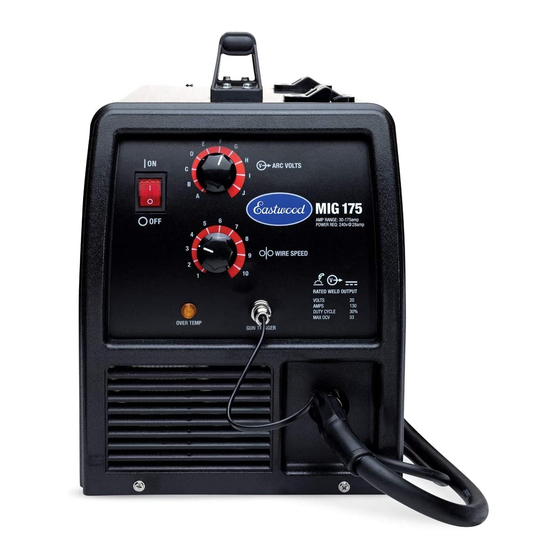
Page 4: Components And Controls
When unpacking your Eastwood MIG175, check to make sure all of the parts listed below are included: • MIG175 Welder • Torch / Gun Cable Assembly • Spool Gun Assembly • Ground Cable Assembly • Gas Flow Regulator • Gas Hose •... - Page 5 19 18 To order parts and supplies: 800.345.1178 >> eastwood.com...
-
Page 6: Installation
4. Reinstall the Black Ground Knob and finger tighten. CHANGING POLARITY FIG. C The Eastwood MIG175 comes set up to weld with Solid Wire, to use a Flux Cored wire the Polarity must be changed. 1. Disconnect the wire lead coming from the Drive Motor by removing the Red Positive Knob. - Page 7 A Shielding Gas Bottle is not included with your Eastwood MIG175 but is necessary to welding using Solid Wire, but can be bought at most local Welding Supply Stores. Eastwood recommends the use of 75% Argon / 25% CO2 for shielding gas when MIG welding Steel, 100% Argon for Aluminum, and Tri-Mix (90% He / 7.5% Ar / 2.5% CO2) for Stainless Steel.
-
Page 8: Installing Wire Spool
INSTALLING WIRE SPOOL The Eastwood MIG175 can be used with either a 4”or an 8” Wire Spool. To use the larger 8” spool an included adaptor is necessary. To install a 4” Wire Spool: 1. Open the door of the welder and remove the wing nut (Fig. 2G), spacer (Fig. 1G), and 8in Spool Adaptor (Fig. 3G) from the Wire Spool Spindle. - Page 9 7. Tighten the star knob finger tight. 8. Push the rocker arm back down into place. 9. Lift up on the Tensioner to put back in place and adjust as necessary. To order parts and supplies: 800.345.1178 >> eastwood.com...
-
Page 10: Threading Welding Wire
11. Plug in welder to your power source and turn on the welder. 12. Trigger the Spool Gun to feed the wire and adjust the Brass Tensioner Thumb Screw (Fig. 2K) so that the wire does not slip. 13. Replace Contact Tip and Nozzle. FIG.K Eastwood Technical Assistance: 800.544.5118 >> techelp@eastwood.com... -
Page 11: Operation
WELDING PROCESS Your Eastwood MIG175 can be used to form a large number of different joints and welds all of which will require practice and testing before using on an actual project piece. This following welding process is just a baseline to get you started. -
Page 12: Types Of Weld Joints
5. Tee Weld is a joint between two pieces where one is 6. Plug Weld is a joint which joins two overlapping pieces perpendicular to the other. by filling in a hole punched in the top piece. Eastwood Technical Assistance: 800.544.5118 >> techelp@eastwood.com... -
Page 13: Overload Protection
OvERLOAD PROTEcTION Your Eastwood MIG175 is equipped with a temperature controller as well as an overload breaker. These two protection devices will protect your welder if the duty cycle is exceeded. If the output is exceeded, the internal breaker will trip and stop power supply to the drive motor although the fan will still run to cool the unit. -
Page 14: Troubleshooting
TROuBLEShOOTING Eastwood Technical Assistance: 800.544.5118 >> techelp@eastwood.com... - Page 15 TROuBLEShOOTING To order parts and supplies: 800.345.1178 >> eastwood.com...
-
Page 16: Consumable Parts
• 12762 – L/XL/XXL Welding Jacket REPLACEMENT PARTS Call Eastwood Customer Service at 1-800-343-9353 for assistance with replacement parts. If you have any questions about the use of this product, please contact The Eastwood Technical Assistance Service Department: 800.544.5118 >> email: techelp@eastwood.com PDF version of this manual is available online >>...