
Related Manuals for Zeiss Crossbeam 550L


Summary of Contents for Zeiss Crossbeam 550L
- Page 1 Instruction Manual ZEISS Crossbeam 550L, Crossbeam 550 Focused Ion Beam - Scanning Electron Microscope (FIB-SEM)
- Page 2 Effective from: 06/2020 © 2020 Without the prior written consent of ZEISS, this document or any part of it must neither be translated nor reproduced or transmitted in any form or by any means - including electronic or mechanic methods, by photocopying, recording or by any in- formation or filing system.
-
Page 3: Table Of Contents
3.3 Optional Components and Accessories ..............44 3.3.1 Optional Detectors ..................44 3.3.2 Control Panel ....................53 4 Software Description .................... 55 4.1 SmartSEM........................ 55 4.1.1 SmartSEM User Interface ................55 Instruction Manual ZEISS Crossbeam 550L, Crossbeam 550 | en-US | Rev. 3 | 349500-8122-000... - Page 4 6.7 Performing an Emergency Shutdown ............... 93 7 Maintenance and Repair..................94 7.1 Maintenance Work ....................94 7.2 Maintenance Intervals....................94 7.3 Change of Consumables and Chemicals ..............94 Instruction Manual ZEISS Crossbeam 550L, Crossbeam 550 | en-US | Rev. 3 | 349500-8122-000...
- Page 5 10.3 Declaration of Conformity..................129 11 Parts and Tools .....................130 11.1 Consumables ......................130 11.2 Spare Parts ......................130 11.3 Tools and Accessories ....................130 Index ........................132 Instruction Manual ZEISS Crossbeam 550L, Crossbeam 550 | en-US | Rev. 3 | 349500-8122-000...
-
Page 6: Glossary
A server that implements the internal fields. communication between control soft- ware and microscope hardware. Backscattered Electron Detector Instruction Manual ZEISS Crossbeam 550 | en-US | Rev. 3 | 349500-8122-000... - Page 7 Root Mean Square Gas Injection System Schottky field emitter Type of electron source in which emis- Graphical User Interface sion occurs at or near the work function barrier. Height Instruction Manual ZEISS Crossbeam 550 | en-US | Rev. 3 | 349500-8122-000...
- Page 8 / or a clearly defined cus- shank of the Schottky field emitter. tomer group. T-axis (Tilt) Transmission Electron Microscope Instruction Manual ZEISS Crossbeam 550 | en-US | Rev. 3 | 349500-8122-000...
-
Page 9: General Information
The manual is designed for operators who have been trained to operate the microscope by a ZEISS service representative. Basic operator training and safety instructions will be provided within the scope of initial start-up by ZEISS. Operators of the microscope must not deviate from the in- structions provided in this manual. -
Page 10: Explanation On Warnings And Additional Information
CAUTION Type and source of danger CAUTION indicates a potentially hazardous situation which, if not avoided, may result in minor or moderate injury. Instruction Manual ZEISS Crossbeam 550L, Crossbeam 550 | en-US | Rev. 3 | 349500-8122-000... -
Page 11: Further Applicable Documents
Material Safety Data Sheets Material safety data sheets (MSDS) of chemicals used in combination with the microscope are contained in the document folder delivered with the microscope. Instruction Manual ZEISS Crossbeam 550L, Crossbeam 550 | en-US | Rev. 3 | 349500-8122-000... -
Page 12: Contact
1 General Information | 1.4 Contact ZEISS 1.4 Contact If you have any questions or problems, please contact your local ZEISS Sales & Servicepartner or one of the following addresses: Headquarter Phone: +49 1803 33 63 34 Fax: +49 3641 64 3439 Email: info.microscopy.de@zeiss.com... -
Page 13: Safety
SmartSEM Software The SmartSEM software is intended for the operation of scanning electron microscopes (SEMs). The SmartSEM software has to be run exclusively on a personal computer delivered by ZEISS. Any other applications are not allowed. Regarding the operation of the microscope, the following regulations must be met: §... -
Page 14: Safety Procedures
ZEISS § The microscope is only to be used by operators who have been trained by a ZEISS service rep- resentative. Basic operator training and safety instructions will be provided within the scope of the initial start-up by ZEISS. Make sure that everyone who operates the microscope only performs the tasks for which he/she is trained. -
Page 15: Safe Handling Of Spare Parts
Moreover, it is recommended that you conclude a service contract with your local ZEISS service representative or organization. 2.2.4 Safe Handling of Spare Parts Using spare parts that are not provided by ZEISS can be hazardous or can lead to property dam- age: §... -
Page 16: Electrical Hazards
Use the recessed grip or door handle to close the chamber door. chamber door § Ensure not to get your fingers caught in the chamber door gap. Instruction Manual ZEISS Crossbeam 550L, Crossbeam 550 | en-US | Rev. 3 | 349500-8122-000... -
Page 17: Radiation Hazards
To download the document: 1. Go to EIGA homepage www.eiga.eu. 2. Select Publications > EIGA Documents. 3. From the list, select Doc. 44/18. 4. Click Download. Instruction Manual ZEISS Crossbeam 550L, Crossbeam 550 | en-US | Rev. 3 | 349500-8122-000... -
Page 18: Safety Equipment
Electron optical column protective cover panels Specimen chamber protective cover panels Plinth protective cover panels Operation of the microscope is only allowed with attached protective cover panels. Instruction Manual ZEISS Crossbeam 550L, Crossbeam 550 | en-US | Rev. 3 | 349500-8122-000... -
Page 19: Main Switch
AC Unit. The EMO button must always be readily accessible and operable. Up to three additional EMO buttons may be connected. Fig. 3: EMO button Instruction Manual ZEISS Crossbeam 550L, Crossbeam 550 | en-US | Rev. 3 | 349500-8122-000... -
Page 20: Locking Devices
The EHT (Extra high tension) is off. § The column chamber valve is closed. This is to prevent any risk of damaging the airlock rod or the gate valve. Instruction Manual ZEISS Crossbeam 550L, Crossbeam 550 | en-US | Rev. 3 | 349500-8122-000... -
Page 21: Lockout/Tagout Equipment
Required Energy Isolating Devices § Branch circuit molded case circuit breaker § Main shut-off valves – Nitrogen supply – Compressed air supply – Cooling water supply Instruction Manual ZEISS Crossbeam 550L, Crossbeam 550 | en-US | Rev. 3 | 349500-8122-000... -
Page 22: Safety Labels
Several labels also provide legal informa- tion. Labels Attached to the Front Side of the Microscope Labels Attached to the Rear Side of the Microscope Instruction Manual ZEISS Crossbeam 550L, Crossbeam 550 | en-US | Rev. 3 | 349500-8122-000... - Page 23 The safety labels always need to be attached to the correct spots at the microscope. If a safety la- bel is lost or unreadable, it needs to be reordered via the following reorder numbers: Instruction Manual ZEISS Crossbeam 550L, Crossbeam 550 | en-US | Rev. 3 | 349500-8122-000...
- Page 24 The specimen chamber is ventilated with gaseous nitrogen. scope is sufficiently ventilated. Ensure that the area around the electron microscope is sufficiently ventilated. Reorder no. 347800-0033-000-08en 347800-0033-000-08en Instruction Manual ZEISS Crossbeam 550L, Crossbeam 550 | en-US | Rev. 3 | 349500-8122-000...
- Page 25 X-rays are produced in this Scanning Electron Mi- croscope! The acceleration voltage is limited to 30 kV. Observe local safety and X-ray protection regula- tions. Order no. 346000-0088-000 Instruction Manual ZEISS Crossbeam 550L, Crossbeam 550 | en-US | Rev. 3 | 349500-8122-000...
- Page 26 EVO is configured, either 230 VAC or 120 VAC. Order no. 354900-9040-000 (EVO10) Order no. 354900-9041-000 (EVO15) Order no. 354900-9042-000 (EVO25) Instruction Manual ZEISS Crossbeam 550L, Crossbeam 550 | en-US | Rev. 3 | 349500-8122-000...
-
Page 27: Product And Functional Description
Plinth with ON/STANDBY/OFF buttons Monitor Work desk Dual joystick Refer to Dual Joystick [ 43] Personal Computer (PC) Optional Components and Accessories Fig. 7: Optional components and accessories Instruction Manual ZEISS Crossbeam 550L, Crossbeam 550 | en-US | Rev. 3 | 349500-8122-000... - Page 28 Electrostatic Beam Blanker for SEM Refer to instruction manual Beam Blanker § Rapid Laser Ablation Upgrade Refer to instruction manual Rapid Laser Ablation Upgrade § Further options on request Instruction Manual ZEISS Crossbeam 550L, Crossbeam 550 | en-US | Rev. 3 | 349500-8122-000...
-
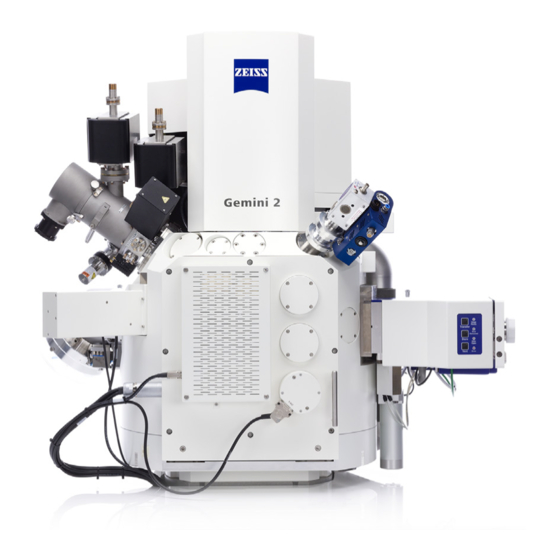
Page 29: Main Components
Instruction Manual ZEISS Crossbeam 550L, Crossbeam 550 | en-US | Rev. 3 | 349500-8122-000... - Page 30 Quiet Mode The automatically controlled Quiet Mode is optionally available. This option allows switching off the pre-vacuum pump after specimen exchange when the vacuum threshold is achieved. Instruction Manual ZEISS Crossbeam 550L, Crossbeam 550 | en-US | Rev. 3 | 349500-8122-000...
-
Page 31: Electron Optical Column | Gemini Ii
Deflect the beam across the specimen surface in what is usually referred to as a raster scan. Specimen Suppressor voltage Extractor voltage Acceleration voltage Liner tube voltage Instruction Manual ZEISS Crossbeam 550L, Crossbeam 550 | en-US | Rev. 3 | 349500-8122-000... - Page 32 When the primary electron beam hits the specimen, certain interaction products are released, which can be recorded by specific detectors, e.g. the InLens SE detector . For more informa- tion see Principle of Signal Detection [ 37]. Instruction Manual ZEISS Crossbeam 550L, Crossbeam 550 | en-US | Rev. 3 | 349500-8122-000...
- Page 33 The characteristics and the beam paths of the High Resolution Low Current mode and High Reso- lution mode are the same, except the different operation of the gun. Instruction Manual ZEISS Crossbeam 550L, Crossbeam 550 | en-US | Rev. 3 | 349500-8122-000...
- Page 34 Useful for an overview of large specimens and for specimen navigation. § Can be used with EHTs between 100 V and 2000 V. § Requires the SmartSEM software license Field Mode. Instruction Manual ZEISS Crossbeam 550L, Crossbeam 550 | en-US | Rev. 3 | 349500-8122-000...
-
Page 35: Ion-Sculptor Focused Ion Beam (Fib) Column (Optional)
1 pA and 100 nA. Objective Lens The objective lens is designed as an electrostatic Einzel-lens system. It focuses the beam onto the specimen surface. Instruction Manual ZEISS Crossbeam 550L, Crossbeam 550 | en-US | Rev. 3 | 349500-8122-000... - Page 36 Mills with the milling parame- ters set (milling current). Mill + SEM Mills and generates a SEM image. SEM real-time imaging of the ion beam milling or deposition. Instruction Manual ZEISS Crossbeam 550L, Crossbeam 550 | en-US | Rev. 3 | 349500-8122-000...
-
Page 37: Detectors
Cathodoluminescence (CL) Electrons impacting on luminescent materials cause the emission of photons which may have wavelengths in the visible spectrum and can be imaged by specialized detectors. Instruction Manual ZEISS Crossbeam 550L, Crossbeam 550 | en-US | Rev. 3 | 349500-8122-000... - Page 38 Detector [ 47] Angular resolved BSE imag- Compositional contrast aSTEM Detector [ 50] Transmitted electrons Diffraction contrast Compositional contrast CL Detector [ 52] Light photons Mineralogy Instruction Manual ZEISS Crossbeam 550L, Crossbeam 550 | en-US | Rev. 3 | 349500-8122-000...
- Page 39 Without the field of the electrostatic lens, which attracts the secondary electrons, the effi- ciency of the InLens SE detector is reduced. Instruction Manual ZEISS Crossbeam 550L, Crossbeam 550 | en-US | Rev. 3 | 349500-8122-000...
- Page 40 The chamber CCD camera is located at the backside of the specimen chamber. A second CCD camera can be installed on the left-hand side of the specimen chamber. Instruction Manual ZEISS Crossbeam 550L, Crossbeam 550 | en-US | Rev. 3 | 349500-8122-000...
- Page 41 It is highly recommended that the CCD illumination control is set to Auto Detect. This avoids any problems by the user forgetting to switch the illumination back for a different detector. Instruction Manual ZEISS Crossbeam 550L, Crossbeam 550 | en-US | Rev. 3 | 349500-8122-000...
-
Page 42: Specimen Stage
Movement of the specimen surface into the tilt axis at various working distances Rotation Stage rotation parallel to the X-Y plane Tilt Stage tilt about an axis parallel to the X axis Instruction Manual ZEISS Crossbeam 550L, Crossbeam 550 | en-US | Rev. 3 | 349500-8122-000... -
Page 43: Dual Joystick
At higher magnifications the stage movement is slower. The stage is moving with its maximum speed when viewing the specimen with the CCD (Charge Coupled De- vice) camera. The different axes can also be moved simultaneously. Instruction Manual ZEISS Crossbeam 550L, Crossbeam 550 | en-US | Rev. 3 | 349500-8122-000... -
Page 44: Optional Components And Accessories
+300 V Ion mode Secondary ions Crystal orientation contrast, ma- terial contrast e.g. imaging of typical collector voltage −4 kV corrosion/oxidation caused by FIB processes in metals Instruction Manual ZEISS Crossbeam 550L, Crossbeam 550 | en-US | Rev. 3 | 349500-8122-000... - Page 45 BSEs to enhance contrast and resolution. The combination of InLens SE detector and EsB detector allows simultaneous imaging and mixing of a high contrast topography (SE) and a compositional contrast (BSE). Instruction Manual ZEISS Crossbeam 550L, Crossbeam 550 | en-US | Rev. 3 | 349500-8122-000...
- Page 46 Quad mode. Each channel can have an arbitrary combination of segments. This way, you can collect compositional images, topographical images, and custom combinations all at once. Instruction Manual ZEISS Crossbeam 550L, Crossbeam 550 | en-US | Rev. 3 | 349500-8122-000...
- Page 47 Risk of property damage: Motorized specimen stage Risk of damaging the detector when operating the motorized specimen stage. Retract the detector head completely after you have finished the work with the detector. Instruction Manual ZEISS Crossbeam 550L, Crossbeam 550 | en-US | Rev. 3 | 349500-8122-000...
- Page 48 Since the detector has a limited speed, it is recommended to use scan speed 6 or higher (slower), especially at small magnifications. The lower the gain is, the faster is the detector. Instruction Manual ZEISS Crossbeam 550L, Crossbeam 550 | en-US | Rev. 3 | 349500-8122-000...
- Page 49 InLens SE detector (bottom right) At small magnifications, the field of view is limited by the hole inside the aBSD detector: Fig. 23: Central hole of the aBSD detector Instruction Manual ZEISS Crossbeam 550L, Crossbeam 550 | en-US | Rev. 3 | 349500-8122-000...
- Page 50 When you use a diode detector, always make sure that the TV illumination is switched off. If the CCD Mode is set to Auto Detect, then the TV illumination is automatically switched off when a diode detector is used. Instruction Manual ZEISS Crossbeam 550L, Crossbeam 550 | en-US | Rev. 3 | 349500-8122-000...
- Page 51 Risk of property damage: Motorized specimen stage Risk of damaging the detector when operating the motorized specimen stage. Retract the detector head completely after you have finished the work with the detector. Instruction Manual ZEISS Crossbeam 550L, Crossbeam 550 | en-US | Rev. 3 | 349500-8122-000...
- Page 52 The detector can be used during energy-dispersive X-ray spectrometer (EDS) measurements and wavelength-dispersive spectrometer (WDS) measurements at any valid magnification. Fig. 27: CL image of sandstone Instruction Manual ZEISS Crossbeam 550L, Crossbeam 550 | en-US | Rev. 3 | 349500-8122-000...
-
Page 53: Control Panel
Adjusts the magnification of the system. § Reduced Changes the scan field to a reduced area. The size of the area is determined by the current sub scan area settings. Instruction Manual ZEISS Crossbeam 550L, Crossbeam 550 | en-US | Rev. 3 | 349500-8122-000... - Page 54 Changes the focal point of the column by adjusting the magnitude of the objective lens. § Scan Speed +/− Increases (+) or decreases (−) the scan speed by doubling or halving the beam dwell time with each click step. Instruction Manual ZEISS Crossbeam 550L, Crossbeam 550 | en-US | Rev. 3 | 349500-8122-000...
-
Page 55: Software Description
Image Area with Data Zone FIB Toolbar Displays image information and acquisition param- Contains the controls to configure the FIB column. eters from the microscope. Instruction Manual ZEISS Crossbeam 550L, Crossbeam 550 | en-US | Rev. 3 | 349500-8122-000... -
Page 56: Graphical Control Elements
Readout Displays the status of a system entity. Enables you to select an action or a value by opening a dialog with an input field. Instruction Manual ZEISS Crossbeam 550L, Crossbeam 550 | en-US | Rev. 3 | 349500-8122-000... -
Page 57: User Access Levels And User Privileges
Enables the user to change the location where all user specific param- tory eters and configurations are saved. Extractor Enables the user to change the extractor voltage. Instruction Manual ZEISS Crossbeam 550L, Crossbeam 550 | en-US | Rev. 3 | 349500-8122-000... - Page 58 Activate Partial Vent on Standby, Z Move on vent, Protect Z, Go to HV@Shutdown, EHT Off & Log Off and Leave Gun ON at Shut- down. § Use the bakeout function § Start the FIB filament heating. Instruction Manual ZEISS Crossbeam 550L, Crossbeam 550 | en-US | Rev. 3 | 349500-8122-000...
-
Page 59: Smartsem Program Suite
Service activities, for ZEISS service representatives only Service Centre Provides an overview of the state of the microscope. Smart Stage Map- Service activities, for ZEISS service representatives only ping Instruction Manual ZEISS Crossbeam 550L, Crossbeam 550 | en-US | Rev. 3 | 349500-8122-000... - Page 60 Service activities, for ZEISS service representatives only Database Merlin Alignment Service activities, for ZEISS service representatives only Wizard Merlin Database Service activities, for ZEISS service representatives only Wizard Instruction Manual ZEISS Crossbeam 550L, Crossbeam 550 | en-US | Rev. 3 | 349500-8122-000...
-
Page 61: Smartfib
Left hand side: informs you about the current mouse position in the Working Area and indicates the selected tool, e.g. Vertex. § Right hand side: enables you to control some exclusive properties of the Working Area. Instruction Manual ZEISS Crossbeam 550L, Crossbeam 550 | en-US | Rev. 3 | 349500-8122-000... -
Page 62: Graphical Control Elements
Enables you to enter the desired value . Slider Enables you to adjust the corresponding function. Expandable sec- Enables you to expand or collapse the section as required. tion Instruction Manual ZEISS Crossbeam 550L, Crossbeam 550 | en-US | Rev. 3 | 349500-8122-000... -
Page 63: Smartfib Program Suite
Designer Offline creation of layouts: Arrangement of elements in the scan- ning area § Interaction with Sample Mode: Used as a drawing tool for Sample Mode Instruction Manual ZEISS Crossbeam 550L, Crossbeam 550 | en-US | Rev. 3 | 349500-8122-000... -
Page 64: Installation
Unpacking, installation, and first start-up are carried out by an authorized ZEISS service represen- tative. An excerpt of the installation requirements can be found under Installation Requirements [ 114]. For more details refer to the document Installation Requirements. Instruction Manual ZEISS Crossbeam 550L, Crossbeam 550 | en-US | Rev. 3 | 349500-8122-000... -
Page 65: Operation
4. If the Emergency Off (EMO) option is installed, press the green button to confirm the set- ting of the MAIN switch. Instruction Manual ZEISS Crossbeam 550L, Crossbeam 550 | en-US | Rev. 3 | 349500-8122-000... -
Page 66: Starting The Microscope
Toggles Tool Bar on/off <F2 + SHIFT> Hysteresis removal <F3> Closes all windows except the Tool Bar and Status Bar <F3 + SHIFT> Toggles PC Plane ON/OFF Instruction Manual ZEISS Crossbeam 550L, Crossbeam 550 | en-US | Rev. 3 | 349500-8122-000... - Page 67 Switches to Annotation and inserts Point to Point Marker <CTRL + ALT + M> Enable/Disable the Movable Crosshairs Marker <CTRL + ALT + F> Enable/Disable Mouse Following for Movable Crosshairs Marker Instruction Manual ZEISS Crossbeam 550L, Crossbeam 550 | en-US | Rev. 3 | 349500-8122-000...
-
Page 68: Obtaining A First Image
73] § Switching on the EHT [ 74] § Acquiring an Image [ 74] § Optimizing the Image [ 76] § Saving the Image [ 78] Instruction Manual ZEISS Crossbeam 550L, Crossbeam 550 | en-US | Rev. 3 | 349500-8122-000... -
Page 69: Preparing The Specimen Holder
3. To fix the stub to the specimen holder, tighten the location screw with the Allen key. 4. Note down which fix position is occupied by the specimen. Instruction Manual ZEISS Crossbeam 550L, Crossbeam 550 | en-US | Rev. 3 | 349500-8122-000... -
Page 70: Loading The Specimen Chamber
The specimen chamber is purged with gaseous nitrogen. à If the Stage is not initialized, a system message is displayed. Refer to Initializing the Stage 99]. Instruction Manual ZEISS Crossbeam 550L, Crossbeam 550 | en-US | Rev. 3 | 349500-8122-000... - Page 71 Make sure that the dovetail is placed in the correct orientation so that the flat side of the dovetail of the specimen holder is flush with the milled edge of the specimen stage. Instruction Manual ZEISS Crossbeam 550L, Crossbeam 550 | en-US | Rev. 3 | 349500-8122-000...
-
Page 72: Locating The Specimen
8. In the Stage Topview section of the Stage Navigation Bar, spot the stub with the specimen you want to observe. 9. To drive the stub directly under the electron beam, double-click the stub. Instruction Manual ZEISS Crossbeam 550L, Crossbeam 550 | en-US | Rev. 3 | 349500-8122-000... -
Page 73: Switching On The Gun
à The pop-up menu for vacuum, gun, and EHT activation is displayed. 5. Click à The gun runs up. à This may take up to 5 minutes. Instruction Manual ZEISS Crossbeam 550L, Crossbeam 550 | en-US | Rev. 3 | 349500-8122-000... -
Page 74: Switching On The Eht
4. In the input field, enter 300. à The probe current is set to 300 pA. 6.2.6.2 Selecting the SE Detector 1. In the Crossbeam SEM Control panel, select the Imaging tab. Instruction Manual ZEISS Crossbeam 550L, Crossbeam 550 | en-US | Rev. 3 | 349500-8122-000... - Page 75 Image Area in left/right direction. à The current working distance is indicated in the Status Bar. 5. Adjust contrast and brightness again. Instruction Manual ZEISS Crossbeam 550L, Crossbeam 550 | en-US | Rev. 3 | 349500-8122-000...
-
Page 76: Optimizing The Image
2. In the Alignment section, click Beam Offset. 3. To shift the beam, in the Beam Offset naviga- tion box, use the scroll bars or the red marker. Instruction Manual ZEISS Crossbeam 550L, Crossbeam 550 | en-US | Rev. 3 | 349500-8122-000... - Page 77 Scan Speed drop-down list, select Scan Speed = 7. à The scan speed is set to Scan Speed = 7. 2. Bring the image into focus. Instruction Manual ZEISS Crossbeam 550L, Crossbeam 550 | en-US | Rev. 3 | 349500-8122-000...
-
Page 78: Saving The Image
4. To confirm the selected path, click Select Folder. 5. Enter the filename in the Filename input field. 6. Click Save <file name>.tif. 7. To continue imaging, click the Freeze:Unfreeze/Scanning icon. Instruction Manual ZEISS Crossbeam 550L, Crossbeam 550 | en-US | Rev. 3 | 349500-8122-000... -
Page 79: Modifying Gun Parameters
INFO: For maximum probe current, also check the alignment of the gun. INFO: If you use the Analytic gun mode, then the lifetime of the emitter is reduced. Instruction Manual ZEISS Crossbeam 550L, Crossbeam 550 | en-US | Rev. 3 | 349500-8122-000... -
Page 80: Setting The Probe Current
10. Grab the crosshairs and move them into the hole of the Faraday cup. à The probe current is measured continuously. à The measured probe current is displayed in the Specimen I readout. Instruction Manual ZEISS Crossbeam 550L, Crossbeam 550 | en-US | Rev. 3 | 349500-8122-000... -
Page 81: Changing The Extractor Voltage
6 Operation | 6.4 Working with Different Aperture Configurations and Beam Modes 6.3.4 Changing the Extractor Voltage Purpose The Extractor voltage is preset by the factory or by the ZEISS service representative. Within certain limits, the operator may carefully increase the extractor voltage in order to optimize the probe current for particular applications. -
Page 82: Selecting The Column Mode
6 Operation | 6.5 Finding Appropriate Detector Settings ZEISS Info If you wish to change the installed configuration of your microscope, contact your local ZEISS service representative. 1. From the Menu Bar, select View > SEM Status. à The SmartSEM Status dialog is displayed. -
Page 83: Setting Up The Inlens Se Detector
Purpose The SE detector collects the SE signal, highlighting the topography of the specimen. Fig. 31: An eledone tentacle The following settings are recommended for the SE detector: Instruction Manual ZEISS Crossbeam 550L, Crossbeam 550 | en-US | Rev. 3 | 349500-8122-000... -
Page 84: Setting Up The Esb Detector
2. From the Signal A drop-down list, select ESB. 3. Adjust the EHT, working distance (WD), and EsB Grid according to the suggestions in the table in order to optimize the image. Instruction Manual ZEISS Crossbeam 550L, Crossbeam 550 | en-US | Rev. 3 | 349500-8122-000... -
Page 85: Setting Up The Sesi Detector
4. In order to detect secondary ions, in the Imaging tab, activate the SESI Mode checkbox. 5. Adjust the EHT, working distance (WD), and collector voltage according to the suggestions in the table in order to optimize the image. Instruction Manual ZEISS Crossbeam 550L, Crossbeam 550 | en-US | Rev. 3 | 349500-8122-000... -
Page 86: Setting Up The Absd/Bsd Detector
1. From the Panel Configuration Bar, select BSD Control. The BSD Control panel enables you to change the polarity of the segments, select BSD modes, and set the BSD gain. Instruction Manual ZEISS Crossbeam 550L, Crossbeam 550 | en-US | Rev. 3 | 349500-8122-000... - Page 87 INFO: Since the detector has a limited speed, it is recommended to use scan speed 6 or higher (slower), especially at small magnifications. The lower the gain is, the faster is the detector. Instruction Manual ZEISS Crossbeam 550L, Crossbeam 550 | en-US | Rev. 3 | 349500-8122-000...
-
Page 88: Setting Up The Astem/Stem Detector
S1 - S2 + S3 BF + DF All on User defined name Custom combination of segments Active segments Custom combination with +/- signs of segments. "+" on, "-" inverted Instruction Manual ZEISS Crossbeam 550L, Crossbeam 550 | en-US | Rev. 3 | 349500-8122-000... - Page 89 HAADF outer HAADF S4 + S5 User defined name Custom combination of segments Active segments Custom combination with +/- signs of segments. "+" on, "-" inverted Instruction Manual ZEISS Crossbeam 550L, Crossbeam 550 | en-US | Rev. 3 | 349500-8122-000...
- Page 90 Select between Low, Medium, High, or Very High. 7. For displaying several channels of a aSTEM/STEM detector simultaneously, repeat steps 3 to 6 for the other display zones. Instruction Manual ZEISS Crossbeam 550L, Crossbeam 550 | en-US | Rev. 3 | 349500-8122-000...
-
Page 91: Setting Up The Cl Detector
4. Only when interrupting work for longer periods between 2 and 7 days: In the Vacuum tab activate the Partial Vent on Standby checkbox. à This maintains the gun vacuum, and switches off and protects the turbo pump. Instruction Manual ZEISS Crossbeam 550L, Crossbeam 550 | en-US | Rev. 3 | 349500-8122-000... -
Page 92: Energizing The Microscope
7. To secure the microscope against accidental re-activation, refer to Performing a Lockout/ Tagout [ 93]. See also Finishing the Work Session [} 91] Performing a Lockout/Tagout [} 93] Instruction Manual ZEISS Crossbeam 550L, Crossbeam 550 | en-US | Rev. 3 | 349500-8122-000... -
Page 93: Performing A Lockout/Tagout
If the EMO option is not installed, set the MAIN switch at the rear side of the plinth to the OFF position. Instruction Manual ZEISS Crossbeam 550L, Crossbeam 550 | en-US | Rev. 3 | 349500-8122-000... -
Page 94: Maintenance And Repair
A list of ZEISS locations and authorized service partners can be found at: http://www.zeiss.com/microscopy 7.3 Change of Consumables and Chemicals The change of consumables and chemicals has to be performed by a ZEISS service representative at mandatory intervals. The times scheduled are designed for the maximum equipment performance level (i.e. 24 h per day of permanent operation). - Page 95 FIB apertures If used up Precursors There is no warranty on field emission guns; manufacturers do not guarantee any lifetime. Tab. 3: Schedule for the change of consumables Instruction Manual ZEISS Crossbeam 550L, Crossbeam 550 | en-US | Rev. 3 | 349500-8122-000...
-
Page 96: Troubleshooting
ZEISS 8 Troubleshooting 8.1 Overview The following table provides hints for solving common problems. If you cannot solve the problem or if you are unsure about a certain technical difficulty, contact your local ZEISS service represen- tative. Keyword Symptom Cause Remedy §... - Page 97 Gun has been switched off Refer to Baking out the matically. automatically for safety Gun Head [ 102]. reasons since gun vacuum is worse than 2 × 10⁻⁸ mbar Instruction Manual ZEISS Crossbeam 550L, Crossbeam 550 | en-US | Rev. 3 | 349500-8122-000...
- Page 98 No compressed air. Check compressed air sup- ply. Vac ready = OK is dis- Penning gauge has not Restart the microscope. played abnormally fast. been identified correctly. Instruction Manual ZEISS Crossbeam 550L, Crossbeam 550 | en-US | Rev. 3 | 349500-8122-000...
-
Page 99: Overall System
1. From the Menu Bar, select Stage > Stage Initialise. à Initialise Stage window is displayed. 2. Confirm via Yes. à The stage initialization process takes a few minutes. Instruction Manual ZEISS Crossbeam 550L, Crossbeam 550 | en-US | Rev. 3 | 349500-8122-000... -
Page 100: Defining The Post Initialization Position Of The Stage
90° If the CCD camera is installed at the front, enter 0°. If the CCD camera is installed at the side, enter chamber door 90°. 0° Instruction Manual ZEISS Crossbeam 550L, Crossbeam 550 | en-US | Rev. 3 | 349500-8122-000... -
Page 101: Replacing The Chamber Door Seal
The EM Server shows the message WARNING Stage Touching. 1. To accept the warning, click OK. 2. Move the stage in the reverse direction away from the touch. Instruction Manual ZEISS Crossbeam 550L, Crossbeam 550 | en-US | Rev. 3 | 349500-8122-000... -
Page 102: Checking The Water Flow And Temperature
The pop-up menu for Vacuum, Gun and EHT activation is displayed. 2. Click Shutdown Gun. 3. Wait until the gun has ramped down. à This may take up to 5 minutes. Instruction Manual ZEISS Crossbeam 550L, Crossbeam 550 | en-US | Rev. 3 | 349500-8122-000... -
Page 103: Calibrating The Probe Current
Faraday cup through the aperture orifice. 5. In the Panel Configuration Bar, double-click Probe Current Calibration. à The Probe Current Calibration window is displayed. 6. Activate the Spot checkbox. Instruction Manual ZEISS Crossbeam 550L, Crossbeam 550 | en-US | Rev. 3 | 349500-8122-000... -
Page 104: Power Circuit
1. Check if one of the circuit breakers on the rear side of the plinth is tripped. 2. If one of the circuit breakers is tripped, push it upwards. Instruction Manual ZEISS Crossbeam 550L, Crossbeam 550 | en-US | Rev. 3 | 349500-8122-000... -
Page 105: Detectors
2. Clean the rod with isopropanol with a clean, lint-free cloth. 3. Spread some drops of TEM oil 300 across the rod. Use a clean, lint-free cloth. Instruction Manual ZEISS Crossbeam 550L, Crossbeam 550 | en-US | Rev. 3 | 349500-8122-000... -
Page 106: Focused Ion Beam
An automatic heating routine is performed. 3. If the ion source still does not start emitting, find a new extractor value. Refer to Manually Finding a New Extractor Value [ 107]. Instruction Manual ZEISS Crossbeam 550L, Crossbeam 550 | en-US | Rev. 3 | 349500-8122-000... -
Page 107: Manually Finding A New Extractor Value
13. To enable the suppressor regulation, activate the Regulate checkbox. Info During the process of finding a new extractor target, the FIB gun will be automatically switched to the state. Instruction Manual ZEISS Crossbeam 550L, Crossbeam 550 | en-US | Rev. 3 | 349500-8122-000... -
Page 108: Shutdown And Disposal
If a gas injection system (GIS) is used, the precursors may be explosive, reactive, toxic or irritant when they come into contact with the environment or a person. Do not remove or install a GIS reservoir. Contact your local ZEISS service representative to have a reservoir removed or installed. - Page 109 A hand pallet truck has to be used to move the microscope: § Ensure all hallways and corners are wide enough to be passed with the hand pallet truck. Instruction Manual ZEISS Crossbeam 550L, Crossbeam 550 | en-US | Rev. 3 | 349500-8122-000...
-
Page 110: Disposal
§ Materials: e.g. metals, non-metals, composite materials, process materials § Electronic scrap material: e.g. transformers, circuit boards, cables Comply with national and regional waste disposal regulations. Instruction Manual ZEISS Crossbeam 550L, Crossbeam 550 | en-US | Rev. 3 | 349500-8122-000... -
Page 111: Technical Data And Conformity
Dynamic focus: For correction of focus on tilted specimens Focus wobble: For assistance in aperture alignment, with adjustable amplitude and speed Instruction Manual ZEISS Crossbeam 550L, Crossbeam 550 | en-US | Rev. 3 | 349500-8122-000... - Page 112 22 free ports for optional acces- ports lators etc. sories such as load lock, STEM, 4QBSD, GIS, EDS, WDS, EBSD, CL, flood gun, cryo transfer, SIMS, manipulator, etc. Instruction Manual ZEISS Crossbeam 550L, Crossbeam 550 | en-US | Rev. 3 | 349500-8122-000...
- Page 113 Parallel detection, processing, and display of up to four channels possible § 2 signal detector inputs can be mixed for enhanced image infor- mation InLens detectors InLens SE detector: Instruction Manual ZEISS Crossbeam 550L, Crossbeam 550 | en-US | Rev. 3 | 349500-8122-000...
-
Page 114: Installation Requirements
Exclusively inside buildings Recommended Min. 4.0 m × 5.0 m × 2.3 m room size Service area Min. 1.0 m at each side Entrance Min. 1.1 m wide Hallways Min. 1.3 m wide Instruction Manual ZEISS Crossbeam 550L, Crossbeam 550 | en-US | Rev. 3 | 349500-8122-000... - Page 115 Floor stability > 1000 kg/m Parameter Requirement Installation site Exclusively inside buildings Recommended Min. 3.6 m × 4.0 m × 2.3 m room size Service area Min. 0.8 m at each side Instruction Manual ZEISS Crossbeam 550L, Crossbeam 550 | en-US | Rev. 3 | 349500-8122-000...
- Page 116 A grounding wire AWG10 is delivered with the microscope. Cross section: > 4 mm Instruction Manual ZEISS Crossbeam 550L, Crossbeam 550 | en-US | Rev. 3 | 349500-8122-000...
- Page 117 PE of the FEMALE RECEPTACLE as short as possible. (see picture) This grounding connection must not be common to other electrical equipment. Instruction Manual ZEISS Crossbeam 550L, Crossbeam 550 | en-US | Rev. 3 | 349500-8122-000...
- Page 118 Power consump- Max. 3 kVA, dependent on accessories tion Circuit breaker (at 16 A Type C house installation) Ampere interrupt- Min. 10,000 A ing capacity (AIC) Instruction Manual ZEISS Crossbeam 550L, Crossbeam 550 | en-US | Rev. 3 | 349500-8122-000...
- Page 119 Heat dissipation 1 kW Connection hose 6 mm inside diameter. Two pieces 10 m each are delivered. Parameter Requirement Water flow rate > 1.5 l/min Pressure 2–3 bar Water tempera- 18–22 °C ture Instruction Manual ZEISS Crossbeam 550L, Crossbeam 550 | en-US | Rev. 3 | 349500-8122-000...
- Page 120 Approx. 12 l/min at 0.6 MPa pressure during air leveling system infla- tion Pressure 0.6–0.8 MPa (6–8 bar) Quality Oil-free Connection hose 6 mm inside diameter. 10 m are delivered with the microscope. Instruction Manual ZEISS Crossbeam 550L, Crossbeam 550 | en-US | Rev. 3 | 349500-8122-000...
- Page 121 AC component: less than 1 mG peak to peak between 10 Hz and 1 kHz Acoustic noise Up to 120 Hz: less than 52 dB 120–450 Hz: less than 43 dB Above 450 Hz: less than 47 dB Parameter Requirement Ambient tempera- Appr. 21±4 °C ture Instruction Manual ZEISS Crossbeam 550L, Crossbeam 550 | en-US | Rev. 3 | 349500-8122-000...
- Page 122 For long-running 2 °C/24 h experiments: Long-term stability of ambient tem- perature Relative humidity Less than 65 % Altitude Max. 2000 m above sea level to guarantee an undisturbed operation Instruction Manual ZEISS Crossbeam 550L, Crossbeam 550 | en-US | Rev. 3 | 349500-8122-000...
- Page 123 This means that devices with RF transmitters such as mobile phones or DECT phones must not be used in close proximity. Instruction Manual ZEISS Crossbeam 550L, Crossbeam 550 | en-US | Rev. 3 | 349500-8122-000...
-
Page 124: Layout And Connections
Pressure reducer (water, nitrogen, Computer workplace compressed air) Main shut-off valves Emergency Off (EMO) button (optional) Water supply Water runback Nitrogen supply Compressed air supply Exhaust line Instruction Manual ZEISS Crossbeam 550L, Crossbeam 550 | en-US | Rev. 3 | 349500-8122-000... - Page 125 Static vibration damper max. 16 A Equipotential bonding bar, afety Pre-vacuum pump earth Vacuum exhaust Plinth and column Chilled water supply Computer workplace Dry compressed air Dry nitrogen supply Instruction Manual ZEISS Crossbeam 550L, Crossbeam 550 | en-US | Rev. 3 | 349500-8122-000...
- Page 126 Pressure reducer (nitrogen) Pre-vacuum pump 2 (optional) Main shut-off valve Computer workplace Nitrogen supply Emergency Off (EMO) box (optional) Exhaust line (optional) Emergency Off (EMO) button (optional) Instruction Manual ZEISS Crossbeam 550L, Crossbeam 550 | en-US | Rev. 3 | 349500-8122-000...
-
Page 127: System Layout
4 × Ø 80 mm + 200 mm airlock Table + PC 1650 × 1000 × 838 4 × 24.3 4 × Ø 50 mm 1100 × 1000 × 838 Instruction Manual ZEISS Crossbeam 550L, Crossbeam 550 | en-US | Rev. 3 | 349500-8122-000... - Page 128 4 × 22.5 on wheels Compressor* 281 × 139 × 239 1 × 25.0 281 mm × 139 mm *Actual measurements are country dependent (different manufacturers). Instruction Manual ZEISS Crossbeam 550L, Crossbeam 550 | en-US | Rev. 3 | 349500-8122-000...
-
Page 129: Declaration Of Conformity
CE Marking The CE conformity marking is located on the type plate of the machinery or the optional acces- sory, respectively. Unauthorized modifications of the machinery or the optional accessory will cancel this declara- tion. Instruction Manual ZEISS Crossbeam 550L, Crossbeam 550 | en-US | Rev. 3 | 349500-8122-000... -
Page 130: Parts And Tools
NOTICE Risk of property damage: Spare parts and consumables Using spare parts or consumables that are not provided by ZEISS can lead to property damage. Only genuine spare parts and consumables supplied by ZEISS are to be used in servicing the microscope. - Page 131 Part Number 1.5 mm Allen key 000000-0151-883 Small pliers – Specimen holders Refer to specimen holder catalog. Stubs – Tweezers – Lint-free cloth – Lint-free gloves – Instruction Manual ZEISS Crossbeam 550L, Crossbeam 550 | en-US | Rev. 3 | 349500-8122-000...
-
Page 132: Index
68, 74 InLens SE 39, 83 Optimization 76 40, 83 Saving 78 SESI 44, 85 Imaging STEM 88 Imaging mode 36 Imaging gun mode 79 Initializing the stage 99 Instruction Manual ZEISS Crossbeam 550 | en-US | Rev. 3 | 349500-8122-000... - Page 133 Stage initialization 99 Prevention of hazards 15 Starting SmartSEM 66 Preventive maintenance 14 Starting the microscope 66 Primary electron 37 STEM detector 88 Supervisor privilege 106 Switching off 102 Instruction Manual ZEISS Crossbeam 550 | en-US | Rev. 3 | 349500-8122-000...
- Page 134 Tool 131 Touch alarm, reset 101 Transmitted electron 37 Troubleshooting 96 Type plate 25, 26 User access level 57 User interface 55 User privilege 57 Vacuum system 29 Instruction Manual ZEISS Crossbeam 550 | en-US | Rev. 3 | 349500-8122-000...
- Page 136 Carl Zeiss Microscopy GmbH Carl-Zeiss-Promenade 10 phone: +49 1803 33 63 34 07745 Jena fax: +49 3641 64 3439 Germany info.microscopy.de@zeiss.com www.zeiss.com/microscopy...