Sharp XE-A147 Basic User Manual
Electronic cash register
Hide thumbs
Also See for XE-A147:
- Basic user manual (39 pages) ,
- Instruction manual (86 pages) ,
- Service manual (28 pages)
Table of Contents
Advertisement
Quick Links
Advertisement
Table of Contents

Related Manuals for Sharp XE-A147


Summary of Contents for Sharp XE-A147
- Page 1 ELECTRONIC CASH REGISTER MODEL XE-A137 XE-A147 BASIC USER MANUAL...
- Page 2 CAUTION: WARNING: This is a Class A product. In a domestic environment this product may cause radio interference in which case the user may be required to take adequate measures. SD card ADDITIONAL INFORMATION: We would like to point out that the time for the SD card storage depends on the size of the already used memory on SD card. Measurements have shown that backing up data is approximately 6 minutes, unless there are already up to 3000 backups / directories on the SD card.
-
Page 3: Introduction
INTRODUCTION Thank you very much for your purchase of the SHARP Electronic Cash Register, Model XE-A137/XE-A147. Please read this manual carefully before operating your machine in order to gain full understanding of functions and features. Please keep this manual for future reference. It will help you if you encounter any operational problems. -
Page 4: Table Of Contents
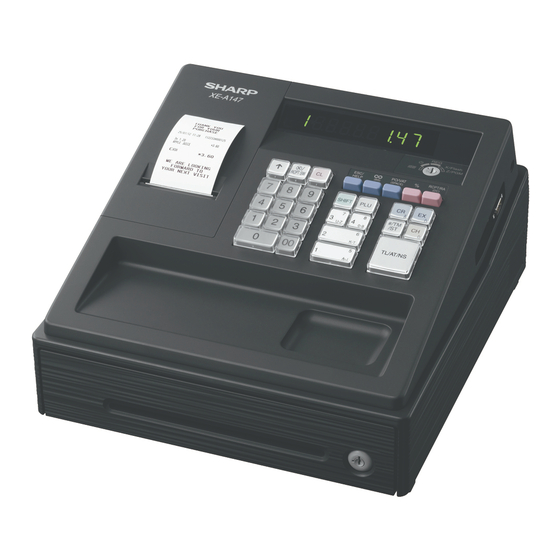
CONTENTS INTRODUCTION ............................1 IMPORTANT ..............................1 CONTENTS ..............................2 PARTS AND THEIR FUNCTIONS ........................ 3 1 External View ............................3 2 Printer ..............................3 3 Mode Switch and Mode key ........................4 4 Keyboard .............................. 4 5 Display ..............................5 6 Drawer Lock Key .......................... -
Page 5: Parts And Their Functions
SD card slot (Important: For SD type card SDHC 4GB to 32GB) Cheque slot Reset switch (Only for the XE-A147) DO NOT push the reset switch unless Drawer lock instructed to do. Doing so may damage or delete the data. -
Page 6: Mode Switch And Mode Key
Mode Switch and Mode key Insert the mode key (the same key as drawer lock key) into the mode switch and move the key to get an appropriate mode. Turns the display off. No operations are possible. Permits transaction entry. REG: Permits correction after finalizing a transaction. -
Page 7: Display
Display ■ Operator display Your cash register is equipped with a front LED (Light-Emitting Diode) display that affords easy visibility of 9 digits for the operator during transaction. PLU/Subdepartment code Department code Repeat Receipt off (“.”) Shift for the character entry (“_”) DC for the character entry (“_”) Appears in the far-right eight (max.) positions. -
Page 8: Preparing The Cash Register
PREPARING THE CASH REGISTER Unpack the cash register and make sure all accessories are included. For details of accessories, please refer to “SPECIFICATIONS” section. For installing the cash register, find a stable surface near an AC outlet where the cash register will not subject to water sources or direct sunlight. -
Page 9: Installing Batteries
Installing Batteries Three new alkaline batteries LR6 (“AA”size) must be installed in the cash register to prevent the data and user- programmed settings from being erased from the memory, when the AC adapter plug is accidentally disconnected or in case of power failure. Once installed, the batteries will last approximately one year before needing replacement. -
Page 10: Installing A Paper Roll
Installing a Paper Roll The register can print receipts. For the printer, you must install the paper roll provided with the register. Install the paper roll in the printer. Be careful then to set the roll and cut the paper end correctly. NOTE (How to set the paper roll) (How to cut the paper end) -
Page 11: Help Function
HELP FUNCTION The help function allows you to print guidance messages for basic programming procedures of the cash register. This function is available in any mode switch position other than “ ”. For more details on each programming, refer to “BASIC FUNCTION PROGRAMMING” on pages 10 to 20. ■... -
Page 12: Basic Function Programming
BASIC FUNCTION PROGRAMMING Before starting sales entries, you must first program necessary items so the cash register suits your sales needs. In this manual, there are three sections, BASIC FUNCTION PROGRAMMING (pages 10-20) where required items must be programmed, “AUXILIARY FUNCTION PROGRAMMING” for using all available keyboard keys and “ADVANCED FUNCTION PROGRAMMING”. - Page 13 ■ Guidance for text programming The register allows you to program texts for department item names, PLU/subdepartment item names, logo messages, foreign and domestic currency symbols, and function texts. There are two ways for programming text; using character keys on the keyboard or entering character codes with numeric keys on the keyboard.
-
Page 14: Language Selection
Language Selection T o set "0" *Language (0 - 4) *Language: 0: English 1: German 2: French 3: Spanish 4: Swedish By default, English is set. Key operation example Print Caution: When you change the language, the texts such as logo messages and function texts, which you programmed, will be reset to the default settings. -
Page 15: Tax Programming
Tax Programming If you program the VAT/tax, the cash register can calculate the sales tax. In the VAT system, the tax is included in the price you enter in the register, and the tax amount is calculated when tendered according to the VAT rate programmed. -
Page 16: Department Programming
Department Programming Merchandise can be classified into a maximum of 8 departments. Items sold using the department keys can later be printed on a report shown as the quantities sold and sales amounts classified by department. The data is useful for making purchasing decisions and other store operations. ■... - Page 17 ■ Preset unit price For dept. 5 through 8 To program zero Dept. key Unit price (max. 8 digits) To program another department Key operation example Print 1000 Unit price If a department is not programmed to allow the entry of preset unit prices in functional programming, the NOTE department is automatically changed to allow the entry of preset unit prices by this programming entry.
- Page 18 ■ Department text (item label) For dept. 5 through 8 To keep current setting Dept. key Character entry characters (max. 12 To program another department Key operation example Print FRUIT Text programmed for dept. 1 (Programming FRUIT for dept.1) For details of the text entry (“FRUIT”), please refer to the “Guidance for text programming” on page 11. (F:5 , R:7 , U:0...
-
Page 19: Plu (Price Look-Up) And Subdepartment Programming
PLU (Price Look-Up) and Subdepartment Programming The PLU function allows speedy key entries whereby a price is automatically called up when a code is entered. The subdepartment is a kind of “open PLU”, which requires you to enter a price after the PLU code is entered. PLU/subdepartment setting for 1 through 200 codes are available. - Page 20 ■ PLU text (item label) To keep current setting PLU code Character entry (max. 12 characters) To program following PLU code To program another PLU code Key operation example Print MELON Text programmed for PLU code 1 (Programming MELON to PLU1) For details of the text entry (“MELON”), please refer to the “Guidance for text programming”...
-
Page 21: Text Programming
Text Programming Please refer to “Guidance for text programming” section as for how to entering characters. ■ Logo messages (6 lines and 30 characters for each line) The register can print programmed messages on every receipt. On the standard model, a header 3-line and footer 3-line logo message is printed on the receipt. - Page 22 To print the logo message “THANK YOU” using double sized characters and centering on the third line. Key operation example Print W S W S W S W S W For details of the text entry, please refer to the “Guidance for text programming” on page 11. (T:9 , H:7 , A:0...
-
Page 23: Basic Sales Entry (Example)
BASIC SALES ENTRY (Example) Basic Sales Entry Listed below is a basic sales entry example when selling items by cash. Details can be freely downloaded from the URL. Mode switch setting Turn the mode switch to the REG position. Item entries Enter the price for the appropriate department. -
Page 24: Plu Sales Entry
PLU Sales Entry Enter a PLU code using numeric keys and press the key. Key operation example Operator display Receipt print 3620... -
Page 25: Correction
CORRECTION Cancellation of the Numeric Entry If you make an incorrect numeric entry, you can clear the entry by pressing the key only before pressing a department key, PLU/subdepartment key or the key. Correction of the Last Entry (direct void) If you make an incorrect entry relating to a department, PLU/subdepartment or percentage ( ), you can void this entry by pressing the... -
Page 26: Correction Of The Next-To-Last Or Earlier Entry (Indirect Void)
Correction of the Next-to-last or Earlier Entry (indirect void) You can void any incorrect department entry, PLU/subdepartment entry or item refund entry made during a transaction if you find it before finalizing the transaction (e.g. pressing the key). This function is applicable to department, PLU/subdepartment and refund entries only. -
Page 27: Correction After Finalizing A Transaction (Void Mode)
Correction after Finalizing a Transaction (Void mode) When you need to void incorrect entries that are found after finalizing a transaction or cannot be corrected by direct, indirect void or subtotal void, the following steps should be taken: Turn the mode switch to the position using the mode key, to enter into the void mode. -
Page 28: Full Sales Report (X Or Z Report)
FULL SALES REPORT (X or Z REPORT) • Use the reading function (X) when you need to take a reading of sales information entered since the last reset. You can take this reading any number of times. It does not affect the register’s memory. •... - Page 29 Cash counter and total Cheque sales counter and total Credit sale and tendering counter and total Exchange counter and total Domestic currency Cash in drawer Cheque in drawer Cash + cheque in drawer Change total for cheque tendering ■ Periodic consolidation (X2 or Z2 report) Put the mode key in the mode switch and turn it to the X/Flash or the Z/PGM position.
-
Page 30: Main Functional Overview
MAIN FUNCTIONAL OVERVIEW The register has the following main functions. Details can be freely downloaded from the URL. Item Entries Auxiliary Payment Treatment Single item entries Currency exchange Repeat entries Received-on-account entries Multiplication entries Paid-out entries Single item cash sale (SICS) entries No-sale (exchange) Special Entries for PLU Correction... -
Page 31: Operator Maintenance
• Never touch the surface of the printer head and print roller. ■ Cautions in handling the recording paper (thermal paper) • Use only the paper specified by SHARP. • Do not unpack the thermal paper until you are ready to use it. -
Page 32: Replacing The Batteries
Replacing the Batteries This cash register displays a low battery symbol ( ) when the batteries are low, and displays a no battery symbol ( ) when batteries are extremely low or batteries are not installed. When the low battery symbol is displayed, replace the batteries with new ones as soon as possible. The existing batteries will be dead in about two days. -
Page 33: Replacing The Paper Roll
Replacing the Paper Roll Be sure to use paper rolls specified by SHARP. The use of any other paper rolls other than those specified could cause paper jamming, resulting in register malfunction. Paper specification Paper width: 57.5 ± 0.5 mm Max. -
Page 34: Removing A Paper Jam
Removing a Paper Jam Caution: The paper cutter is mounted on the printer cover. Be careful not to cut yourself. Never touch the printer head immediately after printing, as the head may still be hot. Remove the printer cover. Lift up the print roller arm. (When a large roll paper is set, hold the both side of the print roller arm as per the diagram.) Remove the paper jam. -
Page 35: Removing The Drawer
Removing the Drawer The drawer in the register is detachable. After closing your Lever business for the day, remove the drawer. To detach the drawer, pull it forward fully, and while holding the lever down, lift the drawer slightly and remove. The 6-denomination coin case is detachable. Coin case Lever Opening the Drawer by Hand... -
Page 36: Before Calling For Service
BEFORE CALLING FOR SERVICE The malfunctions shown in the left-hand column below, labeled “Fault,” do not necessarily indicate functional faults of the machine. It is therefore advisable to refer to “Checking” shown in the right-hand column before calling for service. Fault Checking (1) The display shows symbols that do not make... -
Page 37: Specifications
Mode key (same as drawer lock key): AC adapter: Fiscal caution sheet: 1 (for Germany and Norway) *Specifications and appearance are subject to change without notice for improvement. ■ Option The following sharp option is available only for your XE-A147 register. • Option battery model XE-A1BT... - Page 39 CAUTION: (only for the XE-A147) Shielded interface cables must be used with this equipment to maintain compliance with EMC regulations. XE-A137 Noise level LpA: 56.4 dB(A-weighted) Measured according to EN ISO 7779:2001 [Maximum value if the cash drawer springs open LpAI: 71.4...
- Page 40 SHARP ELECTRONICS (Europe) Ltd. 4 Furzeground Way, Stockley Park Uxbridge, UB11 1 EZ, United Kingdom Printed in Thailand 16E TINSE2649BSZ1...