Table of Contents
Advertisement
Quick Links
Installation Manual
GPS NAVIGATOR
GP-170
Model
SAFETY INSTRUCTIONS ................................................................................................ i
SYSTEM CONFIGURATIONS......................................................................................... ii
EQUIPMENT LISTS......................................................................................................... v
1. MOUNTING..............................................................................................................1-1
1.1 Display Unit........................................................................................................................1-1
1.2 Antenna Unit ......................................................................................................................1-3
2. WIRING....................................................................................................................2-1
2.1 Grounding ..........................................................................................................................2-1
2.2 External Equipment............................................................................................................2-2
2.3 MAIN Board .......................................................................................................................2-2
3. ADJUSTMENTS ......................................................................................................3-1
3.1 Checking Operation ...........................................................................................................3-1
3.2 Beacon Setup ....................................................................................................................3-3
3.3 DGPS Operation Checking ................................................................................................3-7
3.4 Ethernet Setup ...................................................................................................................3-8
3.5 Input/Output Signal ..........................................................................................................3-10
3.6 Sound Test.......................................................................................................................3-19
3.7 How to Set Dual Configuration.........................................................................................3-19
3.8 How to Set Route Start Position ......................................................................................3-20
APPENDIX 1 DIGITAL INTERFACE (IEC 61162-1 EDITION 5 (2016))...................AP-1
PACKING LISTS ......................................................................................................... A-1
OUTLINE DRAWINGS ................................................................................................ D-1
INTERCONNECTION DIAGRAMS.............................................................................. S-1
www.furuno.com
All brand and product names are trademarks, registered trademarks or service marks of their respective holders.
Advertisement
Table of Contents

Related Manuals for Furuno GP170D


Summary of Contents for Furuno GP170D
-
Page 1: Table Of Contents
3.8 How to Set Route Start Position ..................3-20 APPENDIX 1 DIGITAL INTERFACE (IEC 61162-1 EDITION 5 (2016))....AP-1 PACKING LISTS ......................A-1 OUTLINE DRAWINGS ....................D-1 INTERCONNECTION DIAGRAMS................S-1 www.furuno.com All brand and product names are trademarks, registered trademarks or service marks of their respective holders. - Page 2 The paper used in this manual is elemental chlorine free. ・FURUNO Authorized Distributor/Dealer 9-52 Ashihara-cho, Nishinomiya, 662-8580, JAPAN A : JUN 2014 Printed in Japan All rights reserved. E : MAY 28, 2019 Pub. No. IME-44820-E ( YOTA ) GP-170...
-
Page 3: Safety Instructions
SAFETY INSTRUCTIONS The installer must read the appropriate safety instructions before attempting to install the equipment. Indicates a potentially hazardous situation which, if not WARNING avoided, could result in death or serious injury. Indicates a potentially hazardous situation which, if not CAUTION avoided, may result in minor or moderate injury. -
Page 4: System Configurations
SYSTEM CONFIGURATIONS Single configuration Antenna Unit Antenna Unit Antenna Unit GPA-021S* GPA-020S** GPA-017S** *: w/internal beacon receiver **: w/o internal beacon receiver Switching Hub USB Flash NU/CU MENU HUB-100 Memory LIST Radar, ROUTE GO TO DISPLAY Echo Sounder, MARK PLOT EVENT ON/OFF 6 Autopilot,... - Page 5 SYSTEM CONFIGURATIONS Dual configuration (Without IF-2500) Antenna Unit Antenna Unit Antenna Unit Antenna Unit Antenna Unit Antenna Unit GPA-021S* GPA-020S** GPA-017S** GPA-021S* GPA-020S** GPA-017S** *: w/internal beacon receiver **: w/o internal beacon receiver Switching Hub HUB-100 MENU NU/CU MENU NU/CU USB Flash Memory USB Flash Memory LIST...
- Page 6 SYSTEM CONFIGURATIONS Dual configuration (With IF-2500) Antenna Unit Antenna Unit Antenna Unit Antenna Unit Antenna Unit Antenna Unit GPA-021S* GPA-020S** GPA-017S** GPA-021S* GPA-020S** GPA-017S** *: w/internal beacon receiver **: w/o internal beacon receiver Switching Hub HUB-100 MENU NU/CU MENU NU/CU USB Flash Memory USB Flash Memory LIST...
-
Page 7: Equipment Lists
EQUIPMENT LISTS Standard Supply Name Type Code No. Remarks For GPS, φ69 Antenna Unit GPA-017S For GPS, φ156, Improved resis- GPA-020S tance to multipath GPA-021S For DGPS GP170-EA With DGPS Beacon Receiver Display Unit GP170-EN Without DGPS Beacon Receiver With Mast Mount Kit CP20-03400 000-023-633 With Antenna Cable Assy. - Page 8 EQUIPMENT LISTS Name Type Code No. Remarks Right Angle Antenna No.13-QA330 001-111-910-10 Base L-Type Antenna No.13-QA310 001-111-900-10 Base For antenna unit Handrail Antenna No.13-RC5160 001-111-920-10 Base Mast Mount Kit CP20-01111 004-365-780 MJ-A6SPF0011-050C Cross cable 5m, 6P-4P 000-159-690-10 (03S9202) For DATA1, 2 or 3 MJ-A6SPF0011-100C Cross cable 10m, 6P-4P 000-159-691-10...
-
Page 9: Mounting
MOUNTING NOTICE Do not apply paint, anti-corrosive sealant or contact spray to coating or plastic parts of the equipment. Those items contain organic solvents that can damage coating and plastic parts, especially plastic connectors. Display Unit When selecting a mounting location for GP-170, keep in mind the following points. •... - Page 10 1. MOUNTING 1.1.2 Flush mounting, fixed at front An optional flush mount kit type F is required. For details, see the outline drawing at end of this manual. (Name: Flush Mount Kit F, Type: OP20-41, Code No.:001-243- 900) Name Type Code No Self-tapping screw 5 20 SUS304 000-162-608-10...
-
Page 11: Antenna Unit
1. MOUNTING Antenna Unit 1.2.1 Mounting Install the antenna unit referring to the "INSTALLATION PROCEDURE" at end of manual. When selecting a mounting location for the antenna unit, keep in mind the fol- lowing points. • Select a location out of the radar and inmarsat beams. Those beams will obstruct or prevent reception of the GPS satellite signal. - Page 12 1. MOUNTING 1.2.2 Extending antenna cable length Extension cable line-up The standard cable is 15 m long. 30 m, 40 m, and 50 m long extension cable sets are optionally available. Cable length Necessary parts Code no. CP20-01700 004-372-110 30 m CP20-02700 004-381-160 CP20-01720...
- Page 13 1. MOUNTING How to attach the N-P-8D-FB connector Dimensions in millimeters. Outer Sheath Inner Sheath Shield Armor Remove outer sheath and armor by the dimensions shown left. Expose inner sheath and shield by the dimen- sions shown left. Cover with heat-shrink tubing and heat. Remove insulator and core by 10 mm.
- Page 14 1. MOUNTING How to attach the N-P-8DSFA connector Outer sheath 15 15 50 50 Armor Inner sheath Braided Shield Twist the shield and pass the clamp. 30 30 10 10 Core Cover with heat-shrink Clamp tube or bynil tape. Nut Washer Gasket Core (Adjust the length) Center pin...
-
Page 15: Wiring
WIRING CAUTION CAUTION Ground the display unit to prevent loss of sensitivity and mutual interference. Connect the equipment, referring to the figure below and the interconnection diagram at the back this manual. Antenna Unit GPA-021S GPA-020S GPA-017S 20 cm Rear of Display Unit Ground terminal Cable for Ethernet... -
Page 16: External Equipment
2. WIRING External Equipment The DATA1, DATA2, DATA3, DATA4 and Ethernet ports are used to connect external equipment such as autopilot, remote display, navigation equipment, DGPS beacon re- ceiver. MAIN Board How to set the termination resistors on jumper blocks Use the jumper block J15 on the MAIN Board (20P8209) to set the termination resistor J6 on or off. -
Page 17: Adjustments
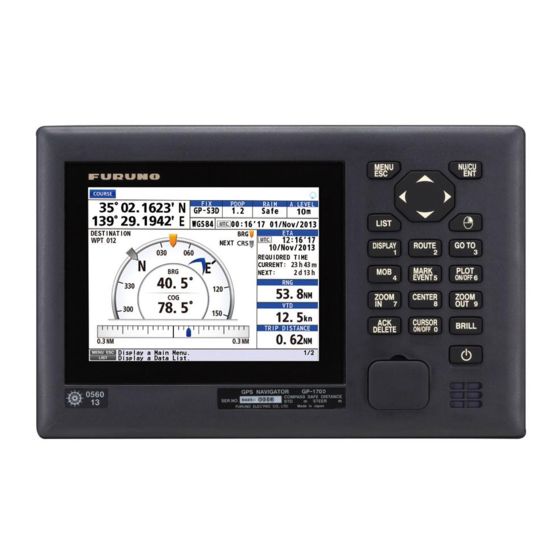
ADJUSTMENTS Checking Operation 1. Turn on GP-170. The following display appears. Self test results Self-test display at equipment start up 2. Confirm “OK” on the self-test display. Note: The display related to BEACON appears at the bottom of the start-up screen when DGPS beacon receiver is built in the GP-170. - Page 18 3. ADJUSTMENTS 3. Press the MENU/ESC key to open the main menu. 4. Select [6 Maintenance]. 5. Select [2 Self Test]. 6. Select [1 Memory Test]. Confirm “OK” for all items except for Data1, Data2, Data3, Data4 and LAN on the self-test display.
-
Page 19: Beacon Setup
3. ADJUSTMENTS 2013. 11. 01 01 : 35 OK 2013. 11. 01 01 : 35 OK 2013. 11. 01 01 : 35 OK 2013. 11. 01 01 : 35 OK 2013. 11. 01 01 : 35 OK 2013. 11. 01 01 : 35 OK 2013. - Page 20 3. ADJUSTMENTS 3. Select [6 Beacon/SBAS]. 4. Select [1 Mode]. 5. Select an option. [GNSS+Internal Beacon]: Uses internal beacon. [GNSS+Beacon (Data1, Data2 or Data4)]: Uses external beacon. With internal Without internal Menu item DGPS beacon DGPS beacon receiver receiver GNSS+Internal Beacon Selectable Not selectable GNSS+Beacon (Data1, Data2 or Data4)
- Page 21 3. ADJUSTMENTS 6. Enter frequency in four digits (283.5 kHz to 325.0 kHz). 7. Move the cursor to select [Enter]. 8. Press the NU/CU ENT key. 9. Select [2 Bit Rate]. 10. Press the cursorpad ( ) to select baud rate; 25, 50, 100, 150 or 200 bps. 11.
- Page 22 3. ADJUSTMENTS 3.2.3 Beacon station The beacon station list shows the 10 closest beacon stations, including user-pro- grammed stations. For user-programmed stations, see the Operator’s Manual. 1. Press the MENU/ESC key open the main menu. 2. Select [8 System Setting] then [6 Beacon/SBAS]. 3.
-
Page 23: Dgps Operation Checking
3. ADJUSTMENTS DGPS Operation Checking 1. Press the DISPLAY 1 key several times to select the integrity display. 2. Press the cursorpad ( ) to select the beacon display. 34° 23. 4567' N 134° 23. 4567' E 00:18 01/Nov/2013 Internal (Auto) E Saki 0609/0697 320.5kHz... -
Page 24: Ethernet Setup
3. ADJUSTMENTS Ethernet Setup The settings described in this section are done at the service menu, which the custom- er cannot access. Do as follows to access it. 1. Change the display to the course display (see the Operator’s Manual). 2. - Page 25 3. ADJUSTMENTS 4. Do the following to set the Ethernet SFI: 1) Press the ACK/DELETE key to move the cursor to the leftmost of the input position. Press the ACK/DELETE key. Backspace 2) Enter the Ethernet SFI with the cursorpad and the numeric keys (combination of two alphabets and four numerals).
-
Page 26: Input/Output Signal
3. ADJUSTMENTS Input/Output Signal The GP-170 can receive or output various navigation data. Before selecting data to output, confirm what data the external equipment requires. Output necessary data only. Outputting unnecessary data can cause receiving prob- lems at the external equipment. 3.5.1 Talker All data transmitted by marine electronics equipment is prefixed with a two-character... - Page 27 Distance waypoint to waypoint Waypint-to-waypoint distance, rhumb line Waypoint location Cross-track error, measured (direction to steer to return to track) Time and date *: not used on SOLAS shIps. Output sentence of Furuno proprietary sentence Sentence Description $PFEC, IIalr Contact signal $PFEC, pidat...
- Page 28 3. ADJUSTMENTS Input sentence of Furuno proprietary sentence Sentence Description $PFEC, AGFPA Autopilot information from FURUNO autopilot equipment $PFEC, GPatt Pitch and roll $PFEC, GPhve Heaving $PFEC, IIals Contact signal $PFEC, pireq Product information Others Sentence Description RTCM sc104 Data for DGPS...
- Page 29 3. ADJUSTMENTS 3.5.3 TX Rate of operation The TX rate of operation is the percentage of data output in one second, and it ap- pears on the screen. If short intervals are assigned to many sentences, the rate of op- eration increases as illustrated below.
- Page 30 3. ADJUSTMENTS 4. Select [1 Mode]. 5. Select [1 IEC/NMEA] or [2 RTCM]. [IEC/NMEA]: NMEA sentence output [RTCM]: Binary output (It is for outputting the beacon binary information to exter- nal equipment.) 6. Select [2 Format]. 7. Select [1 IEC 61162-1 Ed.4], [2 IEC 61162-1 Ed.3], [NMEA V2.0] or [NMEA V1.5]. 8.
- Page 31 3. ADJUSTMENTS 12. Select [5 Sentence]. 135° 45. 6789'E 35° 45. 6789'N 13. Press the cursorpad to select the sentence then press the NU/CU ENT key. 14. Press the cursorpad ( ) to select the TX interval. TX interval: [---], [0.1s]*, [0.2s]*, [1s], [2s], [3s], [4s], [5s], [6s], [10s], [15s], [20s], [30s], [60s], [90s] *: Only for GGA, GLL, GNS, RMC and VTG when selecting [38400 bps] at step 11.
- Page 32 3. ADJUSTMENTS 3.5.5 Ethernet output setting 1. Press the MENU/ESC key to open the main menu. 2. Select [7 I/0] then [5 Ethernet]. 3. Select [1 Sentence]. 4. Press the cursorpad to select the sentence then press the NU/CU ENT key. 5.
- Page 33 3. ADJUSTMENTS 3.5.6 DATA1, 2 or 4 input setting 1. Press the MENU/ESC key to open the main menu. 2. Select [7 I/O] then [6 Data Source Select]. 3. Select [1 HDG]. 4. Select the port for heading data. For [5 Ethernet], go to step 5. For [7 User Priority], go to step 6. 5.
- Page 34 3. ADJUSTMENTS 2) Enter the Ethernet SFI with the cursorpad and the numeric keys (combination- of two alphabets and four numerals). SFI (System Function ID) is an identifi- cation code used by the system. Note: Set the SFI to eliminate overlap with other ones. 3) Move the cursor to [Enter] then press the NU/CU ENT key.
-
Page 35: Sound Test
3. ADJUSTMENTS Sound Test Note: It is recommended to keep the default setting. Do not change the setting unless absolutely necessary. 1. Access the service menu (Refer to section 3.4). 2. Press the MENU/ESC key to open the main menu. 3. -
Page 36: How To Set Route Start Position
3. ADJUSTMENTS How to Set Route Start Position You can set the route start position when setting a destination. 1. Access the service menu (Refer to section 3.4). 2. Press the MENU/ESC key to open the main menu. 3. Select [6 Maintenance] then [6 Service]. 4. -
Page 37: Appendix 1 Digital Interface (Iec 61162-1 Edition 5 (2016
Ethernet ACK, ACN, DBT, DPT, HBT, HDG, HDM*, HDT*, MTW, THS, TLL, VBW, VHW *: Not used for SOLAS ships FURUNO proprietary sentences DATA 1, DATA 2, DATA 4 Input PFEC (AGFPA, IIals, pireq, GPatt, GPhve) DATA 1, DATA 2, DATA 3, DATA 4 Output... - Page 38 Isolation: Photo coupler Input impedance: 470 ohms Max. voltage: ±15V Threshold: 3 mA (in case of connection of FURUNO device talker) Data transmission Data is transmitted in serial asynchronous form in accordance with the standard referenced in IEC 61162-1 and IEC 61162-2. The first bit is a start bit and is followed by data bits.
- Page 39 APPENDIX 1 DIGITAL INTERFACE (IEC 61162-1 EDITION 5 (2016)) DATA 1 or 2 port (input) 3.3V_D 3.3V_D C18 0.1u PC400J00000F 3.3k RD1-H R222 (13A2) RD1-C (13A2) 1SS226_TE85L_F 3.3V_D 3.3V_D C19 0.1u PC400J00000F 3.3k RD2-H R223 (13C2) RD2-C (13C2) 1SS226_TE85L_F DATA 4 port 3.3V_D 5.1V_D 15V*15V / 330 = 0.68W...
- Page 40 APPENDIX 1 DIGITAL INTERFACE (IEC 61162-1 EDITION 5 (2016)) DATA 1, 2, 3 or 4 port (external output) DATA1 DATA3 NFM21CC470U1H3D NFM21CC470R1H3D MJ_A6SRMDC_R MJ_A6SRMDC_R FL16 FL33 TD1-A TD3-A (5B6) TD1-A (5C6) TD3-A FL30 FL34 TD1-B TD3-B (5C6) TD1-B (5C6) TD3-B FL31 FL35 RD1-H...
- Page 41 APPENDIX 1 DIGITAL INTERFACE (IEC 61162-1 EDITION 5 (2016)) Ethernet Note: For layout purposes and to prevent miswiring, the TX and RX lines on HX1188NLT are con- nected reversely of shown here. The TX and RX lines share the same transformer structure so there is no problem.
- Page 42 APPENDIX 1 DIGITAL INTERFACE (IEC 61162-1 EDITION 5 (2016)) Sentence description AAM-Waypoint arrival alarm $GPAAM,A,A,x.x,N,c--c,*hh<CR><LF> 1 2 3 4 5 1. Status (A=Arrival circle entered V=Not arrived) 2. Status (A=Perpendicular passed at waypoint, V=Not arrived) 3. Arrival circle radius, nm 4.
- Page 43 APPENDIX 1 DIGITAL INTERFACE (IEC 61162-1 EDITION 5 (2016)) ALF-Alert sentence $**ALF,x,x,x,hhmmss.ss,a,a,a,aaa,x.x,x.x,x.x,x,c--c,*hh<CR><LF> 1 2 3 5 6 7 8 9 10 11 12 13 1. Total number of ALF sentences this message (1, 2) 2. Sentence number (1, 2) 3. Sequential message identifier (0 to 9) 4.
- Page 44 APPENDIX 1 DIGITAL INTERFACE (IEC 61162-1 EDITION 5 (2016)) APB-Heading/track controller (autopilot) sentence B $--APB,A,A,x.x,a,N,A,A,x.x,a,c--c,x.x,a,x.x,a,A,*hh<CR><LF> 1 2 3 4 5 6 7 8 9 10 11 12131415 1. Status (A=Data valid V=LORAN-C blink or SNR warning V=general warning flag for other navigation systems when a reliable fix is not available) 2.
- Page 45 APPENDIX 1 DIGITAL INTERFACE (IEC 61162-1 EDITION 5 (2016)) BWC-Bearing and distance to waypoint - Great circle $ GPBWC,hhmmss.ss,llll.ll, a,IIIII.II,a,yyy.y,T, yyy.y,M,yyy.y,N,c--c,A,*hh<CR><LF> 9 10 11 12 13 1. UTC of observation 2. Waypoint latitude 3. N/S 4. Waypoint longitude 5. E/W 6.
- Page 46 APPENDIX 1 DIGITAL INTERFACE (IEC 61162-1 EDITION 5 (2016)) DPT-Depth $**DPT,x.x,x.x,x.x,*hh<CR><LF> 1. Water depth relative to the transducer, meters 2. Offset from transducer, meters 3. Minimum range scale in use (no use) DTM-Datum reference $**DTM,ccc,a,x.x,a,x.x,a,x.x,ccc,*hh<CR><LF> 1 2 3 4 5 6 7 1.
- Page 47 APPENDIX 1 DIGITAL INTERFACE (IEC 61162-1 EDITION 5 (2016)) GLL-Geographic position - Latitude/longitude $**GLL,llll.lll,a,yyyyy.yyy,a,hhmmss.ss,a,x,*hh<CR><LF> 1. Latitude 2. N/S 3. Longitude 4. E/W 5. UTC of position (no use) 6. Status (A=data valid V=data invalid) 7. Mode indicator (A=Autonomous D=Differential S=Simulator) GNS-GNSS fix data $**GNS,hhmmss.ss,llll.lll,a,IIIII.III,a,c--c,xx,x.x,x.x,x.x,x.x,x.x,a*hh<CR><LF>...
- Page 48 APPENDIX 1 DIGITAL INTERFACE (IEC 61162-1 EDITION 5 (2016)) GST-GNSS pseudorange noise satistics $**GST,hhmmss.ss,x.x,x.x,x.x,x.x,x.x,x.x,x.x,*hh<CR><LF> 2 3 6 7 8 1. UTC time of the GGA or GNS fix associated with this sentence 2. RMS value of the standard deviation of the range inputs to the navigation process. Range inputs include pseudoranges and DGPS corrections.
- Page 49 APPENDIX 1 DIGITAL INTERFACE (IEC 61162-1 EDITION 5 (2016)) HDT-Heading true $**HDT, xxx.x,T*hh<CR><LF> 1. Heading, degrees 2. True (T) MSK-MSK receiver interface $**MSK,x.x,a,x.x,a,x.x,x,a,*hh<CR><LF> 1 2 3 4 5 6 7 1. Beacon frequency 2. Auto/manual frequency, A/M 3. Beacon bit rate, bits/s 4.
- Page 50 APPENDIX 1 DIGITAL INTERFACE (IEC 61162-1 EDITION 5 (2016)) RMB-Recommended minimum navigation information $GPRMB,A,x.x,L,CCCC,CCCC,xxxx.xx,a,xxxxxx.xx,a,xxx.x,xxx,xx.x,A,a*hh <CR><LF> 1 2 3 11 12 1314 1. Data status (A=data valid, V=navigation receiver warning) 2. Cross track error (NM) 3. Direction to steer (L/R) 4. Origin waypoint ID 5.
- Page 51 APPENDIX 1 DIGITAL INTERFACE (IEC 61162-1 EDITION 5 (2016)) RTE-Routes $**RTE,x.x,x.x,a,c--c,c--c, ,c--c*hh <CR><LF> 2 3 4 1. Total number of messages being transmitted 2. Message number 3. Message mode (C=complete route w=working route, first listed) 4. Route identifier 5. Waypoint identifier Additional waypoint indentifiers 6.
- Page 52 APPENDIX 1 DIGITAL INTERFACE (IEC 61162-1 EDITION 5 (2016)) VDR-Set and drift $**VDR,x.x,T,x.x,M,x.x,N,*hh <CR><LF> 1 2 3 4 5 6 1. Direction, degrees 2. T=True (fixed) 3. Direction, degrees 4. M=Magnetic (fixed) 5. Current speed 6. N=Knots (fixed) VHW-Water speed and heading $GPVHW,x.x,T,x.x,M,x.x,N,x.x,K,*hh <CR><LF>...
- Page 53 APPENDIX 1 DIGITAL INTERFACE (IEC 61162-1 EDITION 5 (2016)) WNR-Waypoint to waypoint distance, Rhumb line $**WNR,x.x,N,x.x,K,c--c,c--c*hh<CR><LF> 1 2 3 4 1. Distance, nautcal miles 2. N (fixed) 3. Distance, km 4. K (fixed) 5. To waypoint identifier 6. FROM waypoint identifier WPL-Waypoint location $**WPL,llll.ll,a,yyyyy.yy,a,c--c*hh<CR><LF>...
- Page 59 001-243-920-00 20BF-X-9401 CODE NO. TYPE CP20-03401 工事材料表 INSTALLATION MATERIALS 数量 番 号 名 称 型名/規格 略 図 用途/備考 Q'TY OUTLINE NAME DESCRIPTIONS REMARKS +トラスタッピンネジ 1シュ 5X20 SUS304 SELF-TAPPING SCREW CODE NO. 000-162-608-10 コンベックス CV-125N CONVEX CODE NO. 000-172-164-10 型式/コード番号が2段の場合、下段より上段に代わる過渡期品であり、どちらかが入っています。 なお、品質は変わりません。 TWO TYPES AND CODES MAY BE LISTED FOR AN ITEM. THE LOWER PRODUCT MAY BE SHIPPED IN PLACE OF THE UPPER PRODUCT. QUALITY IS THE SAME.
- Page 64 Mar.27'07 R.Esumi...
- Page 65 17/May/2013 H.MAKI...
- Page 67 13/Nov/2015 H.MAKI 電子署名者 : 牧 宏昌 DN : cn=牧 宏昌, o= 古野電気㈱, ou=情技 牧 宏昌 課, email=hiromasa.maki @furuno.co.jp, c=JP 日付 : 2015.11.13 17:02:40 +09'00'...
-
Page 68: Interconnection Diagrams
空中線部 空中線部 ANTENNA UNIT ANTENNA UNIT GPA-017S GPA-017S GPA-020S GPA-020S GPA-021S GPA-021S TNC-J-3 TNC-J-3 NR203PF-VVS1.25 100-230VAC ネットワーク機器 3.5m STP(CAT5) CABLE 1φ,50/60Hz NETWORK EQUIPMENT 受信演算部 受信演算部 INS, ETC. DISPLAY UNIT DISPLAY UNIT NETWORK NETWORK GP-170 イーサネットHUB GP-170 MOD-WPAS0001-030+,3m MOD-WPAS0001-030+,3m ETHERNET HUB または...