Table of Contents
Advertisement
Quick Links
We advise you to read this manual carefully, which contains all the instructions for maintaining the
appliance's aesthetic and functional qualities. For further information on the product: www.smeg.com
PRECAUTIONS
General safety instructions
Risk of personal injury
• ATTENTION: during use, the
appliance and its accessible
parts become very hot.
Children must be kept away
from the appliance.
• ATTENTION: during use, the
appliance and its accessible
parts become very hot. Never
touch the heating elements
during use.
• Protect your hands by wearing
oven gloves when moving food
inside the oven.
• Never try to put out a fire or
flames with water: turn off the
appliance and smother the
flames with a fire blanket or
91477A143/A
29
29
32
33
33
39
33
33
34
34
34
34
34
34
35
35
35
35
36
other appropriate cover.
• This appliance may be used by
children aged at least 8 and by
people of reduced physical,
sensory or mental capacity, or
lacking in experience in the use
of electrical appliances,
provided that they are
supervised or instructed by
adults who are responsible for
their safety.
• Children must not play with the
appliance.
• Keep children under the age of
8 at a safe distance unless they
are constantly supervised.
• Keep children under the age of
8 away from the appliance
when it is in use.
37
37
37
37
42
43
43
43
43
43
45
45
47
48
48
48
PRECAUTIONS - 29
Advertisement
Table of Contents

Related Manuals for Smeg SOP6900TP


Summary of Contents for Smeg SOP6900TP
-
Page 1: Table Of Contents
Electrical connection Accessories Positioning We advise you to read this manual carefully, which contains all the instructions for maintaining the appliance’s aesthetic and functional qualities. For further information on the product: www.smeg.com PRECAUTIONS General safety instructions other appropriate cover. • This appliance may be used by... - Page 2 • Cleaning and maintenance current standards. must not be carried out by • Do not try to repair the unsupervised children. appliance yourself or without • The cooking process must the assistance of a qualified always be monitored. A short technician.
- Page 3 oven cavity. paper, place it so that it will not interfere with the hot air circulation inside the oven cavity. • Do not use the open door to rest pans or trays on the internal glass pane. • Never use the oven door to •...
-
Page 4: For This Appliance
• The appliance must not be switch off the power supply. installed on a pedestal. • Disconnect the appliance after • Position the appliance into the the installation, through an cabinet cut-out with the help of accessible plug or switch in a second person. -
Page 5: Appliance Purpose
the manufacturer. • Do not use the temperature probe during the pyrolytic Temperature probe (if present) cycle. • Do not touch the rod or the tip Appliance purpose of the temperature probe after This appliance is intended for use. cooking food in the home •... -
Page 6: Disposal
plate for any reason. product in question. Disposal To save energy This appliance conforms to the WEEE • Only preheat the appliance if the recipe European directive (2012/19/EU) and requires you to do so. must be disposed of separately from •... -
Page 7: Description
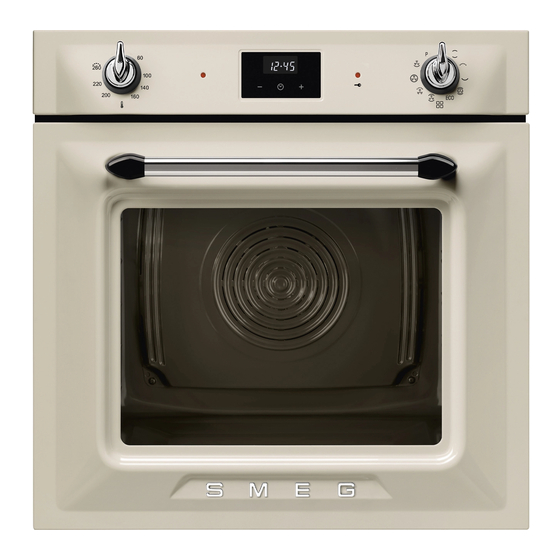
DESCRIPTION General description 1 Control panel 4 Light bulb 2 Seal 5 Door 3 Temperature probe socket (on some models 6 Fan only) Frame shelf Control panel 1 Temperature knob 4 Pyrolytic function indicator light This knob allows you to select the cooking It comes on when the automatic (pyrolytic temperature. -
Page 8: Accessories
Cooling fan cooking. Deep tray Useful for collecting fat from foods placed on the rack above and for cooking pies, pizzas, The fan cools the appliance and comes into baked desserts, biscuits, etc. operation during cooking. Protective cover (on some models only) The fan causes a steady outflow of air from above the door which may continue for a short period of time even after the appliance has... -
Page 9: Use
Preliminary operations Using the oven See General safety instructions. See General safety instructions. • Remove any protective film from the outside Digital programmer or inside of the appliance, including accessories. • Remove any labels (apart from the technical data plate) from the accessories and shelves. - Page 10 The dot between the hours and the minutes 2. Use the increase and decrease stops flashing. keys to set the required minutes. To change the time, hold down the 3. Press the clock key or wait for a few increase key and decrease key seconds to activate the Minute minder timer function.
-
Page 11: Using The Temperature Probe (On Some Models Only)
will appear on the display. finishes at the time set by the user. To reset the set programming, turn the To reset the set programming, turn the function knob and/or the temperature function knob and/or the temperature knob to the 0 position. knob to the 0 position. - Page 12 Setting cooking parameters when using the tip of the probe. temperature probe Do not install any telescopic guides on Attention: during use, the accessible the fourth shelf from the bottom, as they parts become very hot. Protect your would not allow access to the hands with heat-proof gloves when temperature probe side socket.
- Page 13 GRILL automatically by the cooking stage. It allows to obtain excellent grilling and With cooking started: grating results. Used at the end of 1. Turn the function knob to select the required cooking, it gives a uniform browning to function. the dishes.
-
Page 14: Cooking Advice
THERMALLY-VENTILATED Advice for cooking desserts/pastries and The heat is distributed quickly and biscuits evenly. Suitable for all dishes, ideal for • Use dark metal moulds: They help to absorb cooking on several levels without mixing the heat better. odours and flavours. •... -
Page 15: Mini Guide To Accessories
Place the baking tray on the last shelf with the baking tray grill to cook in GRILL mode on cooking suggestions, we recommend visiting Discover the recipes the dedicated page on the www.smeg.com To consult the recipes developed for various website, which can be reached using the QR categories of food and to get more information code on the leaflet supplied with the product. - Page 16 that grooved sections A are resting 5. Pull the intermediate glass unit downwards completely in the slots. from the door and then lift it upwards. N.B.: in some models, the intermediate glass unit consists of two glasses. 4. Lower the door and once it is in place remove the pins from the holes in the hinges.
-
Page 17: Cleaning The Oven Cavity
9. Reinsert the intermediate glass unit and 4. Leave the door open until the inside of the reposition the inner glass. appliance has dried completely. Removing racks/trays support frames Removing the rack/tray support frames enables the sides to be cleaned more easily. To remove the rack/tray support frames: •... - Page 18 lit. The display shows the text alternated with the Pyrolytic cycle During the first Pyrolytic cycle, unpleasant odours may occur due to duration (factory set to 2 hours and 30 minutes). the normal evaporation of oily 2. Use the increase and decrease manufacturing substances.
-
Page 19: Extraordinary Maintenance
Programmed Pyrolytic function 3. Use a tool (e.g. a spoon) to remove the bulb cover. Like for the cooking functions, it is also possible to set an end time for the Pyrolytic function. To set a programmed Pyrolytic function: 1. Turn the function knob to the position The text alternated with the duration of the Pyrolytic cycle... -
Page 20: Installation
INSTALLATION Electrical connection Cable replacement Power voltage See General safety instructions. Danger of electrocution • Disconnect the mains power supply. General information Check the mains characteristics against the data 1. Unscrew the rear casing screws and remove indicated on the plate. the casing to access the terminal board. - Page 21 leaking in. Fastening bushings 1. Remove the bushing covers on the front of the appliance. 2. Mount the appliance into the recess. 3. Secure the appliance to the cabinet using screws. 4. Cover the bushings with the previously removed covers. Appliance overall dimensions (mm) 91477A143/A INSTALLATION - 49...
- Page 22 Mounting into a column (mm) Make sure that the cabinet top/rear section has an opening approx. 35-40 mm deep. 50 - INSTALLATION 91477A143/A...
- Page 23 Mounting under worktops (mm) If the appliance is to be built-in under a worktop, a wooden bar has to be installed order to use the seal that is glued to the back of the front panel to prevent water or other liquids leaking in. A min.
- Page 24 A min. 603 mm B 560 - 564 mm C 583 - 585 mm D 9 - 11 mm E min. 5 mm F 121 - 1105 mm G min. 560 mm H min. 594 mm co Cutout for power cord (min. 6 cm jb Electrical connection box wb Wooden bar (recommended) Mounting under worktops (mm) (pyrolytic...
- Page 25 When using a wooden separator, a wooden bar has to be installed under the worktop in order to use the seal that is glued to the back of the front panel to prevent water or other liquids leaking in. 91477A143/A INSTALLATION - 53...