Table of Contents
Advertisement
Quick Links
V
V
T
B
y
p
a
V
V
T
B
y
p
a
I
n
s
t
a
l
l
a
I
n
s
t
a
l
l
a
CARRIER CORPORATION ©2017
A member of the United Technologies Corporation family · Stock symbol UTX · Catalog No. 11-808-436-01 · 2/7/2017
s
s
C
o
n
t
r
o
l
s
s
C
o
n
t
r
o
l
t
i
o
n
a
n
d
S
t
i
o
n
a
n
d
S
l
e
r
l
e
r
t
a
r
t
-
u
p
G
u
t
a
r
t
-
u
p
G
u
i
d
e
i
d
e
Advertisement
Table of Contents

Related Manuals for Carrier VVT Bypass


Summary of Contents for Carrier VVT Bypass
- Page 1 CARRIER CORPORATION ©2017 A member of the United Technologies Corporation family · Stock symbol UTX · Catalog No. 11-808-436-01 · 2/7/2017...
- Page 2 Verify that you have the most current version of this document from www.hvacpartners.com or your local Carrier office. Important changes are listed in Document revision history at the end of this document. CARRIER CORPORATION ©2017. All rights reserved throughout the world. i-Vu is a registered trademark of Carrier...
-
Page 3: Table Of Contents
Field-supplied hardware ............................6 Mounting the VVT Bypass Controller ........................7 To mount the controller ........................7 Wiring the VVT Bypass Controller for power ..................... 9 To wire the controller for power ......................9 Addressing the VVT Bypass Controller ......................10 Wiring for communications .......................... -
Page 5: Introduction
The air source supply fan's variable frequency drive (VFD) NOTE The VVT Bypass Controller controller is available in both English or Metric units. The metric version has (-M) appended to the part number. Everything in this document applies to both versions. - Page 6 Introduction NOTE This document gives instructions for field-installation of a VVT Bypass Controller in an i-Vu® Control System. VVT Bypass Controller Carrier Proprietary and Confidential CARRIER CORPORATION ©2017 Installation and Start-up Guide All rights reserved...
-
Page 7: Specifications
-24 to 140°F (-30 to 60°C), 0 to 90% relative humidity, non-condensing Physical UL94-5VA plenum rated enclosure for installation in plenum (or other space for environmental air) in accordance with NEC Section 300.22 (c) and (d) VVT Bypass Controller Carrier Proprietary and Confidential CARRIER CORPORATION ©2017 Installation and Start-up Guide... -
Page 8: Safety Considerations
Good judgment should be used in applying any manufacturer's instructions to avoid injury to personnel or damage to equipment and property. VVT Bypass Controller Carrier Proprietary and Confidential CARRIER CORPORATION ©2017 Installation and Start-up Guide... - Page 9 Disconnect all power to the unit before performing maintenance or service. Unit may automatically start if power is not disconnected. WARNING Follow all local, state, and federal laws regarding disposal of equipment containing hazardous materials such as mercury contactors. VVT Bypass Controller Carrier Proprietary and Confidential CARRIER CORPORATION ©2017 Installation and Start-up Guide...
-
Page 10: Installing The Vvt Bypass Controller
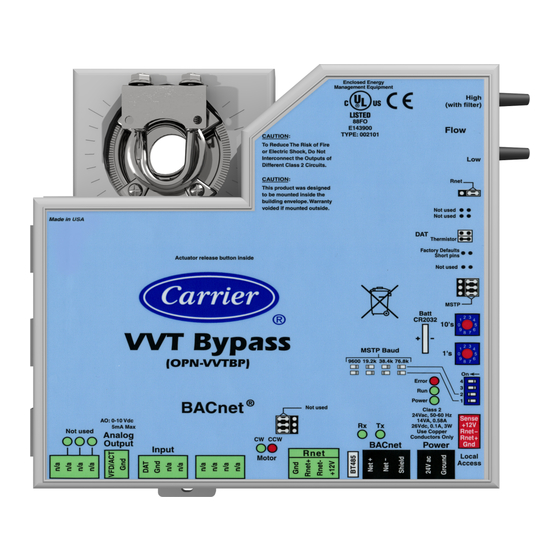
Set the controller's address (page 10). Wire the controller to the BACnet MS/TP or BACnet ARC156 network (page 10). Wire the inputs and outputs (page 12). Field-supplied hardware Each VVT Bypass Controller installation requires the following field-supplied components: • damper •... -
Page 11: Mounting The Vvt Bypass Controller
Installing the VVT Bypass Controller Mounting the VVT Bypass Controller Mount the VVT Bypass Controller on the bypass duct damper actuator shaft. For service access, allow at least 1 foot (.3 m) of clearance between the front of the controller and adjacent surfaces. - Page 12 Installing the VVT Bypass Controller Hold down the controller’s damper release button and rotate the actuator clamp in the same direction that closed the damper. Rotate the clamp until it stops, then rotate it back one notch. Release the button.
-
Page 13: Wiring The Vvt Bypass Controller For Power
WARNING Do not apply line voltage (mains voltage) to the controller's ports and terminals. CAUTIONS • The VVT Bypass Controller is powered by a Class 2 power source. Take appropriate isolation measures when mounting it in a control panel where non-Class 2 circuits are present. •... -
Page 14: Addressing The Vvt Bypass Controller
Verify that the Power LED is on and the Run LED is blinking. Addressing the VVT Bypass Controller You must give the VVT Bypass Controller an address that is unique on the network. You can address the VVT Bypass Controller before or after you wire it for power. -
Page 15: Wiring Specifications For Bacnet Ms/Tp And Arc156
Baud diagram on the controller. NOTE Use the same baud rate for all controllers on the network segment. If the VVT Bypass Controller is at either end of a network segment, connect a BT485 to the VVT Bypass Controller. Insert the power screw terminal connector into the VVT Bypass Controller's power terminals. -
Page 16: Wiring Inputs And Outputs
Wiring a Duct Air Temperature sensor to an input Part #33ZCSENDAT The VVT Bypass Controller must be connected to a Duct Air Temperature (DAT) sensor that monitors the temperature of the air delivered by the air source. NOTE This document gives instructions for wiring the sensor to the VVT Bypass Controller. For mounting and wiring the sensor, see the Carrier Sensors Installation Guide. -
Page 17: Wiring Field-Supplied Actuators To The Analog Output
NOTE You cannot use the VVT Bypass Controller's built-in actuator if wiring external actuator(s) to the analog output. High-torque actuators You can wire one of the following Belimo actuators to the VVT Bypass Controller's analog output instead of using the controller's built-in, 35 in.-lb (4 Nm) actuator. NMX24-MFT P-10028 90 in.-lb (10 Nm) actuator with 0–10 Vdc control and 0–10 Vdc... - Page 18 NOTE For proper operation and to prevent damage to the devices, use the same polarity for the actuator's power and the VVT Bypass Controller's power. Linked actuators You can wire up to 4 of the following Belimo actuators to the VVT Bypass Controller's analog output. Link actuators whose travel times and other parameters coincide. LMX24-MFT P-10028 45 in.-lb (5 Nm) actuator with 0–10 Vdc control...
-
Page 19: Wiring And Mounting The Equipment Touch
Installing the VVT Bypass Controller NOTE Maintain polarity if using the same power supply for more than one actuator. Wiring and mounting the Equipment Touch CAUTION If the equipment is used in a manner not specified by the manufacturer, the protection provided by the equipment may be impaired. - Page 20 Partially cut, then bend and pull off the outer jacket of the cable. Do not nick the inner insulation. Strip about .25 inch (.6 cm) of the inner insulation from each wire. Wire the VVT Bypass Controller's Rnet+ and Rnet- terminals to the terminals of the same name on the Equipment Touch's connector.
-
Page 21: Start-Up
Configuring the VVT Bypass Controller's properties To start up the VVT Bypass Controller, you must configure certain points and properties. Appendix A (page 29) is a complete list of all the points and properties, with descriptions, defaults, and ranges. These properties affect the unit operation and/or control. -
Page 22: Performing System Checkout
Performing system checkout Bypass damper Verify the VVT Bypass Controller is securely fastened to the bypass damper shaft and duct work. Verify duct air temperature sensor is installed at the inlet of the damper or in the air source supply duct upstream of the bypass damper connection. -
Page 23: Variable Frequency Drive (Vfd)
Pressure are not locked and that Target Damper Position is >0% and <100%. You may have to adjust the Duct Static Pressure Setpoint slightly to get the damper within this range. VVT Bypass Controller Carrier Proprietary and Confidential CARRIER CORPORATION ©2017... - Page 24 Program > Configuration > Service Configuration > Service Test, then disable Service Test and Fan Test. Make sure all other outputs under Service Test are disabled. VVT Bypass Controller Carrier Proprietary and Confidential CARRIER CORPORATION ©2017 Installation and Start-up Guide...
-
Page 25: Sequence Of Operation
The controller can operate as part of a linked VVT system or as a stand-alone controller. Duct static pressure control The VVT Bypass Controller modulates a bypass damper or VFD to maintain the static pressure in the supply duct of the pressure-dependent VVT system. The controller has a built-in damper actuator that provides 35 in./lbs (4 Nm) of torque. -
Page 26: Equipment Fan Off Detection
Maximum Heating SAT or below the configured Minimum Cooling SAT for more than 5 minutes. Airside linkage When the VVT Bypass Controller is part of a linked system, it uses data received through Linkage (equipment SAT and mode) to detect excessive leaving air temperature (LAT) conditions at the equipment and equipment operating mode. -
Page 27: Air Source Mode Determination
Vent Damper Position or the Minimum Cooling Damper Position as the minimum during the VENT mode. See the air source’s installation manual for more specific operation. VVT Bypass Controller Carrier Proprietary and Confidential CARRIER CORPORATION ©2017... -
Page 28: Troubleshooting
NOTE To help you troubleshoot, obtain a Module Status (Modstat) from the controller and review the System Error and Warning details. LED's The LED's on the VVT Bypass Controller show the status of certain functions. Verify the LED patterns by cycling power to the controller and noting the lights and flashes. If this LED is on... -
Page 29: To Get The Serial Number
Controller. • Replace the VVT Bypass Controller. To get the serial number If you need the VVT Bypass Controller's serial number when troubleshooting, the number is on: • a sticker on the back of the main controller board • a Module Status report (Modstat) under Core (or Main) board hardware To obtain a modstat in the WebCTRL®... -
Page 30: To Replace The Controller's Battery
Troubleshooting To replace the controller's battery If the VVT Bypass Controller experiences a power outage and the control program stops functioning, replace the battery. You need to replace the battery if the voltage measures below 2.9 volts when the controller is not powered. - Page 31 Press the air can's trigger twice for no more than 2 seconds each time. Reconnect tubing to the High and Low flow sensor tubes. To replace the filter Order a replacement filter from Carrier. Pull the tubing from both ends of the existing filter. Disconnect...
-
Page 32: Compliance
Compliance of listed products to requirements of ASHRAE Standard 135 is the responsibility of BACnet International. BTL ® is a registered trademark of BACnet International. VVT Bypass Controller Carrier Proprietary and Confidential CARRIER CORPORATION ©2017 Installation and Start-up Guide All rights reserved... -
Page 33: Appendix A: Vvt Bypass Controller Points/Properties
Appendix A: VVT Bypass Controller Points/Properties Appendix A: VVT Bypass Controller Points/Properties NOTE Engineering units shown in this document in the defaults and ranges are strictly for reference. You must enter an integer only. Status Navigation: i-Vu® / Field Assistant:... - Page 34 Appendix A: VVT Bypass Controller Points/Properties Point Name/Description Default/Range Maximum Heating SAT – The value that the SAT must exceed to cause the static 120°F (48.9°C) pressure setpoint to be set to the LAT Duct Static Pressure Setpoint. This is also the 40 to 180°F...
-
Page 35: Maintenance
Appendix A: VVT Bypass Controller Points/Properties Point Name/Description Default/Range Test and Balance Zero Cal – Closes the bypass damper and waits for the air source to go to the Off mode before zeroing out the static pressure sensor. This does not occur if the static pressure is >... -
Page 36: Alarms
Appendix A: VVT Bypass Controller Points/Properties Alarms Navigation: i-Vu® / Field Assistant: Properties Control Program Alarms > > Point Name/Description Range Supply Air Temperature Alarm – Indicates if the supply air temperature exceeds the Normal/Alarm high temperature alarm limit or drops below the low temperature alarm limit. - Page 37 Appendix A: VVT Bypass Controller Points/Properties Point Name/Description Range SAT Sensor – The current duct air temperature sensor that is physically connected to -56 to 245°F the controller. (-48.9 to 118.3°C) AO Output – The current voltage on the controller's VFD/ACT output terminal.
-
Page 38: Document Revision History
To wire the controller to the BACnet Added BACnet ARC156 connection information network Wiring for communications Changed from Wiring the VVT Bypass Controller to the MS/TP network Sequence of operation - Linkage Clarified reason and method for generating a particular mode. - Page 40 CARRIER CORPORATION ©2017 A member of the United Technologies Corporation family · Stock symbol UTX · Catalog No. 11-808-436-01 · 2/7/2017...