Table of Contents
Advertisement
Quick Links
Advertisement
Table of Contents

Related Manuals for CDA HVG980


Summary of Contents for CDA HVG980
- Page 1 HVG980 Five Burner Gas Hob Installation, use and maintenance www.cda.eu...
-
Page 2: Table Of Contents
Contents: Important Important Notes Using Your Hob Switching the appliance on (and operating the lock) Igniting the burners Efficient use of your hob Care and maintenance Troubleshooting What to do if you smell gas Mains Electricity Connection Technical Information Gas Supply Requirements Ventilation Natural Gas to LPG Conversion LPG to Natural Gas Conversion... -
Page 3: Important
Appliance information: Please enter the details on the appliance rating plate below for reference, to assist CDA Customer Care in the event of a fault with your appliance and to register your appliance for guarantee purposes. Appliance Model... - Page 4 EU Declarations of Conformity This appliance has been manufactured to the strictest standards and complies with all applicable legislation, including Electrical safety (LVD) 2014/35/EU and Electromagnetic interference compatibility (EMC) 2014/30/EU. Parts intended to come into contact with food conform to 1935/2004/EC. IMPORTANT INFORMATION FOR CORRECT DISPOSAL OF THE PRODUCT IN ACCORDANCE WITH EU DIRECTIVE 2012/19/EU.
-
Page 5: Important Notes
Important Notes Please note: • Gas hobs become hot and remain hot during and immediately after use. We strongly advise that you do not touch the hob, nor any of its components, until it has been allowed to cool. If wiping away a spillage, please take every care not to burn yourself. -
Page 6: Using Your Hob
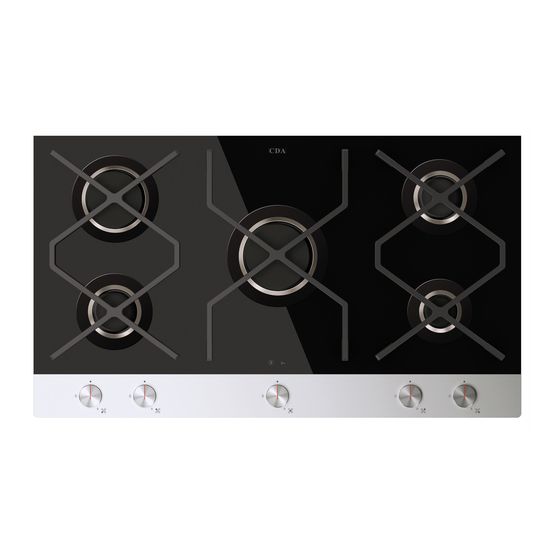
Using your hob Fig.1 Burners 1. Medium burner 2.0kW 2. Large burner 3.0kW 3. Medium burner 2.0kW 4. Auxiliary burner 1.0kW 5. Ultra large burner 4.0kW Control knobs 6. Front left 7. Back left 8. Central 9. Back right Fig.2 10. -
Page 7: Switching The Appliance On (And Operating The Lock)
Gas burners Gas flow to the burners is controlled by the control knobs (6, 7, 8, 9 and 10 in Fig. 1). There are 3 positions shown on the control panel (Fig. 2). Turning the control knob to the positions shown below achieves the following: Closed (switches gas valve and burner off) Maximum position (highest heat level) &... -
Page 8: Igniting The Burners
Igniting the gas burners This hob’s burners are fitted with automatic reignition. In the event of a burner being extinguished whilst running, the hob will relight said burner. To ignite the burners Simply twist the desired burner’s control knob anticlockwise (left) to the desired heat level position (anywhere between large and small flame symbols). -
Page 9: Care And Maintenance
with flat bottoms and choose an appropriate burner depending on the size of the pan. The most efficient use of the hob is shown below, where the pan and burner are correctly chosen. • Use pan lids where possible to minimize the energy usage of your appliance. - Page 10 • The cast iron parts of hobs (pan stands and burner caps on this model) are not suitable for cleaning in dishwashers. They should be washed by hand and dried thoroughly with a clean, dry cloth. • A glass cleaning guide is below: Type of residue Clean with Cleaning advice...
-
Page 11: Troubleshooting
Contact CDA Customer Care using the contact details below. IMPORTANT: Ensure burners have been allowed to cool before handling them. A: Customer Care Department, The CDA Group Ltd, Harby Road, Langar, Nottinghamshire, NG13 9HY T: 01949 862 012 F: 01949 862 003... -
Page 12: What To Do If You Smell Gas
WHAT TO DO IF YOU SMELL GAS: 1. Turn off the gas. For natural gas - Turn off the gas supply at the meter situated at the emergency control valve (ECV) unless the meter is located in a basement or cellar. - Page 13 5. Call the Gas Emergency Contact Centre In the case of natural gas, contact the Gas Emergency Service Provider (ESP) or, in the case of LPG, the Gas Supplier. Below is a list of ESPs relevant to region: England, Scotland and Wales: Natural Gas - 0800 111 999 (Gas Emergency Contact Centre) LPG - Bulk and Metered supplies - See telephone number on bulk storage vessel or at the meter.
- Page 14 Flogas - 0845 7200 100 Shell - 0870 7539 999 Please note: The CDA Group Ltd. makes no warranty about the content of this section and will not be held liable, under any circumstances, for any direct or indirect damages resulting from the use of this information.
-
Page 15: Mains Electricity Connection
Mains Electricity Connection Warning! This appliance must be earthed. This appliance must be connected to the mains power supply by a competent person using fixed wiring via a double pole switched fuse spur outlet, having a contact separation of at least 3mm in all poles, and protected by a 3A fuse. -
Page 16: Technical Information
The wires in the mains lead of this appliance are coloured in accordance with the following code: Green & Yellow = Earth Blue = Neutral Brown = Live As the colours of the wires in the mains lead for this appliance may not correspond with the coloured markings identifying the terminals connecting to the fuse spur, proceed as follows: •... -
Page 17: Gas Supply Requirements
UK and Ireland. The installation must comply with the Gas Safety (installation and use) Regulations 1984. • The CDA Group Ltd is not legally able to provide any assistance in the installation of gas appliances except to Gas Safe registered installers. Any Gas Safe registered fitter requiring help must provide their name, address and registration number. -
Page 18: Ventilation
Ventilation All rooms require a window, or equivalent (e.g. a door), which can be opened. Some rooms require a permanent vent in addition to a window (see below). This unit must not be used in a room which is less than 5m³. The following table details the requirements based on the kitchen volume (DxWxH) in m³. -
Page 19: Lpg To Natural Gas Conversion
3. Remove the injectors and replace with the corresponding injector as shown in the table at the bottom of this page. Setting up minimum flow rates: 1. Turn on the gas supply, light the burners and turn the controls to the minimum position, as indicated by the small flame. -
Page 20: Fitting The Hob
(tiles or steel, for example). These dimensions are shown in Fig. 6. If fitting a cooker hood above the hob: If a CDA cooker hood is to be installed above the hob, the height of the hood above the hob must be at least 750mm (Fig. 7). If the... -
Page 21: How To Install The Hob
and user from the heat generated during use. This should be fitted at least 75mm below the hob (measured from the gas hob elbow). This panel should have a ventilation space at the rear of greater than 30mm (Fig. 9). •... - Page 22 >61.5mm 484mm 845mm 300mm 300mm Fig. 6 Fig. 7 Fig. 8 B/B* 500x20 mm 500x10 mm 500x10 mm min 30 mm Fig. 9...
-
Page 23: Energy Efficiency Information
To ensure the optimal life expectancy of the gas hob, please follow the operation and maintenance guidelines strictly; please do not modify the appliance. • Please contact CDA Customer Care for repairing and exchanging of the components (such as gas valve, control knob) if necessary. •... - Page 24 For more information please contact: The Sales Department on 01949 862 010 or email sales@cda.eu Customer Care Department. The CDA Group Ltd, Harby Road, Langar, Nottinghamshire, NG13 9HY 01949 862 012 F: 01949 862 003 E: customer.care@cda.eu www.cda.eu...