Table of Contents
Advertisement
Advertisement
Table of Contents

Related Manuals for Barco ACS-2048


Summary of Contents for Barco ACS-2048
- Page 1 ^`pJOMQU rëÉêÛë=dìáÇÉ • Manual #: 26-0603000-00 • Revision: 02...
- Page 2 30 days after the transfer of risks. In the event of justified notice of compliant, Barco can repair the fault or provide a replacement at its own discretion within an appropriate period. If this measure proves to be impossible or unsuccessful, the purchaser can demand a reduction in the purchase price or cancellation of the contract.
- Page 3 Not included in the guarantee coverage are system failures which are attributed to programs or special electronic circuitry provided by the purchaser, e.g. interfaces. Normal wear as well as normal maintenance are not subject to the guarantee provided by Barco either.
- Page 4 To avoid fire hazard, use only the fuse having identical type, voltage rating, and current rating characteristics. Refer fuse replacement to qualified service personnel. aç=kçí=léÉê~íÉ=áå=bñéäçëáîÉ=^íãçëéÜÉêÉë To avoid explosion, do not operate this product in an explosive atmosphere. ACS-2048 • User’s Guide...
- Page 5 Ein Ausrufungszeichen innerhalb eines gleichwinkeligen Dreiecks dient dazu, den Benutzer auf wichtige Bedienungs-und Wartungsanweisungen in der Dem Great beiliegenden Literatur aufmerksam zu machen. ACS-2048 • User’s Guide...
- Page 6 `Ü~åÖÉ=eáëíçêó The table below lists the changes to the ACS-2048 User’s Guide. Table 0-1. Change History Date ECP # Description Approved By 9/6/07 549078 ACS-2048 User’s Guide R. Pellicano 10/15/08 562625 Updates for code version 1.02 R. Pellicano ACS-2048 • User’s Guide...
-
Page 7: Table Of Contents
ACS-2048 Front Panel ........ - Page 8 Software Upgrade Overview........74 ACS-2048 • User’s Guide...
- Page 9 In This Appendix..........93 Communicating with ACS-2048 ........93 Command Protocol.
- Page 10 Contact Information ......... . . 108 fåÇÉñ =K=K=K=K=K=K=K=K=K=K=K=K=K=K=K=K=K=K=K=K=K=K=K=K=K=K=K=K=K=K=K=K=K=K=K=K=K=K=K=K=K=K=K=K=K=K=K=K=K=K=K=KNMV ACS-2048 • User’s Guide...
-
Page 11: Chapter Structure
NK==fåíêçÇìÅíáçå få=qÜáë=`Ü~éíÉê This chapter is designed to introduce you to the ACS-2048 User’s Guide. Areas to be covered are: • Chapter Structure • How to Use This Guide • Conventions • About the ACS-2048 • Connectivity Diagram • Application Questions `Ü~éíÉê=píêìÅíìêÉ... - Page 12 From the Main Menu, select INPUT to display the Input Menu. Scroll to the Timing Adjust line and press SEL to display the Timing Adjust Menu. Scroll to the H Position line and press SEL to adjust the image’s horizontal position. ACS-2048 • User’s Guide...
-
Page 13: Overview
A Word About HDCP lîÉêîáÉï As the ideal peripheral for all Barco digital cinema installations, ACS-2048 is an 8 x 1 video switcher that accepts "universal" input formats, and outputs up to 12-bit DVI at 2048 x 1080. With a high-quality scaler at its core, upconverting any input format is as simple as "auto-acquiring"... - Page 14 (2 in ACS-2048 + 2 in Projector). tÜ~íÛë=kÉï=áå=cáêãï~êÉ=sÉêëáçå=NKMO This section lists the new or modified features that have been implemented since the last revision of the ACS-2048 User’s Guide. Reference links are provided for additional details. • Input Files The number of input files has been increased from one per input to a global pool of 64 files.
- Page 15 • HDCP compliant repeaters cannot be connected to the output of the ACS-2048, as the ACS-2048 must be the last device in the HDCP "chain" — prior to the HDCP compliant display device (projector). If an HCDP repeater is connected, the message “HDCP Violation”...
-
Page 16: Connectivity Diagram
In the diagram: • Your selected media server connects to the Barco projector via dual-link HD-SDI. • The ACS-2048 connects to the Barco projector via single link 8-bit DVI or twin-link 10/12-bit DVI. • Eight dedicated inputs are available: 1 x SDI or HD-SDI, for serial digital or HD sources 2 x DVI, for computer sources. -
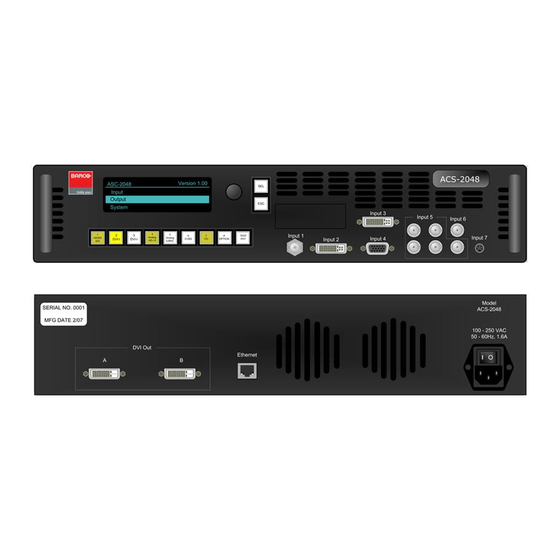
Page 17: Acs-2048 Front Panel
OK==e~êÇï~êÉ=lêáÉåí~íáçå få=qÜáë=`Ü~éíÉê This chapter provides detailed diagrams of the ACS-2048’s front and rear panels, along with comprehensive explanations of each. The following topics are discussed: • ACS-2048 Front Panel • ACS-2048 Rear Panel ACS-2048 • User’s Guide... -
Page 18: Display Section
2. Hardware Orientation ACS-2048 Front Panel ^`pJOMQU=cêçåí=m~åÉä The figure below illustrates the ACS-2048 front panel: ACS-2048 MAIN MENU ACS-2048 > In Auto Acquire Input >> Output >> Adjust Input 3 Input 6 DVI / RGBHV Input 5 CVBS Inputs Input 1... -
Page 19: Inputs Section
The Inputs Section includes eight buttons that enable you to select inputs, plus a TEST PAT button that enables you to output a selected test pattern. Refer to the “Inputs Section” heading on page 21 for complete details. ACS-2048 • User’s Guide... - Page 20 The Menu Display is a 4 line x 20 character Vacuum Fluorescent Display (VFD) that shows all ACS-2048 menus and sub-menus. Brightness is adjustable. A C S - 2 0 4 8 M A I N M E N U >...
- Page 21 1 — selects an HD-SDI or SD-SDI input (the front panel Input 1 connector) as the ACS-2048’s source. HD/SD • 2 — selects a digital DVI or analog RGBHV input (the front panel Input 2 connector) as the source. DVI-I ACS-2048 • User’s Guide...
- Page 22 Menu, the Test Patterns Menu appears whenever the TEST PAT button is pressed, allowing you to select an internal test pattern and adjust additional test pattern parameters. In Chapter 4, refer to the “Using Test Patterns” section on page 71 for details. ACS-2048 • User’s Guide...
-
Page 23: Acs-2048 Rear Panel
Pinouts” section on page 87 for pinouts. Ethernet One RJ-45 connector is provided for 10/100BaseT Ethernet communications with the ACS-2048 system. The port is typically used for diagnostics or command-line operations via Telnet (using port 23). telnet 192.168.1.100 23 In Appendix A, refer to the “Ethernet... - Page 24 2. Hardware Orientation ACS-2048 Rear Panel AC Power One AC Connector is provided for connecting ACS-2048 to AC. The integral switch turns the chassis on and off. In Appendix A, refer to the “Physical and Electrical Specifications” section on page 84 for power details.
-
Page 25: Safety Precautions
PK==fåëí~ää~íáçå få=qÜáë=`Ü~éíÉê This chapter provides detailed instructions for installing the ACS-2048 hardware. The following topics are discussed: • Safety Precautions • Unpacking and Inspection • Site Preparation • Cable and Adapter Information • Rack-Mount Installation • Power Installation • Signal Installation •... - Page 26 If there is damage, notify the shipping carrier immediately for all claims adjustments. páíÉ=mêÉé~ê~íáçå= The environment in which you install your ACS-2048 should be clean, properly lit, free from static, and have adequate power, ventilation, and space for all components. `~ÄäÉ=~åÇ=^Ç~éíÉê=fåÑçêã~íáçå...
- Page 27 3. Installation Rack-Mount Installation o~ÅâJjçìåí=fåëí~ää~íáçå ACS-2048 units are designed to be rack mounted and are supplied with front rack-mount hardware. Please note the following important points: • When rack mounting the unit, remember that the maximum ambient operating temperature for the unit is 40 degrees C.
-
Page 28: Power Installation
Input Power: 100-240 VAC, 50-60 Hz • Power Consumption: 240 watts maximum ACS-2048 performs line voltage selection automatically, and no user controls are required. The AC power cords must be accessible so that they can be removed during field servicing. Warning... -
Page 29: Signal Installation
3. Installation Signal Installation páÖå~ä=fåëí~ää~íáçå The figure below illustrates a sample ACS-2048 system diagram. Use this figure for reference during the signal installation process. Sample Source Input Devices Input 1 (HD/SD SDI) ACS-2048 Input 2 (DVI) DVI Out A Barco... - Page 30 If you are operating the ACS-2048 in 10-bit or 12-bit mode, connect both DVI outputs (A and B) to the projector’s DVI inputs A and B. If you are operating the ACS-2048 in 8-bit mode, connect DVI output A to the projector’s DVI input A.
-
Page 31: Control Overview
QK==léÉê~íáçå få=qÜáë=`Ü~éíÉê This chapter provides comprehensive menu descriptions and detailed operating instructions for the ACS-2048. The following topics are discussed: • Control Overview • Power-Up Initialization • Quick Setup and Operations • Menu Tree • Quick Function Reference • Using the Main Menu •... - Page 32 93 for additional details. mçïÉêJré=fåáíá~äáò~íáçå After connecting power to the ACS-2048, locate the power switch on the back of the chassis, and turn the power ON. While the system is initializing, the following messages are displayed: A C S - 2 0 4 8 Ba rco I n i t i a l i z i n g .
- Page 33 Connect Ethernet — Ensure that Ethernet is properly connected to the ACS- 2048. (Chapter 3, “Signal Installation” on page 29.) Turn on power — Turn on power to the ACS-2048, your projector, and to all peripheral devices as required. (This chapter, “Power-Up Initialization” on page 32.)
- Page 34 4. Operation Quick Setup and Operations 10. Connect inputs — Connect all inputs to the ACS-2048, and check for the proper backlight, which indicates that sync is detected. (Chapter 3, “Signal Installation” on page 29. This chapter, “Understanding Backlighting” on page 69.) 11.
-
Page 35: Menu Tree
4. Operation Menu Tree jÉåì=qêÉÉ The figure below illustrates the entire ACS-2048 menu tree. Please use this diagram for reference as you learn how to operate the system. TEST Main Menu Auto Acquire Input Output System Status Software Version Factory Reset... -
Page 36: Using The Menu System
Using the Menu System rëáåÖ=íÜÉ=jÉåì=póëíÉã This section lists the rules and conventions for using ACS-2048’s menu system. For reference, the figure below illustrates the Main Menu: A C S - 2 0 4 8 M A I N M E N U >... - Page 37 Throughout this chapter, entire menus will be shown for clarity — rather than a series of four-line sections. • If a value is displayed between brackets, (e.g., [SMPTE]) this indicates that the value can not be changed. ACS-2048 • User’s Guide...
- Page 38 Quick Function Reference nìáÅâ=cìåÅíáçå=oÉÑÉêÉåÅÉ Use the following table to quickly access the proper menu for a specific function. Both hyperlinks and page numbers are provided. Table 4-1. ACS-2048 Quick Function Reference Table How to: Use the Following Section: Page Adjust color balance...
- Page 39 4. Operation Quick Function Reference Table 4-1. ACS-2048 Quick Function Reference Table (Continued) How to: Use the Following Section: Page Change image brightness Brightness Change image contrast Contrast Change image processing Processing Change image timing Timing Adjust Change input colorspace...
- Page 40 4. Operation Quick Function Reference Table 4-1. ACS-2048 Quick Function Reference Table (Continued) How to: Use the Following Section: Page Perform quick setup and operations Quick Setup and Operations Program EDID EDID DVI Input Format Reset input configuration Reset Config...
-
Page 41: In Auto Acquire
4. Operation Using the Main Menu rëáåÖ=íÜÉ=j~áå=jÉåì After ACS-2048 initialization is complete, the Main Menu appears, which is the system’s top-level menu. Please note: • When you make changes to input, output and system parameters, configuration information can be stored in non-volatile memory — provided that the user performs the three “Save Config”... - Page 42 • When the In Auto Acquire mode is ON, the ACS-2048 automatically detects and acquires the input video type and resolution (in most cases), and limits menu selections as applicable to the detected video type (e.g., color space).
-
Page 43: Input Format
Following are descriptions of each Input Menu function: • • Input Format Timing Adjust • • Type Processing • • Colorspace Reset Config • • Image Adjust Save Input Config • • Contrast Delete Config • • Brightness Recall Config • Color Balance ACS-2048 • User’s Guide... - Page 44 The available input types that will be shown depend on the selected input button: • For input 1: [SDI] • For inputs 2 and 3: [DVI] or [Analog]. The ACS-2048 automatically detects the type of input signal, and selects the correct type. Note If both analog and digital inputs are connected simultaneously (via customer-supplied “Y”...
- Page 45 If a source type is chosen and a correct signal cannot be detected, the Input Format field (in the Input Menu and the Status Menu) indicates “Invalid Signal.” • For inputs 2 and 3, analog signals can be connected to the ACS-2048 using a customer-supplied DVI to HD-15 adaptor. `çäçêëé~ÅÉ...
- Page 46 For both H Crop and V Crop, the function always cuts into the visible image, and never exposes any video outside the source’s active area. In addition, as you crop, the ACS-2048 always scales the input back up to fit the selected aspect ratio within the system’s 2048 x 1080 output window.
-
Page 47: Rgb Color Balance Menu
0.750 to 3.000. Note that the default value depends on the last Aspect Ratio selected before Custom was chosen. Note The ACS-2048 selects and displays the input video aspect ratio according to the input format detected. For example: Computer video at 1280x1024@60Hz defaults to... -
Page 48: Timing Adjust
[80 6] V Position V Active Figure 4-12. Timing Adjust Menu (sample) The following functions are available: • Auto Config — This function is identical to the Auto Config function located in the Image Adjust Menu. ACS-2048 • User’s Guide... - Page 49 Its value will always be shown in brackets. • V Position — sets the offset of start of active area from V sync. • V Active — sets the size of the active area. ACS-2048 • User’s Guide...
-
Page 50: Processing
Sync Slice — This function selects the sync comparator threshold for RGsB (RGB with Sync on Green) or YP analog component video sources. When ACS-2048 detects Macrovision copy protection on the incoming YP NTSC/PAL video, the Sync Slice value is automatically repositioned to 60mV to account for the reduced amplitude sync pulse. -
Page 51: Save Input Config
Figure 4-14. Save Config Menu (sample) The ACS-2048 provides a global pool of 64 input configuration files, and the default file number is a 1:1 association with the input number itself (e.g., input 1 = 1, input 2 = 2, etc.). -
Page 52: Delete Config
Please note: • The ACS-2048 supports multiple input configuration files for each physical input. When you select a file number and recall an input, the system automatically creates a file association on the File Association Menu, using the selected file number. -
Page 53: Output Menu
• Default: 10-bit (this mode requires connecting both outputs to the projector) Please note the following points regarding the ACS-2048’s two DVI-I output connectors: • In 10-bit or 12-bit mode, both outputs (A and B) must be connected to the projector. - Page 54 Patterns” section on page 71 for details. • Type — This function enables you to select a test pattern. Available choices are: H Ramp V Ramp 100% Col Bars 16 x 16 Grid 32 x 32 Grid Burst ACS-2048 • User’s Guide...
- Page 55 Positioning is limited to the overall 1080 “space,” and the image cannot be moved off screen. • Reset All — resets H and V Size to 2048 x 1080, and H and V Position to [0]. ACS-2048 • User’s Guide...
- Page 56 < S E L > = Y e s < E S C > = N o Figure 4-22. Save Output Configuration Prompt Select (SEL) to save changes. Select (ESC) to continue operation without saving the changes. ACS-2048 • User’s Guide...
-
Page 57: System Menu
The transition time is defined as the total time required for the system to fade to black, switch to the new input, and fade up to the new input. 100% Video Switch Input 1 Input 2 Black Transition Time Figure 4-24. Transition Time Diagram ACS-2048 • User’s Guide... - Page 58 Note Always consult with your network administrator to obtain valid IP, subnet mask and gateway addresses. When ON, the ACS-2048 queries the DHCP server for a valid IP address, and the Config Network field is hidden. • If the ACS-2048 finds a DHCP server and receives an IP address, the address is displayed.
- Page 59 Use the following steps to edit the IP address, Netmask or Gateway. Valid fields range from 000 to 255. Press SEL to begin editing. This action highlights the first digit, and displays the carat “^.” Use the ADJUST knob to move the carat left and right through the address. ACS-2048 • User’s Guide...
- Page 60 (as well as the allowed) device resolutions. The ACS-2048’s EDID file is stored in non-volatile memory. This file is read by a computer's DVI graphics card during boot-up, when its DVI output is connected to a DVI-I input connector on the ACS-2048 system (inputs 2 and 3).
- Page 61 E D I D P r o g f a i l e d ! ES C = Con tinue Figure 4-33. EDID Programming Failed Message If this message persists, please contact customer service for technical support. ACS-2048 • User’s Guide...
- Page 62 Figure 4-35. System Temperature Menu (sample) The System Temperature Menu is an information-only display that indicates the chassis’ internal temperature in both celsius and farenheit. When the menu is displayed, temperature values update every 4 seconds. ACS-2048 • User’s Guide...
-
Page 63: User Preference
4. Operation Using the Main Menu Note that the ACS-2048 measures the internal temperature for an “over-temp” condition every 5 minutes. If the system’s internal temperature exceeds 122° F (50° C), the following message appears: O VE R T EM PE RA T U RE Co ntact f actory if conditio n persist s. -
Page 64: File Association
“first” when that input is selected from the front panel — whether or not In Auto Acquire is ON. • Repeat to configure additional file associations. Refer to the “Understanding Auto Acquire” section on page 70 for additional information on the Auto Acquire mode. ACS-2048 • User’s Guide... -
Page 65: Diagnostics
DI AGNOS TIC S > SE L = Sta rt T ests Figure 4-39. Diagnostics Menu If you suspect a problem with the ACS-2048, press SEL to run a series of internal diagnostic tests. The menu will report back “PASS” or “FAIL.” Note If the menu report “FAIL,”... - Page 66 < S E L > = Y e s < E S C > = N o Figure 4-41. Save System Configuration Prompt Select (SEL) to save changes. Select (ESC) to continue operation without saving the changes. ACS-2048 • User’s Guide...
-
Page 67: Status Menu
(such as an HDCP repeater) has been detected. In this situation, video output is disabled. • Output Format — Indicates the current output video format in the form: Hact x Vact @ Vr Hz 2048x1080@59.94 Hz ACS-2048 • User’s Guide... -
Page 68: Software Version
< E S C > = N o Figure 4-44. Factory Reset Menu This function enables you to reset the ACS-2048 to its factory default condition, in which all input, output and system configuration files are deleted. When the command is executed, a confirmation menu is shown. -
Page 69: Using Inputs
(as entered on the System Menu). • When you press a button for a valid input (sync is detected and the button is backlit), the ACS-2048 immediately transitions to the selected input. If Menu Context is (in the User Preference Menu), the Input Menu appears. - Page 70 User Preference Menu. Two different error messages can be displayed when In Auto Acquire is ON: Mismatch: The ACS-2048 cannot match to any saved input configuration, or to any format in the input format table. Invalid Signal: No valid input signal is detected.
-
Page 71: Using Test Patterns
1 or 2 — depending on the current situation. rëáåÖ=qÉëí=m~ííÉêåë Pressing the TEST PAT button selects the internal test pattern as the ACS-2048’s source. There are two ways to use the button: TEST •... -
Page 72: Front Panel Lockout
4. Operation Front Panel Lockout cêçåí=m~åÉä=içÅâçìí The ACS-2048 includes a front panel lockout mode which when enabled, locks out the front panel from all source selections, including the Test Pattern. Use the following steps to lock (and unlock) the front panel: Press and hold the SEL and ESC buttons for 3 seconds. -
Page 73: Software Upgrade Overview
RK==réÖê~ÇáåÖ=pçÑíï~êÉ få=qÜáë=`Ü~éíÉê This chapter provides detailed instructions for upgrading ACS-2048 system software. The following topics are discussed: • Software Upgrade Overview • Hardware Requirements • Software Requirements • Downloading Software • Ethernet Upgrade Method ACS-2048 • User’s Guide... -
Page 74: Upgrading Software
5. Upgrading Software Software Upgrade Overview pçÑíï~êÉ=réÖê~ÇÉ=lîÉêîáÉï Firmware files for the ACS-2048 are loaded into the hardware at power-up. These files are stored in the unit’s onboard flash memory. The ACS-2048’s system software can be easily upgraded using the following steps: •... -
Page 75: Downloading Software
5. Upgrading Software Downloading Software açïåäç~ÇáåÖ=pçÑíï~êÉ Two different methods can be used to download ACS-2048 software: • Via FTP Site • Via Web Site sá~=cqm=páíÉ Barco Folsom's FTP site address is: ftp.folsom.com To download software from the FTP site: Create a target folder on your PC (e.g., ACS-2048). -
Page 76: Ethernet Upgrade Method
(with DHCP on or off). Note The default IP address is 192.168.000.5. On your PC (or laptop), open up a web browser. In the browser’s address bar, enter the ACS-2048’s IP address. Figure 5-1. Address bar with sample IP address ACS-2048 • User’s Guide... - Page 77 5. Upgrading Software Ethernet Upgrade Method When the PC establishes communications with the ACS-2048, several web pages are downloaded into the PC, and the ACS-2048 Upgrade Page appears: Figure 5-2. ACS-2048 Upgrade Page (sample) Click the Firmware Upgrade link to continue the upgrade process. The Select File page appears, as shown below: Figure 5-3.
- Page 78 If the upload was successful, click Restart ACS-2048 to complete the entire procedure. 14. Close your browser, and resume operations on the ACS-2048. Be sure to check the Software Version Menu to verify that the system has been updated. From the Main Menu, select Software Version to display the Software Version Menu.
- Page 79 5. Upgrading Software Ethernet Upgrade Method qêçìÄäÉëÜççíáåÖ=bíÜÉêåÉí=`çããìåáÅ~íáçå Use the following steps to determine the IP address of the ACS-2048, and establish proper communications: Power-up the ACS-2048. Note the ACS-2048’s current IP address: From the Main Menu, select System to display the System Menu.
- Page 80 5. Upgrading Software Ethernet Upgrade Method ACS-2048 • User’s Guide...
- Page 81 ^K==péÉÅáÑáÅ~íáçåë få=qÜáë=^ééÉåÇáñ This appendix provides detailed technical specifications for the ACS-2048. The following topics are discussed: • Input Specifications • Output Specifications • Physical and Electrical Specifications • Communications Specifications • Agency Specifications • Pinouts • Input Format Table ACS-2048 • User’s Guide...
-
Page 82: Input Specifications
^K==péÉÅáÑáÅ~íáçåë Input Specifications fåéìí=péÉÅáÑáÅ~íáçåë= The table below lists ACS-2048 input specifications. Table A-1. ACS-2048 Input Specifications Parameter Detail Specification Input 1 Connector Format SD-SDI per SMPTE 259M-C (NTSC/PAL resolution) HD-SDI per SMPTE 292M (HDTV) per DDWG 1.0 Input 2 Connector... -
Page 83: Output Specifications
Connector 4-pin mini-DIN Format Encoded NTSC or PAL Y/C video Input 8 Not currently implemented lìíéìí=péÉÅáÑáÅ~íáçåë The table below lists ACS-2048 output specifications: Table A-2. ACS-2048 Output Specifications Parameter Detail Specification Outputs Outputs A and B Dual channel (Twin-Link) DVI output... -
Page 84: Physical And Electrical Specifications
^K==péÉÅáÑáÅ~íáçåë Physical and Electrical Specifications mÜóëáÅ~ä=~åÇ=bäÉÅíêáÅ~ä=péÉÅáÑáÅ~íáçåë= The table below lists ACS-2048 physical and electrical specifications. Table A-3. ACS-2048 Physical and Electrical Specifications Parameter Detail Specification Power Connector Standard IEC, integral on/off switch Power 100-240 VAC, 50-60 Hz Mechanical Chassis H: 3.50 inches (8.89 cm) W: 17.00 inches (43.18 cm) -
Page 85: Communications Specifications
^K==péÉÅáÑáÅ~íáçåë Communications Specifications `çããìåáÅ~íáçåë=péÉÅáÑáÅ~íáçåë= The table below lists ACS-2048 communications specifications. Table A-4. ACS-2048 Communications Specifications Parameter Detail Specification Communications Ethernet RJ-45, 10/100 Mbps ^ÖÉåÅó=péÉÅáÑáÅ~íáçåë= The table below lists ACS-2048 agency specifications. Table A-5. ACS-2048 Agency Specifications Parameter Detail Specification... -
Page 86: Pinouts
Figure A-1. Analog 15-pin D connector, chassis view The table below lists Analog 15-pin D connector pinouts. Table A-6. Analog 15-pin D Connector Pinouts Signal Signal Green Blue H Sync or C Sync Red return V Sync Green return Blue return ACS-2048 • User’s Guide... -
Page 87: Dvi-I Connector Pinouts
T.M.D.S. Data 1+ T.M.D.S. Clock Shield T.M.D.S. Data 1/3 Shield T.M.D.S. Clock + T.M.D.S. Data 3- T.M.D.S. Clock - MicroCross Pins Analog Red Video Analog Horizontal Sync Analog Green Video Analog Common Ground Return Analog Blue Video ACS-2048 • User’s Guide... -
Page 88: Ethernet Connector
Brown jáåáJafk=`çååÉÅíçê The figure below illustrates the 4 pin Mini-DIN connector. Figure A-4. 4 Pin Mini-DIN connector The table below lists Mini-DIN connector pinouts. Table A-9. Mini-DIN Connector Pinouts DMX Signal Description Chrominance Luminance Ground Ground ACS-2048 • User’s Guide... -
Page 89: Input Format Table
^K==péÉÅáÑáÅ~íáçåë Input Format Table fåéìí=cçêã~í=q~ÄäÉ The table below lists the available input formats for the ACS-2048. Each entry uses the following convention: Format @Fv (Hz). Table A-10. ACS-2048 Input Formats Format Aspect Ratio Color Space NTSC (480i) 1.33333 SMPTE, RGB 720x480p 1.33333... - Page 90 ^K==péÉÅáÑáÅ~íáçåë Input Format Table Table A-10. ACS-2048 Input Formats (Continued) Format Aspect Ratio Color Space 1280x720 II @60 1.77778 1280x768 @47.95 1.66667 1280x768 @48 1.66667 1280x768 @50 1.66667 1280x768 @59.94 1.66667 1280x768 @75 1.66667 1280x800 @60 1.60 1280x800 II @60 1.60...
- Page 91 ^K==péÉÅáÑáÅ~íáçåë Input Format Table Table A-10. ACS-2048 Input Formats (Continued) Format Aspect Ratio Color Space 1366x768 @59.94 1.77778 1400x1050 @48 1.33333 1400x1050 @50 1.33333 1400x1050 @59.94 1.33333 1400x1050 @60 1.33333 1400x1050 @75 1.33333 1440x900 @60 1.60 1440x900 @75 1.60 1440x900 @85 1.60...
- Page 92 ^K==péÉÅáÑáÅ~íáçåë Input Format Table Table A-10. ACS-2048 Input Formats (Continued) Format Aspect Ratio Color Space 1920x1080sF@24 1.77778 SMPTE, RGB 1920x1080i @50 1.77778 SMPTE, RGB 1920x1080i @59.94 1.77778 SMPTE, RGB 1920x1080i @60 1.77778 SMPTE, RGB 2048x1080p @48 1.8963 2048x1080p @50 1.8963 2048x1080p II @50 1.8963...
-
Page 93: Communicating With Acs-2048
Ensure that all Ethernet parameters are properly set up. In Chapter 4, refer to the “Ethernet” section on page 58 for details. For Telnet communications, use the ACS-2048’s IP address and port 23. On a Microsoft Windows PC, open a command prompt window and enter the following: >... -
Page 94: Command Protocol
_K==oÉãçíÉ=`çåíêçä=mêçíçÅçä Command Protocol `çãã~åÇ=mêçíçÅçä The ACS-2048’s command protocol is compatible with GNU getopt parsing. Every parameter of the command has an option character associated with it. A <CR> carriage return (ASCII 13) terminates the command. Note The order of the option characters in the command does not matter. - Page 95 The list shows has the numeric value for the parameter, followed by the value text encased in quotes. A colon separates the numeric value from the string. List query option example: ISMP -i 4 --list<CR> Response: 0:"OverSample" 1:"1:1" ISMP -e 0<LF> </x4> ACS-2048 • User’s Guide...
-
Page 96: Error Codes
_K==oÉãçíÉ=`çåíêçä=mêçíçÅçä Error Codes bêêçê=`çÇÉë This section provides ACS-2048 error codes: bêêçê=`çÇÉëW==dÉåÉê~ä=c~áäìêÉë The table below lists general failure codes: Table B-1. ACS-2048 General Error Codes Code Description -9999 Generic fail -9998 Operation is not applicable in current state -9997 UI Related... Did not get response from device -9996 UI Related... -
Page 97: Isel
_K==oÉãçíÉ=`çåíêçä=mêçíçÅçä ACS-2048 Command List ^`pJOMQU=`çãã~åÇ=iáëí The table below lists ACS-2048 remote commands. Table B-1. ACS-2048 Remote Commands Command Description Page AUTOACQ Auto Input Acquisition Mode AUTOSAVE Auto Input Settings Save BLKVID Puts black into the scaler selected CONTEXT Sets menu context... -
Page 98: Save
_K==oÉãçíÉ=`çåíêçä=mêçíçÅçä Remote Commands Table B-1. ACS-2048 Remote Commands (Continued) Command Description Page SAVE System Save SELMODE Sets whether input selection of inputs w/o valid syncs will be made SUBNET Set subnet mask to be used when DHCP is OFF TEMP... -
Page 99: Context
Query Params: -a (active addr): Active gateway active address f`abi • Description: Deletes input configuration. • Command Format: ICDEL -i (input) -f (file) • Parameters: -i (input):1 - 8 -f (file): 1 - 64. (optional) • Query Format: N/A • Query Response: N/A ACS-2048 • User’s Guide... -
Page 100: Iclist
Description: Saves Input Configuration. The selected input’s file association is updated if the –f (file) parameter is specified. • Command Format: ICSAV -i (input) -f (file) • Parameters: -i (input):1 - 8 -f (file): 1 - 64. (optional) • Query Format: N/A ACS-2048 • User’s Guide... -
Page 101: Ihcrop
Command Format: IP -s (static) • Command Params: -s static addr with format xxx.xxx.xxx.xxx • Query Format: IP -? • Query Response: IP -a (active addr) -s (static addr) • Response Params: -a (active addr): returns active address ACS-2048 • User’s Guide... - Page 102 Query Response: IVPAN -i (input) -p (pan) --min (active min) -- max (active max) il`hlrq • Description: Controls the lockout mode of the front panel. When enabled, the keys and menu will be deactivated. • Command Format: LOCKOUT -m (mode) ACS-2048 • User’s Guide...
- Page 103 List Response: 0: "8 bits" 1: "10 bits" 2: "12 bits" lo_j= • Description: Output Raster Box Mode • Command Format: ORBM -o (output) -m (mode) • Parameters: -o (output): 1 - DVI -m (mode): 0-off, 1-on ACS-2048 • User’s Guide...
- Page 104 Query Response: OTPM -o (output) - m (mode) --min 0 -- max 1 lqmq= • Description: Output Test Pattern Type • Command Format: OTPT -o (output) - t (type) • Parameters: -o (output): 1 - DVI -t (type): • 1 - H Ramp ACS-2048 • User’s Guide...
- Page 105 Description: Sets whether input selection of inputs w/o valid syncs will be made. • Command Format: SELMODE -m (mode) • Parameters: -m (mode): 0 - don't allow selection, 1 - allow selection (Default: off) • Query Format: SELMODE -? ACS-2048 • User’s Guide...
-
Page 106: Subnet
Command Format: VFDBRT -b (brightness) -f • Parameters: -b (brightness): 1 - 16 (default: 10) -f: Command from front panel • Query Format: VFDBRT -? • Query Response: VFDBRT -b (brightness) --min 1 -- max 16 ACS-2048 • User’s Guide... -
Page 107: Warranty
Warranty related repairs include parts and labor, but do not include faults resulting from user negligence, special modifications, lightning strikes, abuse (drop/crush), and/or other unusual damages. The customer shall pay shipping charges when unit is returned for repair. Barco will cover shipping charges for return shipments to customers. oÉíìêå=j~íÉêá~ä=^ìíÜçêáò~íáçå=Eoj^F... -
Page 108: Contact Information
E-mail: folsomsales@barco.com Barco N.V. Noordlaan 5 8520 Kuurne BELGIUM • Phone: +32 56.36.82.11 • Fax: +32 56.35.16.51 • Website: www.barco.com Technical Support Information • Tech Line: (866) 469-8036 — 24 hours per day, 7 days per week ACS-2048 • User’s Guide... - Page 109 ......3 IP .......60 ACS-2048 • User’s Guide...
- Page 110 ..... . .21 Communicating with ACS-2048 ... .93 dim yellow .
- Page 111 Digital cinema ......13 Features, ACS-2048 ....13 Dim yellow button .
- Page 112 TEST PAT button ....22 Introduction to ACS-2048 ....11 use the main menu .
- Page 113 Page Mini-DIN connector pinouts ....88 ACS-2048 upgrade ....77 Mode select file .
- Page 114 ......86 Restart ACS-2048 ..... .78 Static IP .
- Page 115 ..... .63 Using auto acquire ..... . .42 ACS-2048 • User’s Guide...
- Page 116 Index ACS-2048 • User’s Guide...