Table of Contents
Advertisement
Quick Links
Advertisement
Table of Contents

Related Manuals for Fujitsu ARROWS NX F-01K


Summary of Contents for Fujitsu ARROWS NX F-01K
- Page 1 F-01K ’17.11 INSTRUCTION MANUAL...
- Page 2 Introduction "INSTRUCTION MANUAL" (PDF file) Thank you for purchasing "F-01K" mobile terminal. This manual provides detailed information and operations of Before using your terminal, or when necessary, read this the functions. manual to ensure safe use and handling. 〈From PC〉https://www.nttdocomo.co.jp/english/support/ trouble/manual/download/f01k/index.html Learning operations *You can download the latest information.
-
Page 3: Basic Package
■ クイックスタートガイド (Quick start guide) (in Basic package Japanese only) ご利用にあたっての注意事項 (Notes and instructions for use) (in Japanese only) ■ F-01K ■ TV antenna cable F01 ・ You can check or purchase optional accessories compatible with the terminal (optional) in the DOCOMO online shop. https://www.mydocomo.com/onlineshop/options/ index.html (In Japanese only) Contents/Precautions... -
Page 4: Table Of Contents
Contents My Magazine ..............65 Information of home application ........66 ■ Basic package ............1 Phone ........... 67 ■ Before using the terminal ........5 ■ Precautions (Always follow these directions) ..7 Making a call/video call ........... 67 Receiving a call/video call ..........69 ■... - Page 5 Location data/GPS ............117 Useful tools ..............162 Schedule .................119 Date & time ..............166 Clock ................120 Accessibility ..............166 Calculator ................122 About phone ..............167 Search ................122 docomo Data Copy ............123 File management ....... 168 Storage (Internal storage) ..........168 Settings ........
- Page 6 Appendix/Index ......186 Troubleshooting (FAQ) ..........186 Anshin Enkaku Support ..........193 Warranty and After-Sales Service .........194 Software update .............196 Main specifications ............199 Specific Absorption Rate (SAR) of Mobile Phones ..203 Export Administration Regulations ......208 Intellectual Property Right ..........208 SIM unlock ..............211 Index ................212 Contents/Precautions...
-
Page 7: Before Using The Terminal
・ The terminal supports function with which users and guests Before using the terminal can use the terminal. Therefore, some services or applications recognize them as the same user even after the user is switched. Note that DOCOMO assumes no ・... - Page 8 ・ ・ Depending on the applications or service you use, packet The terminal supports only sp-mode, mopera U and communication charge may be applied even in Wi-Fi Business mopera Internet. Other providers are not communication. supported. ・ ・ The software on the terminal can be updated with the latest If you want to use tethering, subscription to Packet Pack/ information.→P196 packet flat-rate service is strongly recommended.
-
Page 9: Precautions (Always Follow These Directions)
Minor injury: This refers to injuries, burns (high- and low- Precautions (Always follow temperature), electric shock, etc. that do not require hospital admission for treatment or long-term hospital attendance as an these directions) outpatient. Physical damage: This refers to extended damage to buildings, ・... - Page 10 ■ Precautions contain the description below. Do not charge when the terminal is wet with Handling the terminal, adapter, docomo nano UIM card, and water (drinking water, perspiration, seawater, TV antenna cable (common) ..........8 urine of pet animals, etc.). Don’t Handling the terminal ...............10 May cause fire, burns, injuries, or electric shock.
- Page 11 Do not allow liquid (drinking water, perspiration, Make sure to turn off the terminal or stop seawater, urine of pet animals, etc.) to come into charging before you get close to places like a gas the charging jack, external connection jack. station where a flammable gas or dust can be No liquids May cause fire, burns, injuries, or electric shock.
- Page 12 ◆ Handling the terminal Do not store the equipment in extremely humid, dusty or hot areas. May cause fire, burns, or electric shock. DANGER Don’t For the waterproof and dustproof functions, refer to the following. Do not throw the terminal into fire or apply heat. →P23 "Waterproofness/Dustproofness, shock resistance"...
- Page 13 Do not allow a foreign substance such as water When using the handsfree call, ringtone is and other liquids (drinking water, sweat, ringing loud, or in the standby mode, be sure to seawater, urine of pet animals, etc.), metal parts, keep this terminal off of the ears.
- Page 14 Turn the terminal OFF near high-precision CAUTION electronic control equipment or electronic Do not swing the terminal around by holding a equipment using low-power signals. strap, etc. The radio wave from the terminal may interfere with the operation etc. of electronic devices or equipment. May cause accident such as injuries.
- Page 15 ◆ Handling the adapter If fluid etc. leaks out from the internal battery, do not let the fluid contact with the skin on your face or hands. WARNING Don’t May cause eye or skin problems. If the fluid etc. enters your eyes or mouth, or contacts skin Do not use the adapter cord if it gets damaged.
- Page 16 Do not use a transformer for overseas travel When you connect the adapter to an outlet or (travel converter) as the AC adapter. accessory socket, firmly connect it to the outlet. May cause ignition, heating, or electric shock. Not doing so may cause fire, burns, electric shock. Don’t Do not apply an excessive force on the connected When you disconnect the power plug from an...
- Page 17 ◆ Handling mobile phones near electronic Always remove the power plug from an outlet or medical equipment accessory socket when cleaning the equipment. Not doing so may cause fire, burns, or electric shock. Unplug WARNING CAUTION Wearers of medical equipment such as Do not touch the adapters for a long time while implanted pacemakers or defibrillators must they are connected to an outlet or accessory...
-
Page 18: Material List
◆ Material list Part Material/Surface treatment USB Type-C jack Stainless steel/Nickel plating ■ F-01K Terminal ■ TV antenna cable F01 Part Material/Surface treatment Part Material/Surface treatment Display panel Hardened glass/AF coating Cord Olefinic elastomer/None Exterior case Front case Aluminum, PBT resin/Alumite treatment, none Earphone jack Cap Styrene elastomer/None... -
Page 19: Handling Precautions
・ Do not place the terminal near an air-conditioner outlet. Handling precautions - The rapid change in temperature may cause condensation, causing internal corrosion and malfunction. ・ Do not apply excessive force to the terminal. ◆ General - Putting the terminal into a tightly packed bag or sitting on the terminal in your pocket might cause malfunction or ・... - Page 20 ・ ・ Be sure to back up the data you saved in the terminal on a Do not decorate the terminal with films or stickers. microSD card, PC, or cloud service, or keep a separate note. - May hinder the proper operations for functions using the - NTT DOCOMO is not liable for any loss of saved data.
- Page 21 ◆ Instructions for using the adapter ◆ docomo nano UIM card ・ ・ Charge the battery in an area within the proper ambient Do not use excessive force to install/remove docomo nano UIM card. temperature range (5-35℃). ・ ・ Do not charge the battery in the areas below. Note that DOCOMO assumes no responsibility for - In areas of excessive humidity, dust or vibrations malfunctions occurring as the result of inserting and using...
-
Page 22: Bluetooth Function
◆ Bluetooth function Cautions on using Bluetooth devices ・ The terminal is equipped with the security features, that are In the bandwidth used by the terminal, in addition to compliant with Bluetooth standards for communication via home electric appliances such as a microwave oven and Bluetooth. - Page 23 ・ ◆ Wireless LAN (WLAN) Frequency bands The frequency band used by the terminal's wireless LAN ・ Wireless LAN (WLAN) exchanges information using radio function is written as follows: waves, and allows you to freely establish LAN connection if you are within an area where radio wave reaches. On the other side, if you communicate without appropriate 2.4DS/OF4 security settings, communications may be intercepted or...
- Page 24 Cautions on using 5 GHz devices Using wireless LAN built-into the terminal in 5.2/5.3 GHz Cautions on using 2.4 GHz devices outside is prohibited by the Radio Law. In the frequency band used by WLAN devices, in addition Channel numbers and frequency bands available in Japan to home electric appliances such as a microwave oven are as follows.
-
Page 25: Waterproofness/Dustproofness, Shock Resistance
◆ CAUTION Waterproofness/Dustproofness, ・ Do not use a remodeled terminal. Using a remodeled shock resistance terminal violates the Radio Law/Telecommunications Business Act. The terminal is compliant with rules on the technical F-01K has a waterproof equivalent to IPX5 and IPX8 , as standard conformance of specified wireless equipment well as a dustproof property equivalent to IP6X... - Page 26 Dustproofness (6- Dust test for 6 hours consecutively (dust Operation at high- Operation environment : High hours with concentration of 10±7 g/m , wind speed temperature temperature test at 60℃ specified wind of 8.9 m/s) (60℃ fixed) speed) Operation at high- High temperature test of 3 cycles of Dustproofness (72- Dust test for 72 hours consecutively...
- Page 27 ❖ What you can do with waterproofness of Our tests which are in accordance with the procurement standard of 23 provisions established by the USA Department F-01K of Defense (MIL-STD-810G) are implemented: drop, shock ・ You can use the terminal to talk or watch TV without using resistance, waterproofness (immersion), dustproofness (6- an umbrella in the rain (with a rainfall of about 20 mm per hours with specified wind speed), dustproofness (72 hours),...
- Page 28 ・ - Rapid temperature change may cause condensation. If you After using, insert the slot cap in the direction of the arrow bring the terminal from a cold place to warm place such as straight, firmly press part. Make sure that there is no gap a bathroom, wait until the terminal reaches the room between the terminal and the slot cap.
- Page 29 ・ Do not apply water flow stronger than allowed (→P23). Even if F-01K is waterproof in IPX5 waterproof, water may enter It is recommended to replace the parts once every two inside from a damaged section and cause troubles such as years to maintain the waterproof/dustproof performance, electric shocks or corrosion of the battery.
-
Page 30: Draining Water
DOCOMO does not guarantee actual operations under all states. Malfunctions deemed to be caused by inappropriate operation by the customer are not covered by the warranty. ◆ Draining water When the terminal is wet, water may flow out after wiping it c Swing the terminal about 10 times against a dry, clean off;... - Page 31 ◆ Charging Check the following during and after charging. ・ Never try to charge the battery when the terminal is wet. ・ When charging the battery after the terminal gets wet, adequately drain the terminal and then wipe off the remaining water with a dry, clean cloth or something similar.
-
Page 32: Before Using The Terminal
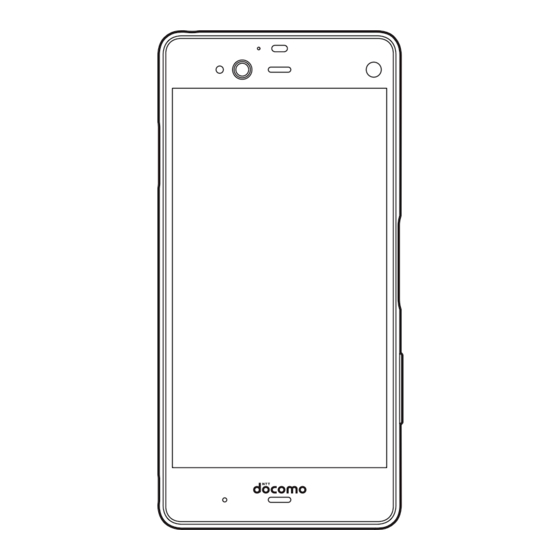
d Indicator LED→P49 Before using the terminal e Proximity sensor/RGB sensor Proximity sensor detects approach of your face during a call so as to prevent erroneous operation of the touch panel, or measures distance between the terminal and your eyes for iris authentication. RGB sensor senses ambient Part names and functions light condition or brightness and automatically adjusts the display backlight. - Page 33 A sticker bearing the CE mark, FCC ID, IMEI information, etc. is attached. Please do not peel off the sticker or remove the nameplate. Putting a protective sheet or sticker on the sensor or covering the sensor with fingers may cause erroneous operation or incorrect sensing result.
-
Page 34: Docomo Nano Uim Card
docomo nano UIM card A docomo nano UIM card is an IC card that stores user information, such as the users phone number. ・ You can use the terminal only with a docomo nano UIM card. If you have a docomo mini UIM card, docomo UIM card, or FOMA card, bring it to a docomo Shop to replace it with a docomo nano UIM card. -
Page 35: Microsd Card
d Check that the display side of the terminal faces up and ✔INFORMATION then horizontally insert the slot cap in the direction of the ・ When handling docomo nano UIM card, take care not to arrow straight touch or scratch the IC. Also, be aware that trying to insert or remove the docomo nano UIM card using excessive force may cause it to break. - Page 36 ・ ◆ Installing/Removing microSD card Data transfered from the other device to a microSD card may not be displayed or played on the terminal. Data transfered ・ Install/remove after turning off the power. from the terminal to a microSD card may not be displayed or ・...
-
Page 37: Charging
・ ■ Removing When the power voltage of the internal battery is abnormal, charging error occurs and the indicator LED flashes. a Face the display side of the terminal up, put your fingertip Immediately exit any applications if you are using. Remove into the groove and then open the slot cap→P26 the terminal from the charger and charge it again in the b Draw the slot cap in the direction of the arrow straight and... -
Page 38: Charging With Ac Adapter
❖ Available charging adapter USB Type-C For details, refer to the manual of AC adapter, DC adapter, or jack Indicator LED USB cable. AC Adapter 06 (optional) : Supports 100V to 240V AC. The shape of AC adapter plug is for 100V AC (Japanese specification). -
Page 39: Turning Power On/Off
[Power off]→[OK] Turning power on/off The terminal turns off vibrating. ◆ Turning power on Basic operation ・ Before turning on the power, make sure that there is no gap between the terminal and the slot cap. ◆ Using touch panel Press and hold P (2 sec. -
Page 40: Touch And Hold
❖ Tap/Double-tap Tap : Touch the screen lightly and release the finger quickly. Double-tap : Tap twice quickly. Example : Drag ❖ Pinch Example : Tap Touch the screen with two fingers and widen (pinch-out) or ❖ narrow (pinch-in) the fingers distance. Touch and hold Touch the screen for a while. - Page 41 ◆ How to use Exlider ■ Magnification mode Zoom in center of screen : Double-tap Exlider (P) (Zoom in)→ Trace Exlider (P) to scroll the screen or zoom in. Slide Exlider (P) up or down (Change the magnification of the ・...
-
Page 42: Emergency Mode
◆ Screenshot ◆ Application permissions You can save a screen displayed on the terminal as an image. The first time you launch an application or function that ・ Some screens may not be saved. accesses other functions and information on the terminal, a confirmation screen that requests authorization for access Press and hold P and the volume down key at rights appears. -
Page 43: Character Entry
■ QWERTY keypad Character entry Enter characters using Romaji input. Enter characters using software keyboard displayed on the screen. ・ Entering characters with Super ATOK ULTIAS is mainly described in this section. ・ Switching to other input method is available.→P44 ・... - Page 44 i Backspace (Delete a character to the left of the cursor) 手書き (Handwritten input) : Switch to handwritten input ・ After a character is fixed, flick a key up to delete the 全画面手書き (Handwritten in full-screen) : Switch to full- screen handwritten input character on the right to the cursor and flick to the left to delete all characters on the left to the cursor.
- Page 45 ❖ o Handwritten input area : Write a character with your finger Numeric keypad input to enter You can use the following 4 input methods in the numeric ・ When you write a character, a recognized character keypad. appears on the top of input area. You can select a ・...
-
Page 46: Setting Character Entry
■ Gesture input ◆ Switching input method If you touch and hold the key assigned the character you want You can also switch to another input method such as the to enter, characters (gesture guide) will be displayed around Google keyboard to enter characters. that key. - Page 47 [Google Keyboard]/[Google voice typing]/ Numeric keypad : Set Input mode (Flick input/Numeric keypad input/Gesture input/2-touch input), Flick input [Moji-Henshu]/[Super ATOK ULTIAS] (Flick guide, Flick Sensitivity,「や」key flick, Modifier key ・ Tap [Manage keyboards] to set the keyboard displayed flick, Alphabet key flick), Multi-tap input, Auto cursor in the list screen of "Current Keyboard"...
-
Page 48: Editing Text
❖ Copying text/Cutting Set selection list : Set Font size, Number of lines to display (Vertical screen/Horizontal screen), Expression mode, Punctuation marks, Prediction correction, Proofreading ■ Copying/Cutting in the character entry field support. Touch and hold a text Design : Set Keyboard selection, Theme, Adjust keyboard height (Numeric keypad (Vertical display/Horizontal Selected text is highlighted. - Page 49 ❖ ❖ Pasting text Displaying the virtual keyboard You can set whether to display the software keyboard when an Tap a position to paste→[PASTE] external keyboard is connected. The text is pasted to the cursor position. From the Home screen, →[Settings]→...
-
Page 50: Initial Settings
In Anything else? screen, set each item→[ALL Initial settings SET] The Home screen appears. When you turn on the terminal for the first time, make initial ✔INFORMATION settings following the on-screen instructions. ・ ・ Depending on Google account settings, indicated items may When How to use the Home screen appears, confirm the vary. -
Page 51: Indicator Led
Indicator LED Screen/Icon Indicator LED notifies the terminal states such as charging ◆ Icons on Navigation bar and missed call by lighting or flashing. Operation icons appear on the navigation bar shown at the ■ Main notification type, lighting/flashing bottom of the screen. Names and actions of icons are as Turning on the terminal : Light once in green follows. -
Page 52: Icons On The Status Bar
◆ Slide display ◆ Icons on the status bar When you hold the terminal in one hand, you can move the The status bar along the top of the screen shows notification whole screen to the direction of the navigation bar to operate icons and status icons that allow you to check various on the screen where your finger did not reach to. - Page 53 : Notification of recording or programmed to record Full : Omakase Lock is set on the terminal and docomo nano Seg/1Seg as background→P97 UIM card : Alarm is snoozed/sounding/set within 2 hours→P120 : Omakase Lock is set on the terminal or docomo nano UIM : Notification of docomo Data Copy→P123 card : Safe data storage→P161, P162...
-
Page 54: Notification Panel
d Notification : Handwritten input mode→P41 ・ : Number/symbol/smily/pict, common phrase input→P41 Tap the notification to check details or activate the corresponding application. ◆ Notification panel ・ Touch and hold the notification, or slide left or right and then tap to make settings of Notifications. -
Page 55: Sleep Mode
e Panel switches ◆ Panel switch Tap each panel switch to ON/OFF of the function or setting. Flick the status bar downward with two fingers to open the Touch and hold the panel switch to open the corresponding Panel switch. Tap the panel switch to switch ON/OFF of the setting menu. - Page 56 ◆ Unlocking screen lock ◆ Slide-in function During sleep mode, P By default, you can call out Slide-in launcher and Capture & Draw/Highlight & Copy by sliding your finger from the slide On the screen, spot (start point for sliding) at the corner of the screen. ・...
- Page 57 ❖ ❖ Capture & Draw Highlight & Copy Capture displayed screen to edit as an image or share with Text strings selected by tracing on the screen with your finger other application. can be copied or shared with another application. ・...
-
Page 58: Task Manager
◆ Customizing screen Split screen The keyboard and battery icon design can be changed. From the Home screen, →[Settings]→ Split the screen in two and operate two different applications [Display/Sound/Apps]→[Display & Wallpaper] at the same time in each screen. ・ Activate an application to display beforehand. -
Page 59: Switching The Home Applications
✔INFORMATION Switching the home ・ Alternatively, touch and hold (History) when the applications application is used to open the split screen. ・ The split screens can be displayed upper and lower in the vertical screen and left and right in the horizontal screen. Change the screen (Home screen) displayed by tapping ・... -
Page 60: Docomo Live Ux
d Indicator docomo LIVE UX Indicates the page number of home screens and which screen you are in. e Dock Displayed even if the home screen page is changed. Apps button : Display the application list screen. →P60 Home screen My Magazine button : Display My Magazine. -
Page 61: Home Screen
Select items or make settings as required ✔INFORMATION ・ ・ To move an application or add a widget to the Home If [Uninstall] appears when you touch and hold an screen, touch and hold an icon in the application/widget application, drag the application to [Uninstall] and tap [OK] to list screen, then drag it to the Home screen area at the uninstall. -
Page 62: Application List
◆ Setting Machi-Chara Application list You can change the character display, character moving, balloon display and auto-update setting of character etc. Display the application list to activate registered applications Touch and hold blank area in the customize or move applications or widgets to the Home screen. area ・... - Page 63 ・ To move an application or add a widget to the Home DiXiM Player : Watch and listen recorded TV programs, screen, touch and hold an application/widget, then photos, music, videos on the home network with your devices. drag it to the Home screen area. For use, Wi-Fi environment is required.
- Page 64 LAWSON : The official application of LAWSON. You can Anshin Scan : Ensure your smartphone by checking virus, display digital membership using your mobile phone as a applications which require your personal data, by alerting member's card, search shops, and find valuable exchange when you attempt to access a non-secure website, etc.
- Page 65 Data Copy : An application for transferring data when you Hanashite Hon'yaku : An application that translates the change the model, or backing up to/restoring from "microSD speaker's language into the partner's language. You can enjoy communication with people in different languages. card"...
- Page 66 ◆ Installing a recommended application ✔INFORMATION ・ The pre-installed applications are displayed in the Home Tap [Recommends] button to display applications screen or the application list by default. recommended by NTT DOCOMO. ・ Some pre-installed applications require separate From the Home screen, →[Recommends] subscriptions (charged) to be used.
-
Page 67: Backup And Restoration Of Home Screen
Backup and restoration of My Magazine Home screen My Magazine is a search service for displaying articles for categories you selected. It helps to set search words based on You can restore the Home screen layout such as applications your tendency of articles to read or profile information to and widgets using docomo LIVE UX data backed up in bring them closer to your preference. -
Page 68: Information Of Home Application
◆ Category setting Information of home You can select categories for information you want to view in application My Magazine. From the Home screen, You can check the provider of docomo LIVE UX or version of The list screen divided by genres appears. home application. -
Page 69: Phone
Phone →[Video call] Making a video call : When a call is ended, [END CALL] ✔INFORMATION Making a call/video call ・ With VoLTE, you can make high-quality voice and video calls. To use VoLTE, both parties must meet the following From the Home screen, requirements. -
Page 70: Emergency Call
・ - If your terminal failed to switch to a video call during a voice This terminal supports "Emergency call location call, a massage appears on the screen indicating that the notification". If you use the terminal to place a call to emergency numbers such as 110, 119, or 118, the failure occurred, and the voice call is maintained. -
Page 71: Receiving A Call/Video Call
・ In Japan, if the docomo nano UIM card is not inserted, Receiving a call/video call emergency calls 110, 119 and 118 cannot be made on the PIN code entry screen, during PIN code lock/PUK lock or while updating software. ◆... -
Page 72: Operation During A Call
◆ Receiving a video call Operation during a call <Example> When a call is received in sleep mode A call is received The following operations are possible in the screen during a call. The incoming call screen (full-screen) appears. ・ Press P/volume key to stop ringtone or vibration. - Page 73 g Switch to video ✔INFORMATION Tap to display a selection screen for switching to video call ・ Enable Voice clear to improve call sound to be heard clearly on the other party's terminal. If it is accepted, switching to by emphasizing the other party's voice or adjusting the video call is available.
-
Page 74: Recent Calls
f History Recent calls Display "Outgoing call"/"Incoming call"/"Missed call". ・ In Recent calls, call type such as voice call or video call is not displayed. You can check call history. g Date and time for incoming/outgoing call From the Home screen, ✔INFORMATION [Recent calls] ・... -
Page 75: Phone Memo
Phone memo Call settings Set phone memo or play/delete recorded phone memos. Make various settings for DOCOMO network services, call and ・ Note that accepting a video call by phone memo Internet call. automatically changes it to a voice call and the image is not From the Home screen, →... - Page 76 Vibrate on ring : Set whether to vibrate while ringtone is Extension line service setting : Make setting to use the sounding. Office Link holding and forwarding line service. ・ You cannot set while Manner mode is enabled. It is not available for video calls. Dialpad touch tones : Set whether to sound when The Office Link is an extension line service for operating the dial pad.
- Page 77 Disconnect : Set whether to disconnect calls by motion or ✔INFORMATION voice command. ・ Although the voice command function of Suguden uses the ・ Motion : Set whether to disconnect the call by placing voice recognition technology or the language processing the terminal horizontally with the display facing down technology, DOCOMO is not liable for any accuracy of those or by shaking the terminal twice during a call.
- Page 78 ・ ・ The Suguden (answer) function uses the proximity sensor as When you use the Suguden (answer) function, the terminal one of the motion determinations. If you use the function with detects that the terminal is tilted (lifted) or near your ear and the proximity sensor (→P30) soiled, you cannot answer sets the proper sound volume, but if the terminal does not properly, and loud sound may emit near your ear, resulting in...
-
Page 79: Phonebook
a Name Phonebook Tap to display the profile screen. In the profile screen, you can make a call, send SMS, etc. b Search You can register phone numbers, email addresses, etc. to the Search contacts. phonebook. You can contact registered parties through c Register→P77 simple operation. - Page 80 ❖ ◆ Deleting a phonebook entry Registering a contact to a group In the phonebook list, select a contact to delete In the phonebook list, [Group] → →[Delete]→[OK] Select a group→[Add member]→Mark ・ In the phonebook list, →Tap [Delete contact] to select contacts to add→[OK]→[OK] and delete contacts.
- Page 81 f SMS ✔INFORMATION Display the SMS creation screen and send a message. ・ If you try to send all phonebook entries via Bluetooth g Make a video call/Check location communication to an i-mode terminal, data cannot be moved Make a video call or connect the website of imadoco normally.
-
Page 82: Mail/Browser
Mail/Browser Messaging (SMS) You can send and receive text messages with a mobile phone number as the destination. docomo mail * For details on a number of characters that you can send/receive etc, refer to "Short Message Service (SMS)" on the NTT DOCOMO website. -
Page 83: Deleting Sms
◆ When SMS is received ◆ Forwarding SMS When an SMS message is received, the notification icon →[Messaging] From the Home screen, appears on the status bar (→P50). To check the new SMS, open the Notification panel (→P52) and then tap the Select a message thread→Touch and hold SMS notification. -
Page 84: Nx! Mail
◆ Setting SMS NX! Mail →[Messaging]→ From the Home screen, [MENU]→[Settings] Set docomo mail address (@docomo.ne.jp) or an email account provided by general provider to use Email. Set required items To use NX! Mail, download the application from Google Play. SMS Enabled : Change default SMS application. -
Page 85: Creating And Sending An Email
◆ Creating and sending an email ◆ Receiving/Displaying emails →[NX! Mail] →[NX! Mail] From the Home screen, From the Home screen, ・ The folder list screen appears. [MENU]→[Update] ・ If a folder is set for the startup screen (→P84), the mail list screen of the set folder appears. -
Page 86: Setting Email
◆ Operations on the folder list screen ◆ Setting Email Make Email settings. Display the folder list screen ❖ General settings for NX! Mail Displaying the mail list screen in a folder : Tap the folder to display the mail list screen of Creating a new folder : [Create folder]→[Create folder On the folder list screen, [MENU]→[Settings]... - Page 87 ❖ Setting NX! Mail account ✔INFORMATION ・ Setting of [Push] to [Receive interval] accelerates the battery ・ Available items vary depending on account type. consumption. <Example> Setting IMAP account ・ To delete an email account, touch and hold the account to On the folder list screen, [MENU]→[Settings]→...
-
Page 88: Gmail
Gmail Early warning "Area Mail" You can use email provided by Google or other general Area Mail is a service which allows you to receive earthquake providers. early warning or tsunami warning, emergency warning ・ If Google account or email account is not set, follow the on- related to weather etc. - Page 89 ◆ When receiving Early warning "Area ◆ Setting Early warning "Area Mail" Mail" Set whether to receive Area Mail, or set operations when receiving Area Mail. When Area Mail is received, the notification screen appears and you are notified by the dedicated buzzer sound or From the Home screen, →[Disaster kit] dedicated ringtone and vibration.
-
Page 90: Chrome
◆ Opening a new tab Chrome You can open multiple tabs to switch web pages quickly. When a web page is displayed, slide the screen You can view web pages like on a PC using Chrome. down to display the top of the screen→ On the terminal, "Chrome"... - Page 91 ◆ Web page link operations ✔INFORMATION ・ Web pages opened in incognito tab are not left in the history. Tap a link displayed on web page to operate the following. If you close the incognito tab, any record such as Cookie is ・...
- Page 92 ◆ Printing web page ◆ Setting Chrome You can print a displayed web page using a Wi-Fi supported You can set search engine and privacy setting etc. printer or the cloud print function. Set connection with a When a web page is displayed, slide the screen printer beforehand.→P175 down to display the top of the screen→...
-
Page 93: Applications
Applications dmarket Various services including selling digital contents such as music, videos, books, shopping sites, travel reservation sites, dメニュー (dmenu) etc. are provided. From the Home screen, [dmarket] In dmenu, you can easily access sites recommended by Top screen of dmarket appears. DOCOMO or convenient applications. - Page 94 ◆ Installing application ✔INFORMATION ・ Once you accept the installation of an application, you will be From the Home screen, [Play Store] held responsible for its use. Be careful especially about Google Play screen appears. applications which access many functions or large amount of data.
-
Page 95: Osaifu-Keitai
[UNINSTALL]→[OK] ◆ Precautions on using Osaifu-Keitai compatible terminal ・ When [REFUND] is not displayed for charged applications, this means that the free trial period has ・ Data in the IC card and in the docomo nano UIM card ended. may be lost or modified because of the malfunction of the terminal (when we repair your terminal etc., as we cannot repair it with Osaifu-Keitai data remained, you are required Osaifu-Keitai... - Page 96 Select a service ◆ Using "かざしてリンク対応サービス (Kazashite-Link compatible service)" Set up the service ・ Make the required settings from the service site or From the Home screen, →[Settings]→ application. [Wireless & networks]→[NFC/Osaifu-Keitai Hold mark over a card reader Settings] ・ When the password setting screen for NFC/Osaifu- ✔INFORMATION Keitai lock appears, follow the on-screen instructions to...
- Page 97 ◆ Tap & pay ◆ Notes when holding over the other device Enable or disable the setting of the service available by holding the terminal over the IC card reader, such as Osaifu-Keitai Pay attention to the following when holding the terminal over service.
- Page 98 ・ ◆ Locking Osaifu-Keitai function When canceling Lock NFC/Osaifu-Keitai, make sure that your terminal contains the same docomo nano UIM card that was Lock the Osaifu-Keitai function not to allow others to use in the slot when you enabled Lock NFC/Osaifu-Keitai. Osaifu-Keitai services or acquire data from scanners.
-
Page 99: Tv (Full Seg/1Seg)
◆ トルカ (ToruCa) TV (Full Seg/1Seg) The ToruCa application allows you to save coupons offered by your favorite shops and other useful information (ToruCa) to TV is an application for watching programs switching your terminal. ToruCa can be obtained via emails or download between Full Seg and 1Seg according to reception of signals. - Page 100 ■ The included TV antenna cable F01 Packet communication charge is applied when accessing a site such as a "data broadcasting site" or others. TV antenna receives broadcasting signals when you watch TV Some sites require information charges to be used. (Full Seg/1Seg).
- Page 101 ❖ ◆ Activating TV TV watching screen →[TV] From the Home screen, TV watching screen appears. ・ When you activate the software for the first time, create a channel list corresponding to the watching area.→ P104 ・ By default, Full Seg/1Seg watching mode is set to [Auto].
- Page 102 c Control bar (for Full Seg only) ◆ TV link ・ When you tap an icon, the corresponding screen is For some data broadcasting programs, link information to displayed in the operation panel area. related websites (TV link) is displayed. Save TV links to display : Show/hide remote controller related websites directly.
- Page 103 ・ ◆ Reserving watching/recording When using functions that can be used by users or guests or the terminal is being used by other than the owner, Reserve You can reserve watching or recording TV programs. Viewing/Reserve Recording is not available. If the reserved time comes while the terminal is being used by other than On the TV watching screen, →[Reserve...
- Page 104 ・ ◆ Recording a program If the following occurs while recording Full Seg/1Seg, recording automatically stops. You can record image, sound, subtitle and data broadcasting - Available space on the terminals memory or microSD card you are watching. is 19 MB or less for Full Seg and 0.5 MB or less for 1Seg The maximum of 99 items can be recorded onto the terminal - Remaining battery is 10% or less and microSD card each.
- Page 105 Select data ◆ TV settings A play screen appears. →[Settings] On the TV watching screen, ・ If playback ended halfway in the previous session, playback resumes from where it left off. Set required items ・ Tap the play screen to display the play controller. Superimpose setting : Set displaying/hiding super impose : 15 seconds rewinding text and language for Full Seg.
-
Page 106: Camera
◆ Setting the channel Camera ❖ Creating channel list ◆ Cautions on shooting →[Change area] On the TV watching screen, ・ Although the camera is manufactured using extremely high- Touch and hold an unregistered item→[Area precision technology, it may contain dots or lines that are info setting]→Select the region, prefecture, always lit or that do not light. -
Page 107: Viewing Shooting Screen
◆ Viewing shooting screen Copyrights and portrait rights Avoid reproducing, altering, or editing taken or recorded pictures or sounds using the terminal without the copyright holders authorization, because, except for personal use etc., they are prohibited by the Copyright law. Avoid using or altering pictures of others without their consent, because they may infringe on portrait rights. -
Page 108: Shooting Still Images
e Menu icon ◆ Shooting still images ・ It does not appear during video recording. f Still images/videos that was taken immediately before From the Home screen, [Camera] ・ Tap to check a shot still image/video. When the camera is A still image shooting screen appears. -
Page 109: Continuous Shooting
・ ◆ Continuous shooting In continuous shooting mode, you can set the picture size × × (3MP 2048 1536/Fit screen 1920 1080/Mobile email × You can shoot continuously up to 100 images. 480), location information, save location, Touch shutter, ・ Continuous shooting mode is not available for shooting with grid view, and Exposure/WB adjust.→P108 in-camera, shooting with HDR mode, flash or self timer... - Page 110 ◆ Automatic still image shooting ■ Automatic exposure Automatically adjust exposure according to the ambient The terminal automatically adjusts settings and shoots lighting. When face detection frame of auto focus appears, pictures in the following functions. exposure is fixed based on the brightness of face. If you want ・...
-
Page 111: Shooting Video
■ Flash ■ Others Select Flash setting from auto flash ( )/flash ( )/off ( ). If Location : Set to add location information to shot images. auto-flash is set, when the camera determines that lighting is When location information is set to be added, icon of insufficient, the flash automatically lights. - Page 112 ・ ◆ Shooting High speed videos When shooting starts, elapsed time appears on the shooting screen. You can shoot scenes with motions such as sport etc. with (Stop) "HighSpeedVideo" camera mode and edit so that the videos can be played partially in slow-motion. Shooting end sound is heard and a shooting stops.
- Page 113 ❖ Editing high speed videos ◆ Automatic video recording Edit a range of shot high speed video to be played in slow The terminal automatically adjusts settings and records video motion. in the following functions. ・ ・ The range specified for slow motion is played in 1/4 of the Recording voice is always turned on.
-
Page 114: Qr Code Reader
■ HDR mode (unavailable for HighSpeedVideo) ◆ QR code reader Set to adjust contrasting of screen for video with crushed Scan QR code data and use it. blacks reduced even in backlight. ・ QR code cannot be scanned for some versions (type and ■... -
Page 115: Album-Scene
Check scanned data Album-Scene Saving data : On the scanned data, [MENU]→[Save to history]→Tap history field Displaying history : On the QR code shooting screen, You can view still images or videos shot with the camera or [MENU]→[History]→Select a history downloaded to the terminal. -
Page 116: Hf Player
: Activate camera ・ HF Player Displayed items vary depending on the displayed screen or operation status. Or slide your finger from left edge to right on the screen. Play music contents saved in the internal storage or a Or slide your finger from right edge to left on the screen. microSD card. -
Page 117: Playing Music
d Show lyrics ◆ Playing music ・ Show lyric and the tap at the upper right to change the font size. Also, tap at the upper left to use the From the Home screen, [HF Player] function which chases the lyric according to play of song. Select the tab e Title/Artist/Album name f Repeat... -
Page 118: Using Playlist
◆ Purchasing from d music etc. ✔INFORMATION ・ Select a play list on the play list screen→Select a song to You can purchase or download songs or albums via d music or play. e-onkyo music. ・ To sort the playlists, in the playlist list screen, [Edit]→Drag From the Home screen, [HF Player] of the playlist up or down to move→[Done]. -
Page 119: Location Data/Gps
・ The displayed map based on the acquired location Location data/GPS information (latitude and longitude information) may be inaccurate because of the legal system in each country and area. You can use the GPS function on the terminal and a compatible application to check your current location or ■... -
Page 120: Setting Location
◆ Precautions for using electronic ◆ Setting Location compass Allow applications to use location information. ・ Items or displays may vary depending on the version of the An electronic compass is equipped with the terminal and it application. senses the faint fluctuation in the magnetic field of the earth to calculate directions. -
Page 121: Schedule
◆ Google Maps Schedule The Google Maps™ application lets you measure your current location, find locations and calculate routes. You can manage your schedule. ・ To use Google Maps, a network connection via LTE/3G/ GPRS network or Wi-Fi is required. From the Home screen, [ドコモクラウド... -
Page 122: Clock
◆ Displaying schedule Clock Display information of registered schedule. On the calendar screen, tap a date→Tap a You can use the alarm, clock, timer, stopwatch and world schedule clock. ・ On the alarm/clock/timer/stopwatch screen, tap → Check the schedule [Settings] to make settings for the clock. Editing schedule : [Edit]→Edit schedule→[Save] ◆... -
Page 123: Using Stopwatch
◆ Using stopwatch : Displayed within 2 hours until the alarm sounds to cancel the alarm. →[Clock] From the Home screen, ✔INFORMATION [STOPWATCH] ・ To delete an alarm in the alarm list, tap of alarm to delete → The stopwatch screen is displayed. ・... -
Page 124: Calculator
Calculator Search From the Home screen, →[Calculator] Use "Google" application to search. ・ Items or displays may vary depending on the version of the Calculate application. Deleting the input numbers and symbols : [DEL] ◆ Google Search Deleting all mathematical expressions : [DEL] (Touch and hold)/[CLR] You can search in the website by entering keywords. -
Page 125: Docomo Data Copy
◆ Voice Search docomo Data Copy You can search in the website by entering keywords by voice. From the Home screen, [Google]→[Google]→ With "docomo Data Copy", you can copy the data saved in the →Say a keyword to the mouthpiece/ terminal to another terminal, or back up/restore the data. - Page 126 ❖ ◆ Backing up to/Restoring from microSD Backup card Back up the phonebook data, media files, etc. You can transfer or back up the data such as phonebook From the Home screen, →[Data Copy]→ entries or images using a microSD card. [Backup &...
- Page 127 ❖ Copying phonebook data to docomo ✔INFORMATION account ・ Periodical backup is not executed at the specified time while the screen is locked or the emergency mode is running and Copy phonebook data saved to your Google account or the will be executed when activating the function is available terminal to your docomo account.
-
Page 128: Settings
Settings Category Page Wireless & Wi-Fi P127 networks Bluetooth P170 NFC/Osaifu-Keitai P94, P173 Settings Setting menu Airplane mode P133 Tethering P133 Make various settings from the Settings menu. P135 →[Settings] From the Home screen, Cellular networks P136, P181 12 categories are displayed (TILE). Network settings reset P137 ・... -
Page 129: Wi-Fi
◆ Turning Wi-Fi to On to connect Wi-Fi network From the Home screen, →[Settings]→ Connect to home network, company network, or wireless [Wireless & networks]→[Wi-Fi] LAN access points for public wireless LAN services using Wi- Fi function of the terminal to use mail and Internet. Tap the button at the upper right of the screen To connect to a wireless access point, set the connection to turn [Wi-Fi] to On... - Page 130 ・ Enter additional security information as To use docomo services via Wi-Fi, you need to set up your d ACCOUNT. To set up, from the Home screen, →[Settings] required→[SAVE] →[docomo service/cloud]→[d ACCOUNT setting] and operate. ◆ Deleting Wi-Fi network connecting ・...
- Page 131 Tap the detected Wi-Fi Direct device WPS system : [WPS system]→[Push button system]/[PIN entry system (8 digits)]/[PIN entry system (4 digits)]→ Disconnecting Wi-Fi Direct device : Tap the connected Operate on the access point Wi-Fi Direct device→[OK] ・ In case of push button method, press a dedicated button ■...
- Page 132 ・ Set each item When Multi-connection is set to OFF, high-speed download also turns OFF. ・ Tap [Select mode] to select the communication mode ・ If data amount exceeds the limit of subscribed budget plan for Multi-connection. and transmission speed is limited, Multi-connection does not ・...
- Page 133 ◆ Wi-Fi sleep policy ◆ Configuring Wi-Fi Set whether to disconnect Wi-Fi when the screen of the →[Settings]→ From the Home screen, terminal turns off or while charging. [Wireless & networks]→[Wi-Fi]→ From the Home screen, →[Settings]→ [CONFIGURE] [Wireless & networks]→[Wi-Fi] Set each item [CONFIGURE]→[Wi-Fi sleep policy]→Select the Saved networks : Saved Wi-Fi networks are displayed.
-
Page 134: Data Usage
◆ Setting a billing cycle Data usage Set a billing cycle (measuring period), a data amount for warning, or an upper limit of data usage. Check the data usage amount or make settings for the cellular From the Home screen, →[Settings]→[Data data communication. -
Page 135: Airplane Mode
◆ USB tethering Airplane mode Connect the terminal to a PC using USB cable A to C 01 (optional) to use the terminal as a modem to access the Set Airplane mode to disable wireless function (call, packet Internet. communication, Wi-Fi, Miracast, tethering, Bluetooth Connect the terminal and a PC with the USB function) of the terminal. -
Page 136: Bluetooth Tethering
◆ Setting Wi-Fi tethering ◆ Bluetooth tethering Change the settings as required. You can connect Bluetooth devices to the Internet. ・ ・ By default, [F-01K_AP] is set for Network name, [WPA2 PSK Up to 4 Bluetooth devices can be connected at the same AES] is set for Security, and a random value is set for time. -
Page 137: Vpn (Virtual Private Network)
◆ Connecting to VPN VPN (Virtual Private Network) →[Settings]→ From the Home screen, [Wireless & networks]→[More]→[VPN] VPN (Virtual Private Network) is a technology to connect to the information in a protected local network such as Select a VPN to connect to enterprises or universities from another network. -
Page 138: Cellular Networks
❖ Checking the access point in use Cellular networks →[Settings]→ From the Home screen, [Wireless & networks]→[More]→[Cellular Disable data communication or add an access point. networks]→[Access Point Names] ◆ Stopping the packet communication ❖ Adding an access point Some applications automatically perform packet ・... -
Page 139: Network Settings Reset
❖ Initializing an access point Display & Wallpaper By initializing an access point, the default state is restored. From the Home screen, →[Settings]→ Set screen brightness or auto-rotate screen. [Wireless & networks]→[More]→[Cellular →[Settings]→ From the Home screen, networks]→[Access Point Names] [Display/Sound/Apps]→[Display &... -
Page 140: Screen Brightness
❖ Keep lit when held Video correction : Set whether to correct image quality of videos (1Seg, YouTube, etc.). Set whether to keep the screen backlight on while the terminal ・ For videos recorded by the camera or downloaded etc. is in motion, held in hand. -
Page 141: Notifications
◆ Touch and go display Notifications Set whether to cancel sleep mode by double-tapping the screen. Set the display method of notification of each application or From the Home screen, →[Settings]→ function. Also, you can change the settings of the notification [Display/Sound/Apps]→[Display &... -
Page 142: Sound
◆ Advanced settings of Notifications Sound →[Settings]→ From the Home screen, [Display/Sound/Apps]→[Notifications]→ Make settings for sound volume, phone ringtone, etc. [ADVANCED] →[Settings]→ From the Home screen, [Display/Sound/Apps]→[Sound] Set each item Pulse notification light : Set whether to notify of new Set each item SMS, missed call, etc. -
Page 143: Manner Mode
・ ◆ Volumes You can set Do Not Disturb in the Panel switch (→P53). → To use the function, display the Panel switch→ You can adjust volume of media playing sound, alarm sound, Touch and hold [Do not disturb] and drag to add to the ringtone. - Page 144 ◆ Dolby Audio ✔INFORMATION ・ You can also set/cancel Manner mode by the following steps. Set whether to use Dolby Audio for playing video or music. - Press the volume down key for 1 second or more From the Home screen, →[Settings]→...
-
Page 145: Apps
◆ Deleting applications Apps ・ For applications obtained from Play Store, you are recommended to delete from the Google Play screen. →P92 Manage, delete, etc. installed applications. ・ You cannot uninstall some pre-installed applications by default. And if pre-installed applications are uninstalled, you ◆... -
Page 146: Storage
Storage Battery Check the usage status of the internal storage or microSD Check the remaining amount of battery, etc. card. →[Settings]→ From the Home screen, From the Home screen, →[Settings]→ [Battery] [Display/Sound/Apps]→[Storage] Set each item Set each item Battery saver : Setting steps→P144 Internal shared storage : Used amount and total amount Full charge settings : Set whether to charge the battery to of memory of the terminal, used amount per data are... -
Page 147: Memory
✔INFORMATION Users ・ When charging starts, the setting of Battery saver turns off automatically. To use Battery saver, turn it on again after charging. Add a user to share the terminal with multiple users (the function with which users and a guest can use the terminal). ◆... -
Page 148: Gestures
My physical profile : Set basic information to use for docomo service/cloud health care applications or widgets. ✔INFORMATION Make settings for docomo service or cloud. ・ You can add up to 5 users including the owner and guests. ・ →[Settings]→ From the Home screen, To remove a user when the user uses the terminal, from the Home screen,... -
Page 149: Security
Open source licenses : Show open source licenses. Security ✔INFORMATION ・ You can disable some applications displayed in docomo Make various settings for security. service/cloud. Disabled applications may not be displayed in →[Settings]→ From the Home screen, the list of docomo service. Also, if you newly download an application provided by DOCOMO, an item may be added in [Security] the list of docomo service/cloud. - Page 150 Apps with usage access : Manage applications which can access the app usage history in the terminal. Notes on the security codes Encrypt phone : Check that the system data saved in the ・ Avoid using a number that is easy to guess, such as internal storage is encrypted.
-
Page 151: Network Security Code
❖ ・ Network security code If docomo nano UIM card is PIN locked or PUK locked, remove the docomo nano UIM card to display the Home The network security code is a 4-digit number necessary for screen so that communication via Wi-Fi connection is identification or using the docomo network services at available. -
Page 152: Locking The Screen
◆ Setting the security unlock preference Power button instantly locks : Set whether to activate the screen lock instantly by pressing P. Canceling the screen Set type of authentication operation to unlock the screen lock. lock requires authentication. Lock screen message : Enter a message to be displayed on From the Home screen, →[Settings]→... - Page 153 ❖ When you forget unlock method ◆ Fingerprint authentication function ・ When the security unlock preference that requires The terminal is equipped with the fingerprint authentication authentication is set and if you fail unlocking screen lock 5 with which authenticate the security with registered times or more, the cancel operation cannot be performed fingerprint information.
- Page 154 ・ ・ When connecting the terminal to a device which requires The following conditions may make fingerprint grounding such as a desktop PC with a USB cable, be sure authentication difficult or reduce the authentication to perform a ground connection. While connecting without performance.
-
Page 155: Fingerprint Settings
[NEXT]→Follow the onscreen instructions to ◆ Iris authentication function register your iris→[DONE] The terminal is equipped with the iris authentication with ・ To add another fingerprint, tap [Add fingerprint] and which authenticate the security with registered iris then follow the onscreen instruction to register information. - Page 156 ❖ ❖ Precautions for registering iris Precautions for using iris authentication ・ ・ If you wear glasses, remove them to register (you can wear Authentication performance depends on the condition of glasses at authentication). use. The following conditions may make iris authentication ・...
- Page 157 ❖ ❖ Registering iris Iris authentication setting →[Settings]→ →[Settings]→ From the Home screen, From the Home screen, [Security]→[Register iris] [Security]→[Iris settings] ・ When you set security unlock preference requiring Set required items authentication, authenticate, tap [START Improving accuracy of iris authentication : Register the REGISTRATION], and then go to Step 3.
- Page 158 ❖ ◆ Personal note Displaying authentication information storage type Register and manage authentication information such as your ID (account), password, etc. You can enter by quoting the From the Home screen, →[Settings]→ registered information.→P42 [Security]→[Information security] ・ Set a security unlock preference which requires authentication in advance.→P150 Check [Storage type] ・...
-
Page 159: Setting Pin Code
Enter the name of the authentication Mark [Unknown sources]→Confirm information/certificate→[OK] precautions and [OK] ❖ Clearing credentials ◆ Setting PIN code Clear all authentication information, certificates or VPN ❖ Set up SIM card lock settings from the authentication storage. From the Home screen, →[Settings]→... -
Page 160: Accounts
❖ Entering PIN code ✔INFORMATION ・ You can set to require authentication when unpinning Turn on the power→on the PIN code entry application by setting [Security authentication for unpinning] screen, enter the PIN code→ to On in Step 2. ❖ Unlocking PUK Accounts When PIN code is locked (PUK lock), unlock the lock and then... -
Page 161: Google
◆ Deleting an account Google →[Settings]→ From the Home screen, [Location/Accounts]→[Accounts] Check, change, or delete information or settings related to your Google account and the services. Select an account type→Select an account→ ・ For details on Google settings, on the Google setting screen, [MENU]→[Remove account]→[REMOVE →[Help &... -
Page 162: Languages & Input
◆ Switching to English display Languages & input Change the language to be used to English. →[設定 (Settings)]→[ From the Home screen, Change the language used for the terminal, font or character size. 言語と入力 (Languages & input)]→[言語 (Languages)] From the Home screen, →[Settings]→... -
Page 163: Backup & Reset
◆ Setting Voice Search Backup & reset Set Google Voice Search functions. From the Home screen, →[Settings]→ Back up the data of the terminal or reset the terminal. [Languages & input]→[Virtual keyboard]→ →[Settings]→ From the Home screen, [Google voice typing] [Location/Accounts]→[Backup &... -
Page 164: Useful Tools
[ERASE EVERYTHING] Useful tools A short while after the reset is completed, the terminal will be restarted. ・ Do not turn off the terminal while resetting tablet. Set Slide-in function, Pedometer, etc. ✔INFORMATION →[Settings]→[Useful From the Home screen, tools] ・ If the touch operations cannot be performed correctly after resetting, turn off and on the power. - Page 165 ◆ Exlider settings ✔INFORMATION ・ Configure the following settings to use Personal assist more Swipe the power key to scroll or zoom the screen. comfortably. These settings will help identify your current From the Home screen, →[Settings]→[Useful location with higher accuracy, thus providing more accurate tools]→[Exlider settings] assistance.
-
Page 166: Navigation Bar
・ ◆ Navigation bar Note that unintended operation may be executed if you put the terminal in a pocket or a bag with the backlight ON when Set icons (→P49) on Navigation bar. [Glove touch] is marked. Let the terminal go to sleep mode when putting the terminal in a pocket etc. - Page 167 ❖ Precautions on using Pedometer ✔INFORMATION ・ At the beginning of walking, the figure is not changed ・ To count steps accurately, it is recommended that you wear because the Pedometer is judging to prevent miscount the pedometer correctly (place it in a carrying case and whether you started walking.
-
Page 168: Date & Time
Date & time Accessibility Set for date and time. Set for assistance of user operations. ・ To set the date & time and the time zone manually, unmark →[Settings]→ From the Home screen, [Automatic date & time]/[Automatic time zone]. [System]→[Accessibility] From the Home screen, →[Settings]→... -
Page 169: About Phone
Text-to-speech output : Set up text-to-speech output. Touch & hold delay : Set time to detect a touch and hold. Color inversion : Set whether to invert the color. Color correction : Make the settings related to color correction function. About phone Display various information about the terminal. -
Page 170: File Management
File management microSD card (External storage) Save the data of the terminal to a microSD card or import the data of a microSD card to the terminal. Storage (Internal storage) ・ For microSD cards, refer to "microSD card".→P33 Folders in the internal storage (/storage/emulated/0/) and data saved in each folder by default are as follows. -
Page 171: File Operations
File operations You can manage data saved in the internal storage and microSD card (rename/delete/copy/move etc. folders and files). From the Home screen, →[File Manager] Touch and hold a folder/file ・ Tap a file to display/play. ・ →To switch the storage, tap [F-01K]/[SD card]. ・... -
Page 172: Data Communication
❖ Data communication Handling precautions when using Bluetooth function ・ Connect with another Bluetooth device keeping the line-of- sight distance to 10 m or shorter. Distance available for ® connection may be shorter if obstacles exist between the Bluetooth communication terminal and the Bluetooth device or depending on surrounding (wall, furniture, etc.). - Page 173 ◆ Bluetooth ON/OFF ◆ Connecting with registered Bluetooth devices Set Bluetooth to ON to use Bluetooth function. When you do not use Bluetooth, set it to OFF in order to cut the battery Connect Bluetooth device. You can talk or play back sounds or power consumption.
- Page 174 ◆ Sending or receiving data to or from ◆ Canceling connection with a Bluetooth Bluetooth device device You can send data such as Album-Scene (→P113) and contacts When a Bluetooth device such as an earphone microphone or or receive data from a Bluetooth device. keyboard is connected, cancel it by the following operation.
-
Page 175: Nfc Communication
◆ Bluetooth Low Energy setting NFC communication Set notification for Bluetooth Low Energy device. From the Home screen, →[Settings]→ NFC is an abbreviation for Near Field Communication and a [Wireless & networks]→[Bluetooth]→[MENU] short range wireless communication method of international standard defined by ISO (International Organization for →[Bluetooth Low Energy] Standardization). - Page 176 Mark [Reader/Writer, P2P] [Android Beam]→Tap the button at the upper right of the screen to turn [Android Beam] ON ❖ Transferring content displayed on the screen You can transfer content shown on the screen such as websites, only by holding mark over each other's terminal.
-
Page 177: External Device Connection
External device connection Transfer photos (PTP) : Transfer still images or videos to a PC etc. which does not support MTP. Use device as MIDI : Use the terminal for MIDI input. USB tethering : Setting steps→P133 Perform target operations Connecting with a PC ✔INFORMATION ・... - Page 178 ・ ◆ Print For details on Google Cloud Print, refer to Help of Google Cloud Print on the Google website. <Example> Printing a web page displayed with →[Settings]→ From the Home screen, "Chrome" application [System]→[Printing]→[Cloud Print] While a web page is displayed, slide down the Tap the button at the upper right of the screen screen to display the top part of the web page to turn [Cloud Print] to On...
-
Page 179: Connecting With Dlna Device
アクセス権の設定 (Set access right) : Mark [アクセス権の初 Connecting with DLNA device 期設定 (Set up access right)] to permit DLNA devices to access the terminal. Unmark it to permit only DLNA devices that are marked in [接続機器の一覧 (Device list)] to Still images, videos or music stored in the terminal can be access. - Page 180 ◆ Distributing contents in the terminal ◆ Playing back DLNA devices contents on the terminal Distribute contents on the terminal to DLNA devices. Playback can be operated via the terminal. ・ Disclose contents on the DLNA device to allow access from ・...
-
Page 181: Connecting With Other Devices
✔INFORMATION Connecting with other devices ・ Touch and hold content in the content selection screen to display menu options for playing or deleting the content, or downloading or playing it on another device. However, ◆ Displaying on Wi-Fi Miracast device via copyrighted contents may not be downloaded on some Wi-Fi connection DLNA devices. -
Page 182: Overseas Use
Overseas use Available services for overseas Main communication 3G850 Outline of international (GPRS) services roaming (WORLD WING) Phone ○ ○ ○ ○ ○ ○ ○ ○ With the international roaming (WORLD WING), you can use Packet the terminal without changing phone number or mail address ○... -
Page 183: Before Using The Terminal Overseas
・ To use network services overseas, you need to set "Remote Before using the terminal operation settings" to activate. You can set "Remote operation settings" in the country you visit. From Japan (→ overseas P73), from overseas (→P185) ・ Even if the setting/canceling operation is available, some network services cannot be used depending on overseas ◆... - Page 184 [Data roaming]→Check the contents on the ✔INFORMATION Attention screen, [OK] ・ To set network mode automatically, from the Home screen, →[Settings]→[Wireless & networks]→[More]→[Cellular ❖ Setting Network operators networks]→[Network operators]→Tap [4G/3G/GSM(Auto)]. ❖ By default, the terminal is set to automatically search and Date &...
-
Page 185: Making/Receiving A Call In The Country You Stay
◆ Making a call inside the country you Making/Receiving a call in the stay country you stay You can make a call to the other party's land-line phone or mobile phone in the same way you do in Japan. ◆ Making a call to outside country you From the Home screen, stay (including Japan) [Dial]→Enter a phone number... -
Page 186: Setting International Roaming
❖ Making a call to your terminal Setting international roaming ■ To have the other party in Japan call you overseas Have your phone number dialed as a domestic call in Japan. Make settings for international roaming service. ・ The settings may not be made depending on overseas ■... -
Page 187: After Returning To Japan
Operate according to the voice guidance International prefix : Select the country code used in the automatic conversion function. ◆ Network service (overseas) After returning to Japan Set the network services such as the voicemail service to use overseas. When you return to Japan, the terminal is connected to ・... -
Page 188: Appendix/Index
Appendix/Index * Note that data and settings may be erased since that is an operation for shutting down of the power or restarting forcibly. ● Cannot charge the battery (the indicator LED does not turn on or blinks) • Is the adapters power plug inserted to the outlet or Troubleshooting (FAQ) accessory socket correctly? •... - Page 189 ● The operation time provided by the battery is short ● The screen reacts slowly when a touch panel is tapped/ • Running multiple applications increases battery key is pressed. consumption and usage time may become short. Exit When large amount of data is saved in the terminal or from applications which you are not using as follows.
- Page 190 ● Display flickers * Some applications or widgets may be hidden. If [Adaptive brightness] is marked, the display may be ● Operations are not possible when tapping the screen looked like flickered because backlight automatically • Do you operate with a fingernail or foreign object on the changes according to the ambient brightness.
- Page 191 ● During a voice call, the distant party's voice is hard to ● Calls cannot be made • listen to or too loud Is the docomo nano UIM card installed in the right Adjust the listening volume. Turn on Voice clear and Voice direction?→P32 •...
- Page 192 ■ Osaifu-Keitai ● There is no incoming call overseas Is Incoming call restriction while roaming set to [Activate ● Osaifu-Keitai function is unavailable restriction]?→P184 • When Omakase Lock is set, appear on the ● No caller ID is notified/A notified caller ID is different status bar and Osaifu-Keitai functions are unavailable from that of the caller/Functions for using contents regardless of the NFC/Osaifu-Keitai lock settings.
-
Page 193: Error Messages
■ Bluetooth ● Commercially available external devices (USB mouse, keyboard, etc.) are not recognized. ● The terminal cannot be connected to a Bluetooth device/ • Connect a USB device to the terminal and operate the A Bluetooth communication device cannot be found following to start using a USB device. - Page 194 ● Cannot activate iris device ● SD card error It appears when the camera for iris authentication does SD card removed. not work properly. If the camera for iris authentication is To prevent data loss, turn off the device, and then eject SD card.
-
Page 195: Anshin Enkaku Support
[遠隔サポートの接続画面に進む (Go to Enkaku Anshin Enkaku Support support connection screen)]→[同意する (Agree)] By sharing screens of your terminal with DOCOMO, you can Enter connection number notified by DOCOMO receive technical support to make settings, use applications, connect with peripheral devices such as a PC. (In Japanese Enkaku support starts when you are connected only) ・... -
Page 196: Warranty And After-Sales Service
b Even if the warranty period has not expired, a fee will be Warranty and After-Sales charged for repair under the following circumstances. 1. The malfunction or damage is due to modification Service (including alteration of software) of the product. 2. - Page 197 f The software of the terminal is updated to the latest one ■ Replacement parts when operation confirmation test is performed without Replacement parts (parts required to maintain functions) will regard to repair. in principle be kept in stock for 4 years after termination of g Please find repaired part and repair date on the repair production.
-
Page 198: Software Update
・ Function settings and information may be cleared (reset) by Software update malfunctions, repair or other handling of the terminal. Should that happen, set up the functions again. Depending on the setting, a packet communication charge may be ◆ About Software Update applied. - Page 199 ❖ ・ Cautions Updating is unavailable in the following cases. - During a call ・ When updating is performed, restoring the previous - When the icon (out of service area) is displayed software is not possible. - Tethering in use as an access point ・...
-
Page 200: Updating Software
a Select an upgrade method ◆ Updating software Perform now (only via Wi-Fi) : Immediately download ・ Depending on update, installation may not be reserved and the update file via Wi-Fi connection. you need to execute the installation by yourself. Open the Perform at scheduled time (via Wi-Fi/Xi) : Download Notification panel→Tap a notification→Tap [Install]. -
Page 201: Main Specifications
◆ Updating applications Main specifications ・ After updating, check if there is an update for application. Operations may become unstable or function may not work properly without updating the application. Be sure to ■Phone upgrade to the latest version. Product name F-01K ×... - Page 202 Charging time AC Adapter 06 : Approx. 130 Still picture recording size Out-camera : × min. 23M 5520 4140 × DC Adapter 05 : Approx. 140 17M 5520 3104 × min. 8M 3840 2160 × 3M 2048 1536 × Display Type Fit screen 1920 1080...
- Page 203 Continuous call time indicates the estimated time that the phone Bluetooth Version can send or receive radio waves normally. Output BT5.0 BR/EDR:Power Class 1 Continuous 1Seg/Full Seg watching time indicates the estimated BT5.0 LE : Power Class2 watching time when radio signal reception is normal. Supported HFP (1.6) , HSP (1.2),...
- Page 204 ❖ ❖ File formats of still images and videos Recording time of Full Seg (Estimation) taken by the terminal ・ Varies by memory space of the terminal/microSD card or contents of program to be recorded (data broadcasting Type File format Extension volume etc.).
-
Page 205: Specific Absorption Rate (Sar) Of Mobile Phones
0.886 W/kg and when worn on https://www.nttdocomo.co.jp/english/product/sar/ the body is 0.398 W/kg . There may be slight differences FUJITSU LIMITED Website: between the SAR levels for each product, but they all satisfy http://www.fmworld.net/product/phone/sar/ (in Japanese the limit. only) -
Page 206: Declaration Of Conformity
Including other radio systems that can be simultaneously Model Name: F-01K used with cellular radio wave. Hereby, Fujitsu Connected Technologies Ltd. declares that Tests for SAR have been conducted using standard the RE product of "F-01K" is in compliance with RED 2014/ operation positions with the phone transmitting at its 53/EU. - Page 207 RFID 13.56MHz This model phone meets the U.S. Government's requirements The manufacturer of this product is Fujitsu Connected for exposure to radio waves. This model phone contains a Technologies Ltd. with its registered place of business at 1-1, radio transmitter and receiver. This model phone is designed...
- Page 208 ・ maximum value. This is because the phone is designed to In the United States, the SAR limit for wireless mobile operate at multiple power levels so as to use only the power phones used by the general public is 1.6 Watts/kg (W/kg), required to reach the network.
-
Page 209: Important Safety Information
◆ Important Safety Information Hearing Aids Some digital wireless phones may interfere with some hearing AIRCRAFT aids. In the event of such interference, you may want to consult Switch off your wireless device when boarding an aircraft or your hearing aid manufacturer to discuss alternatives. whenever you are instructed to do so by airline staff. -
Page 210: Export Administration Regulations
Export Administration Intellectual Property Right Regulations ◆ Copyrights and portrait rights This product and its accessories may be under coverage of the Except for the case protected by copyright laws such as Export Administration Regulations of Japan ("Foreign personal use, use of terminal to reproduce, alter, or publicly Exchange and Foreign Trade Control Laws"... - Page 211 ・ Facebook and Facebook logo are trademarks or registered Digital Living Network Alliance. trademarks of Facebook, INC. DLNA certification of this model is acquired by FUJITSU ・ microSD logo, microSDHC logo and CONNECTED TECHNOLOGIES LIMITED. ・...
-
Page 212: Open Source Software
For details, - Playing MPEG-4 Videos recorded personally by refer the website below. consumers not engaged in profit activities http://spf.fmworld.net/fujitsu/c/develop/sp/android/ (In - Playing MPEG-4 Video supplied from the provider licensed Japanese only) from MPEG-LA... -
Page 213: Sim Unlock
SIM unlock This terminal supports SIM unlock. If you release SIM lock, you can use SIM by a carrier other than NTT DOCOMO. ・ Available services and functions may be limited. DOCOMO is not liable to any failures or malfunctions. ・... -
Page 214: Index
Cancel sync..............索引 Index Deleting................ Settings ................ Synchronizing manually..........Adaptive brightness ............After-Sales Service ............Airplane mode..............Album-Scene ..............About phone..............Viewing still image/Playing video......Auth ................Android Beam ..............Legal information ............Anshin Enkaku Support ..........Status................APN .................. Access point .............. - Page 215 Translation/App link setting.......... Renaming..............Automatic still image shooting ........Sending/Receiving data..........Adjust flicker ............... Unpairing ..............Auto focus ..............Bluetooth Low Energy............ Automatic exposure ........... Alert Notification ............Scene mode ..............Alert Notification Detail Setting ......... Touch focus..............Find Me Ringtone............White balance .............
- Page 216 Cellular networks ............Customize screen.............. Character entry..............Editing text ..............Keyboard ................ d ACCOUNT..............Setting ................Data roaming..............Voice input ..............Data usage............... Charging................Billing cycle..............AC adapter ..............Cellular data..............Charging adapter............Date .................. PC..................Date & time ..............Precautions ..............
- Page 217 dmarket................Easy settings for Wi-Fi tethering........dmenu ................Editing text ................ Do not disturb ..............Emergency information..........docomo Data Copy ............Emergency mode .............. Backing up to/Restoring from microSD card ... Enabling/Disabling the data communication ....Backing up to/Restoring to docomo cloud ....English display ..............
- Page 218 Setting Machi-Chara ............. Wallpaper............... Gestures................Homescreen selector ............Jump to Camera ............How to use Exlider............Turn off sound when flipped ........Glove touch ..............Gmail .................. Icon..................Displaying ..............Back icon................ Google................History icon..............Google Account.............. Home icon..............Google Maps ..............Navigation bar...............
- Page 219 Registering ..............Memory................Iris authentication LED ............. Messaging ................. Iris registration camera ............ Microphone ............... 33, 168 microSD card............Erasing data..............File transfers ..............Jump to Camera............. Formatting ..............Installing ................ Operation from a PC ........... 93, 94 Kazashite-Link compatible service ......Photo transfer (PTP)............
- Page 220 Nuisance call blocking service ......... Add 2-sec pause ............41, 43 Numeric keypad ............Call settings ..............Flick input ............... Call volume..............67, 73 Gesture input ..............Caller ID notification ..........Numeric keypad input........... Emergency call .............. 2-touch input..............Making a call..............NX! Mail ................
- Page 221 Setting ................. Schedule ................Pinch................... Displaying ..............Play Store................Registering..............Deleting application ............Screen brightness ............Installing application ............. Screen lock 53, 150 Playing video ..............Locking..............Pointer speed..............Setting unlock method..........Power key ................Unlock ................Pre-installed applications ..........Screen locking sounds ...........
- Page 222 HDR mode ..............Sound at start charging ..........Location............... Speaker ................Picture Size..............Specifications ..............Save ................Spell check............... SelfTimer..............Split screen................ Touch shutter.............. Status bar ................Shooting settings for video .......... Status icon................. Camera Mode ............. Still image shooting screen ........... Light................
- Page 223 Task manager ..............Using TV ................ Tethering................. TV antenna cable F01 ............Bluetooth tethering ............ TV watching screen ............Easy settings ............... USB tethering ............. Wi-Fi tethering ............Unknown sources ............160, 167 Text-to-speech output ........... Unlocking PUK ..............Time................. USB tethering..............
- Page 224 VPN.................. Adding ................. Connecting ..............Disconnecting ............. VPN (Virtual Private Network)........Warranty ................. Waterproofness/Dustproofness, shock resistance ..Wi-Fi ................Adding ................. Advanced Wi-Fi settings ..........Configuring ..............Connecting ..............Connecting easily ............Deleting ............... Scanning ..............Wi-Fi Auto ON/OFF ............. Wi-Fi sleep policy ............
- Page 225 Match the volume of voice and ring alert to your Use mobile phone with your manners! location Remember to be courteous to others when you use your ■ In a quiet place like a restaurant or hotel lobby, terminal. pay attention to the volume of your voice etc. when using the terminal.
- Page 226 Functions designed for public use Your terminal has a number of useful functions designed for public use, such as a setting that instructs your terminal not to answer incoming calls and the ability to set the terminal for silent operation. ●...
- Page 227 Online Procedures, Confirmation of Subscription, etc. From the terminal dメニュー (dmenu)→"My docomo(お客様サポート)(My docomo (Customer support))" (in Japanese only) From PCs My docomo (https://www.nttdocomo.co.jp/mydocomo/) (in Japanese only) ● There are cases where the site may not be available depending on system maintenance or subscription, etc. ●...
- Page 228 General Inquiries Technical Inquiries & Repairs <docomo Information Center> ■ From DOCOMO mobile phones (In Japanese only) 0120-005-250 (toll free) (No prefix) 113 (toll free) * Service available in: English, Portuguese, Chinese, Spanish * Unavailable from part of IP phones. * Unavailable from land-line phones, etc.