Table of Contents
Advertisement
Advertisement
Table of Contents

Related Manuals for Smeg UG405DSUK


Summary of Contents for Smeg UG405DSUK
- Page 1 PROFESSIONAL DISHWASHER...
-
Page 3: Table Of Contents
Summary PRECAUTIONS FOR SAFETY AND USE ........................2 Trademark ................................2 Name and address of manufacturer or distributor ..................2 Declaration of conformity to product standards ....................2 TECHNICAL DATA ..............................3 INSTALLATION AND POSITIONING ..........................6 INSTRUCTIONS FOR TECHNICAL STAFF ........................6 Plumbing hookup ..............................6 Electrical connection ............................7 FIRST START-UP ................................7 Using the water softener (on models with this feature only) ................8 SET-UP (Authorised technical staff only) ........................9... -
Page 4: Precautions For Safety And Use
TROUBLESHOOTING ............................23 MALFUNCTIONS SHOWN ON THE DISPLAY (FOR THE USER) ................25 SMEG Thanks you for choosing one of its products. Read all the instructions in this manual carefully to become familiar with the right conditions for the proper use of your dishwasher. -
Page 5: Technical Data
THIS MANUAL IS AN INTEGRAL PART OF THE DISHWASHER AND MUST ALWAYS BE KEPT INTACT TOGETHER WITH THE APPLIANCE. POSITIONING, HOOKUP, COMMISSIONING, TROUBLESHOOTING AND REPLACING THE POWER CABLE MUST BE CARRIED OUT BY QUALIFIED STAFF. THE APPLIANCE MUST BE GROUNDED AS REQUIRED BY ELECTRICAL EQUIPMENT SAFETY STANDARDS. THE SYMBOL OF THE RUBBISH BIN WITH A BAR ACROSS IT ON THE PRODUCT OR IN THE TECHNICAL DOCUMENTATION INDICATES THAT THIS PRODUCT MUST NOT BE TREATED AS ORDINARY DOMESTIC WASTE BUT MUST BE CONSIGNED TO THE SPECIAL COLLECTION POINT FOR THE RECYCLING OF ELECTRICAL AND... - Page 6 TANK TOTAL POWER VOLTAGE FUSE HEATING MOTOR BOILER POWER CABLE ELEMENT RATING 230V-50Hz /1/N/PE 2,0kW 0,3kW 2,3kW 2,6kW 3X2,5 Measure “A”: min 670 / 710 Measure “B”: 209 / 249...
- Page 7 REAR INFERIOR PANEL CHARGING HOSE EARTH TERMINAL POWER SUPPLY CABLE PERISTALTIC PUMP TUBES WASTE PIPES...
-
Page 8: Installation And Positioning
INSTALLATION AND POSITIONING INSTALLATION and POSITIONING Bring the dishwasher to the installation site, remove the packaging and check the appliance and components for damage; any damage found must be reported to the transporter in writing. The packaging components (plastic bags, expanded polystyrene, nails, etc.) must not be left within reach of children and pets since they are potentially dangerous. -
Page 9: Electrical Connection
When installing the drain hose to a siphon with valve, the maximum height of the drain outlet is reduced to 600 mm. 4.2 Electrical connection The dishwasher and any additional equipment must be connected to the electrical system by authorised, skilled staff, in accordance with the relevant regulations;... -
Page 10: Using The Water Softener (On Models With This Feature Only)
IMPORTANT Whenever the type of detergent or rinse aid is changed, it is ABSOLUTELY ESSENTIAL to flush out the peristaltic pumps by placing the external intake pipes in water for a few cycles. Always use only products specifically recommended for use in a professional dishwasher. -
Page 11: Set-Up (Authorised Technical Staff Only)
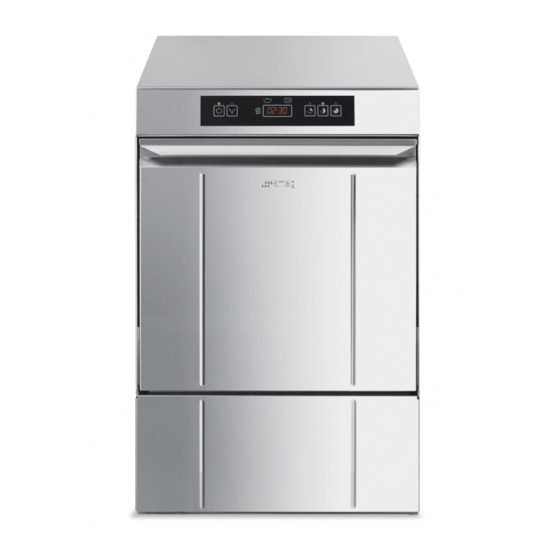
SET-UP (Authorised technical staff only) Set-up During first start-up, the functions/parameters listed below must be set or adjusted. Control Panel Key to Symbols On/off button Total pump-out (tank -boiler) button Regenerating salt symbol (only if softener is fitted) Short programme button Medium programme button Long programme button Short programme Led... -
Page 12: Contents Of Display
Using the buttons Button Short press Pressed for 2” Pressed for 5” Long press, release, press again Door open and machine OFF. Long press >>> display reads Display temperatures On/OF “- -“ >>> release and press Boiler and tank again: Access Setup Menu (1) Scroll through Setup Start Pump-out Total pump-out (tank+boiler) -
Page 13: Modifiable Parameters
6.4 Modifiable parameters This table lists the model choice or programme and temperature option parameters. Display Settings available Description °b From 85° to 71° Boiler temperature °t From 62° to 52° Tank temperature 0 – 2 gr/lt (in steps of 0,1) Rinse aid batching 0-10 gr/lt Detergent batching... -
Page 14: Starting The Peristaltic Pumps In Manual Mode - Rapid Filling Of Detergent And Rinse Aid Circuit
Starting the peristaltic pumps in manual mode – rapid filling of detergent and rinse aid circuit Energized dishwasher and full tank: press for 5 seconds buttons P2 simultaneously. The peristaltic pumps work until P1 or P2 are pressed again; during the procedure the indicator lights stay on and the display shows “rd”. -
Page 15: Clean Water Cycle" Option - Display Reads "Cl
6.10 CL” "Clean water cycle" option - Display reads “CL With this option clean water is used for every washing. At each cycle, the washing water is completely drained and it is replaced with clean water from rinsing. Press to enable (On)/disable (OF) 6.11 “Thermostop”... - Page 16 pressure switch is indicating full even with the boiler empty: - damaged boiler heating element – conta ctor failure - open on boiler safety thermostat side. - boiler temperature probe faulty or incorrectly positioned - motherboard relay failure, Important: If the boiler heating element is damaged, this might be due to operation with no water in the boiler, pressure switch continues to give full reading even with boiler empty: check boiler air trap and/or relative pressure switch and replace if necessary.
-
Page 17: Instructions For The User
INSTRUCTIONS FOR THE USER 8.1 Control panel Key to Symbols On/off button Total pump-out (tank -boiler) button Regenerating salt symbol (only if softener is fitted) Short programme button Medium programme button Long programme button Short programme Led Medium programme Led Long programme Led Drainage Led Appliance on Led... -
Page 18: Before Washing
Use only detergents and rinse aids for industrial dishwashers. Do not use detergents intended for hand washing. We recommend the use of Smeg products, specially developed for this dishwasher. When topping up the tanks, take care not to swap the products; this might damage the dishwasher and cause malfunctions. -
Page 19: First Use Each Day (Tank And Boiler Empty)
4. That the filters are in place, the spray arms rotate, and there are no foreign bodies in the dishwasher. 5. Switch on the master switch (user): the decimal points of both digits appear on the display. 8.3 First use each day (tank and boiler empty) Door closed and master switch on ON: Press and hold for 2/3 seconds, Leds ON/OF light up and... -
Page 20: Choosing The Program
When the door is closed again, the system offers the last program run. 8.4 Choosing the program SYMBOL PROGRAM TYPE OF DIRT DURATION (*) Short Glasses and cups 2’ Medium Glasses, cups and plates with light dirt 2’30” Long Very dirty dishes and cutlery 3’... - Page 21 BASKETS PROVIDED The shape and material of the baskets provided with the dishwasher depend on the purchased model. Extra baskets can be purchased through the After-Sale Service. The following images are indicative. Glasses: Place the glasses downwards. Cutlery Use the dedicated basket. Place the cutlery randomly, preferably with the handle downwards, using caution to avoid injures...
-
Page 22: Maintenance And Cleaning
Topping up with regenerating salt (for models with softener) Warning: use specific salt only, do not use cooking sea salt. Salt must be supplied when the led under the symbol indicated in the left side picture lights up. The salt container has a capacity of about 1 kg of granulated salt. The container is located on the bottom of the tank and it is fitted with two caps. -
Page 23: Daily Cleaning Of Filters
9.1 Daily cleaning of filters The filter group is made of 2 or 3 filtering elements, according to the model. Procedure to disassemble filters made of 3 filtering elements: a- Unfasten and remove the lower spray arm b- Lift and remove the two rectangular filters c- Rotate filter “C”, lift it and separate it extracting the central part “D”... -
Page 24: Routine Inspection Of The Spray Arms (Once A Week)
Procedure to disassemble the filters made of 2 filtering elements: it is not necessary to remove the lower spray arm. a- Rotate filter “C”, lift it and separate it by extracting the central part “D” Filter “C” can have different depths, according to the model. When removing the filters, do not let the coarse residues fall into the basin under the filters;... -
Page 25: Lengthy Periods Out Of Use
9.3 Lengthy periods out of use If the dishwasher is to be out of use for a fairly long period of time, the detergent and rinse aid dispenser devices must be emptied to prevent crystallisation and damage to the pumps: Remove the intake hoses from the detergent and rinse aid containers and place them in a container of clean water, then perform a few wash cycles followed by a complete pump-out. - Page 26 Badly positioned dishes / glasses. Place dishes / glasses correctly. Verify the temperature displayed, Low washing temperature if it is inferior than 50°C contact customer Support. Increase the duration of the washing Improper set cycle cycle, especially if the load is very dirty or partially dried.
-
Page 27: Malfunctions Shown On The Display (For The User)
11 MALFUNCTIONS SHOWN ON THE DISPLAY (FOR THE USER) The dishwasher can show a series of malfunctions on display. After the machine has been switched off and restarted, if the problem is not solved, follow the steps below: ( FOR A MORE PROFICIENT AFTER-SALES SERVICE, ALWAYS TAKE NOTE OF THE INDICATED ERROR ) Err04 Tank temperature probe anomaly Contact After-sales Service... - Page 28 INFORMATION AND AFTER-SALES SERVICE FOR SMEG PRODUCTS COMMERCIAL DISHWASHERS Our Sales Department staff will be able to provide you with information about prices and special offers. Our After-Sales Department will be able to provide you with guidance about keeping your appliance functioning correctly and put you in touch with your nearest authorised Service Centre.
- Page 29 Il materiale contenuto in questo manuale è a scopo informativo. Il contenuto e l’apparecchiatura descritta possono essere soggetti a modifiche senza che ne venga data comunicazione 19.290.2211.00 25/01/2016 Rev. Manuale Date...