Table of Contents
Advertisement
Quick Links
Advertisement
Table of Contents

Related Manuals for DigiTech iPB-10


Summary of Contents for DigiTech iPB-10
- Page 1 OWNER’S MANUAL...
-
Page 2: Table Of Contents
Introduction ............3 Firmware Version ..........16 Working With Amps ..........33 Tuner Reference ............ 16 Adding an Amp to the iPB-10 Signal Path ..33 Features/Included Items ........4 Record Out Level ..........16 Changing the Amp ..........34 Hardware/Software Requirements .... -
Page 3: Introduction
Traditional multi-effect devices have given you the flexibility to change the entire configuration of your signal chain with a single footswitch. The iPB-10 brings the concept of presets to a pedalboard. This allows you to save 100 of your favorite pedalboards with the touch of your finger, and instantly recall them with the stomp of your foot. -
Page 4: Features/Included Items
Before you get started, please make sure that these items are • Intuitive iPB-Nexus User Interface for iPad in the box: (iPad sold separately) • iPB-10 Footswitch Pedalboard • Up to 10 Pedals per Pedalboard Setup • Power Supply •... -
Page 5: Hardware/Software Requirements
Hardware/Software Requirements Hardware/Software Requirements iTunes & iPad Requirements Requirements ® ® ® • • iTunes 10.2 or later recommended Mac computer with an Intel, PowerPC G5 or G4 processor (free download from www.itunes.com/download) • Mac OS X v10.5.8 or later •... -
Page 6: Disable Ipad ® Notifications & Alerts
Disable iPad Disable iPad Notifications & Alerts Notifications & Alerts ® ® Ensure notifications and alerts from other applications do not Ensure notifications and alerts from other applications do not disrupt your playing by disabling them in your iPad General Settings. disrupt your playing by disabling them in your iPad General Settings. -
Page 7: Disable Auto-Brightness
Disable Auto-Brightness Disable Auto-Brightness It may be desirable to disable the iPad’s Auto-Brightness feature It may be desirable to disable the iPad’s Auto-Brightness feature for use with the iPB-Nexus application. for use with the iPB-Nexus application. To disable Auto-Brightness on your iPad: Go to Settings. -
Page 8: Ipb-Nexus Icons
Help Icon Tuner Icon Opens the help file within Tune your guitar here. the iPB-Nexus app. My Tones Icon Volume Icon Opens the My Tones library, where Use this to set the volume for all factory and user tones reside. each tone independently. -
Page 9: Pedalboard Window
Quick Save Button Touching this button saves the currently loaded tone. Use this option for quickly overwriting a tone after making edits. Save New Button Touching this button allows you to save a new user tone or make a copy of an existing tone. Use this option when you don’t want to overwrite the currently loaded tone. -
Page 10: Loaded Tone
Loaded Tone This display shows the currently loaded tone along with the bank and footswitch it is assigned to. Banks Tone Buttons Use this slider to select one of the 20 banks, each These buttons display the tones in each bank. containing 5 custom tones, providing 100 tones in all. -
Page 11: Amplifier
Amplifier Cabinet This section displays the currently selected amplifier This section displays the and allows you to edit the amp’s controls. currently selected cabinet. Tap once on either the amp or cabinet image to select from HINT: over 50 amps and cabinets to create your own custom sound! -
Page 12: Assigned Footswitches
Assigned Footswitches Expansion Bar This section displays the pedals which are Touching this bar expands the view, displaying currently assigned to the A-E footswitches. all effect pedals in the signal chain. Double tapping on a pedal will zoom in on the controls to make editing quick and easy. Tap the footswitch to turn HINT: the pedal on and off. -
Page 13: My Tones Window
Tapping the ‘+’ button will assign tones to the iPB-10 pedalboard. Trash Can Icon Touch this icon to delete a selected user tone from My Library. My Tones Window... -
Page 14: Tuner Window
Accessing the Tuner from the iPB-10 To access the tuner from the iPB-10 footswitches, simply press and hold the currently active preset’s footswitch. The iPB-10 will enter Bypass mode briefly then enter the Tuner. -
Page 15: Volume Window
Tone Volume Tap the Volume icon and use the slider to increase or decrease the level for the current tone. Volume can be saved with each tone individually. Volume Window Volume Window... -
Page 16: Settings Window
Record Out Level When recording to the iPad or via USB to a computer DAW, this option changes digital signal level sent from the iPB-10 up to the iPad or computer DAW (the range is -12 dB - +24 dB). -
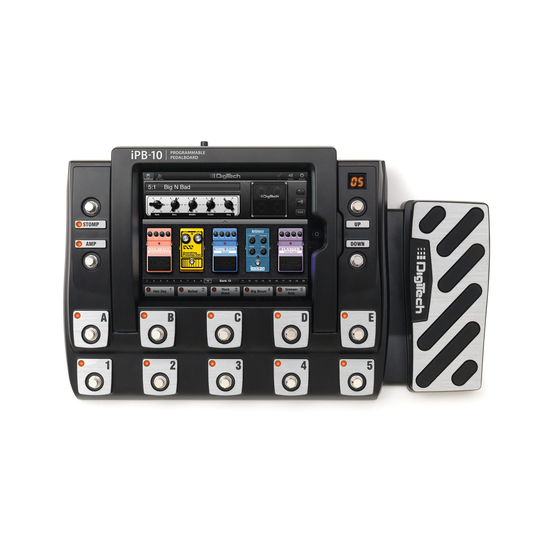
Page 17: Ipb-10 Top Panel
Top Panel iPB-10 Top Panel LED Display Displays the currently selected bank in the iPB-10 Pedalboard (1-20). Bank UP/DOWN Footswitches Use these footswitches to select a tone bank. 1-5 Footswitches Once a bank is selected, use these footswitches to select one of 5 different tones within the selected bank. -
Page 18: Stomp Loop
Top Panel iPB-10 Top Panel Stomp Loop Expression Pedal When using the NOTE: Expression Pedal, the Wah will only be controlled if it This pedal provides This footswitch enables and disables the exists in the effects chain. real-time control of mono stompbox effects loop. -
Page 19: Ipb-10 Rear Panel
Rear Panel iPB-10 Rear Panel Power Switch Power Input Used to turn the Connect the included iPB-10 power power adapter here. on and off. Input This input is a high impedance 1/4” instrument input for connecting your guitar. Headphone Output Connect headphones here. -
Page 20: Amp Loop Ground Lift Switch
(or chain of effects) into the iPB-10 signal path. Amp Loop Ground Lift Switch This switch can be enabled to help prevent unwanted hum or buzz caused by ground loops between the iPB-10 and an externally connected amplifier or preamp. -
Page 21: Amp/Mixer Switch
Rear Panel iPB-10 Rear Panel 1/4” Line Outputs These 1/4” outputs can be plugged into a guitar amplifier or to the inputs of a mixer or recording device. Amp/Mixer Switch Output Level This switch optimizes the 1/4” line outputs for connecting to... -
Page 22: Usb Port
Rear Panel iPB-10 Rear Panel USB Port The USB port connects the iPB-10 to a computer for recording to your favorite DAW software. This port streams four channels of audio (2 up/2 back). -
Page 23: Connection Diagrams
Connect your guitar to switch to ‘AMP’. the iPB-10 Input. Connect the iPB-10 Left Connect the stompbox Output to (mono) Line Output to the iPB-10 Stomp Loop Return. the amp Input. Connect the iPB-10 Stomp Loop Send to the stompbox Input. -
Page 24: Amp Loop & Stomp Loop
Connection Diagrams Connection Diagrams Amp Loop & Stomp Loop Connect the stompbox Output to Connect the iPB-10 Stomp Loop the iPB-10 Stomp Loop Return. Send to the stompbox Input. Set the Amp/Mixer Connect your guitar to switch to ‘AMP’. the iPB-10 Input. -
Page 25: Mixer
Mixer Set the Amp/Mixer Connect your guitar to switch to ‘MIXER’. the iPB-10 Input. Connect either the iPB-10 Line Outputs or XLR Outputs to the inputs of the mixer. To retain the stereo image, make sure to pan the mixer... -
Page 26: Loading Tones
Tap on pads 1-5 to select the desired Tone. Loading Tones from the iPB-10 Use the BANK UP or BANK DOWN footswitches to select a bank (you may not need to perform this step if the desired bank has already been selected). -
Page 27: Working With Pedals
Working With Pedals Working With Pedals Changing Pedal Settings If the Pedalboard window is not already active, select it by touching the Pedalboard icon. Touch the Expansion bar to expand the view and show all pedals. Place your finger on the knob you want to modify and drag it up to increase the value or down to decrease the value. -
Page 28: Changing Pedals - Performance Mode
Working With Pedals Working With Pedals Changing Pedals – Performance Mode If the Pedalboard window is not already active, select it by touching the Pedalboard icon. Touch the Expansion bar to show all pedals. Touch the effect pedal you would like to swap out for another pedal. -
Page 29: Changing Pedals - Edit Mode
Working With Pedals Working With Pedals Changing Pedals – Edit Mode If the Pedalboard window is not already active, select it by touching the Pedalboard icon. Touch the Edit button to display the Edit screen. Touch the effect pedal you would like to swap out for another pedal. -
Page 30: Adding Pedals
Working With Pedals Working With Pedals Adding Pedals If the Pedalboard window is not already active, select it by touching the Pedalboard icon. Touch the Edit button to display the Edit screen. Touch the icon in the empty pedal slot. A window will appear, displaying all available effect types (i.e. -
Page 31: Deleting Pedals
Working With Pedals Working With Pedals Deleting Pedals If the Pedalboard window is not already active, select it by touching the Pedalboard icon. 2. & 5. If you would like to see the pedals in the order they are connected, touch the Edit button (optional). Touch the effect pedal you would like to delete. -
Page 32: Reordering Pedals
Working With Pedals Working With Pedals Reordering Pedals If the Pedalboard window is not already active, touch the Pedalboard icon. Touch the Edit button to display the Edit screen. Place your finger on the effect pedal you would like to move and drag it to the position in the signal chain you would like to move it to. -
Page 33: Working With Amps
Working With Amps Working With Amps Adding an Amp to the iPB-10 Signal Path If the Pedalboard window is not already active, select it by touching the Pedalboard icon. Touch the Edit button to display the Edit screen. Touch the icon located in the amp field. -
Page 34: Changing The Amp
Working With Amps Working With Amps Changing the Amp If the Pedalboard window is not already active, select it by touching the Pedalboard icon. From either Performance mode or Edit mode, touch the amplifier. A window will appear displaying all available internal amps. -
Page 35: Changing The Cabinet
Working With Amps Working With Amps Changing the Cabinet If the Pedalboard window is not already active, select it by touching the Pedalboard icon. From either Performance mode or Edit mode, touch the Cabinet. A window will appear displaying all available cabinets. Select the desired cabinet from the list. -
Page 36: Deleting An Amp From The Signal Path
Working With Amps Working With Amps Deleting an Amp from the Signal Path If the Pedalboard window is not already active, select it by touching the Pedalboard icon. Touch the amp. A window will appear. Touch the Delete button to delete the amplifier. -
Page 37: Assigning Footswitches
Assigning Footswitches Assigning Footswitches Assigning Pedals to the A-E Footswitches If the Pedalboard window is not already active, select it by touching the Pedalboard icon. 2. & 4. Touch the Edit button to display the Edit screen. Touch the effect pedal you would like to assign to the footswitch and drag it into the desired footswitch slot. -
Page 38: Configuring The Amp Loop
Performance mode. Press the AMP LOOP footswitch to engage and disengage the Amp Loop. When this footswitch LED is on, the Amp Loop is enabled and the connected device is inserted into the iPB-10 signal path replacing the internal amp. -
Page 39: Configuring The Stomp Loop
Once complete, touch the Performance button to get back to Performance mode. Press the STOMP LOOP footswitch to engage and disengage the Stomp Loop. When this footswitch’s LED is on, the Stomp Loop is enabled and the connected device is inserted into the iPB-10 signal path. -
Page 40: Expression Pedal & Lfos
Expression Pedal & LFOs Expression Pedal & LFOs Assigning the Expression Pedal If the Pedalboard window is not already active, select it by touching the Pedalboard icon. Touch the Edit button to display the Edit screen. Touch the Expression Assignments icon. In the Expression Assignments window, touch the Pedal button. -
Page 41: Assigning Parameters To An Lfo
Expression Pedal & LFOs Expression Pedal & LFOs Both LFO 1 and LFO 2 can be assigned and used at the same time. HINT: Assigning Parameters to an LFO If the Pedalboard window is not already active, select it by touching the Pedalboard icon. -
Page 42: Saving & Assigning Tones
Saving & Assigning Tones Saving & Assigning Tones Saving Tones with the Quick Save Button At any time after a User tone has been edited, you can quickly save changes to memory by touching the Quick Save button. Quick Save is a fast method for storing your edits back to the My Tones library without prompting you to to edit the name, description, or selecting a new memory location. -
Page 43: Saving Tones With The Save New Button
Saving & Assigning Tones Saving & Assigning Tones Saving Tones with the Save New Button If you have modified a tone and want to change the name, description, or the memory location where the tone resides, you can do so with the Save New button. If the Pedalboard window is not already active, select it by touching the Pedalboard icon. -
Page 44: Assigning Tones To The Ipb-10 Pedalboard
Saving & Assigning Tones Saving & Assigning Tones Assigning Tones to the iPB-10 Pedalboard Select the My Tones icon. Sort through the library using the Category buttons or by typing a keyword into the Search box. Select the tone you would like to audition or assign. -
Page 45: Bypassing Tones
If you’re using the Amp Loop and/or Stomp Loop when you go into bypass, any devices connected to the Amp Loop and Stomp Loop are still active. So you can use bypass to kill all the effects in the iPB-10 without bypassing any externally connected effects or an externally connected amplifier or preamp. -
Page 46: Amps & Pedals
About Amps & Pedals The iPB-10 offers a dream collection of vintage and modern pedals, amplifiers, and cabinets – all in a single, programmable, portable package. With pedals, the order in which they are connected affects the overall sound. The iPB-Nexus app allows you to quickly reorder the pedals, so you have complete control over shaping your sound. -
Page 47: Amps/Preamps
Amps/Preamps Amps/Preamps Amps/Preamps The amplifies in the iPB-10 are an assortment of popular vintage and modern amp tones. The amplifiers also include two acoustic guitar simulators. The available amps and preamps are: • 45 JTM • Bass Man (Modeled after ‘65 Marshall JTM-45) (Modeled after ‘59 Fender... - Page 48 • DigiTech Fuzz experimental amp that works perfect for blues, rock-a-billy, country The DigiTech Fuzz tone is based off of the fuzz tone of the late 60’s and rock. You’ll want to drive this hard. English bands with our own twist with fizz. Thus making the DigiTech Fuzz ideal for 90’s grunge to today’s mix of music.
- Page 49 • DigiTech Monster of the classic Tweed Deluxe and combine it with the output stage of The DigiTech Monster was created on an operating table in a European the Blackface Twin Reverb and here is the monster you get. ®...
- Page 50 Amps/Preamps Amps/Preamps • Heritage • Lux Verb (Modeled after ‘99 Carvin Legacy VL-100) (Modeled after ‘65 Fender Blackface Deluxe Reverb ® ® Steve Vai’s signature amp that he has been using since 1999. Custom The single speaker version of its bigger brother, this amp is equally at tweaked tone to Steve’s specifications featuring an EL-34 tube output home for blues, country and rock players.
- Page 51 Amps/Preamps Amps/Preamps • RG 100 (Modeled after ’88 Randall ® RG-100) A vintage solid state amp that ushered in a new metal generation. This was the amp Dimebag used in the earlier Pantera days. • Solar 100 (Modeled after ’67 Sunn 100S) ®...
-
Page 52: Cabinets
Cabinets The cabinets in the iPB-10 are an assortment of popular vintage and modern cabinet tones. Note that when you select an amp, the default cabinet is automatically loaded. You can, however, change the cabinet after selecting an amp to achieve different tones. - Page 53 Cabinets Cabinets • DigiTech Spank 4x12 • Twin 2x12 Need a jangley, funk high end? The Spank is perfect for funk. (Modeled after 2x12 ‘65 Fender Blackface Twin Reverb ® The benchmark that many others have tried to imitate. The classic •...
-
Page 54: Compressors
• DigiTech Compressor The DigiTech Compressor compresses high-input signals while boosting low-input signals, giving you smooth and long sustain without degrading the quality of the original sound and also allows you to adjust the tone of the compression. -
Page 55: Chorus
3rd knob allowing you to adjust the overall level as well. • DigiTech Multi Chorus DigiTech’s famous multi-chorus allows you to get an incredibly warm chorus tone using 16 voices that interact with each other in Stereo mode, giving you the most incredible and unique chorus tone you can imagine. -
Page 56: Delays
Desired for their brilliant qualities, digital delays have virtually no noise and a full frequency response. • DigiTech Lo Fi Delay The Lo Fi delay is an analog delay with a severely limited frequency response, producing an even grungier delay effect. -
Page 57: Distortions
Distortion and overdrive pedals were designed to give your guitar tone gain before it reaches your amp. Many heavily distorted pedals such as the DigiTech Grunge were designed to provide most or all of the gain and run through a cleaner amp. Overdrives are great for boosting the gain of your guitar sound and driving an already distorted amp, giving your total tone more gain and a heavier feel. - Page 58 Pedals – Distortions Pedals – Distortions • DOD 250 Overdrive/Preamp • Heavy Metal The DOD 250 is another classic overdrive. With no tone control to get ® (Modeled after Boss MT -2 Metal Zone ® ® in the way, the 250’s beauty is just it’s pure overdrive. The Metal Zone will produce nearly any metal tone needed from tight, percussive, Bay area thrash to deep, detuned grind core.
- Page 59 Pedals – Distortions Pedals – Distortions • Screamer (Modeled after Ibanez TS-9 Tube Screamer ® One of the most famous pedals ever created, the TS-9 has stood the test of time and can be found on nearly every pedal board. •...
- Page 60 Pedals – EQ Pedals – EQ The iPB-10 is equipped with a 3 band semi-parametric EQ which helps shape your tone with Low, Mid, and High controls. • 3 Band Semi-Parametric EQ This EQ provides Low, Mid, and high tone shaping with adjustable...
-
Page 61: Flangers
• DigiTech Filter Flanger • Flanger Affair ® The DigiTech team expanded on the traditional flanger by adding a (Modeled after Electro Harmonix ® Electric Mistress band pass filter in the feedback path of the effect. Because of this filter, This flanger has a unique tone, giving it a sort of chorus/flanger mixed the Filter Flanger’s feedback affects only a set amount of frequencies,... -
Page 62: Noise Gates
(or the signal is substantially attenuated) and the gate is ‘closed’. The available noise gate pedals are: • DigiTech Auto Swell Gate This noise gate will also let you set the threshold of the noise floor, but instead of a strict feel of “opening and closing”... -
Page 63: Phasers
This phaser will give you the standard phaser tone and options for controlling it via the Speed, Depth, Regeneration, and Level settings. • DigiTech Triggered Phaser Like the Triggered Chorus, you can set the threshold of the sensitivity knob to dictate how loud the guitar signal must be before the phaser will be triggered. -
Page 64: Pitch
Pitch The iPB-10 comes equipped with effects to manipulate your pitch and do incredible things with it like harmonize both intelligently and by using standard semitones, detune, and do cool effects by raising and/or lowering your original notes from 2 octaves down to 2 octaves up! The available pitch effect pedals are: •... -
Page 65: Tremolo/Panner
This pedal pans the sound from side to side. The speed controls how fast the panning occurs and the depth controls how much of the signal is panned. • DigiTech Scatter Tremolo The Scatter Tremolo combines two tremolos that are “out of sync”, producing an unpredictably scattered tremolo sound. -
Page 66: Envelope/Special
Pedals – Envelope/Special Pedals – Envelope/Special Envelope/Special The DigiTech® Envelope Filter is a dynamic wah effect that alters your sound based upon how hard you play. The available envelope/special effect pedals are: • DigiTech Auto Yah • DigiTech Ya Ya... -
Page 67: Reverbs
Using reverb in recorded program material gives the listener a sense that the material is being performed in an actual room or hall. It is this similarity to actual acoustic spaces that makes reverberation a useful tool in recorded music. The iPB-10 features... -
Page 68: Vibrato/Rotary
Vibrato/Rotary The DigiTech Vibrato effect modulates the pitch of the incoming signal at an even rate. The Rotary emulates a device that included a spinning horn and woofer. The rotation of these two speakers produced an interesting combination of the sound panning from side to side. -
Page 69: Wah
Wah is an effect controlled by an Expression Pedal making the guitar sound as if it’s saying “Wah.” The available wah pedals are: • DigiTech Full Range Wah ® DigiTech’s Full Range Wah sweeps the entire spectrum of audible frequencies, giving you the most range of tone from the wah pedal. • Clyde Wah (Modeled after Vox Clyde McCoy Wah) ®... -
Page 70: Preset List
Preset List Preset List 1. Recto 26. Solo Dude 51. Hot Rod 76. Citrus 2. Cool Chorus 27. Black Label 52. Cool Clean 77. Legacy 3. Solo Delay 28. Angel Of Death 53. Hot Rhythm 78. Bass Man 4. Boogie Man 29. -
Page 71: Factory Hard Reset
After performing a factory hard reset, you can connect the iPad and launch the iPB-Nexus app to restore your previous settings. If you experience a problem with the iPB-10 hardware, you can try performing the factory hard reset procedure listed below. iPad Connected... -
Page 72: Specifications
Specifications Specifications Analog Input Connections Standard: 2.0 compliant Guitar Input Audio Streaming: 2 channels to computer, 2 channels from Impedance: 1M Ohms computer Maximum Input Level: +8 dBu Sample Rate: 44.1 kHz Word Length: 24-bit Stompbox Loop Input General Impedance: 475K Ohms Maximum Input Level: +8 dBu... -
Page 73: Compliance Information
IEC 60065 -01+Amd 1 Sandy, Utah 84070, USA Date: June 30, 2011 EMC: EN 55022:2006 EN 55024:1998 European Contact: Your local DigiTech Sales and Service Office or FCC Part 15 Harman Signal Processing ELECTROMAGNETIC COMPATIBILITY 8760 South Sandy Parkway Sandy, Utah... - Page 74 Talk, Lexicon, Johnson Amplification and AudioDNA are trademarks of Harman. *Other product names modeled in this product are trademarks of their respective companies that do not endorse and are not associated or affiliated with DigiTech or Harman. ADA Flanger, Arbiter Fuzz Face, Boss CE-2 Chorus, Boss CS-2, Boss DM-2, Boss DS-1,...