Table of Contents
Advertisement
Available languages
Available languages
BVSTDCDW12B, BVSTDCDW12R,
MODELOS/
BVSTDCDW12W, BVSTDCDWX20B &
MODELS
BVSTDCDWX20R
Manual de Instrucciones
CAFETERA
LEA TODAS LAS INSTRUCCIONES ANTES DE USAR ESTE APARATO
Instruction Manual
COFFEE MAKER
PLEASE READ ALL INSTRUCTIONS BEFORE USING THIS APPLIANCE
Manual de Instruções
CAFETEIRA
LEIA TODAS AS INSTRUÇÕES ANTES DE USAR ESTE APARELHO
Advertisement
Table of Contents

Related Manuals for Oster BVSTDCDW12B


Summary of Contents for Oster BVSTDCDW12B
- Page 1 BVSTDCDW12B, BVSTDCDW12R, MODELOS/ BVSTDCDW12W, BVSTDCDWX20B & MODELS BVSTDCDWX20R Manual de Instrucciones CAFETERA LEA TODAS LAS INSTRUCCIONES ANTES DE USAR ESTE APARATO Instruction Manual COFFEE MAKER PLEASE READ ALL INSTRUCTIONS BEFORE USING THIS APPLIANCE Manual de Instruções CAFETEIRA LEIA TODAS AS INSTRUÇÕES ANTES DE USAR ESTE APARELHO...
- Page 2 5. NO opere ningún artefacto con un cable o enchufe dañados, después de que el artefacto haya fallado o si se cae al suelo o se daña de cualquier otra manera. Lleve el artefacto al Centro de Servicio Oster Autorizado más cercano para ®...
-
Page 3: Cuidado Y Uso De La Jarra
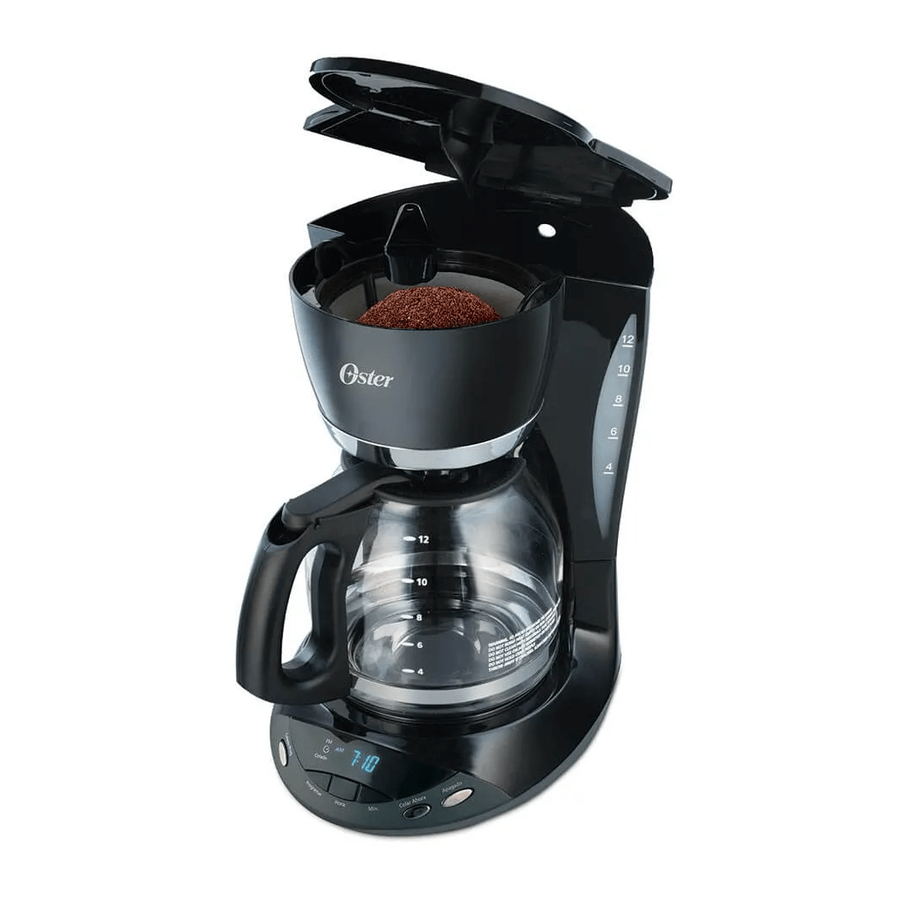
CON SE RV E E S TA S INS TRU CC ION ES CUIDADO Y USO DE LA JARRA Siga las siguientes instrucciones para reducir o eliminar el riesgo de romper la jarra: a. Esta jarra está diseñada para ser utilizada con su cafetera Oster , por lo tanto ®... - Page 4 9. Filtro permanente f. Indicador PM 10. Interruptor de encendido/apagado g. Indicador de la programación (Modelos BVSTDCDW12B, h. Pantalla del reloj BVSTDCDW12R y BVSTDCDW12W) i. Botón de apagado 11. Luz indicadora de encendido/ apagado (Modelos BVSTDCDW12B, BVSTDCDW12R y BVSTDCDW12W) Esp añ ol-3...
- Page 5 5. Canasta removible – La canasta removible le permite levantar la canasta de la cavidad y sacar el filtro y el café molido antes de colocarla nuevamente en su lugar 6. Luz indicadora de encendido/apagado – (Modelos BVSTDCDW12B, BVSTDCDW12R y BVSTDCDW12W) Esta función de seguridad le recuerda que su cafetera está encendida 7.
- Page 6 PRE PA RA CI ÓN PA RA EL U SO P O R P RI ME RA VEZ AJUSTANDO LA LONGITUD DEL CABLE ELÉCTRICO Usted puede ajustar la longitud del cable eléctrico de manera que tenga la longitud exacta que usted desea. Para aumentar la longitud del cable eléctrico: Tome el cable eléctrico (no el enchufe) y hálelo suavemente sacándolo de la ranura, después hálelo alejándolo de la...
- Page 7 U S A N DO S U A RTE FA C TO PREPARANDO SU CAFE Limpieza de la cafetera antes de utilizarla por primera vez: Siga los pasos indicados en la sección “Añadiendo Agua y Café Molido” y en “Preparando Café Ahora”, pero sin agregar café. Seleccionando y midiendo el café...
- Page 8 No prepare café con la tapa abierta. PREPARANDO CAFÉ AHORA Para los modelos con interruptor (Modelos BVSTDCDW12B, BVSTDCDW12R y BVSTDCDW12W, únicamente): Presione el interruptor de manera que la luz se encienda. Consulte la figura 6. Esta luz indica que la cafetera está encendida y que el ciclo de preparación está...
- Page 9 PREPARANDO CAFÉ MAS TARDE Para los modelos programables (Modelos BVSTDCDWX20B y BVSTDCDWX20R únicamente): Usted debe programar el tiempo en el que le gustaría que la cafetera inicie a preparar su café. 1. Mientras que la cafetera está apagada, presione y detenga el botón para programar la preparación de café...
- Page 10 4. Inicie el ciclo de preparación: Para Modelos: • BVSTDCDW12B, BVSTDCDW12R y BVSTDCDW12W a. Presione el interruptor de encendido/apagado de manera que la luz se encienda. • BVSTDCDWX20B y BVSTDCDWX20R b.
- Page 11 Limpieza de la jarra El agua dura puede dejar manchas blancas en la jarra. El café puede tornar estas manchas color café. Para remover las manchas de la jarra 1. Llene la jarra con una solución de partes iguales de agua y vinagre blanco y deje que la solución repose en la jarra durante aproximadamente 20 minutos.
- Page 12 En el caso poco probable de que su artefacto nuevo no funcione satisfactoriamente, sírvase revisar la siguiente lista de posibles problemas e intente seguir los pasos recomendados ANTES de llamar a un Centro de Servicio Autorizado de Oster PROBLEMAS POTENCIALES CAUSAS PROBABLES Luz indicadora de encendido/apagado no se Está...
- Page 13 5. DO NOT operate any appliance with a damaged cord or plug or operate it after the appliance malfunctions, or has been damaged in any manner. Take this appliance to the nearest Oster Authorized Service Center for examination, repair ®...
-
Page 14: Decanter Use And Care
DECANTER USE AND CARE Follow the instruction below to reduce or eliminate the chance of breaking the decanter: a. This decanter is designed for use with your Oster coffee maker and therefore ® must never be used on a range top or in any oven, INCLUDING A MICROWAVE OVEN. - Page 15 DES CR I P T I ON O F T HE A PPLIA NC E 10 11 1. Lid 11. ON/OFF Indicator Light (Models BVSTDCDW12B, BVSTDCDW12R 2. Showerhead and BVSTDCDW12W) 3. Removable Basket 12. Control Panel 4. Water Reservoir (Models BVSTDCDWX20B and BVSTDCDWX20R) 5.
- Page 16 5. Removable basket – The removable basket will lift out of socket to allow you to remove the permanent filter and ground coffee before returning back to its socket 6. ON/OFF indicator light – (Models BVSTDCDW12B, BVSTDCDW12R and BVSTDCDW12W) This safety feature reminds you that your coffee maker is on 7.
-
Page 17: Adjusting The Power Cord Length
PREPAR I N G F O R FIRST TIM E US E ADJUSTING THE POWER CORD LENGTH You can customize the length of the power cord so that it is the exact length you desire. To increase the length of the power cord: Grasp the power cord (not the power plug) and gently lift it out of the slot, then feed it into the coffee maker. -
Page 18: Brewing Coffee
U SI N G YOU R AP PLIA NC E BREWING COFFEE Cleaning the Coffee maker Before First Use Follow the steps below under “Adding Water and Ground Coffee” and “Brewing Coffee Now”, but do not add coffee grounds. Selecting and Measuring Ground Coffee For best results, use coffee ground for use with automatic drip coffee makers. -
Page 19: Brewing Coffee Now
Do not brew coffee while the lid is open. BREWING COFFEE NOW For Switch Models (Models BVSTDCDW12B, BVSTDCDW12R and BVSTDCDW12W only): Push the switch so the light illuminates. See Figure 6. This light indicates that the coffee maker is on and the brew cycle will begin. -
Page 20: Brewing Coffee Later
BREWING COFFEE LATER For Programmable Model (Models BVSTDCDWX20B and BVSTDCDWX20R only): You must set the time for when you would like the coffee maker to begin brewing your coffee. 1. While the coffee maker is off, press and hold the “Programar”... - Page 21 4. Start the brew cycle: For Models: • BVSTDCDW12B, BVSTDCDW12R and BVSTDCDW12W a. Push the ON/OFF switch to ON. • BVSTDCDWX20B and BVSTDCDWX20R b. Push the “Colar Ahora” button.
- Page 22 Cleaning the decanter Hard water can leave a whitish stain on the decanter. Coffee may then turn this stain brown. To remove decanter stains: 1. Fill the decanter with a solution of equal parts tap water and vinegar and let the solution stand in the decanter for approximately 20 minutes.
- Page 23 ® trouble free service. In the unlikely event that your new appliance does not operate satisfactorily, please review the following potential problems and try the steps recommended BEFORE you call or take it to an Authorized Oster Service Center. ®...
- Page 24 5. NÃO use nenhum aparelho com fio ou plugue danificados, caso o aparelho esteja apresentando falhas, ou quando apresentar qualquer tipo de avaria ou se tiver caído no chão. Leve-o a uma Assistência Técnica Credenciada Oster para ® que seja revisado ou reparado.
- Page 25 CUIDADO E USO DA JARRA Siga as instruções abaixo para reduzir ou eliminar o risco da jarra quebrar: a. Esta jarra foi desenvolvida para ser utilizada com a sua cafeteira Oster ® portanto nunca deverá ser usada sobre a boca de um fogão, em um forno ou em um micro-ondas.
- Page 26 DES CRI ÇÃ O D O APA RELHO 10 11 1. Tampa da cafeteira 11. Luz indicadora de ligado/ desligado (somente nos modelos 2. Bico para gotejamento BVSTDCDW12B, BVSTDCDW12R e 3. Porta-filtro removível BVSTDCDW12W) 4. Tanque para água 12. Painel de controle (somente nos modelos BVSTDCDWX20B e 5.
- Page 27 6. Luz indicadora de ligado/desligado – (somente nos modelos BVSTDCDW12B, BVSTDCDW12R e BVSTDCDW12W) Esta função de segurança avisa quando a cafeteira está ligada.
- Page 28 AN TES D E US AR PE LA P RI MEI RA VE Z AJUSTANDO O COMPRIMENTO DO FIO ELÉTRICO Você pode ajustar o comprimento do fio, de modo que ele tenha o comprimento exato que você deseja. Para aumentar o comprimento do fio: Pegue o fio (não o plugue) e puxe-o para fora da ranhura, com cuidado.
- Page 29 UTI L I Z AN DO O S EU A PAR E LHO PREPARANDO O CAFE Limpeza da cafeteira antes de usar pela primeira vez Siga os passos indicados na seção “Colocando água e pó de café” e em “Preparando o café agora”, porém, sem adicionar o pó de café e deixe a cafeteira funcionar como se estivesse preparando café.
- Page 30 Não prepare café com a tampa da cafeteira aberta. PREPARO DO CAFÉ AGORA Para os Modelos com Botão para Ligar/Desligar (somente para o modelos BVSTDCDW12B, BVSTDCDW12R e BVSTDCDW12W) Pressione o botão para ligar. Veja a figura 6. A luz irá acender indicando que a cafeteira está ligada e que o ciclo de preparo irá...
- Page 31 REPARANDO O CAFÉ MAIS TARDE Para os Modelos Programáveis (somente para os modelos BVSTDCDWX20B e BVSTDCDWX20R) Você pode programar a hora que deseja começar a preparar o café. 1. Enquanto a cafeteira estiver desligada, pressione e mantenha pressionado o botão para programar o preparo de café.
- Page 32 4. De início ao preparo: Para os modelos: • BVSTDCDW12B, BVSTDCDW12R e BVSTDCDW12W a. Pressione o botão para ligar/ desligar colocando-o na posição de ligado. • BVSTDCDWX20B e BVSTDCDWX20R b. Pressione o botão “Preparar Agora”.
- Page 33 Limpeza da jarra A água, com muitos resíduos minerais, pode deixar manchas esbranquiçadas na jarra, ou transformá-las, posteriormente, em cor de café. Manchas de café, de tonalidade marrom, também podem aparecer, devido ao uso contínuo da jarra. Para remover as manchas da jarra: 1.
- Page 34 ® problemas. Caso seu aparelho não estiver funcionando bem, cheque os possíveis problemas indicados abaixo e siga os passos recomendados ANTES DE levá-la a um uma Assistência Técnica Credenciada Oster ® POSSÍVEIS PROBLEMAS PROVÁVEIS CAUSAS A luz de ligado não acende...
- Page 35 XXX onde X é qualquer número entre 0 e 9 ou qualquer letra entre A e Z. La siguiente información es para México solamente. The following information is intended for Mexico only. A informação a seguir é somente para o México. CAFETERA DE 12 TAZAS OSTER ® MODELOS: BVSTDCDW12B, BVSTDCDW12B-013, BVSTDCDW12R, BVSTDCDW12R-013,...