Table of Contents
Advertisement
Available languages
Available languages
Quick Links
Advertisement
Table of Contents

Related Manuals for Oster BVSTDC10SS


Summary of Contents for Oster BVSTDC10SS
- Page 1 MODELO BVSTDC10SS MODEL Manual de Instrucciones CAFETERA LEA TODAS LAS INSTRUCCIONES ANTES DE USAR ESTE ARTEFACTO Instruction Manual COFFEE MAKER PLEASE READ ALL INSTRUCTIONS BEFORE USING THIS APPLIANCE...
-
Page 2: Precauciones Importantes
5. NO opere ningún artefacto con un cable o enchufe dañados, después de que el artefacto haya fallado o si se cae al suelo o se daña de cualquier otra manera. Lleve el artefacto al Centro de Servicio Oster® Autorizado más cercano para examinarlo, repararlo o para ajustarlo mecánica o eléctricamente. -
Page 3: Cuidado Y Uso De La Jarra
Siga las siguientes instrucciones para reducir o eliminar el riesgo de romper la jarra: a. Esta jarra está diseñada para ser utilizada con su cafetera Oster®, por lo tanto, nunca debe ser usada sobre las hornillas de una estufa, horno ni TAMPOCO EN UN HORNO MICROONDAS. -
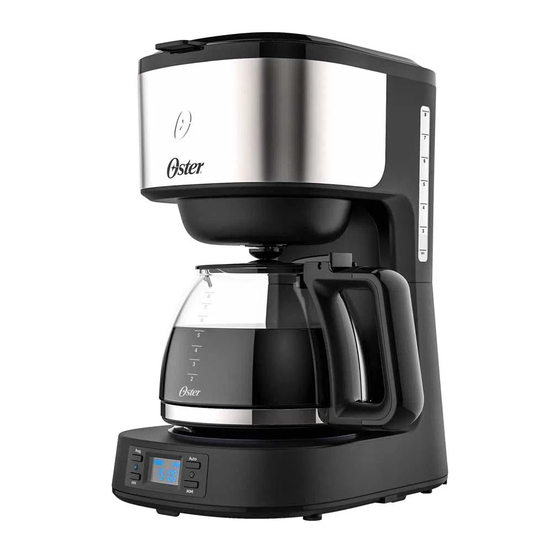
Page 4: Descripción Del Artefacto
DESCRIPCIÓN DEL ARTEFACTO 1. Tapa del tanque de agua 2. Filtro permanente lavable 3. Cesta de Preparación 4. Indicador de nivel de agua 5. Placa de calentamiento 6. Jarra 7. Botón de programación 8. Botón de ‘’Auto’’ (encendido/apagado) 9. Botón de ajuste de la hr (hora) 10. -
Page 5: Ajuste Del Reloj
UTILIZANDO SU ARTEFACTO Ajuste del Reloj Enchufe la cafetera en el tomacorriente. La pantalla mostrará 12:00. Para ajustar el reloj, presione el botón “Prog” (Programar) hasta que aparezca la palabra “Horas” en la pantalla. Luego debe presionar el botón de “HH” hasta que se alcance la hr (hora) deseada. Después de configurar la hr (hora), presione el botón de “MM”... - Page 6 mientras la cafetera está encendida. Nota: La cafetera permanece encendida durante un máximo de 2 hr (horas), después de este tiempo se apagará automáticamente. [10] Apague la unidad cuando la jarra esté vacía o cuando la cafetera no esté en uso presionando el botón de ‘’Auto’’...
-
Page 7: Intervalos De Limpieza Sugeridos
preparar el café. La siguiente tabla le indica un programa sugerido de limpieza. NO TOQUE la placa calefactora durante el uso de la cafetera o cuando termine de usarla, ni después de haberla apagado o desconectado del tomacorriente, la placa calentadora puede estar caliente después de su uso, espere a que se enfríe antes de tocarla. -
Page 8: Important Safeguards
5. DO NOT operate any appliance with a damaged cord or plug or operate it after the appliance malfunctions or has been damaged in any manner. Take this appliance to the nearest Oster® Authorized Service Center for examination, repair or adjustment. -
Page 9: Special Cord Set Instructions
Follow the instructions below to reduce or eliminate the chance of breaking the carafe: a. This carafe is designed for use with your Oster® coffee maker and therefore must never be used on a range top or in any oven, INCLUDING A MICROWAVE OVEN. -
Page 10: Description Of The Appliance
DESCRIPTION OF THE APPLIANCE 1. Water Reservoir Lid 2. Permanent/Washable Filter 3. Brew Basket 4. Water Reservoir 5. Warming Plate 6. Carafe 7. Programming Button 8. Auto Button (On/Off) 9. Hr (hour) Setting Button 10. Min (minute) Setting Button E n g li s h 3... - Page 11 OPERATING INSTRUCTIONS Setting the Clock Plug the coffee maker into the outlet. The display will show “12:00.” To adjust the clock, press the “Prog” (Program) button until the word “Horas” appears in the display. Then the “HH” button must be pressed until the desired time is reached. After setting the time, press the “MM”...
-
Page 12: Programming Your Coffeemaker
is on. Note: The Coffee Maker will remain on for a maximum of 2 hr (hours), after which time it will turn off automatically. [10] Turn off the appliance when the coffee maker is empty or when the coffee maker is not in use by pressing the “Auto’’... -
Page 13: Storing Your Appliance
a suggested cleaning schedule. DO NOT TOUCH the heating plate during use of the coffee maker or when you finish using it, or after turning it off or disconnected from the outlet, the heating plate may be hot after use, wait for it to cool before touching it. Suggested Cleaning Interval Type of Water Cleaning Frequency... - Page 14 Notas/Notes...
- Page 15 Notas/Notes...
- Page 16 Características eléctricas de los modelos de la serie: BVSTDC10SS-XXX Electric characteristics of series models: BVSTDC10SS-XXX Voltaje/Voltage Frecuencia/Frequency Potencia/Power 127 V 60 Hz 800 W 220 V 50/60 Hz 800 W 220 V 50 Hz 800 W XXX en donde X es cualquier numero entre 0 y 9 o cualquier letra entre A y Z.