Table of Contents
Advertisement
Advertisement
Table of Contents

Related Manuals for Penpower WorldCard Series


Summary of Contents for Penpower WorldCard Series
- Page 1 PENPOWER WorldCard User Manual Version: 6.5 Edition: 4 Release: August, 2011...
-
Page 2: Table Of Contents
Contents Chapter 1 Product Introduction ............1-1 1.1 WorldCard Series ..................1-1 1.1.1 WorldCard Color ..................... 1-1 1.1.2 WorldCard Ultra plus ..................1-2 1.1.3 WorldCard Office ..................... 1-3 1.2 Product Feature ................... 1-4 Chapter 2 Getting Started ..............2-1 2.1 System Requirements ................. 2-1 2.2 Installing Penpower WorldCard .............. - Page 3 3.4.5 Hide WorldCard Banner .................. 3-8 Chapter 4 Edit Cards ................4-1 4.1 Edit Window Overview ................4-1 4.2 Verify Contacts ................... 4-1 4.3 Edit Contacts ....................4-3 4.3.1 Recognizing Partial Content of a Card Entry ..........4-4 4.3.2 Adjusting the Separation Rate ................. 4-5 4.3.3 Reframing Command ..................
- Page 4 5.6.1 Text Search ...................... 5-7 5.6.2 Advanced Search ..................... 5-8 5.6.3 Finding Duplicate Data ..................5-9 5.7 Safeguardi your Contacts ................. 5-10 5.7.1 Save ....................... 5-10 5.7.2 Backup your contacts ..................5-10 5.7.3 File Encryption ....................5-10 5.8 Print Cards ....................5-12 5.8.1 Print Preview ....................
- Page 5 6.2.2 View business card image ................6-4 FAQ ....................FAQ-1 There may be newer versions of the software that was released during or after this product’s manufacturing date. If the content in the User Manual differs from the on-screen interface, please follow the instructions on the on-screen interface instead of the User Manual.
- Page 6 The Software and all documents included with the Software, and copyright thereof, are property of Penpower. You are licensed to make one (1) copy of the Software for your personal backup purposes. All other acts of copying are strictly prohibited.
- Page 7 You must be fully aware of your risks in using the Software. Penpower will provide you with the Software and support services in respect of the Soft- ware to the maximum extent permitted by law. However, Penpower does not warrant that the Software and information included in the package of the Software contain no defects or errors.
-
Page 8: Chapter 1 Product Introduction
1.1 WorldCard Series 1.1.1 WorldCard Color The A6-sized color business card scanner is supported by PENPOWER’s BCR technol- ogy to ensure quick scan and accurate recognization of information on a color business card. It provides 600 dpi resolution and can be used as a color scanner to scan 4x6 color photos. -
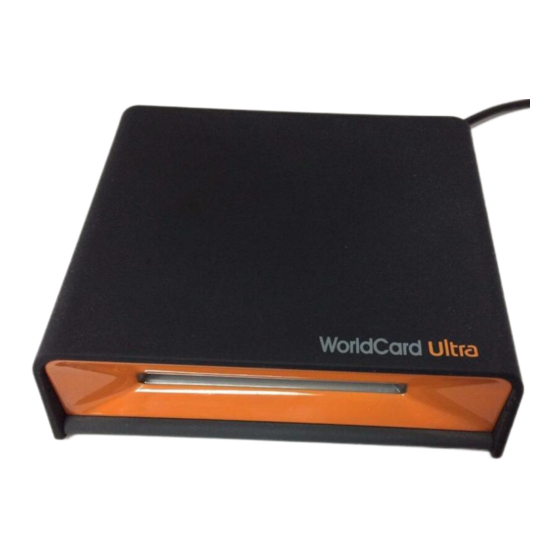
Page 9: Worldcard Ultra Plus
WorldCard 1.1.2 WorldCard Ultra plus Inherit the design concept of WorldCard Ultra, WorldCard Ultra plus help you scan business card in the easiest way that you have never experienced. Insert a Business Card Here Intuitive LED Indicator Tips • Insert a Business Card Here: Insert a card with the information side facing up. •... -
Page 10: Worldcard Office
Chapter 1 Product Introduction 1.1.3 WorldCard Office The A8-sized gray-scale business card scanner leverages PENPOWER’s kernel technol- ogy of character recognition to identifiy data on a business card, inputs them into the cor- responding field, and creates files for management within 5 seconds. -
Page 11: Product Feature
WorldCard 1.2 Product Feature • Easy Card Reader Scanning or capturing your business cards has never been quicker or easier. • Organize Business Cards After scanning or capturing your business cards, WorldCard software can organize, sort, search, add and delete any entries. Also, you can easily edit and add notes to any business card. -
Page 12: Chapter 2 Getting Started
3. Scan or capture your business cards. 2.2.1 Software and Driver Installation To save time, Penpower has combined the installation of the hardware and software into one easy process. To start, insert the CD into your CD/DVD ROM (if the installation program does not start automatically, please double-click the setup.exe file on the CD). - Page 13 WorldCard 2. Select I accept the terms of the license agreement to accept the license agree- ment. Please read the license agreement completely. 3. Please follow the instructions in the on- screen notice. Click Next to continue. 4. Please select the location to install the program.
-
Page 14: Launch Worldcard
2.2.2 Launch WorldCard After installation, please launch the WorldCard application by running the application software under Start / All Programs /PENPOWER WorldCard / WorldCard. 2.2.3 Registration System will ask you to register for warranty at your first run. Please click Register now to start registration or click Register later to skip this procedure. -
Page 15: Connecting Hardware
WorldCard 2.2.4 Connecting Hardware After installing the software, connect the USB connection of your WorldCard scanner or business card camera to the USB port of your computer. Note: Some computers may shut down accidentally after connection. This is due to lack of power to support several USB devices. -
Page 16: Start-Up Wizard
Import data: Import data from sources such as Lotus Notes, Microsoft Outlook and Outlook Express, PocketPC, Palm, ACT! by Sage, Goldmine, Salesforce, and WorldCard series, such as World- Card windows versions, WorldCard Mobile versions ( WorldCard Mobile and WorldCard Contacs). -
Page 17: Online Help
WorldCard provides excellent online help info: 1. Click Help/Index to find the user manual. 2. Click About WorldCard, you can go to Penpower Technology Ltd. official website at the left side to get more information; the hardware information is shown at the right side. -
Page 18: Chapter 3 Overview
Chapter 3 Overview Chapter 3 Overview 3.1 User Interface D E F A: Category tab F: Delete Category B: Search tab G: Disk space used C: Card Window H: Status D: Recycle bin I: Alphabet Index E: Add Category J: Connection status... -
Page 19: Toolbar
WorldCard 3.1.1 Toolbar A: Save Your Card File J: Synchronize with Outlook/PDA/Palm/ Lotus notes B: Print Preview K: Send Email C: Delete Card L: Export All Your Data and the Portable D: Delete Card from Category Software to the Selected Flash Disk E: Settings or Hard Drive F: Mode Button... -
Page 20: Scan Business Cards
Chapter 3 Overview 3.2 Scan Business Cards 3.2.1 Scan Directly To scan your business card, insert the card into your WorldCard Scanner. The scanner scans the card immediately. The recognition result saves to the system. Note: Insert the business card facing up into the WorldCard Color and Ultra plus scanner. Insert the business card facing down into the WorldCard Office scanner. -
Page 21: Batch Scanning
WorldCard 4. In the Scanner Panel area, please select: - Auto scanning if you want the scan to automatically start when the card is inserted. - Auto recognition after scanning if you want the card information to be automatically added to your file. If you want to preview the scanned card image before recognition, do not select this. -
Page 22: Viewing Contacts
Chapter 3 Overview 3.4 Viewing Contacts WorldCard provides several ways to view your contacts: List Mode, Label Mode, age Mode Dual Mode. The default setting is List mode. List Mode is the default mode view. To select a mode, please click View Mode on the View... -
Page 23: Label Mode
WorldCard Category tab You can manage your business cards by storing them into category groups. The Category tab is in the left pane of the card window. The All Records category and the Unfiled category are the preset categories. WorldCard allows you to add as many user-specified categories and sub-categories to manage your business cards as you choose. -
Page 24: Image Mode
Chapter 3 Overview 3.4.3 Image Mode Click the button to view the front sides of all business cards. Click the button to view the back side of all business cards. When the icon appears in the right-top corner, it means the contact has a double-sided business card image. -
Page 25: Dual Mode
WorldCard 3.4.4 Dual Mode Dual Mode lists the scanned contact information in the upper right management pane and displays the front and back side images of the business card in the lower right pane. You can click the front or back side icon of the card to magnify it. When the icon appears in the right top corner, it means the contact has double-sided business card image. -
Page 26: Chapter 4 Edit Cards
Chapter 4 Editing Cards Chapter 4 Edit Cards 4.1 Edit Window Overview The Edit window allows you to edit the information of individual business cards. Double-click any card record in the list menu of the management pane or click the Edit Selected Record button on the Edit toolbar to select the Edit window, . - Page 27 WorldCard Note: You can double-click on the business card image to see a bigger image or back to original view. Enlarge...
-
Page 28: Edit Contacts
Chapter 4 Editing Cards 4.3 Edit Contacts The WorldCard Edit window has three panes: the Card Information pane, the Personal Information pane and the Notes pane. The Card Information pane displays all relevant business card data retrieving from the card. The Card Information pane is shown in the fol- lowing picture. -
Page 29: Recognizing Partial Content Of A Card Entry
WorldCard 4.3.1 Recognizing Partial Content of a Card Entry In some cases, the information of a business card may not be completely recognized. You may use the Partially Select and Recognize command of the Edit window. To select Par- tially Select and Recognize, click this icon After clicking the Partially Select and Recognize, you can use the mouse to select the specific area that contains the correct data. -
Page 30: Adjusting The Separation Rate
Chapter 4 Editing Cards 4.3.2 Adjusting the Separation Rate The Separation Rate is the rate of separation between the color of the card background and the color of the text data contained on the business card. After clicking the Separation Rate button , the following window appears. -
Page 31: Reframing Command
WorldCard 4.3.3 Reframing Command The Reframing Manually command al- lows you to select a specific area of a busi- ness card to save. After the appropriate area is selected, a box will be drawn around the selected data. If the data selected to be modified is cor- rect, click Yes in the dialog box. -
Page 32: Rotating Card
Chapter 4 Editing Cards 4.3.5 Rotating Card If the card image shows an incorrect ori- entation, you can use the Rotate Card com- mand of the WorldCard editor to properly align the card orientation. To use the Rotate Card command, click the Rotate Card but- in the Editor window. -
Page 33: Recognizing Again
WorldCard 4.3.7 Recognizing Again After adjusting a card image with any commands of the Editing window, you can recognize the business card again to update the image processing of your revised card image. This task can be accomplished by click- ing the Recognize again icon from the Editing window. -
Page 34: Viewing Cards
Chapter 4 Editing Cards 4.4 Viewing Cards Cards are displayed in the Editing window after the scanning process. The following window shows a typical display of a card in the Editing window. You can click Back Side button to see the back side image of the busi- ness card. - Page 35 4-10 WorldCard...
-
Page 36: Chapter 5 Manage Business Cards
Chapter 5 Managing Business Cards Chapter 5 Manage Business Cards The management functions of WorldCard allow you to categorize contacts, send e-mail by contact or group functions, add new cards to a group, import cards from other sources, search cards by various data fields, encrypt files to protect your card database, print cards, export the database to other applications and synchronize your card information with other software applications. -
Page 37: Categorize From Editing Page
WorldCard Tips: 1. Cards in each category can be easily moved from one category to another by dragging. 2. Each card can belong to a main category and numerous sub-categories. For example, Bruce is a vendor of your company and your classmate. You can drag his card into ven- dor category and then, drag his card into the classmate category from the All Records category. -
Page 38: Merge And Separating Cards
Chapter 5 Managing Business Cards 5.2 Merge and Separating Cards WorldCard allows you to merge two business cards into one card entry. To merge two cards into one, select two cards in the Management window. On the Tool menu on the Editing window, click Merge and the following dialog box appears. -
Page 39: Add New Cards
WorldCard 5.3 Add New Cards You may add contacts to your WorldCard database by scanning their business card or by manually entering the contact information. If you do not have a card from a new contact, you can enter the contact information of a new business contact into your WorldCard database manually. -
Page 40: Add Cards From Other Resources
Chapter 5 Managing Business Cards 5.4 Add Cards from Other Resources The WorldCard Business Card Scanner and other WorldCard recognition products are equipped with a card scanner or camera which are used to capture a card image. However, you may use other hardware resources in conjunction with your WorldCard software to process card images. -
Page 41: Drag In The Signature Information
WorldCard The system will identify the business card area automatically. Recognized cards will appear within red rectangular boxes with their corresponding recognition number superimposed in red. You can also click the Clear All Regions button to identify the cards manually by drawing the business card area one by one. -
Page 42: Search Contacts
Chapter 5 Managing Business Cards 5.6 Search Contacts You can quickly and efficiently find your contacts with WorldCard Search features. 5.6.1 Text Search The Text Search command of the WorldCard software allows you to quickly find a specific contact. To use Text Search in the WorldCard Management window, on the View menu point to Search, and click Text Search. -
Page 43: Advanced Search
WorldCard 5.6.2 Advanced Search WorldCard also offers an advanced search function. To use the advanced search function, on the View menu, point to Search and click Advanced Search. The Advanced Search pane will open and appear as right. Tip: You may also open the Advanced Search pane from the WorldCard Management window by clicking the Search button... -
Page 44: Finding Duplicate Data
Chapter 5 Managing Business Cards After selecting search by date, you may use the From and To date options to specify a period for your search criteria. The From and To options appear as in the right picture. 5.6.3 Finding Duplicate Data Over a period of time, you may find that you have received a business card from the same individual on more than one occasion. -
Page 45: Safeguardi Your Contacts
5-10 WorldCard 5.7 Safeguardi your Contacts Information is a valuable resource to any business. WorldCard recognizes the intangible value of your business card contacts and has built-in features to help you safeguard that data. 5.7.1 Save WorldCard is a business card database management system. It automatically saves all changes when exit the system. - Page 46 Chapter 5 Managing Business Cards 5-11 With Use file encryption selected, you may use the File Encryption option with password protection. W h e n t h e S e t P a s s w o r d / C h a n g e Password option is selected, the password option is available for you to enter your appropriate password options.
-
Page 47: Print Cards
5-12 WorldCard 5.8 Print Cards WorldCard software allows you to print card information in several usable formats. An overview of the WorldCard printing features is presented in this chapter. 5.8.1 Print Preview Before printing card information, WorldCard allows you to preview your information in the appropriate format for your desired output. -
Page 48: Edit Print Templates
Chapter 5 Managing Business Cards 5-13 5.8.2 Edit Print Templates WorldCard allows you to edit templates for printing your cards. On File menu click Print Template Edit, the following pane appears. You may also click the Edit Print Template icon To edit the Print Template, you may select a Template Class and Template from the left pane. -
Page 49: Exchange Contacts
Excel, Access, Outlook, Outlook Express, Lotus Notes, PocketPC, Palm, ACT!, Goldmine, Salesforce(Contacts), Salesforce(Leads), CSV, VCard, or WorldCard series, such as WorldCard windows versions, WorldCard Mobile versions (WorldCard Mobile for iPhone and WorldCard Contacts for iPhone). For the supported software, please refer 5.9.4 WorldCard Data Exchange Compatibility List. - Page 50 Chapter 5 Managing Business Cards 5-15 2. On the File menu, click Export. The Export Wizard dialog box appears, as previously displayed in the section. Take the Outlook Express application for example. Click Next. The next step is displayed in the Export Wizard dialog box. 3.
- Page 51 5-16 WorldCard 4. The following Export Wizard status dialog box appears. Tips: 1. When the Export process is completed, you can view the Details page as shown in the following picture by clicking De- tail. 2. If the export destination is [Microsoft Outlook], you can click [Change Out- look Contact folder] to appoint which contact subcategory to export to.
- Page 52 Chapter 5 Managing Business Cards 5-17 6. From the Details dialog box, you can choose to export all details of each card or none. To close the Details dialog box, click OK. This will return you to the Export Wizard status dialog box as seen previously in this section.
- Page 53 Export contacts to other WorldCard Series products You need to export contacts from WorldCard first before you share them. These contacts will be bundled and saved as .wcxf format, which can be shared by all WorldCard Series products via email or iTunes File Sharing.
- Page 54 Chapter 5 Managing Business Cards 5-19 2. Follow the instructions given in the Export Wizard dialog box to select which cards you want to export. And then click Next. 3. If you have chosen to continue with the Export function, choose the directory to export the files to.
- Page 55 Step2 Click the import button of on the toolbar. Step3 Select WorldCard series data exchange files and follow the importing process to Step4 import the .wcxf file into WorldCard. To share the .wcxf file with WorldCard Mobile or WorldCard Contacts, please follow the steps below: Open email with a .wcxf file and...
- Page 56 Chapter 5 Managing Business Cards 5-21 6. You can share the .wcxf contact file by attaching it to an email message or share the .wcxf file with WorldCard Mobile or WorldCard Contacts on your iPhone via iTunes File Sharing. iTunes File Sharing requires: 1.
- Page 57 5-22 WorldCard step 4 Please click Add... and locate the .wcxf file that you want to copy from your computer and click Choose. This .wcxf file will be copied into the Documents sharing area immediately. You can click [Save to] to save the file in the Apps to your computer. step 5 Return to your iPhone.
-
Page 58: Import
Chapter 5 Managing Business Cards 5-23 5.9.2 Import To import data into your WorldCard database from another application such as Microsoft Outlook, Outlook Express, P o c k e t P C , P a l m , A C T ! , G o l d m i n e , Salesforce(Contacts), CSV, VCard, World- Card Mac, WorldCard Mobile for iPhone, WorldCard Contacts for iPhone, and etc:... - Page 59 5-24 WorldCard 4. While your files are being imported, a blue progress bar displays. After the process is completed, the Import Wizard dialog box displays Status and Information. Tips: 1. When the Import process is completed, you can view the Details page as shown in the following picture by clicking De- tail.
- Page 60 Import contacts from other WorldCard Series products The new data exchanging function in WorldCard allows you to import contacts from another WorldCard series product, such as WorldCard Mobile for iPhone or WorldCard Contacts for iPhone. WorldCard will import the .wcxf file, which is compatible with all WorldCard Series products.
- Page 61 5-26 WorldCard 3. A note window will appear to ask whether you want to import category or not. Click Yes to import categories or vice versa. 4. Please click Finish to complete the importing process. 5. The new contacts should appear in the Browse pane.
- Page 62 Chapter 5 Managing Business Cards 5-27 5.9.3 Sync The WorldCard Synchronize function allows you to synchronize the data between WorldCard and other applications such as Microsoft Outlook Express, Microsoft Out- look, Lotus Notes, PocketPC Contacts, Palm Desktop, ACT! by Sage, Goldmine and Salesforce(Contacts).
- Page 63 5-28 WorldCard 3. While synchronization occurs, a blue progress bar displays. Once the process is completed, the Sync Wizard window will display Status and Information data about the records you have synchronize. In the Status pane you can see that there is a difference between the Outlook Express database and the WorldCard database.
- Page 64 Chapter 5 Managing Business Cards 5-29 4. You can view the complete details of the actions that will be taken to synchronize the two databases from the Details dialog box. To view the Details dialog box, click Detail. The Details dialog box appears. From the Details dialog box, you can click Select all data to accept all data in the list as acceptable changes.
- Page 65 5-30 WorldCard Note: The Sync function synchronizes the Client database with the Host database. In other words, data in the Client database is changed to reflect the data in the Host database. After clicking Accept, the Client database is to match the Host database. After this point you cannot reverse the process.
- Page 66 Chapter 5 Managing Business Cards 5-31 5.9.4 WorldCard Data Exchange Compatibility List WorldCard supports the following synchronization, exporting, importing contact managers or personal information managers (PIMs). WorldCard Synchronization Item Windows Windows 7/ Windows 7/ Vista 32 Vista 64 Lotus Notes v6.5-v8.5 Microsoft Outlook Microsoft Outlook Express Microsoft Pocket PC Contacts...
- Page 67 5-32 WorldCard WorldCard Import Import contact data from the following products to WorldCard: Item Windows Windows 7/ Windows 7/ Vista 32 Vista 64 Lotus Notes v6.5-v8.5 Microsoft Outlook Microsoft Outlook Express Microsoft Pocket PC Contacts (v3.x, v4.x and Mobile 5, 6) Palm Desktop v4.1.2 or later Salesforce ACT! 2007 or later...
-
Page 68: Settings
Chapter 5 Managing Business Cards 5-33 5.10 Settings WorldCard has many selectable Setting options to allow you to configure the operational Personal functions of Export, Synchronize, Field Display, User Define Field, Scan and setting options. To set your WorldCard options, use the procedures outlined in this chapter. On the Tool menu, point to Setting and click any of the options. -
Page 69: Synchronize Option
5-34 WorldCard 5.10.2 Synchronize Option To set the Synchronize options, open the Setting dialog box as described in the pre- ceding section of this chapter. The Synchronize tab of the Setting dialog box appears with Microsoft Outlook as the selected PIM. PIM stands for Pro- tocol Information Management software. -
Page 70: Field Display
Chapter 5 Managing Business Cards 5-35 5.10.3 Field Display To set the Field Display options of the List Mode and Duel mode, open the Setting dialog box as described in the preceding section of this chapter. The Field Display tab of the Setting dia- log box appears with a default configuration as displayed in the above window. -
Page 71: Scan Option
5-36 WorldCard 5.10.5 Scan Option To configure the Scan options, open the Setting dialog box as described in the preceding section of this chapter. The Scan tab displays the default config- uration as seen in the preceding picture. You may define Card Style, Language, Chinese character options and Scanning method. -
Page 72: Personal Setting
Chapter 5 Managing Business Cards 5-37 5.10.7 Personal Setting The Presonal Setting can let you setup your presonal inforamtion, notify contacts, set notice contacts and set the start address of the direction function. To setup the Presonal Setting options, open the Setting dialog box, and then click the Presonal Setting tab. Presonal Information Click the Presonal Information button to input general Information, office information and home inforamtion. - Page 73 5-38 WorldCard Notify Immediately After setting your personal information, you can notify related contacts immediately. Click the Notify Immediately button to send your personal information with vCard and html file by the default email application. If you set the notice contacts already, the system will add the email addresses of the contacts to the receivers.
-
Page 74: Online Map
Chapter 5 Managing Business Cards 5-39 5.11 Online Map WorldCard offers you online map with a click of your mouse. 1. Select the contact, then click Run / Display map of Address. You can select the country from the pull-down menu. Note: WorldCard offer address searching of many nations, including: Australia, Austria, Belgium, Brazil, Canada, China, Denmark, Finland, France, Germany, Italy, Ja- pan, Netherlands, New Zealand, Norway, Poland, Russia, Spain, Sweden, Switzer-... -
Page 75: Getting Direction
5-40 WorldCard 5.12 Getting Direction WorldCard provides Get Direction function through internet service websites for looking up the route between two contacts or between your location and a specific contact. 1. Right click on a contact and select Get direction/Direction from here from the pop-up menu. -
Page 76: Worldcard Portable Disk
5-41 5.13 WorldCard Portable Disk With Penpower WorldCard, you have a new traveling companion and all the flexibility you need for a successful business trip. You can quickly store your WorldCard Portable soft- ware and database on any USB flash disk and access them from the USB port of any avail- able computer. -
Page 77: Card Data Management For Portable Disk
5-42 WorldCard 5.13.2 Card Data Management for Portable Disk To use the card data stored on a flash disk, plug the flash disk into the USB port of any computer. Using the My Computer directory of Microsoft Windows, locate the Flash Disk. In the flash disk directory, locate the Card_MiniDrv folder. -
Page 78: Chapter 6 Scan Manager
Chapter 6 Scan Manager Chapter 6 Scan Manager WordCard integrates with Microsoft Outlook, Microsoft Outlook Express (Windows XP), Windows Contacts (Windows 7/Vista) and ACT!. You can scan business cards and save veri- fied contacts into the above programs directly. You can view the original scanned business card image in Microsoft Outlook and ACT! as well. -
Page 79: Scan Business Cards
WorldCard 6.2 Scan business cards 6.2.1 Scan and Edit business cards 1. Insert a business card and click the Scan button to scan it. Tip: The WorldCard software will require you to calibrate the scanner when you use the scanner for the first time. Whenever there is color difference after scanning the card, you can calibrate the scanner by clicking Calibration. - Page 80 Chapter 6 Scan Manager Capitalize the first letter of name: Check Capitalize the first letter of name to recog- nize the first letter of the contact's name to a capital letter. The other letters of the name will be recognized to lowercase letters. Auto recognition after scanning: Select Auto recognition after scanning to recognize contacts after scanning.
-
Page 81: View Business Card Image
WorldCard Note: When using Scan to ACT!, you will be asked to input the User ID, Password and DB Path after clicking Recognize contact to address book in order to save the contacts into ACT! properly. 6.2.2 View business card image You can view the image of the business card by just selecting the exported contact from your address book in Microsoft Outlook, and right-click to select view attachment. - Page 82 Q: How can I convert the files in earlier version to v6.X format? A: WorldCard v6.x can convert your v5.x version files and import them in v6.x format. (For v3.0, v4.0 CRD format, support is not available at this moment.) On the File menu, click Import and then WorldCard file to convert the files to v6.x format.
- Page 83 WorldCard...
-
Page 84: Ce Conformity And Fcc Statement
• Increase the separation between the equipment and receiver • Move the computer away from the receiver • Connect the equipment into an outlet on a circuit different from that to which the receiver is connected Penpower WorldCard User Manual Manufacturer: Penpower Technology Ltd. Version: 6.5 Edition: 4...
Need help?
Do you have a question about the WorldCard Series and is the answer not in the manual?
Questions and answers