Table of Contents
Advertisement
Quick Links
Advertisement
Table of Contents

Related Manuals for Manley INTEGRATED AMPLIFIER


Summary of Contents for Manley INTEGRATED AMPLIFIER
-
Page 1: Integrated Amplifier
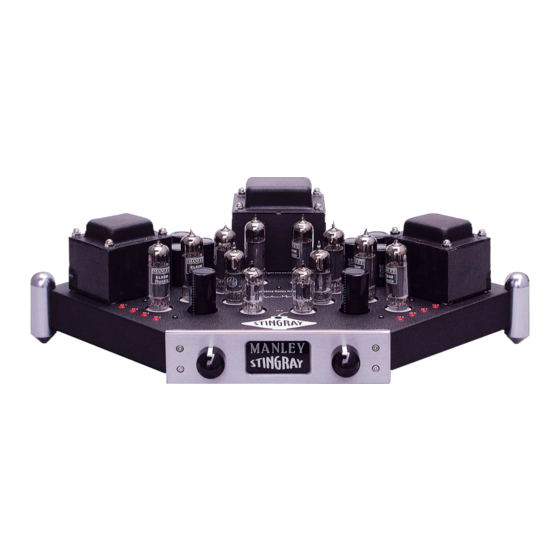
MANLEY LABORATORIES, INC. OWNER'S MANUAL THE "STINGRAY" INTEGRATED AMPLIFIER MANLEY LABORATORIES, INC. 13880 MAGNOLIA AVE. CHINO, CA. 91710 TEL: (909) 627-4256 FAX: (909) 628-2482 email: emanley@manleylabs.com Web site: http://www.manleylabs.com REV. 3-7-2001... -
Page 2: Table Of Contents
SECTION INTRODUCTION MAINS CONNECTIONS OPERATIONAL NOTES CONNECTING YOUR STINGRAY SIMPLE TROUBLESHOOTING FRONT PANEL, LAMP, BACK PANEL TUBE LOCATIONS SIDE PANELS OPTIMIZING YOUR SOUND SYSTEM REPLACING TUBES & SETTING BIAS CREDITS SPECIFICATIONS WARRANTY WARRANTY REGISTRATION CONTENTS PAGE 6&7 12&13 14&15... -
Page 3: Introduction
It may have been the right combination of price, power, features and styling for you. It may have been because you know the Manley Labs reputation for quality, reliability and integrity. If any or all of these were the reasons, you made the right choice. -
Page 4: Mains Connections
MAINS CONNECTIONS Your STINGRAY has been factory set to the correct mains voltage for your country. The voltage setting is marked on the serial badge, located on the rear panel. Check that this com- plies with your local supply. Export units for certain markets have a moulded mains plug fitted to comply with local require- ments. -
Page 5: Operational Notes
OPERATIONAL NOTES SWITCHING ON The power switch is located on the back panel. You shouldn't need to turn the Stingray around or get yourself behind it. You should be able to "feel" the rocker switch located next to the AC power cord. -
Page 6: Connecting Your Stingray
CONNECTING YOUR STINGRAY Setting up this integrated amplifier is rather easy. Please refer to page 8 for a diagram of the back of the Stingray. 1. You will be connecting power last and turning the system on after all other connec- tions are made to prevent ugly noises as wires are connected and to prevent possible damage to the amps and speakers. - Page 7 5. Connect the speaker leads to the terminals on the top far left and far right of the Stingray. Be sure that the RED (+) terminal is connected to the RED(+) wire and BLACK is to BLACK. Connect the opposite ends to the speakers also RED to RED and BLACK to BLACK.
-
Page 8: Simple Troubleshooting
Troubleshooting It is rare that any of these problems occur but if they do here is some things to try. HUM - Try a mains ground adapter if they are legal in your country. They are also called 3 pin to 2 pin adapters or "cheaters" and are available in hardware stores. There should be one ground in your system and only one. -
Page 9: Front Panel, Lamp, Back Panel
FRONT PANEL A - BALANCE - This is a special Nobles balance control. Unlike most balance controls, this one has no loss at center (detented) and can be considered to be a straight wire if it is in the 12:00 position. It only reduces the volume of one channel at a time B - VOLUME - This is also a high quality Nobles conductive plastic precision attenuator. -
Page 10: Top View
TOP VIEW B+ FUSE MDL 1/4 (underneath) TUBE LOCATIONS - See the diagram above for the proper tube locations. Power should be unplugged and the tubes cool before handling them. We label the tube sockets, test points and trimmers to help. It is possible to put tubes in wrong if you bend the pins - not good. -
Page 11: Side Panels
SIDE PANELS Any of the input jacks can be used with any hi-fi RCA outputs and they are electrically identical and only differ in how we labeled them. CD - Plug in your audio outputs from your CD player or "D to A Converter" here. Kind of obvious. -
Page 12: Optimizing Your Sound System
A very important factor is your speakers. Hopefully you have good speakers and they are appropriate for this integrated amplifier. What is appropriate? Well, with 50 watt of tube power per side and probably a limited budget we would hope for reasonably efficient speakers so that the system will get loud enough for the music you listen to. - Page 13 You may have bought a great system but there is a good chance that you are only getting a fraction of it's potential. Very frequently we have experienced top quality electronics sounding unimpressive simply because acoustics were ignored. Even amongst studio engineers, few can really tell the difference between good speakers in a bad room and bad speakers in a good room - but they all know good speakers in a good room and very likely so do you.
- Page 14 Replacing the Tubes & Setting The Bias Setting bias is one of lifes little neccessities when you own tube amps. The other is replacing tubes. Considering how these are related we will treat both as one subject. How long will these tubes last? We can't say for sure. Some die prematurely and some tubes last more than 30 years.
- Page 15 What should I know about BIAS? Bias is a simple DC (negative) voltage that sets, what is called, the "operating point" of the tube. For our purposes it "fine tunes" the current going through the tube. We want each of the 4 tubes per channel to be equally sharing the load. This gives the amplifier's lowest distortion and the tube's optimum life.
-
Page 16: Credits
Featuring concept, layout and industrial design by EveAnna Manley, Starring: Paul Fargo for Input Innovations Hutch for Output Outovations Inspired by : David Manley Mastered by: Baltazar Hernandez Titled by: J. Gordon Holt Contributing Players: Michael Hunter Marcelino Tornez Elias Guzman Miguel Tovar It all began at last year's HI-FI show, at the bar of course -J. -
Page 17: Specifications
Vacuum Tubes: Lamp type Fuse type 120VAC operation: MDL 3 AMP / 250 Volt SLO-BLO 240VAC operation: MDL 2 AMP/ 250 Volt SLO-BLO B+ FUSES (2): MDL 1/4 AMP/250 Volt SLO-BLO Gain Signal to noise Frequency Response Distortion @ 5 watts Volume control "Left / right tracking"... -
Page 18: Warranty
WARRANTY All Manley Laboratories equipment is covered by a limited warranty against defects in materials and workmanship for a period of 90 days from date of purchase to the original purchaser only. A further optional limited 5 year warranty is available to the original purchaser upon proper registration of ownership within 30 days of date of first purchase. -
Page 19: Warranty Registration
WARRANTY REGISTRATION We ask that you please fill out this registration form and send the bottom half to: MANLEY LABORATORIES REGISTRATION DEPARTMENT 13880 MAGNOLIA AVE. CHINO CA, 91710 Or you may FAX this form in to: 909-628-2482 Registration entitles you to product support, full warranty benefits, and notice of product enhancements and upgrades.
Need help?
Do you have a question about the INTEGRATED AMPLIFIER and is the answer not in the manual?
Questions and answers