
Subscribe to Our Youtube Channel
Related Manuals for Rommelsbacher MS 620/E


Summary of Contents for Rommelsbacher MS 620/E
- Page 1 Bedienungsanleitung Instruction manual MS 620/E Milchaufschäumer Milk frother...
-
Page 2: Table Of Contents
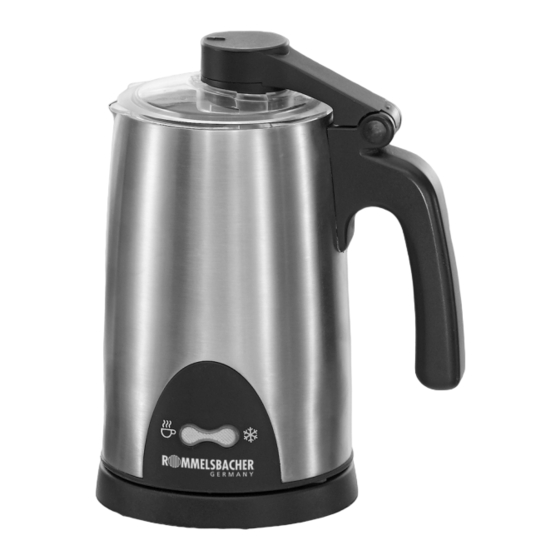
D – Produktbeschreibung GB – Product description 1 Kanne 2 Ausgusstülle Spout 3 Deckel mit Dichtung Lid with gasket 4 Tropfschutz Drip protection 5 Antriebsachse Drive shaft 6 Deckelscharnier mit Motoreinheit Hinged lid with motor unit 7 Handgriff Handle 8 Bedienblende Operating panel Rühreinsatz ohne Zahnung zum Verrühren von Non-serrated stirrer for mixing liquids... -
Page 3: Einleitung
Einleitung Wir freuen uns, dass Sie sich für diesen hochwertigen Milchaufschäumer entschieden haben und bedanken uns für Ihr Vertrauen. Die einfache Bedienung und die vielfältigen Einsatzmöglichkeiten werden auch Sie ganz sicher begeistern. Damit Sie lange Freude an diesem Gerät haben, bitten wir Sie, die nachfolgenden Informationen sorgfältig zu lesen und zu beachten. Bewahren Sie diese Anleitung gut auf. - Page 4 mangelt, oder die in ihren körperlichen, sensorischen oder geistigen Fähigkeiten eingeschränkt sind, dürfen das Gerät nicht ohne Aufsicht oder Anleitung durch eine für ihre Sicherheit verantwortliche Person benutzen. Lassen Sie das Gerät nicht ohne Aufsicht in Betrieb. Halten Sie Kinder stets vom Produkt fern.
-
Page 5: Anwendungsmöglichkeiten
• Um ein Überlaufen zu verhindern, darf die Kanne mit max. 200 ml beim Zubereiten von Milchschaum bzw. 250 ml beim Erwärmen/Verrühren von Flüssigkeiten befüllt werden. • Heiße Flüssigkeiten mit einer Temperatur von über 65 °C dürfen nicht verarbeitet werden. • Dieses Gerät nicht über eine externe Zeitschaltuhr oder ein separates Fernwirksystem betreiben. • Lassen Sie das Gerät nie ohne Aufsicht in Betrieb. • Das Gerät nie im Leerlauf oder mit feuchten Händen betreiben. Anwendungsmöglichkeiten Das Gerät ist mit 2 Temperaturstufen (Kalt und ca. 60 °C) ausgestattet und eignet sich … … zum Zubereiten von kaltem oder warmem Milchschaum. … zum Erwärmen von Flüssigkeiten (z. B. Milch, Kakao, …). … zum Verrühren von kalten Flüssigkeiten (z. B. Milch). Vor dem ersten Gebrauch Reinigen Sie vor dem ersten Gebrauch das Gerät sowie alle Zubehörteile. Nähere Informationen hierzu finden Sie unter „Reinigung und Pflege“. -
Page 6: So Bauen Sie Ihr Gerät Zusammen
Gerät ausschalten. Deckel bis in 90° Kanne von der Position öffnen. Basisstation nehmen. Gerät am Handgriff fassen und den Deckel an den beiden Haltenasen nach oben aufklappen. Deckel abnehmen. Rühreinsatz entfernen. Fassen Sie mit einer Hand Fassen Sie mit einer Hand das Deckelscharnier und das Deckelscharnier und halten es fest, mit der... -
Page 7: Inbetriebnahme Des Gerätes
Deckeldichtung Gerät ausschalten. einbauen. Kanne von der Dichtung an der Basisstation nehmen. vorderen Nut des Deckels positionieren und rundum einsetzen. Achten Sie auf den korrekten Sitz der Dichtung! Markierung beachten! Deckel montieren. Deckelscharnier bis in 90° Position aufklappen. Fassen Sie mit einer Hand das Deckelscharnier und halten es fest, mit der anderen Hand den Deckel... -
Page 8: Vorbereitung
• Achtung Verbrennungsgefahr: Die Oberfläche der Kanne wird während des Betriebes heiß. Gerät zum Ausgießen oder Transport immer am Handgriff anfassen! • Achtung: bei heißen Flüssigkeiten besteht Verbrennungsgefahr! • Das Gerät ist mit einer Heizung ausgestattet. Es ist nicht erforderlich, die Milch vor der Zubereitung zu erhitzen. • Um einen stabilen und feinporigen Milchschaum zu erzeugen, empfehlen wir die Verwendung von gut gekühlter Milch mit 1,5 %. Fettgehalt. • Nach der Zubereitung von Milchschaum bleibt ein Rest flüssiger Milch in der Kanne übrig. Dies ist normal – wir empfehlen, diese Milch für das gerade in Zubereitung befindliche Getränk zu verwenden. • Lassen Sie das Gerät zwischen 2 Anwendungen immer abkühlen, um zu verhindern, dass Milch am Boden der Kanne anhaftet. -
Page 9: Kalt Schäumen/Verrühren
• Drücken Sie unmittelbar nach Beendigung der Funktion „warmer Milchschaum / Flüssigkeit“ erneut auf die linke Hälfte Funktionsschalters. • Das Gerät startet das „Nachschäumen/Nachrühren“. • Die Kontrolllampe leuchtet rot. • Das Gerät schaltet nach ca. 2 Min. automatisch ab. • Die Kontrolllampe erlischt. FUNKTION 3: Kalt Schäumen/Verrühren, z. B. Milch • Drücken Sie auf die rechte Hälfte des Funktionsschalters. • Das Gerät startet die Zubereitung. • Die Kontrolllampe leuchtet blau. • Das Gerät schaltet nach ca. 3 Min. automatisch ab. • Die Kontrolllampe erlischt. HINWEIS: Die Zubereitung kann jederzeit unterbrochen werden, indem Sie erneut auf die aktive Hälfte des Funktionsschalters drücken oder die Kanne am Handgriff fassen und von der Basisstation abnehmen. -
Page 10: Reinigung Und Pflege
• Gerät keinesfalls mit einem Dampfreiniger behandeln! Rezepte Nachfolgend haben wir für Sie einige Anregungen zu den vielfältigen Nutzungsmöglichkeiten Ihres Rommelsbacher Milchaufschäumers: Unsere Tipps vorab: 9 Den besten Milchschaum erhalten Sie, wenn Sie mit sehr kalter, fettarmer Milch (1,5 % Fettgehalt) und etwas Geduld arbeiten. - Page 11 Heiße Getränke: Heiße Mandelmilch Milch zusammen mit 1 TL Zucker und 2 cl Amaretto Likör erhitzen und aufschäumen. In einem großen Glas mit Trinkhalm serviert ist dies der perfekte Warmmacher im Winter. Cappuccino besteht aus je einem Drittel heißen Espresso, heißer Milch und Milchschaum. Macchiato Espresso in einem hohen Glas mit einem ‚Schluck‘...
-
Page 12: Introduction
Introduction We are pleased you decided in favour of this superior milk frother and would like to thank you for your confi dence. Its easy operation and wide range of applications will certainly fi ll you with enthusiasm as well. To make sure you can enjoy using this appliance for a long time, please read through the following notes carefully and observe them. - Page 13 • Children should be supervised in order to ensure that they do not play with the appliance. • Prior to each use, check the appliance and the attachments for soundness, it must not be operated if it has been dropped or shows visible damage. In these cases, the power supply must be disconnected and the appliance has to be checked by a specialist. • Pull the power plug after each use. Never let the cable hang down over the edge of the work surface so that the appliance cannot be pulled down accidentally. • Keep the power cord away from hot surfaces, sharp edges and mechanical forces. Check the power cord regularly for damage and deteriorations.
-
Page 14: Application Possibilities
Application possibilities The appliance is equipped with 2 temperature levels (cold and ca. 60 °C) and is suitable for … … making cold or warm milk foam. … heating fluids (e. g. milk, hot chocolate, …). … stirring cold fluids (e. g. milk). Prior to initial use For a start, please clean the appliance as well as all attachments. For more detailed information please refer to “Cleaning and maintenance”. Description of the operating panel function switch red illuminated : operation with heating blue illuminated : operation without heating How to disassemble your appliance • A ttention hazard of burns: The surface of the jug might become hot during... -
Page 15: How To Assemble Your Appliance
Switch off the Open the lid until an appliance. angle of 90°. Take the jug off the base Take the appliance at the station. handle and fold back the lid at its two grip noses. Remove the lid. Remove the stirrer. Hold the lid hinge tight Hold the lid hinge with with one hand and turn one hand and pull the... -
Page 16: Operating The Appliance
Insert the lid gasket. Switch off the Position the gasket at the appliance. front groove of the lid Take the jug off the base and insert it completely. station. Make sure the gasket fits correctly! Observe the marking! Demount the lid. Open the lid until and angle of 90°. -
Page 17: Preparation
• Attention! Hazard of burns: During operation the jug becomes hot! Always touch the appliance at the handle for pouring out and transportation! • Attention: There is the hazard of burns with hot liquids! • The appliance is equipped with a heating element. Therefore, it is not necessary to heat the milk before preparation. • To make stable and fine-pored milk foam, we recommend using cooled milk with a fat content of 1.5 %. • After preparing milk foam, a rest of liquid milk remains in the jug. This is normal – we recommend using this milk for your beverage. • Let the appliance cool down between 2 operations to avoid that milk will stick to the bottom of the jug. Preparation • Grasp the jug at the handle and remove it from the base station! • Unwind the power cord from the cord take-up and plug in the appliance. • Open the lid (observe the 90°-position). • Fill the jug (observe the min. and max. capacity at the inside of the jug!). • Attach the stirrer to the drive axle. for frothing: for stirring: serrated stirrer non-serrated stirrer (max. filling 200 ml) (max. -
Page 18: Cold Frothing/Stirring
• Press the left half of the function switch directly after completion of function “warm milk foam/liquids”. • The appliance starts “re-frothing/re-stirring”. • The pilot lamp glows red. • The appliance switches off automatically after ca. 2 minutes. • The pilot lamp extinguishes. NOTE: The preparation may also be interrupted at any time by pressing the left half of the function switch again or by grasping the jug at the handle and removing it from the base station. -
Page 19: Cleaning And Maintenance
Cleaning and maintenance • Before cleaning always pull the mains plug! • Never immerse jug, base station, power cord or mains plug under running water or clean them under running water. • Attention! Hazard of burns: During operation the jug becomes hot! • Let the appliance cool down before cleaning! • Clean the appliance immediately after use and cooling so that residues will not dry up. • All parts are not suitable for cleaning in the dishwasher. • Disassemble the appliance according to instructions. • Clean the base station with a moist cloth and wipe it dry. • Clean the jug from the outside with a moist cloth and wipe it dry. • The inside of the jug is equipped with a non-stick coating which facilitates the cleansing. Rinse the inside of the jug with hot water and wipe it dry with a soft cloth. For persistent stains clean the inside of the jug with water and a little dishwashing detergent. -
Page 20: Service Und Garantie
übernehmen wir die Portokosten und senden Ihnen nach Absprache einen Paketaufkleber für die kostenlose Rücksendung zu. Die Gewährleistung ist nach Wahl von Rommelsbacher auf eine Mängelbeseitigung oder eine Ersatzlieferung eines mängelfreien Produktes beschränkt. Weitergehende Ansprüche sind ausgeschlossen. Die Gewährleistung erlischt bei gewerblicher Nutzung, wenn der Mangel auf unsachgemäßer oder missbräuchlicher Behandlung, Gewaltanwendung, nicht autorisierten Reparaturversuchen...
Need help?
Do you have a question about the MS 620/E and is the answer not in the manual?
Questions and answers