Table of Contents
Advertisement
Available languages
Available languages
Advertisement
Table of Contents

Related Manuals for TDK Sound Cube


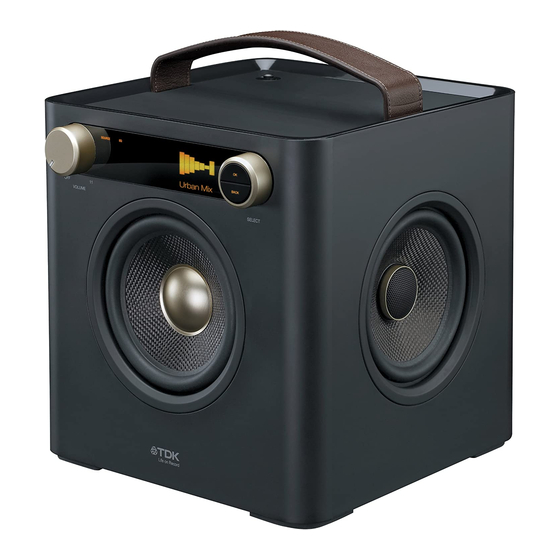
Summary of Contents for TDK Sound Cube
- Page 1 Sound Cube HIGH-FIDELITY STEREO BOOMBOX USER GUIDE TP6701BLK...
-
Page 3: Fcc Warning
Apple Computer, Inc., registered in the U.S. and other countries. The TDK Life on Record logo is a trademark of TDK Corporation used under license. WARNING: TO PREVENT FIRE OR SHOCK HAZARD, DO NOT EXPOSE THIS UNIT TO RAIN... -
Page 4: Surge Protectors
IMPORTANT SAFETY INSTRUCTIONS WARNING: TO REDUCE THE RISK OF FIRE OR ELECTRIC SHOCK, AND ANNOYING INTERFERENCE, USE THE RECOMMENDED ACCESSORIES ONLY. SURGE PROTECTORS: It is recommended to use a surge protector for AC connection. Lightning and power surges ARE NOT covered under warranty for this product. INFORMATION: This equipment complies with Class B digital device regulations. - Page 5 IMPORTANT SAFETY INSTRUCTIONS Read these Instructions. Keep these Instructions. Heed all Warnings. Follow all instructions. Do not use this apparatus near water. Clean only with a dry cloth. Do not block any of the ventilation openings. Install in accordance with the Manufacturer’s instructions.
-
Page 6: Location Of Controls
LOCATION OF CONTROLS FRONT 7 8 9 12 1314 ®p SOURCE Power Indicator Play/Pause 4 ; Button/Indicator Volume/Power Control Skip : Button/Indicator FM Antenna (FM ANTENNA PART 10. Display NO. 188-YS7158001-E*) 11. Carrying Handle Source Button/Indicator 12. Select Control EQ Button/Indicator 13. BACK Button Skip 9 Button/Indicator 14. - Page 7 LOCATION OF CONTROLS (CONTINUED) REAR DC IN Jack 18V z INST (Instrument) Jack (AC ADAPTER PART Battery Compartment NO. 151-UGPE30200-E*) (Bottom of Unit) USB Jack (BATTERY COVER PART (USB CABLE PART NO. 309-ABS-05134-0BAE* NO. 174-9USBBGBW-E*) BATTERY SCREW PART NO. 353-0607176-E*) RCA IN Jacks *Consumer Replaceable Part (See page 24 to order.) LINE IN Jack...
-
Page 8: Power Sources
POWER SOURCES AC CONNECTION Insert the small end of the AC adapter into the jack on the rear of the unit. Insert the other end (with AC Outlet the 2 blades) into a conveniently located AC outlet having 120V AC, 60Hz. AC ADAPTER SPECIFICATIONS: DC 18V AC Adapter’s Plug... -
Page 9: Operation
OPERATION The following controls operate most or all of the functions. TURNING THE UNIT ON/OFF AND ADJUSTING THE VOLUME SOURCE SOURCE Rotate the Volume/Power control until Rotate the Volume/Power a click is heard and the Power indicator control clockwise to increase or lights to turn the unit on. -
Page 10: Using The Fm Radio
OPERATION (CONTINUED) USING THE FM RADIO SOURCE SOURCE ®p Turn this unit on by rotating the Volume/ Press the Source button/indicator u; Power control until a click is heard and the Source menu will appear in the the Power indicator lights to turn the display. Select FM using the Select unit on. - Page 11 OPERATION (CONTINUED) SETTING THE FM PRESETS (FIVE PRESETS) Saved #3 99.5 SOURCE Follow Steps 1-4 on the previous page to tune a station. Press and hold one of the five Preset buttons/indicators. Saved #X (e.g. Saved #3) will appear briefly in the display and the preset will be set. RETRIEVING THE FM PRESETS SOURCE Follow Steps 1-2 on the previous page...
-
Page 12: Using An Ipod
OPERATION (CONTINUED) USING AN iPod SOURCE Insert the iPod cable to the iPod and the Turn this unit on by rotating the Volume/ other end with the USB plug into the USB Power control until a click is heard and jack on the rear of this unit. the Power indicator lights to turn the unit on. - Page 13 OPERATION (CONTINUED) Airbag Creep Misc ®p SOURCE SOURCE ®p Some menus have sub-folders, such as Repeat step 5 until you are in the Albums. You can select a sub-folder desired folder. Select a song/file using using the Select control u and then the Select control u and then press press the OK button v.
-
Page 14: Shuffle Playback
OPERATION (CONTINUED) iPod PLAYBACK NOTES: • Refer to the owner’s manual of the iPod for detailed connection instructions. • The controls on your iPod will not operate the unit, you must use the controls on this unit as shown. • When going through the menu lists (Artists, Albums, etc.), press the BACK button to return to the previous menu. • For the titles, albums, etc. to appear correctly, they must have been tagged properly when recorded to MP3. SHUFFLE PLAYBACK Shuffle Shuffle Repeat... -
Page 15: Repeat Playback
OPERATION (CONTINUED) REPEAT PLAYBACK Shuffle Repeat Shuffle Repeat SOURCE ®p SOURCE ®p While in the Play or Pause USB mode Select Repeat using the Select control. and with an iPod inserted, press the OK button; Shuffle and Repeat will appear in the display. - Page 16 OPERATION (CONTINUED) USING A USB DEVICE (i.e. USB DRIVE) SOURCE Insert a USB drive (support up to 32GB) Turn this unit on by rotating the into the USB jack. Volume/Power control until a click is heard and the Power indicator This unit supports MP3/WMA with a Bit lights to turn the unit on. Rate up to 320kbps.
- Page 17 OPERATION (CONTINUED) SOURCE ®p SOURCE ®p Repeat step 4 until you are in the Press the Play/Pause4 ; button/ indicator desired folder. Select a song/file using to pause playback; ; will appear in the the Select control u and then press display. Press the Play/Pause4 ; button/ the OK button v; the selected song will indicator again to continue playback.
- Page 18 OPERATION (CONTINUED) SHUFFLE PLAYBACK Shuffle Shuffle Repeat Repeat SOURCE ®p SOURCE ®p While in the Play or Paused USB mode Select Shuffle using the Select control. and with a USB device inserted, press the OK button; Shuffle and Repeat will appear in the display.
- Page 19 OPERATION (CONTINUED) REPEAT PLAYBACK Shuffle Repeat Shuffle Repeat SOURCE ®p SOURCE ®p While in the Play or Pause USB mode Select Repeat using the Select control. and with a USB device inserted, press the OK button; Shuffle and Repeat will appear in the display.
- Page 20 OPERATION (CONTINUED) USING AN EXTERNAL UNIT CONNECTED TO THE LINE IN OR RCA JACKS To use the LINE IN Jack: Insert one To use the RCA IN Jacks: Connect a left end of an audio cable into the and right audio cable from the Left/ AUX/LINE OUT jack on your external Right jacks of your external unit to the audio unit and the other end into the RCA IN Left/Right jacks on the rear of...
- Page 21 OPERATION (CONTINUED) USING THE INSTRUMENT FUNCTION SOURCE Insert one end of an instrument cable Turn this unit on by rotating the Volume/ into the OUTPUT jack on your instrument Power control until a click is heard and and the other end into the INST the Power indicator lights to turn the unit (Instrument) jack on the rear of this unit.
- Page 22 OPERATION (CONTINUED) AUX1 INST INST SOURCE ®p SOURCE ®p If the MIX menu has disappeared from Select the desired ratio using the Select the display, press the OK button u or control. For example, to make the BACK button v to bring it back. Instrument more dominant, rotate the Select control clockwise to increase the Instrument ratio.
-
Page 23: Troubleshooting Guide
TROUBLESHOOTING GUIDE No Sound – General • Volume is set to minimum; raise volume. • Power is not on; turn power on. • Correct function button/indicator was not pressed; press the correct function button/indicator. FM, no sound • FM was not selected. Press the Source button to bring up the Source Menu. Then select FM using the Select control and the OK button to confirm. Radio, poor sound • Station is not tuned properly; retune station. -
Page 24: Specifications
PLEASE VISIT OUR WEBSITE AT: TDKPERFORMANCE.COM FOR CONSUMER REPLACEABLE PART(S), CONTACT OUR PARTS AND ACCESSORIES FULFILLMENT CENTER AT: 1-800-379-8439. Imation Enterprises Corp. 1 Imation Way, Oakdale, MN 55128-3414 USA The TDK Life on Record logo is a trademark of TDK Corporation used under license. - Page 26 USER GUIDE Imation Enterprises Corp. 1 Imation Way, Oakdale, MN 55128-3414 USA The TDK Life on Record logo is a trademark of TDK Corporation used under license. TP6701BLK TP6701BLK 63952297-C...
- Page 27 Cube De Son APPAREIL STÉRÉO HAUTE FIDÉLITÉ AVEC TOUTES GUIDE D’UTILISATEUR TP6701BLK...
-
Page 28: Consignes De Sécurité Importantes
Computer Inc., déposée aux É.-U. et dans d’autres pays. Le logo TDK Life on Record est une marque déposée de TDK Corporation utilisée sous licence. AVERTISSEMENT : POUR ÉVITER LE RISQUE D’INCENDIE OU DE CHOC,... - Page 29 CONSIGNES DE SÉCURITÉ IMPORTANTES AVERTISSEMENT : POUR RÉDUIRE LE RISQUE D’INCENDIE OU DE DÉCHARGE ÉLECTRIQUE, AINSI QUE LES INTERFÉRENCES GÊNANTES, UTILISEZ UNIQUEMENT LES ACCESSOIRES RECOMMANDÉS. PARASURTENSEURS : Il est recommandé d’utiliser un parasurtenseur pour le branchement sur secteur. Les coups de foudre et les surtensions NE SONT PAS couverts par la garantie qui accompagne ce produit.
- Page 30 CONSIGNES DE SÉCURITÉ IMPORTANTES Lisez ces consignes. Conservez ces consignes. Tenez compte de tous les avertissements. Suivez toutes les consignes. N’utilisez pas cet appareil à proximité de l’eau. Nettoyez uniquement avec un chiffon sec. Ne bouchez pas les orifices prévus pour la ventilation. Installez conformément aux instructions du fabricant.
-
Page 31: Emplacement Des Commandes
EMPLACEMENT DES COMMANDES PARTIE 7 8 9 12 1314 AVANT ®p SOURCE Voyant d’alimentation Bouton/Voyant Play/Pause (Lecture/Pause) ®p Commande de volume/mise sous tension Bouton/Voyant Skip (Plage) n Antenne FM (ANTENNE FM RÉF. 10. Écran 188-YS7158001-E*) 11. Poignée de transport Bouton/Voyant Source 12. - Page 32 EMPLACEMENT DES COMMANDES (SUITE) PARTIE ARRIÈRE 5. Jack INST (Instrument) 1. Jack d’entrée CC 18 V z 6. Compartiment des piles (sous (ADAPTATEUR SECTEUR RÉF. l’appareil) 151-UGPE30200-E*) (COUVERCLE DU 2. Port USB COMPARTIMENT DES PILES RÉF. (CÂBLE USB RÉF. 309-ABS-05134-0BAE* 174-9USBBGBW-E*) VIS POUR COMPARTIMENT DES 3.
-
Page 33: Sources D'alimentation
SOURCES D’ALIMENTATION BRANCHEMENT SUR SECTEUR Branchez la petite fiche de l’adaptateur secteur sur le jack situé à l’arrière de l’appareil. Insérez l’autre extrémité (la fiche à 2 lames) dans une prise secteur 120 V CA, 60 Hz Prise secteur aisément accessible. SPÉCIFICATIONS ADAPTATEUR SECTEUR : CC 18 V Z Fiche de... - Page 34 UTILISATION Les commandes suivantes permettent l’utilisation de la plupart ou de la totalité des fonctions. MISE SOUS/HORS TENSION DE L’APPAREIL ET RÉGLAGE DU VOLUME SOURCE SOURCE Pour mettre l’appareil sous tension, Tournez la commande Volume/Power dans le sens des aiguilles d’une montre pour tournez la commande Volume/Power augmenter le volume, et dans le sens inverse (Volume/Mise sous tension) jusqu’à...
-
Page 35: Utilisation De La Radio Fm
UTILISATION (SUITE) UTILISATION DE LA RADIO FM SOURCE SOURCE ®p Mettez l’appareil sous tension en Appuyez sur le bouton Source 1. Le tournant la commande Volume/Power menu Source s’affiche à l’écran. (Volume/Mise sous tension) jusqu’à ce Sélectionnez FM à l’aide de la qu’elle émette un clic et que le voyant commande Select (Sélection) 2, puis Power (Marche) s’allume. - Page 36 UTILISATION (SUITE) RÉGLAGE DES PRÉSÉLECTIONS FM (CINQ PRÉSÉLECTIONS) Saved #3 99.5 SOURCE Suivez les directives indiquées aux étapes 1 à 4 de la page précédente pour syntoniser une station. Appuyez sur l’un cinq boutons/voyants Preset (Présélection) et maintenez-le enfoncé. Le message Saved #X (ex. : Saved #3, N° 3 enregistrée) s’affiche brièvement à...
-
Page 37: Utilisation D'un Ipod
UTILISATION (SUITE) UTILISATION D’UN iPod SOURCE Mettez l’appareil sous tension en tournant la Insérez le câble de l’iPod dans celui-ci commande Volume/Power (Volume/Mise sous et insérez l’autre extrémité comportant tension) jusqu’à ce qu’elle émette un clic et la fiche USB dans le port USB situé à que le voyant Power (Marche) s’allume. - Page 38 UTILISATION (SUITE) UTILISATION D’UN PÉRIPHÉRIQUE USB (c.-à-d., UN LECTEUR USB) SOURCE Mettez l’appareil sous tension en Insérez un lecteur USB (d’une capacité tournant la commande Volume/Power jusqu’à 32 G0) dans le port USB. (Volume/Mise sous tension) jusqu’à ce Cet appareil prend en charge les qu’elle émette un clic et que le voyant fichiers au format MP3/WMA, avec un Power (Marche) s’allume.
- Page 39 UTILISATION (SUITE) SOURCE ®p SOURCE ®p Répétez l’étape 4 jusqu’à ce que vous Appuyez sur le bouton/voyant Play/Pause (Lecture/Pause) ®p pour interrompre la accédiez dossier souhaité. lecture. L’indication p s’affiche à l’écran. Sélectionnez une chanson/un fichier à Appuyez de nouveau sur le bouton/voyant l’aide de la commande Select Play/Pause (Lecture/Pause) ®p pour (Sélection) 1, puis appuyez sur le...
-
Page 40: Lecture Aléatoire
UTILISATION (SUITE) LECTURE ALÉATOIRE Shuffle Shuffle Repeat Repeat SOURCE ®p SOURCE ®p Lorsque l’appareil se trouve en mode Sélectionnez Shuffle (Lecture aléatoire) USB, en lecture ou en pause, et qu’un à l’aide de la commande Select périphérique USB est connecté, (Sélection). -
Page 41: Répétition De La Lecture
UTILISATION (SUITE) RÉPÉTITION DE LA LECTURE Shuffle Shuffle Repeat Repeat ®p SOURCE SOURCE ®p Lorsque l’appareil se trouve en mode USB, en Sélectionnez Repeat (Répétition) à lecture ou en pause, et qu’un périphérique USB l’aide de la commande Select est connecté, appuyez sur le bouton OK. Les (Sélection). - Page 42 UTILISATION (SUITE) UTILISATION D’UN APPAREIL EXTERNE CONNECTÉ AUX PRISES JACK LINE IN OU RCA SOURCE Mettez l’appareil sous tension en Pour utiliser la prise jack LINE IN : tournant la commande Volume/Power Insérez l’une des extrémités d’un câble (Volume/Mise sous tension) jusqu’à ce audio dans la prise jack AUX/LINE OUT qu’elle émette un clic et que le voyant de votre appareil audio externe et...
- Page 43 UTILISATION (SUITE) UTILISATION DE LA FONCTION INSTRUMENT SOURCE Mettez l’appareil sous tension en Insérez l’une des extrémités d’un câble tournant la commande Volume/Power d’instrument dans la prise jack (Volume/Mise sous tension) jusqu’à ce OUTPUT (Sortie) de votre instrument et qu’elle émette un clic et que le voyant l’autre extrémité...
- Page 44 UTILISATION (SUITE) AUX1 INST INST ®p SOURCE ®p SOURCE Si le menu MIX disparaît de l’écran, Sélectionnez le niveau de mixage souhaité à l’aide de la commande Select (Sélection). Par appuyez sur le bouton OK 1 ou BACK exemple, pour que le son de l’instrument soit (Retour) 2 pour l’afficher de nouveau.
-
Page 45: Guide De Dépannage
GUIDE DE DÉPANNAGE Général, aucun son émis • Le volume est réglé sur le niveau minimum. Augmentez le volume. • L’appareil n’est pas sous tension. Mettez l’appareil sous tension. • Vous n’avez pas appuyé sur le bouton/voyant de fonction approprié. Appuyez sur le bouton/voyant de fonction approprié. -
Page 46: Caractéristiques Techniques
POUR OBTENIR UNE OU DES PIÈCES DE RECHANGE, CONTACTEZ NOTRE CENTRE PIÈCES ET ACCESSOIRES À L’ADRESSE : 1-800-379-8439. Imation Enterprises Corp. 1 Imation Way, Oakdale, MN 55128-3414 USA Le logo TDK Life on Record est une marque déposée de TDK Corporation utilisée sous licence. - Page 47 USER GUIDE Imation Enterprises Corp. 1 Imation Way, Oakdale, MN 55128-3414 USA Le logo TDK Life on Record est une marque déposée de TDK Corporation utilisée sous licence. TP6701BLK TP6701BLK 63952341-B...
- Page 48 Cubo de Sonido EQUIPO DE AUDIO ESTÉREO PORTÁTIL DE ALTA FIDELIDAD CON CONTROL gUíA DE UTILIzADOR TP6701BLK...
-
Page 50: Instrucciones De Seguridad Importantes
Apple Computer, Inc., registrada en los EE. UU. y en otros países. El logotipo de TDK Life on Record es una marca comercial de TDK Corporation utilizada bajo licencia. ADVERTENCIA: PARA EVITAR EL RIESGO DE INCENDIO O DESCARGA,... - Page 51 INSTRUCCIONES DE SEGURIDAD IMPORTANTES ADVERTENCIA: PARA REDUCIR EL RIESGO DE INCENDIO O DESCARGA ELÉCTRICA E INTERFERENCIA MOLESTA, UTILICE SÓLO LOS ACCESORIOS RECOMENDADOS. PROTECTORES DE SOBRETENSIÓN: Se recomienda utilizar un protector contra sobretensión para la conexión de CA. Los casos de sobretensión de energía y rayos NO ESTÁN cubiertos por la garantía de este producto.
- Page 52 INSTRUCCIONES DE SEGURIDAD IMPORTANTES Lea estas instrucciones. Conserve estas instrucciones. Preste atención a todas las advertencias. Siga todas las instrucciones. No utilice este aparato cerca de agua. Limpie sólo con un paño seco. No bloquee ninguna de las aberturas de ventilación. Instale el producto de acuerdo con las instrucciones del fabricante.
-
Page 53: Ubicación De Los Controles
UBICACIÓN DE LOS CONTROLES PARTE 7 8 9 12 1314 FRONTAL ®p SOURCE Indicador de energía Botón/Indicador Play/Pause (Reproducir/Pausa) Control de volumen/energía Botón/Indicador Skip (Saltar) Antena de FM (ANTENA DE FM: N.° DE PIEZA 188-YS7158001-E*) Pantalla Botón/Indicador Source (Fuente) Manija de transporte Botón/Indicador EQ (Ecualizador) Control Select (Seleccionar) Botón/Indicador Skip... - Page 54 UBICACIÓN DE LOS CONTROLES (CONTINUACIÓN) PARTE TRASERA Enchufe DC IN (ENTRADA DE CC) Compartimiento de las baterías de 18 V (ADAPTADOR DE CA: N.° (en la parte inferior de la unidad) DE PIEZA 151-UGPE30200-E*) (TAPA DE LAS BATERÍAS: N.° DE PIEZA 309-ABS-05134-0BAE* TORNILLO DEL Puerto USB (CABLE USB: N.°...
-
Page 55: Fuentes De Alimentación
FUENTES DE ALIMENTACIÓN CONEXIÓN DE CA Inserte el extremo pequeño del adaptador de CA en el enchufe de energía de la parte posterior de la unidad. Inserte el otro extremo (con las 2 clavijas) en un Tomacorriente AC Outlet de CA tomacorriente de CA convenientemente ubicado de 120 V CA y 60 Hz. - Page 56 FUNCIONAMIENTO Con los siguientes controles se accionan la mayoría o todas las funciones. CÓMO ENCENDER/APAgAR LA UNIDAD Y AJUSTAR EL VOLUMEN SOURCE SOURCE Gire el control de Volumen/Encendido Gire el control de Volumen/Encendido hasta escuchar un clic y se enciendan hacia la derecha para aumentar el las luces indicadores de Energía para volumen o hacia la izquierda para...
- Page 57 FUNCIONAMIENTO (CONTINUACIÓN) USO DE LA RADIO FM SOURCE SOURCE ®p Encienda esta unidad girando el control Presione el botón/indicador Source de Volumen/Encendido hasta escuchar (Fuente) u; aparecerá el menú Source un clic y se enciendan las luces en la pantalla. Seleccione FM con el indicadores de Energía para encender control Select v y luego presione el la unidad.
- Page 58 FUNCIONAMIENTO (CONTINUACIÓN) CONFIgURACIÓN DE LOS AJUSTES PREESTABLECIDOS DE FM (CINCO AJUSTES PREESTABLECIDOS) Saved #3 99.5 SOURCE Siga los pasos de 1 a 4 de la página anterior para sintonizar una estación. Presione y sostenga uno de los cinco botones/ indicadores Preset (Ajustes preestablecidos). Saved #X (Guardado X) (p.
-
Page 59: Uso De Un Ipod
FUNCIONAMIENTO (CONTINUACIÓN) USO DE UN iPod SOURCE Introduzca el cable del iPod en el iPod Encienda esta unidad girando el control de Volumen/Encendido hasta escuchar y el otro extremo con enchufe USB en un clic y se enciendan las luces el puerto USB de la parte posterior de indicadores de Energía para encender esta unidad. - Page 60 FUNCIONAMIENTO (CONTINUACIÓN) Airbag Creep Misc ®p SOURCE SOURCE ®p Algunos menúes tienen subcarpetas, p. ej. Repita el paso 5 hasta llegar a la carpeta Albums (Álbumes). Puede seleccionar una deseada. Seleccione una canción y/o subcarpeta con el control Select u y luego archivo con el control Select u y luego presionando el botón OK v.
-
Page 61: Reproducción Aleatoria
FUNCIONAMIENTO (CONTINUACIÓN) NOTAS SOBRE REPRODUCCIÓN DE iPod: • Consulte el manual del propietario del iPod para conocer las instrucciones de conexión detalladas. • Los controles del iPod no accionarán la unidad, deberá usar los controles de esta unidad tal como se indica en las figuras. •... -
Page 62: Repetir Reproducción
FUNCIONAMIENTO (CONTINUACIÓN) REPETIR REPRODUCCIÓN Shuffle Repeat Shuffle Repeat SOURCE ®p SOURCE ®p Cuando esté en modo USB de reproducción Seleccione Repeat con el control Select. o pausado y con un iPod conectado, presione el botón OK (Aceptar); Shuffle (Orden aleatorio) y Repeat (Repetir) aparecerán en la pantalla. - Page 63 FUNCIONAMIENTO (CONTINUACIÓN) USO DE UN DISPOSITIVO USB (es decir, UNA UNIDAD USB) SOURCE Introduzca una unidad USB (compatibilidad Encienda esta unidad girando el control máxima de 32 GB) en el puerto USB. Esta de Volumen/Encendido hasta escuchar unidad es compatible con MP3/WMA con un clic y se enciendan las luces indicadores una velocidad de bits máxima de 320 kbps.
- Page 64 FUNCIONAMIENTO (CONTINUACIÓN) SOURCE ®p SOURCE ®p Repita el paso 4 hasta llegar a la carpeta Presione el botón/indicador Play/Pause deseada. Seleccione una canción y/o (Reproducir/Pausa) para pausar la archivo con el control Select u y luego reproducción; aparecerá en la pantalla. presione el botón OK v;...
- Page 65 FUNCIONAMIENTO (CONTINUACIÓN) REPRODUCCIÓN ALEATORIA Shuffle Shuffle Repeat Repeat SOURCE ®p SOURCE ®p Cuando esté en modo USB de reproducción Seleccione Shuffle con el control Select. o pausado y con una unidad USB conectada, presione el botón OK (Aceptar); Shuffle (Orden aleatorio) y Repeat (Repetir) aparecerán en la pantalla.
- Page 66 FUNCIONAMIENTO (CONTINUACIÓN) REPETIR REPRODUCCIÓN Shuffle Repeat Shuffle Repeat SOURCE ®p SOURCE ®p Cuando esté en modo USB de reproducción Seleccione Repeat con el control Select. o pausado y con una unidad USB conectada, presione el botón OK (Aceptar); Shuffle (Orden aleatorio) y Repeat (Repetir) aparecerán en la pantalla.
- Page 67 FUNCIONAMIENTO (CONTINUACIÓN) USO DE UNA UNIDAD EXTERNA CONECTADA A LOS ENCHUFES LINE IN O RCA Para usar el enchufe LINE IN: Inserte un Para usar los enchufes RCA IN: Conecte un extremo del cable de audio en el enchufe cable de audio izquierdo y uno derecho AUX/LINE OUT (SALIDA DE LÍNEA/AUXILIAR) en provenientes de las tomas izquierda y el equipo de audio externo y el otro extremo...
- Page 68 FUNCIONAMIENTO (CONTINUACIÓN) USO DE LA FUNCIÓN INSTRUMENT (INSTRUMENTO) SOURCE Inserte un extremo del cable del instrumento Encienda esta unidad girando el control en el enchufe OUTPUT (SALIDA) del de Volumen/Encendido hasta escuchar instrumento y el otro extremo en el enchufe un clic y se enciendan las luces INST (Instrumento) en la parte trasera de indicadores de Energía para encender...
- Page 69 FUNCIONAMIENTO (CONTINUACIÓN) AUX1 INST INST SOURCE ®p SOURCE ®p Si el menú MIX ha desaparecido de la Seleccione la relación deseada con el pantalla, presione el botón OK u o el control Select. Por ejemplo: si desea que el instrumento sea más dominante, gire botón BACK v para recuperarlo.
-
Page 70: Guía De Solución De Problemas
GUÍA DE SOLUCIÓN DE PROBLEMAS Sin sonido – general • El volumen se encuentra al mínimo, suba el volumen. • La unidad está apagada, enciéndala. • No se presionó el botón/indicador de función correcto, presione el botón/indicador de función correcto. La radio FM no tiene sonido •... -
Page 71: Especificaciones
SI NECESITA PIEZAS REEMPLAZABLES POR EL CONSUMIDOR, COMUNÍQUESE CON NUESTRO CENTRO DE SUMINISTRO DE REPUESTOS Y ACCESORIOS: 1-800-379-8439. Imation Enterprises Corp. 1 Imation Way, Oakdale, MN 55128-3414 USA El logotipo de TDK Life on Record es una marca comercial de TDK Corporation utilizada bajo licencia. - Page 73 USER gUIDE Imation Enterprises Corp. 1 Imation Way, Oakdale, MN 55128-3414 USA El logotipo de TDK Life on Record es una marca comercial de TDK Corporation utilizada bajo licencia. TP6701BLK TP6701BLK 63952340-B...
Need help?
Do you have a question about the Sound Cube and is the answer not in the manual?
Questions and answers