Table of Contents
Advertisement
Quick Links
Advertisement
Table of Contents

Related Manuals for Lab 12 PRE1


Summary of Contents for Lab 12 PRE1
- Page 1 Owner’s Manual PRE1 Triode Class A Line Preamplifier www.lab12.gr v1.1...
-
Page 2: Table Of Contents
LAB12 PRE1 Triode Class A Line Preamplifier Table of Contents It is yours Features Installation & Placement Front Panel Rear Panel Remote Control Main connections For the safety of your equipment Specifications... -
Page 3: It Is Yours
Do not forget that your Pre1 is totally handcrafted with perfectly matched parts of the finest selections. You have to know that to reach the optimal performance your PRE1 need at least 200 hours of listening. In this time all components go from “burn in”... -
Page 4: Features
•Five Years Warranty Installation & Placement The LAB12 PRE1 should be placed on a solid flat surface. You should avoid placing it near a heat source as this could compromise the preamplifier performance and reliability. You should never place another component directly on top of PRE1. -
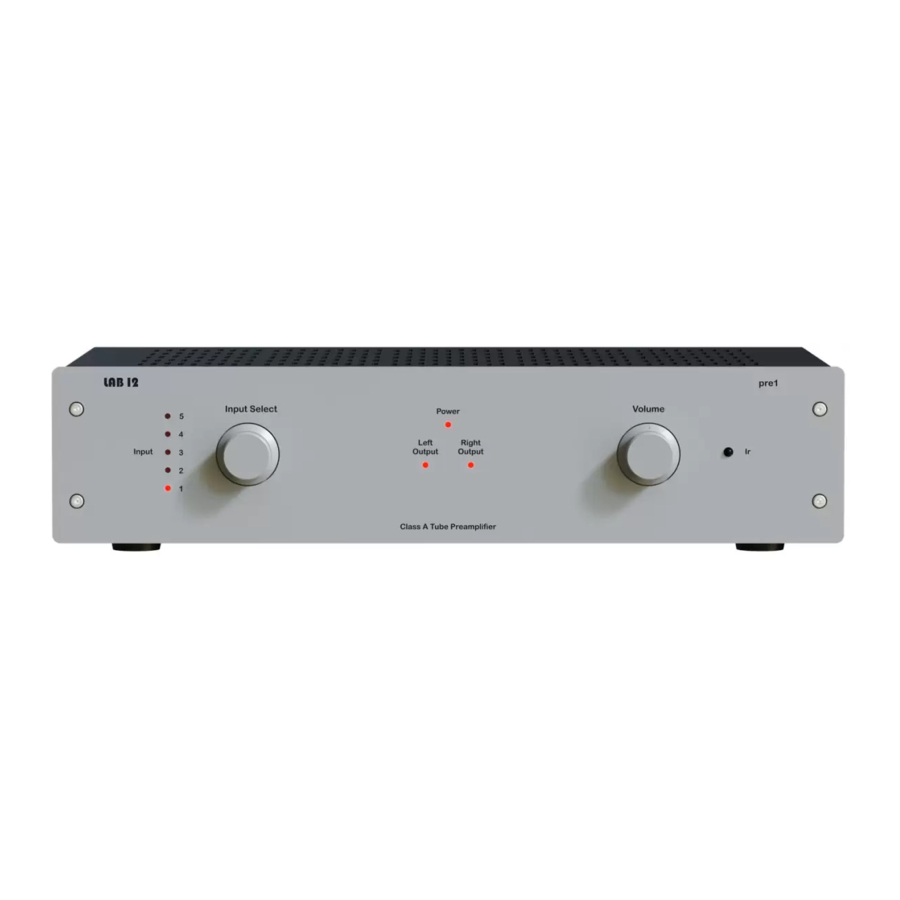
Page 5: Front Panel
The LEDs (D) indicates that the outputs of PRE1 are active. LEDs (D) blinking for a 1 minute (tubes warm up time) after turning on the PRE1, make sure that the volume control is in a low level within this minute. -
Page 6: Rear Panel
LAB12 PRE1 Triode Class A Line Preamplifier Rear Panel PRE1 Rear panel On the rear panel you will find the connection sockets for inputs and outputs. On the left side there are the two pairs of preamp outputs (A). On the right of the preamp outputs you will find the line inputs named 1 to 5 (B). -
Page 7: Remote Control
LAB12 PRE1 Triode Class A Line Preamplifier Remote Control PRE1 Remote Control Panel You can fully control your preamplifier from IR remote control RC1. To the top of the remote control located the two buttons for output volume adjustment (A). -
Page 8: Main Connections
Make sure that your Source has an analog line level output. Connect an analog interconnect cable from the source output to one of analog inputs of PRE1. Select input number with the selector switch on the left side of the front panel on your PRE1. -
Page 9: Specifications
LAB12 PRE1 Triode Class A Line Preamplifier Specifications •Power: 230/240 Vac 50Hz (1Α fused) •Power consumption: 80 VA max •Frequency response: +0-3dB, 5Hz to 100kHz •Distortion: 0.04% at 2V RMS output •Gain: 21dB •Signal to Noise ratio: 90dB •Maximum output: 14V RMS •Input impedance: 50K ohms...
Need help?
Do you have a question about the PRE1 and is the answer not in the manual?
Questions and answers