Table of Contents

Subscribe to Our Youtube Channel
Related Manuals for Coffee Queen MOCCA


Summary of Contents for Coffee Queen MOCCA
-
Page 1: User Manual
User manual MOCCA Your dealer U_EN Rev. 110607... -
Page 2: Table Of Contents
1. Table (list) of contents MOCCA 1. Table of contents page. 2. General 3. Overview of the components, front. 3. Overview of the components, inside 3. Activate with user card 4. Installation and start Important! Safety and maintenance of grinder 5. -
Page 3: General
2. General MOCCA Thank you for choosing a Mocca machine. We hope you enjoy it ! - The machine must be connected correctly for your own safety. Read the user guide before using the machine. - The guide contains important instructions for proper and safe use of the machine - Always keep the guide close at hand. -
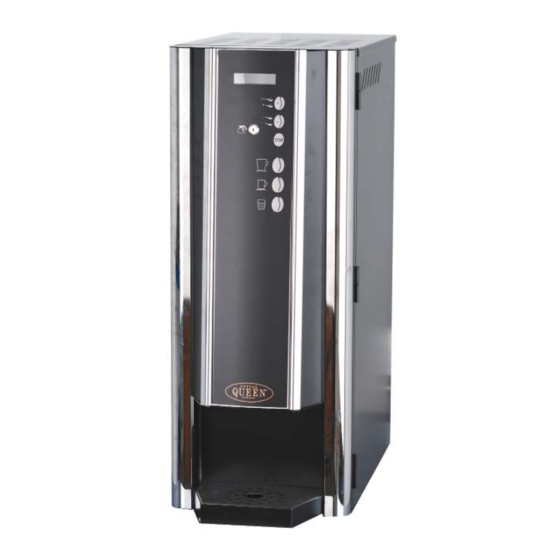
Page 4: Overview Of The Components, Front
3. Overview of components, front MOCCA Display Strength of drinks ++ / - - Key switch Large coffee Small coffee Hot water Door lock Outlet (warm drinks) Drip tray insert Drip tray Options: Base cabinet with waste box... -
Page 5: Overview Of The Components, Inside
3. Overview of components, inside MOCCA Ingredients FUSE ON/OFF canister holder switch Door lock Brewing mechanism Outlet Coffee Waste box Outlet hot water Detail; Ingredients; Width; Height; Amount/unit Canister; Coffee... -
Page 6: Activate With User Card
3. Overview. Activate with user card MOCCA 5. Overview of components, function buttons AC12 USER CARD. USER CARD Item number: 1602692. Is used for cleaning and setting jug beverages. The user card is supplied by your dealer. Insert the user card with the chip upwards, according to the illustration. - Page 7 4. Service. Installation och igångsättning MOCCA Place the brewer on a fl at level and waterproof surface. Connect the electrical plug to a separate grounded wall socket 230V 10A 90º OBSERVE! Make sure there is a space behind the machine for free fl ow of air.( minimum 10cm ) Connect attached water tube to cold water with an R 1/2”.
-
Page 8: Installation And Start
4. Service. Installation and start MOCCA 6. Fill canisters with ingredients. Take out (this to avoid unnecessery spillage in the machine) ingredient canisters and fi ll them with ingredients. 7. When placing the ingredient canister Make sure that the outlet pipe have the position of pointing straight into the (A). -
Page 9: Operation Brewing Of Coffee In Cup
5. Operation: Brewing of coffee in cup MOCCA 1. Place a cup in the centre of the cup holder. 2. The strength has a standard setting, if you wish to increase or decrease it, do as follows if not continue to point 3. -
Page 10: Brewing Of Jug
5. Operation: Brewing of coffee in jug MOCCA Brewing of jug Place a jug in the centre of drip tray. Serving jug 1,2L art.no. 1103091 Turn on the key with jug symbole clockwise. 6 cups of brewing is standard setting. -
Page 11: Cleaning Program
6. Cleaning program MOCCA Automatic cleaning of In/Outlet valves Open door. Put a container under the dispenser. Insert the user card in the card reader. Move through the menu until the display shows ”Service Menu”, ”Clean Machine”. Press the E button. -
Page 12: Cleaning Brewmechanism
6. Cleaning program Clean brewing mechanism. MOCCA Automatic cleaning with brewing mechanism: Cleaning the brewer mechanism should be done once a week. Open door. Insert the user card in the card reader. Move through the menu until the display shows Service Menu, Clean Machine. -
Page 13: Cleaning Of Brew Chamber
6. Cleaning program Clean brewing mechanism. MOCCA Continuation: Automatic cleaning of the brewing mechanism: Cleaning of the brewing mechanism should be done once a week. Display indicates; Preparing Brewer, Please Wait. Display indicates; Cleaning Brewer, Time Left 300s. The machine counts down from 300 seconds. -
Page 14: Dismantling Brew Chamber
6. Cleaning program Clean brewing mechanism. MOCCA Continuation: Automatic cleaning of the brewing mechanism: Cleaning of the brewing mechanism should be done once a week. Disassemble the brewing chamber: Supplementary fl ushing/cleaning of the Reassemble the brewing chamber Note: When the brewing chamber is brewing chamber. -
Page 15: Cleaning And Care
7. Cleaning and care. CLEANING MOCCA Cleaning when necessary. To clean the exterior of the machine, use a soft rag and liquid cleaning agent that is non-abrasive. Canister (A) and chute (B) can be washed in a dish washing machine! Note! Make sure that all parts are dry before use. -
Page 16: Cleaning And Care
7. Cleaning and care. CLEANING MOCCA Disassembly and cleaning of coffee fi lter. A tool for disassembly of coffee fi lter is included with the machine Open the door. Insert the user card in the card reader Move through the menu until the display shows Service Menu, Clean Machine. -
Page 17: Messages Shown On Display
8. Message shown on display MOCCA Message on display: The display indicates: Energy saving mode The machine is in energy saving mode. Not available Drink cannot be selected as jug. Heating Water Low temperature in the water tank, the machine Please Wait... -
Page 18: Programming
9. PROGRAMMING MOCCA Activate programming with the user card. Open door and insert the user card in the card reader. The display indicates: Service Menu, Clean Machine Function buttons programming Press this button if you wish to leave the submenu and return to the main menu. -
Page 19: Programming Main Menu
9. PROGRAMMING MAIN MENU MOCCA PROGRAMMING AND SETTINGS. Service Menu The display shows Clean Machine Press button Service Menu The display shows Counters Press button The display shows Press button... -
Page 20: Clean Machine
9. PROGRAMMERING Clean Machine MOCCA Alter Beverage Setup Clean Machine Step forwards in Service Menu the menu until display shows Clean Machine Machine Clean Press button Select Cleaning Clean Valves Press button Select Cleaning Clean prezzo... -
Page 21: Counters
9. PROGRAMMING Counters MOCCA Se the number of performed cleanings or reset the counter: adjust, Counters, Beverage Step forwards in the menu until Service Menu display shows Counters Counters Press button Press Press Beverage counter Drink 1 Counters Per beverage... - Page 22 9. PROGRAMMING Counters MOCCA Se the number of performed cleanings or reset the counter: Counters, Cleaning Counter Step forwards in the menu until Service Menu display shows Counters Counters Press button Press Counters Clean Counter Cleaning counter Brewer 000 To step forward in menu,...
-
Page 23: Dimension Sketch
10. Dimension sketch. MOCCA... -
Page 24: Storage / Transport
11. Storage/Transport. MOCCA Transport and no use in long time. 1. Turn off the switch, pull out the plug and close incoming water tube. 2. Empty the water tank. 3. Keep machine free from frost. Long machine storage at temperatures below 0ºC (zero degrees celsius) can cause... - Page 26 Mocca FÖR SERVICE Vänligen kontakta din återförsäljare Din återförsäljare / Your retail dealer ................................................CREM International AB Box 10, Viksgränd 2, SE-670 40 Åmotfors, Sweden Tel: +46 (0)570-477 00, Fax: +46 (0)570-47719 E-mail: info.se@creminternational.com www.creminternational.com Art. nr/Art. no.1730134...
Need help?
Do you have a question about the MOCCA and is the answer not in the manual?
Questions and answers