
Related Manuals for Coffee Queen A Series


Summary of Contents for Coffee Queen A Series
- Page 1 ORIGINAL LINE A USER MANUAL Machines with automatic water filling UM_EN Part No.: 1764024_03...
-
Page 2: Table Of Contents
CONTENT ORIGINAL LINE A CONTENT ................................ 2 MANUAL REVISIONS ..........................4 NOTIFICATIONS ............................5 Explanation of descriptions............................5 GENERAL INFORMATION ........................6 Introduction ................................6 General instructions ..............................6 Intended use ................................7 Warnings and Precautions .............................7 TRANSPORT ..............................10 Packaging ................................. 10 Delivery inspection ............................... 10 STORAGE AND DISPOSAL ........................ - Page 3 CONTENT ORIGINAL LINE A OPERATION ..............................22 Brewing with coffee .............................. 22 To keep temperature and aroma ........................24 CLEANING AND CARE ........................25 Rinse thermos, decanter and serving station ....................25 Daily cleaning ................................. 26 Weekly cleaning ..............................26 Cleaning serving station ............................
-
Page 4: Manual Revisions
MANUAL REVISIONS ORIGINAL LINE A Rev. #: Date: TSB#: Change Description Update descaling instructions and general information. Add Apr. 26, 2021 notifications, transport, storage and disposal sections Original instructions. -
Page 5: Notifications
NOTIFICATIONS ORIGINAL LINE A Explanation of descriptions There are five different levels of notification intensity within this manual, as identified by the signal terms: DANGER, WARNING, IMPORTANT, NOTE and PRO TIP. The level of risk and importance of the notification is determined by the following definitions. Always observe the warnings to ensure safety and prevent potential injury and product damage. -
Page 6: General Information
GENERAL INFORMATION ORIGINAL LINE A Introduction Thank you for choosing an Crem Filter Coffee Brewer. We hope you enjoy it ! Please read this user manual carefully before using the machine. This manual contains important instructions regarding safe intended use of the machine. -
Page 7: Intended Use
GENERAL INFORMATION ORIGINAL LINE A Intended use The coffee machine has been designed and manufactured to make espresso coffee and other hot drinks (e.g., steaming and frothing milk). Do not use it for any other purpose. The machine is intended to be used by trained personnel for preparing foodstuffs. - Page 8 GENERAL INFORMATION ORIGINAL LINE A Warnings and Precautions The appliance is not suitable for installation in an area where a water jet could be used. This appliance must not be cleaned with a water jet or a pressure washer. The appliance is not suitable for outdoor use, where it would be exposed to severe weather or extreme temperatures.
- Page 9 GENERAL INFORMATION ORIGINAL LINE A Warnings and Precautions When packed for storage, store the machine in a dry place with an ambient temperature above 5ºC. Boxes may be stacked up to three units high of the same model. Do not place other heavy items on top of the box.
-
Page 10: Transport
TRANSPORT ORIGINAL LINE A Packaging The machine is shipped in a custom-designed carton which utilizes model-specific polystyrene cushions to protect it from damage. The machine’s carton features standardized handling symbols to explain proper shipping and storage methods. The machine must remain in a horizontal position during the transport. Do not store or handle the machine except on its feet. -
Page 11: Storage And Disposal
STORAGE AND DISPOSAL ORIGINAL LINE A Long-term storage requirements Before storage for a month or more be sure to: • Perform all weekly and periodic cleaning procedures described in this manual. • Disconnect and roll up the power cord (this should be performed by a qualified person). •... -
Page 12: Technical Specifications
TECHNICAL SPECIFICATIONS ORIGINAL LINE A Facts & weight FACTS DA-4 Thermos A Mega Gold A 655, 205, 445 428, 205, 410 428, 410, 410 557, 205, 410 Height, Width, Depth Thermos/decanter volume 1.8 L 2x1.8 L 2.2 L 2.5 L 380-400V 2N~ 220-230V~ 220-230V~... -
Page 13: Overview Of Components
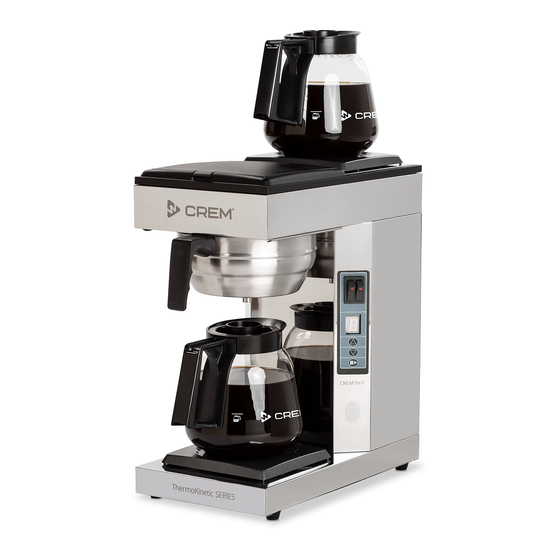
OVERVIEW OF COMPONENTS ORIGINAL LINE A Front view Glass decanter Upper hot plate Tank Lid Filiter Holder Power Switch Display Glass decanter Lower hot plate Original instructions. - Page 14 OVERVIEW OF COMPONENTS ORIGINAL LINE A Front view DA-4 Glass decanters Upper hot plates Tank Lid Filiter Holder Brewing lamp Power Switch Glass decanters Lower hot plates Original instructions.
-
Page 15: Thermos A
OVERVIEW OF COMPONENTS ORIGINAL LINE A Front view Thermos A Tank Lid Filiter Holder Power Switch Display Carry Handle Thermos Original instructions. -
Page 16: Mega Gold A
OVERVIEW OF COMPONENTS ORIGINAL LINE A Front view Mega Gold A Tank Lid Filiter Holder Power Switch Carry Handle Display Serving Station Tap for Coffee Drip Tray Insert Drip Tray Original instructions. -
Page 17: Function
OVERVIEW OF COMPONENTS ORIGINAL LINE A Function A-2, DA-4 ON-OFF button for display ON-OFF button and lower hot plate. For upper hot plate. Shows the number of cups. Display is blinking when brewing. Increase the number of cups. Decrease the number of cups. Starts brewing. -
Page 18: Mega Gold A, Thermos A
OVERVIEW OF COMPONENTS ORIGINAL LINE A Function Mega Gold A, Thermos A ON - OFF button. Shows the number of cups. Display is blinking when brewing. Increase the number of cups. Decrease the number of cups. Starts brewing. During a brewing you may press this button to stop the brew process. -
Page 19: Installation And Start-Up
INSTALLATION AND START-UP ORIGINAL LINE A Positioning Min. 10cm Min. 10cm Place the machine on a flat horizontal surface that will support the weight of the machine. Note: Make sure air is able to circulate behind the machine (minimum 10cm). Water connection Connect the supplied water hose to the cold water connection using a ½’’... -
Page 20: Electrical Connection
INSTALLATION AND START-UP ORIGINAL LINE A Electrical connection A-2, THERMOS A, MEGA GOLD A Important: Connect the plug to a separate earthed wall socket. 110-120V / 220-230V 50-60Hz, 10 Amp. DA-4 The brewer is not reconnectable and may only be installed to the electric supply network with a voltage that is stated on the brewer and shall be carried out by an authorized electrician. -
Page 21: First Time Start-Up
INSTALLATION AND START-UP ORIGINAL LINE A First time start-up Important: First time you use the machine do the first brewing with water only. Slide the filter holder into position without filter and coffee. Turn on the power switch(A). Select 12,15 or 17 cups by adjusting button. -
Page 22: Operation
OPERATION ORIGINAL LINE A Brewing with coffee Recommended powder amount is 60g/L Add coffee (restaurant / catering ground coffee). Make sure that the Place a 90mm filter in the filter holder. coffee is evenly spread. Slide the filter holder into position. - Page 23 OPERATION ORIGINAL LINE A Place the thermos or decanter under the filterholder. Choose number of cups for your brewing by using the buttons described below. - Press the button to increase number of cups - Press the button to decrease number of cups When you have selected your desired number of cups press the button to start brewing.
-
Page 24: To Keep Temperature And Aroma
OPERATION ORIGINAL LINE A To keep temperature and aroma Tips for keeping coffee hot Pre-heat the serving station, start a brewing with only water into the serving station. When brewing is complete let it stand for about 1 hour. Pour out the water. -
Page 25: Cleaning And Care
CLEANING AND CARE ORIGINAL LINE A Rinse thermos, decanter and serving station Before each brewing, rinse the thermos, decanter or serving station with fresh tap water. When cleaning the outside, use a soft rag with liquid cleaning agent to prevent scratches. WARNING! The machine should not be submerged in water or washed in a dishwasher. -
Page 26: Daily Cleaning
CLEANING AND CARE ORIGINAL LINE A Daily cleaning Wash the thermos, decanter(B) and the filter holder with liquid solution for coffee machines. Always remove the filter immediately and clean the filter holder daily, coffee will get moldy. Clean the spray nozzle(A) and the surrounding area. Use a soft rag and liquid solution that does not scratch. -
Page 27: Cleaning Serving Station
CLEANING AND CARE ORIGINAL LINE A Cleaning serving station Disassemble the level tube and clean it every week with the enclosed brush. Take off the main lid and clean the mixer tube(A). Cleaning of serving station 2.5 L Fill the serving station with hot water. ( Full Important: brewing without coffee and filter ). -
Page 28: Programming
PROGRAMMING ORIGINAL LINE A Adjust water amount Adjust amount of brew water Press the buttons at same time in 5 seconds. The buzzer beeps twice. Display shows 0. - Press the button to increase amount of water. - Press the button to decrease amount of water. -
Page 29: Possible Solution
POSSIBLE SOLUTION ORIGINAL LINE A Fault and solution FAULT POSSIBLE SOLUTION Important: Check plug connection to wall socket. All maintenance Check fuse in plug. Power switch does not lit and installations Check if hot plate becomes warm, if so must be done replace power switch. -
Page 30: Dimension
DIMENSION ORIGINAL LINE A Model 595mm 205mm 410mm 428mm 578mm 360mm Original instructions. - Page 31 DIMENSION ORIGINAL LINE A DA-4 Model DA-4 410mm 410mm 428mm 595mm 578mm 360mm Original instructions.
-
Page 32: Thermos A
DIMENSION ORIGINAL LINE A Thermos A Model Thermos A 557mm 205mm 410mm 708mm 360mm Original instructions. -
Page 33: Mega Gold A
DIMENSION ORIGINAL LINE A Mega Gold A Model Mega Gold A 655mm 205mm 445mm 390mm 806mm Original instructions. -
Page 34: Serving Station
DIMENSION ORIGINAL LINE A Serving Station Model Serving Station 205mm 273mm 436mm 400mm 105mm Original instructions. - Page 36 For the warranty to be valid the conditions for maintenance must have been followed according to our instructions, proper precaution has been made and warranty claim been issued without delay. The affected equipment may not be used during awaiting service if there is any risk that the damage or defect would worsen.
Need help?
Do you have a question about the A Series and is the answer not in the manual?
Questions and answers