Table of Contents
Advertisement
Quick Links
Advertisement
Table of Contents

Subscribe to Our Youtube Channel
Related Manuals for Amica PDG4.0 Series


Summary of Contents for Amica PDG4.0 Series
-
Page 1: Instruction Manual
PDG4.0... PDG4.1...A PDG5.0...A INSTRUCTION MANUAL IO 00450/2 (11.2010) -
Page 2: Basic Information
DEAR CUSTOMER, Outstanding user-friendliness and excellent efficiency make cooktops a perfect choice. Please read this manual thoroughly before you start to use the appliance to avoid any trouble. The cooktop’s safety and functionality was checked at the factory test stations prior to di- spatch. -
Page 3: Table Of Contents
TAbLE Of CONTENTS basic information....................2 Important safety instructions..............4 How to save energy....................5 Unpacking......................5 Disposal of an old appliance...................5 Guide to the cooktop....................6,7 Specifications......................6,7 Installation.........................9 Location......................9 Notes for the technician...................11 Operation......................12 Setting the gas type..................12 Valve adjustment....................14 Flame selection....................15 Suitable pans......................16 Cleaning and maintenance................19 Top burners......................19 Work panel......................19... -
Page 4: Important Safety Instructions
SAfETY INSTRUCTIONS • Do not leave children unattended in an area where the appliance is in use. • Do not allow persons of limited physical, sensual, or psychical capabilities, or persons whose experience in operating similar appliances is limited to operate the cooktop, unless if attended by (adult) caretakers. • Make sure no part of the power cord comes in contact with hot parts of the cooktop. • Leave sufficient space around the socket to ensure the power plug is accessible easily after installation. • Do not install the cooktop near cooling appliances. • Do not leave the cooktop unattended while in use. Boil-overs cause smoking, and greasy spill-overs may ignite. • Execute caution when the food is boiling. Boil-overs may flood the burner. • Should a malfunction occur, stop using the appliance. Do not start to use your cooktop before a trained technician has repaired it. • Make sure all the burners are closed before opening the main gas valve at the network or container connection. -
Page 5: How To Save Energy
HOW TO SAVE ENERGY UNPACKING Using energy in a respon- During transportation, pro- sible way not only saves tective packaging was used money but also helps the to protect the appliance environment. So let’s save against any damage. After energy! And this is how you unpacking, please dispose can do it: of all elements of packaging... -
Page 6: Guide To The Cooktop
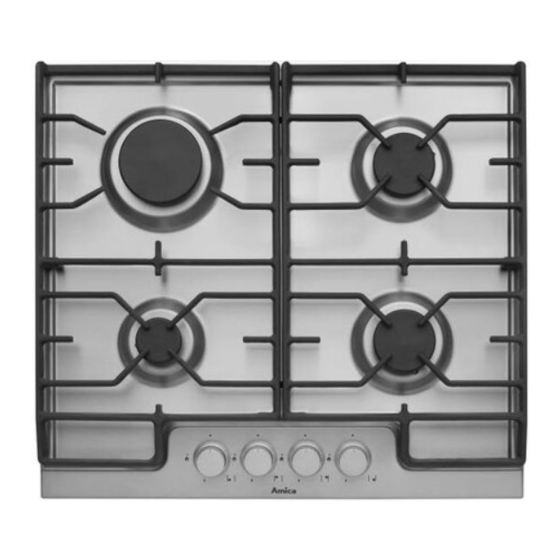
GUIDE TO THE COOKTOP PLATE PDG 4.0... SERIES 1,2,3 - surface burners 4 - surface burner knobs 5 - grid fig.1 TECHNICAL DATA heigh 90 mm depth 520 mm width 590 mm weight of the cooker 11,6 kg The cooker is equipped with burners: 1 - large burner, heat load - 2,4 kW 2 - small burner, heat load... - Page 7 GUIDE TO THE COOKTOP PLATE PDG 4.1...A SERIES 1,2,3 - surface burners 4 - surface burner knobs 5 - grid fig.2 TECHNICAL DATA heigh 90 mm depth 520 mm width 590 mm weight of the cooker 11,8 kg The cooker is equipped with burners: 1 - WOK burner, heat load - 2,65 kW 2 - small burner, heat load...
- Page 8 GUIDE TO THE COOKTOP PLATE PDG 5.0...A SERIES 1,2,3,4 - surface burners 5 - surface burner knobs 6 - grid fig.3 TECHNICAL DATA heigh 90 mm depth 520 mm width 790 mm weight of the cooker 16,1 kg The cooker is equipped with burners: 1 - WOK burner, heat load - 2,65 kW 2 - small burner, heat load...
-
Page 9: Installation
INSTALLATION Installation work and repairs should only be performed by a qualified technician in accordance with all applicable codes and standards. Repairs and service by unqualified persons could be dangerous and the manufacturer will not be held responsible. Location • The kitchen must be dry and well ventilated. - Page 10 INSTALLATION Installation of the cooktop: • Prepare the work top cut-out as shown in the diagram (see fig. 5). • Remember to maintain the minimum safety distances to combustible surfaces below the cooktop of 130 mm. • Fix the tape (included) to the cooktop edge at the bottom side of the appliance. •...
-
Page 11: Notes For The Technician
INSTALLATION Notes for the technician The fitter should: • Bear a valid certificate of gas permit • Have studied the contents of the appliance’s type plate containing the suitable type of gas. Compare the data with the characteristics of the gas available in the network. -
Page 12: Operation
OPERATION Please make sure you have read and understood the entire operating manual. Do follow the instructions to ensure safe and effective operation of your cooktop. NOTE The appliance uses gas, which is a flammable and explosive substance. Thus, it is necessary for the cooktop to be connected to a gas network which supplies the gas type for which the appliance is suitable. - Page 13 OPERATION Replacement of burner nozzle: loosen the nozzle with a dedicated wrench (7). Fit the new nozzle, suitable for the required gas type (see table above for reference). After you have converted the cooktop to another gas type, make sure you have placed a label containing that information on the appliance. Adjustment of the reduced valve flow Table 2 burners flame Converting the...
-
Page 14: Valve Adjustment
OPERATION Valve adjustment Valve adjustment should be done with the control knob set at Burner ON saving flame po- sition. Remove the knob, and adjust the flame with a tiny screwdriver (see fig. 7 below). fig. 7 Checking the adjusted flame: heat the burner at full open position for 10 minutes. Then turn the knob into the saving setting. -
Page 15: Flame Selection
OPERATION flame selection At the burners adjusted correctly, the flames should be light blue, and the inner cone should be clearly visible. The size of flame depends on the position of the related burner control knob. fig. 8 - Burner ON, large flame - Burner ON, small flame (saving mode) -
Page 16: Suitable Pans
OPERATION Significant quantities of energy can be saved if the appliance is used correctly, parameters set correctly, and appropriate cookware is used. The savings can be as follows: • Up to 60 per cent savings when proper pots are used, •... - Page 17 OPERATION Using cooktops with control knob ignition (Zp) • Press the selected control knob and turn anti-clockwise into Burner ON large flame position. • Hold depressed until gas is on fire • Release the knob and set the required flame size. Using cooktops with leak protection (Zt) spark igniter protection Hold the burner’s control knob depressed for approx. 10 seconds in Burner ON large flame position.
- Page 18 OPERATION What to do if surplus gas leak occurs 1 – gas network 2 – gas cut off valve A – valve ON B – valve OFF fig.9 In any emergency, proceed as follows: • turn the burners off • set the cut off valve OFF (see fig. 9 B) • ventilate the kitchen •...
-
Page 19: Cleaning And Maintenance
CLEANING AND ROUTINE MAINTENANCE Daily cleaning and proper maintenance have crucial impact on the durability of your ceramic plate. Clean the ceramic plate observing the same rules as for glass. Never use abrasive or aggressive clean- ing agents, scrubbing powders or scratching sponges. - Page 20 CLEANING AND MAINTENENACE Periodic inspections In addition to current maintenance and care, the following shall be arranged for: • Periodic inspections of control elements and units of the cooktop. Upon expiration of the warranty, service department shall be ordered technical inspections of the appliance at least once every two years.
-
Page 21: Troubleshooting
TROUBLESHOOTING In each case, proceed as follows: • Turn the burners off • Disconnect power supply • Report for repair • The user can fix some minor malfunctions himself, according to the guidance given in the tables below. Please check the information below before contacting the service depart- ment. -
Page 22: Guarantee
GUARANTEE Guarantee Guarantee service will be granted as per the Guarantee Certificate. The manufacturer cannot be held responsible for any damage caused by improper use or operation of the appliance. Please copy the cooktop type and manufacturing number from the nameplate: Type.......... - Page 24 Amica Wronki S.A. ul.Mickiewicza 52 64-510 Wronki tel. 067 25 46 100 fax 067 25 40 320 www.amica.com.pl IO 00450/2 (11.2010)
Need help?
Do you have a question about the PDG4.0 Series and is the answer not in the manual?
Questions and answers