Table of Contents
Advertisement
Quick Links
See also:
Quick Manual
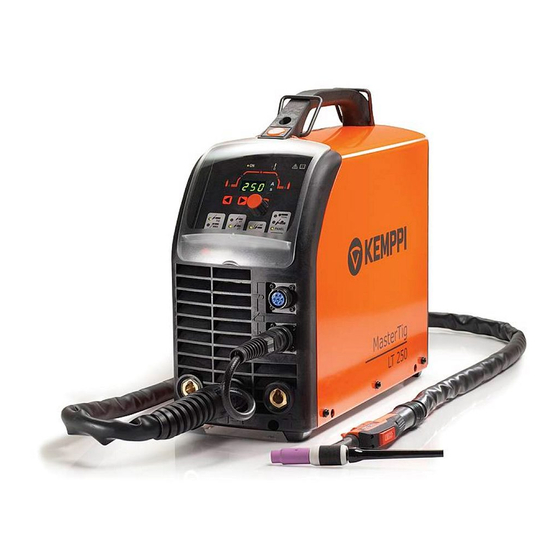
MasterTig
LT 250
Operating manual
Bruksanvisning
Gebrauchsanweisung
Manual de instrucciones
Käyttöohje
Manuel d'utilisation
Manuale d'uso
Gebruiksaanwijzing
Brugsanvisning
Instrukcja obsługi
Manual de utilização
Инструкции по эксплуатации
Bruksanvisning
操作手册
EN
DA
DE
ES
FI
FR
IT
NL
NO
PL
PT
RU
SV
ZH
Advertisement
Table of Contents

Related Manuals for Kemppi MasterTig LT 250


Summary of Contents for Kemppi MasterTig LT 250
- Page 1 MasterTig LT 250 Operating manual Bruksanvisning Gebrauchsanweisung Manual de instrucciones Käyttöohje Manuel d’utilisation Manuale d’uso Gebruiksaanwijzing Brugsanvisning Instrukcja obsługi Manual de utilização Инструкции по эксплуатации Bruksanvisning 操作手册...
- Page 3 OPERATING MANUAL English...
-
Page 4: Table Of Contents
................... . MasterTig LT 250... -
Page 5: Preface
Kemppi. Product introduction MasterTig LT 250 is a high quality DC TIG and MMA welding source for industrial applications. MasterTig LT 250 requires no mains input voltage supply and is powered from the supply voltage provided by a parent power source. -
Page 6: Before You Start Using The Unit
Never aim metallic grinding spray/sparks towards the equipment. Power supply connection MasterTig LT 250 requires no mains input voltage supply and is powered by the supply output voltage from a parent welding power source. You can use either a Constant Current (CC) or Constant Voltage (CV) parent power source normally used for MMA or MIG/MAG welding, or a welding generator with a suitable output characteristic. -
Page 7: General View Of The Machine
10. Welding cables connectors from parent source NOTE! MasterTig LT 250 is polarity protected. If the +/- power cables are connected in reverse the machine will not function. This is evident by no power to the control panel. © Kemppi Oy / 1422... -
Page 8: Welding Cable Connections
Connect the earth return cable to the positive pole in TIG welding and to the negative pole in MMA welding. Before you start welding, clean the work piece surface and fix the earth return clamp to the work piece in order to create a closed and interference free welding circuit. MasterTig LT 250... -
Page 9: Use
250 A DC current. Before use, grind the tungsten electrode to a sharp point at approximately 1.5 times the diameter of the electrode. If the electrode touches the work piece during welding, re-sharpen the electrode. © Kemppi Oy / 1422... -
Page 10: Shielding Gas
4. Adjust the flow by the knob (8 – 12 l/min). NOTE! Use a suitable shielding gas for the welding application. Always secure the gas cylinder in an upright position with either a specially made wall rack or cylinder trolley. Always close the cylinder valve after welding. MasterTig LT 250... -
Page 11: Connection For Mma Welding
It is also important to properly adjust the welding current so that the filler material and coating will melt properly and the welding is efficient. The table below presents the electrode sizes available for use with the MasterTig LT 250 welding machine and the corresponding welding current values. MMA Electrodes and corresponding current settings range Electrode diameter 1.6 mm... -
Page 12: Operating Functions
MMA welding is selected when the indicator next to the MMA symbol is lit. If needed, press the process selection button to select the MMA process (4). The machine automatically sets suitable values to the ignition time, ignition pulse and arc dynamics. MasterTig LT 250... -
Page 13: Tig Welding Function
For HF ignition, press the HF button so that the indicator is on (item 6). Press the TIG torch trigger and hold or release, depending on whether 2T or 4T is selected. The shielding gas flows and the HF (High Frequency arc) ignites the welding arc. © Kemppi Oy / 1422... -
Page 14: Setup Features
Electrode ignition pulse (-9 = No pulse / 0 = Max pulse) Disable automatic remote control recognition. 0 = Enable automatic recognition, 1 = Disable automatic recognition. *) Happens when exiting SETUP mode and value is 1. MasterTig LT 250... -
Page 15: Error Codes
• If the machine’s duty cycle has been exceeded, wait for indicator to turn off. In certain circumstances, this light may also indicate irregularity in the supply voltage. Too low or high supply voltage. If the machine’s malfunction is not eliminated with the above measures, contact Kemppi service. © Kemppi Oy / 1422... -
Page 16: Maintenance
We recommend that you schedule a service inspection of your welding machine every six months. An authorised Kemppi service agent will inspect and clean your machine, ensuring that all power connections are tight and secure. Power connections can become loose and oxidised with frequent and high changes in temperature. -
Page 17: Ordering Numbers
6185477 RTC 20 6185478 Gas flow gauge AR/clock 6265136 Shielding gas hose (4.5 m) W001077 Carrying strap 9592160 Remote control units R 10, length 5 m 6185409 R 10, length 10 m 618540901 R11F 6185407 © Kemppi Oy / 1422... -
Page 18: Technical Data
TECHNICAL DATA MasterTig LT 250 Connection voltage range 40 V – 100 V Rated input power 8.6 kW/9.1 kVA Supply current, I 155 A 1max 230 A Supply current, I 90 A 1eff 135 A Connection cable 35 mm² Output 40 °C... - Page 20 KEMPPI OY KEMPPI, TRADING (BEIJING) COMPANY LTD Telefax +44 (0)845 6444202 Kempinkatu 1 sales.uk@kemppi.com Room 420, 3 Zone, Building B, PL 13 No.12 Hongda North Street, KEMPPI FRANCE S.A.S. FIN-15801 LAHTI Beijing Economic Development Zone, 65 Avenue de la Couronne des Prés...
Need help?
Do you have a question about the MasterTig LT 250 and is the answer not in the manual?
Questions and answers