Table of Contents
Advertisement
Quick Links
Advertisement
Table of Contents

Related Manuals for Teltonika TMU-10x


Summary of Contents for Teltonika TMU-10x
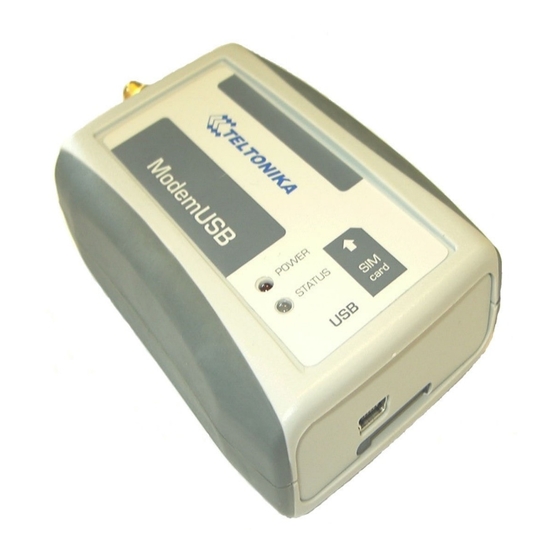
- Page 1 TELTONIKA ModemUSB (TMU-10x) User’s Manual v2.1.1.19...
-
Page 2: Table Of Contents
ModemUSB User’ Manual v2.1.1.19 Table of contents Attention! ...............................3 Legal Notice ..............................3 Introduction ..............................4 1. package contents............................5 2. Technical specifications...........................6 2.1. Data transferring..........................6 2.2. Mechanical specifications ........................6 2.3. Electrical and operating specifications ..................7 2.4. Indication ............................8 3. Modem setup ............................9 3.1. -
Page 3: Attention
All rights reserved. Reproduction, transfer, distribution or storage of part or all of the contents in this document in any form without the prior written permission of TELTONIKA Ltd is prohibited. Other product and company names mentioned herein may be trademarks or trade names of their... -
Page 4: Introduction
ModemUSB User’ Manual v2.1.1.19 INTRODUCTION This document will provide you with the instructions how to install and use “ModemUSB” and its software. “ModemUSB” is a device designed for data transmission via GSM Network. The design of this modem enables the connection to your PC through USB interface. Once the modem is connected to the PC, you can get access to the Internet via one of the data transmission type the GSM are supported. -
Page 5: Package Contents
ModemUSB User’ Manual v2.1.1.19 1. PACKAGE CONTENTS “ModemUSB” is supplied to clients in carton with all contents, which are needed for connection to PC and normal work. 1) Carton; 2) “ModemUSB” modem; 3) “USB A mini USB B” connecting cable; 4) CD with User’s Guide and drivers;... -
Page 6: Technical Specifications
ModemUSB User’ Manual v2.1.1.19 2. TECHNICAL SPECIFICATIONS 2.1. Data transferring “ModemUSB” supports all bearers of GSM Network. Which data-bearer is used depends on GSM operator and data transfer capacity in the chosen GSM Network. EDGE class 6 (class B); • GPRS class 10 (class B);... -
Page 7: Electrical And Operating Specifications
ModemUSB User’ Manual v2.1.1.19 2.3. Electrical and operating specifications Modem is supplied from +5V USB interface. The device does not need any external power supply at all! The PC to which is the “ModemUSB” modem connected must have a USB interface, corresponding to USB 1.1 or USB 2.0 standards. -
Page 8: Indication
ModemUSB User’ Manual v2.1.1.19 2.4. Indication “ModemUSB” has 2 LEDs for indication. They are located at the top part of the device. Due to these indicating LEDs we can determine in which mode is the device operating, are there any shortcuts in its functionality or not. The indication status of the modem is given in the Table 3. -
Page 9: Modem Setup
„Ok“ language and press button. Following TELTONIKA Home screen will appear; Installation processing button 3) The installation program should start automatically there to start installation progress click Install button, please. If it is not the case, so find a catalogue “Software” in the CD and start “Modem Setup”... - Page 10 ModemUSB User’ Manual v2.1.1.19 4) Press “Next” button in the opened box. A second “Modem Control tool Setup” dialog box will appear; 5) You can select a preferable driver installation way in the dialog box. When “Complete” installation is chosen, a standard driver will be installed.
- Page 11 ModemUSB User’ Manual v2.1.1.19 7) Should a dialog box appear, stating that there has been performed any “Windows Logo” “Continue testing driver, select Anyway” Upon this selection copy appropriate files will begin; You must plug your “ModemUSB” modem Now! After you do that, wait till system detect your new device and go to the next steps;...
- Page 12 ModemUSB User’ Manual v2.1.1.19 8.2) In this opened „Found New Hardware Wizard“ „Install window mark off software automatically (recommended)“ „Next“ and press button Hardware Installation” 8.3) The „ dialog box “Continue Anyway” will appear. Press button in the dialog box again. And continue installation.
-
Page 13: Setting Up An Internet Connection
ModemUSB User’ Manual v2.1.1.19 9) Press „Next“ now; 10) Enter dial-up connection parameters: “ISP Name” “Phone number” “APN” “User Name” “Password” “ISP Name” “Phone number” “Next” default is Internet and *99# and press in the opened dialog; Note: APN, user name and password ask your GSM operator! “Finish”... - Page 14 ModemUSB User’ Manual v2.1.1.19 • You have a GSM SIM card with activated data transfer service; • “ModemUSB” is ready to work – SIM card is pushed in, the device is correctly connected to the PC, the drivers are properly installed; •...
- Page 15 ModemUSB User’ Manual v2.1.1.19 Note: APN, user name and password ask your GSM operator! Getting connected to the Internet: “Modem Control Tool” 1) The dial-up connections being set start program. The program can be started also from the PC desktop (or “Start → Programs → Modem Control Tool → Modem Control Tool”) while clicking on the shortcut.
-
Page 16: Sending Short Text Messages (Sms)
ModemUSB User’ Manual v2.1.1.19 If you can not connect the Internet using Internet Explorer after using Modem fallow these steps, press “Start → Settings → Control Panel → Internet Options”. Select the box “Connections” “Internet Properties” in the appeared dialogue box “Dial-up and Virtual Private Network settings”... - Page 17 ModemUSB User’ Manual v2.1.1.19 3. Press “Short Messages Service” button on “Modem Control Tool” window for writing and reading of SMS messages: “Create New SMS 4. In the window ” you can write your short SMS messages. In the “Type Phone Number” square enter phone number with code of country you will send “Place Your Text Below”...
-
Page 18: Changing Of Security Settings
ModemUSB User’ Manual v2.1.1.19 3.5. Changing of security settings For SIM security a unique PIN (Personal Identification Number) is used. Before starting using GSM network services, it is necessary to enter a PIN code. “ModemUSB” supports two main GSM “PIN Request Disable” “PIN Request Enable”... - Page 19 ModemUSB User’ Manual v2.1.1.19 “OK” 6) On the window will open enter PIN code and press PIN control code switching on: 1) Start “Modem Control Tool” “Program Settings” 2) Select “Security Settings” 3) Select “PIN Request Enable” 4) Select “Update Data”, 5) Press “OK”...
-
Page 20: Settings Of Program Language
ModemUSB User’ Manual v2.1.1.19 3.6. Settings of program language “Program Settings” “Language” On press , you can change the program language: Note: by default program language is English 3.7. Choice of GSM operators “Program Settings GSM Oper. Selection”. “GSM Operator Selection” Choose screen will appear “Get GSM Operators List”... -
Page 21: Other Functions Of Program
ModemUSB User’ Manual v2.1.1.19 3.8. Other functions of program “Modem Information”: On press You will see information about your using modem: developer, model, IMEI, operator and supplement information. “About This Program”: On press: There will show version of using program, developer address, telephone number, e-mail and developer Internet address. -
Page 22: Acronyms
ModemUSB User’ Manual v2.1.1.19 4. ACRONYMS AC/DC Alternating Current/Direct Current Access Point Name Circuit Switched Data Circuit Switched Fax GPRS General Packet Radio Service Global System for Mobile communications IMEI International Mobile Equipment Identity Internet Service Provider Light Emitting Diode Operating System Packet Data Protocol Personal Identification Number... -
Page 23: Technical Support
If you have faced some problems using the device, which you are not able to solve by yourself, you are always welcome to address our technical support department by e-mail support@teltonika.lt. We will be very glad to help you.
Need help?
Do you have a question about the TMU-10x and is the answer not in the manual?
Questions and answers