Table of Contents
Advertisement
Quick Links
MIX
MIX
16CH COMPACT INTEGRATED LIVE SOUND MIXER
WITH USB INTERFACE
MIC1
MIC2
MIC3
MIC4
MIC5
MIC6
MIC7
MIC8
MIC9
MIC10
2
1
2
1
2
1
2
1
2
1
2
1
2
1
2
1
2
1
2
1
3
3
3
3
3
3
3
3
3
3
MX1642
16-CH COMPACT INTEGRATED LIVE
SOUND MIXER
LINE IN 1
LINE IN 2
LINE IN 3
LINE IN 4
LINE IN 5
LINE IN 7
LINE IN 9
LINE IN 11
LINE IN 13
LINE IN 15
LEFT
LEFT
LEFT
LEFT
LEFT
LEFT
L
(MONO)
(MONO)
(MONO)
(MONO)
(MONO)
(MONO)
BAL UNBAL
BAL UNBAL
BAL UNBAL
BAL UNBAL
BAL UNBAL
BAL UNBAL
BAL UNBAL
BAL UNBAL
BAL UNBAL
BAL UNBAL
INSERT
INSERT
INSERT
INSERT
LINE IN 6
LINE IN 8
LINE IN 10
LINE IN 12
LINE IN 14
LINE IN 16
R
RIGHT
RIGHT
RIGHT
RIGHT
RIGHT
RIGHT
TAPE IN
TRIM
TRIM
TRIM
TRIM
TRIM
TRIM
TRIM
TRIM
TRIM
TRIM
LEVEL
LEVEL
LEVEL
LEVEL
LEVEL
LEVEL
LEVEL
LEVEL
LEVEL
LEVEL
SET
SET
SET
SET
SET
SET
SET
SET
SET
SET
OdB
50dB
MIC
OdB
50dB
MIC
OdB
50dB
MIC
OdB
50dB
MIC
OdB
50dB
MIC
OdB
50dB
MIC
OdB
50dB
MIC
OdB
50dB
MIC
OdB
50dB
MIC
OdB
50dB
MIC
15dB
35dB
LINE
15dB
35dB
LINE
15dB
35dB
LINE
15dB
35dB
LINE
15dB
35dB
LINE
15dB
35dB
LINE
15dB
35dB
LINE
15dB
35dB
LINE
15dB
35dB
LINE
15dB
35dB
LINE
LOW CUT
LOW CUT
LOW CUT
LOW CUT
LOW CUT
LOW CUT
LOW CUT
LOW CUT
LINE
LINE
75Hz
75Hz
75Hz
75Hz
75Hz
75Hz
75Hz
75Hz
MP3
USB
18dB Oct
18dB Oct
18dB Oct
18dB Oct
18dB Oct
18dB Oct
18dB Oct
18dB Oct
EQ
EQ
EQ
EQ
EQ
EQ
EQ
EQ
EQ
EQ
HI
HI
HI
HI
HI
HI
HI
HI
HI
HI
12kHz
12kHz
12kHz
12kHz
12kHz
12kHz
12kHz
12kHz
12kHz
12kHz
MID
MID
MID
MID
HI MID
-
HI MID
-
HI MID
-
HI MID
-
HI MID
-
HI MID
-
3kHz
3kHz
3kHz
3kHz
3kHz
3kHz
800
800
800
800
FREQ
FREQ
FREQ
FREQ
MID LOW
-
MID LOW
-
MID LOW
-
MID LOW
-
MID LOW
-
MID LOW
-
500Hz
500Hz
500Hz
500Hz
500Hz
500Hz
100Hz
8KHz
100Hz
8KHz
100Hz
8KHz
100Hz
8KHz
LOW
LOW
LOW
LOW
LOW
LOW
LOW
LOW
LOW
LOW
80Hz
80Hz
80Hz
80Hz
80Hz
80Hz
80Hz
80Hz
80Hz
80Hz
AUX SENDS
1
1
1
1
1
1
1
1
1
1
1
2
2
2
2
2
2
2
2
2
2
2
POST
POST
POST
POST
POST
POST
POST
POST
POST
POST
PRE
PRE
PRE
PRE
PRE
PRE
PRE
PRE
PRE
PRE
3
DFX1
3
DFX1
3
DFX1
3
DFX1
3
DFX1
3
DFX1
3
DFX1
3
DFX1
3
DFX1
3
DFX1
3
4
DFX2
4
DFX2
4
DFX2
4
DFX2
4
DFX2
4
DFX2
4
DFX2
4
DFX2
4
DFX2
4
DFX2
4
4 DFX2 SEND
BAL
BAL
BAL
BAL
BAL
BAL
TO L R
PEAK
PEAK
PEAK
PEAK
PEAK
PEAK
PEAK
PEAK
PEAK
PEAK
MUTE
MUTE
MUTE
MUTE
MUTE
MUTE
MUTE
MUTE
MUTE
MUTE
10
10
10
10
10
10
10
10
10
10
10
dB
dB
dB
dB
dB
dB
dB
dB
dB
dB
dB
5
5
5
5
5
5
5
5
5
5
5
SUB 1 2 -
SUB 1 2 -
SUB 1 2 -
SUB 1 2 -
SUB 1 2 -
SUB 1 2 -
SUB 1 2 -
SUB 1 2 -
SUB 1 2 -
SUB 1 2 -
0
0
0
0
0
0
0
0
0
0
0
-5
-5
-5
-5
-5
-5
-5
-5
-5
-5
-5
SUB 3 4 -
SUB 3 4 -
SUB 3 4 -
SUB 3 4 -
SUB 3 4 -
SUB 3 4 -
SUB 3 4 -
SUB 3 4 -
SUB 3 4 -
SUB 3 4 -
-10
-10
-10
-10
-10
-10
-10
-10
-10
-10
-10
-20
-20
-20
-20
-20
-20
-20
-20
-20
-20
-20
MAIN L R -
MAIN L R -
MAIN L R -
MAIN L R -
MAIN L R -
MAIN L-R
MAIN L R -
MAIN L R -
MAIN L R -
MAIN L R -
-25
-25
-25
-25
-25
-25
-25
-25
-25
-25
-25
-30
-30
-30
-30
-30
-30
-30
-30
-30
-30
-30
-40
-40
-40
-40
-40
-40
-40
-40
-40
-40
-40
-60
-60
-60
-60
-60
-60
-60
-60
-60
-60
-60
SOLO
SOLO
SOLO
SOLO
SOLO
SOLO
SOLO
SOLO
SOLO
SOLO
1
2
3
4
5 6
/
7 8
/
9 10
/
11 12
/
13 14
/
15 16
/
SUB1
MX1642
MAIN MIX
MAIN MIX
OUTPUT L
OUTPUT R
LAMP
2
1
2
1
5V
0.5A
3
3
2-TRACK IN OUT
PHONES
BAL UNBAL
BAL UNBAL
A
INSERT
INSERT
B
TAPE OUT
USB PLAYER
TAC-MP3-T
POWER
(Push & Hold)
PROGRAM (PUSH)
24BITs
DIGITAL STEREO EFFECTS PROCESSOR
88
+
00-09 Vocal
50-59 Flange Verb
10-19 Small Room
60-69 Plate
+
20-29 Large Hall
70-79 Chorus GTR
30-39 Echo
80-89 Rotary GTR
+
/
40-49 Echo Verb
+
+
PEAK MUTE
DSP MUTE
90-99 Tremolo GTR
STEREO AUX RETURNS
2TK IN
1
1
TO AUX
SEND1
SOLO
TO MAIN MIX
2
2
CTRL ROOM SOURCE
TO AUX
SEND2
SOLO
MAIN MIX
SUB 1 2
2TK IN
SUB 3 4
3
AUX RETURNS SOLO
SOLO
MAIN MIX
CTRL R
4
MAX
PWR
48
PHONES
SUB 1 2
CLIP
CTRL ROOM
10
SOLO
SUB 3 4
MAIN MIX
7
4 DFX2 RETURN
LEVEL SET
0
7
TO L R
TO L R
TO L R
SOLO ACTIVE
10
PAN
PAN
PAN
PAN
20
30
SOLO MODE
L
R
PFL
AFL
OUTPUT LEVEL
10
10
10
10
10
dB
dB
dB
dB
dB
5
5
5
5
5
0
0
0
0
0
-5
-5
-5
-5
-5
-10
-10
-10
-10
-10
-10
-20
-20
-20
-20
-20
-20
-25
-25
-25
-25
-25
-30
-30
-30
-30
-30
-30
-40
-40
-40
-40
-40
-60
-60
-60
-60
-60
-60
SUB2
SUB3
SUB4
MAIN
L
MAIN R
Advertisement
Table of Contents

Related Manuals for Topp Music Gear MX1642


Summary of Contents for Topp Music Gear MX1642
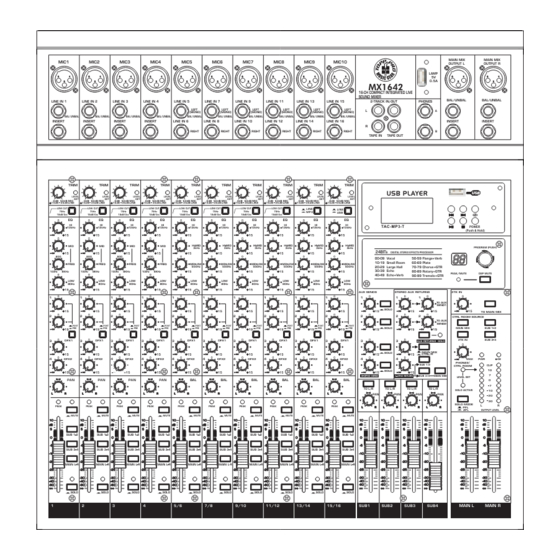
- Page 1 16CH COMPACT INTEGRATED LIVE SOUND MIXER WITH USB INTERFACE MX1642 MAIN MIX MAIN MIX MIC1 MIC2 MIC3 MIC4 MIC5 MIC6 MIC7 MIC8 MIC9 MIC10 OUTPUT L OUTPUT R LAMP 0.5A MX1642 16-CH COMPACT INTEGRATED LIVE SOUND MIXER LINE IN 1...
- Page 2 The mains plug or an appliance coupler is used as the disconnect device, the disconnect device shall remain readily operable.
-
Page 3: Technical Specification
TECHNICAL SPECIFICATION IN THIS MANUAL 1. INTRODUCTION................1 Mono Input Channels Electronically balanced, discrete input configuration Microphone Input 2. FEATURES..................1 ..Frequency Response 10 Hz to 55 kHz, +/-3 dB Distortion (THD & N) 3. QUICK START.................3 ..0.005% at + 4 dBu, 1 kHz Gain Range 0 dB to 50 dB (MIC) -
Page 4: Preset List
Thank you for purchasing the TOPP PRO MX1642 compact integrated mixers, which available for 16 channels. Your MX1642 is a remarkable compact mixer that doesn't find many equals in the market today. With 10 MIC and 6 Stereo Line-level inputs for serious live performances. -
Page 5: Block Diagram
BLOCK DIAGRAM MX1642 MAIN MIX MAIN MIX MIC1 MIC2 MIC3 MIC4 MIC5 MIC6 MIC7 MIC8 MIC9 MIC10 OUTPUT L OUTPUT R LAMP 0.5A MX1642 16-CH COMPACT INTEGRATED LIVE SOUND MIXER BAL UNBAL BAL UNBAL LINE IN 1 LINE IN 2... -
Page 6: Quick Start
QUICK START INSTALLATION AND CONNECTION This is the fastest way to get something out from your MX1642, if you Ring=Return Signal (Connected together) have a keyboard and a microphone. a. Plug the microphone into Channel 1 MIC IN. To Channel Insert b. - Page 7 MIC5 MIC6 MIC7 MIC8 MIC9 MIC10 OUTPUT L OUTPUT R LAMP 0.5A MX1642 Sleeve=Ground/Screen 16-CH COMPACT INTEGRATED LIVE SOUND MIXER LINE IN 1 LINE IN 2 LINE IN 3 LINE IN 4 LINE IN 5 LINE IN 7 LINE IN 9...
-
Page 8: Control Elements
MX1642 on a 19U RACK-box, remove the rubber handle, and fix appear on both input channels. You can use these inputs with a stereo the RACK-mount with the attached screws keyboard, drum machine, etc. -
Page 9: Option Modules
OPTION MODULES CONTROL ELEMENTS 5- LINE GAIN 66- PLAY/PAUSE When you use a line level instrument, you In play state, press PLAY/PAUSE button to pause the player. In pause state, TRIM TRIM shall read the ring (-20~+20 dB). For press PLAY/PAUSE button to start playing. optimum operation, you shall set this LEVEL LEVEL... -
Page 10: Usb Player
CONTROL ELEMENTS OPTION MODULES MP3 player module 11- MID install This is a peaking filter and it will boost/cut frequencies from 100 Hz to 8 kHz Put the MP3 player module connection wire into MP3MOD CONNECTOR. Fix the depending on the position of the MID freq control. This control will affect player module at one of the two module places with the two attached screws. - Page 11 DSP module install Inside your MX1642, the audio signal is monitored in several different stages and then sent to the PEAK LED. When the LED is red illuminated, it warns you that you Take out the short circuit wire which connects DSP module interface. Plug in the...
- Page 12 23- Master STEREO AUX RETURNS Controls These four controls set the level of MX1642 offer two positions for modules assemblage, meanwhile there are three effects that received from the stereo selected modules, of which you can select two or one or none. The two modules...
-
Page 13: Phantom Led
CONTROL ELEMENTS CONTROL ELEMENTS 29- SUBGROUPS Fader 49- MONO Level Control These faders are used to control the levels of the signal send to the SUB- This knob sets the level of mono mix output signal, which can be varied from GROUPS OUT, the adjustable range goes from - to +10 dB. -
Page 14: Main Mix Output
45- AC Inlet with FUSE Holder 41- MAIN MIX OUTPUT Use it to connect your MX1642 to the main AC with the supplied AC cord. These stereo outputs are supplied with both the XLR and 1/4" phone jacks Please check the voltage available in your country and how the voltage for and it is controlled by the Main Mix Level.
Need help?
Do you have a question about the MX1642 and is the answer not in the manual?
Questions and answers