Table of Contents
Advertisement
Quick Links
Want More Information?
Call our support team on: +44 (0)1254 669090
Or view technical specifications directly
on our website: www.heatmiser.com
PDF
FAQ
Twitter: heatmiseruk
31
Electric Floor Heating Thermostat
Model: PRT-EAU
1
2
Electric Floor Heating Thermostat
Electric Floor Heating Thermostat
Installation Procedure
Do
Mount the thermostat at eye level.
Read the instructions fully so you get the best from our product.
Don't
Do not install near to a direct heat source as this will affect functionality.
Do not push hard on the LCD screen as this may cause irreparable damage.
Step 1
Carefully separate the front half of the thermostat from the back plate by
removing the screw on the bottom face and disconnecting the ribbon cable.
Step 2
Place the thermostat front somewhere safe.
Terminate the thermostat as shown in the diagram on page 24 of this booklet.
Note: For time clock use terminate as shown in the diagram on page 30.
Step 3
Screw the thermostat back plate securely into the back box.
Step 4
Reconnect the ribbon cable and replace the front plate onto the back plate
securing it in place with the retaining screw.
3
Electric Floor Heating Thermostat
Facebook: facebook.com/thermostats
Model: PRT-EAU
Table of Contents
Product image
1
Table of contents
2
Installation procedure
3-4
Mode select
5
Mode 1 - Thermostat
6
7-8
What is a programmable
room thermostat?
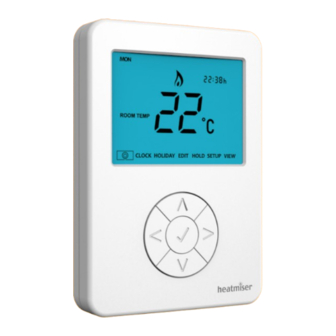
LCD display
9-10
11
Temperature display
Setting the clock
12
Setting the comfort levels
13
14
Setting the temperature
Temperature hold
15
Locking/unlocking the thermostat
16
Frost protection & power on/off
17
18
Holiday programming
Optional features
19-22
Model: PRT-EAU
1
3
Model: PRT-EAU
Model: PRT-EAU
23
Re-calibrating the thermostat
23
Error codes
24
Thermostat mode wiring diagram
25
Mode 2 - Time Clock
25-26
LCD display
Setting the switching time
27
Timer control
28
Optional features
28 - 29
29
Factory reset
Time clock mode wiring diagram
30
2
4
1
2
4
Advertisement
Table of Contents

Related Manuals for Heatmiser PRT-EAU1


Summary of Contents for Heatmiser PRT-EAU1
- Page 1 Want More Information? Call our support team on: +44 (0)1254 669090 Or view technical specifications directly on our website: www.heatmiser.com Model: PRT-EAU Twitter: heatmiseruk Facebook: facebook.com/thermostats Electric Floor Heating Thermostat Model: PRT-EAU Model: PRT-EAU Table of Contents Product image Re-calibrating the thermostat...
-
Page 2: Mode Select
Mode Select Mode 1 - Thermostat This device can either be used as a thermostat or a time clock. Thermostat mode is the default setting. Follow the steps below to change between thermostat or time clock modes. • Use the left and right arrows to scroll to SETUP ............•... -
Page 3: Temperature Display
Temperature Display Setting the Clock To set the clock, follow the steps below. This thermostat can be configured for different sensor options such as built in air sensor, floor sensor or both. On the display it will clearly show which sensor is being displayed •... -
Page 4: Heating On/Off
Holiday Frost Mode Heating On/Off The holiday function allows you to quickly enter a holiday setting. Frost Protect Mode: During a holiday, the thermostat will maintain the frost set temperature. Use the left/right keys to scroll to the power button ..........At the end of your holiday, the thermostat will revert back to the programmed The frost icon will toggle on/off each time tick is pressed ............ -
Page 5: Re-Calibrating The Thermostat
230V AC Re-calibrating the Thermostat Wiring Diagram - Thermostat Mode 16 Amp MAX If you need to re-calibrate the thermostat follow these instructions. • Using the left/right keys scroll to SETUP and press tick ........MAINS SUPPLY 230V AC 16 Amp Max •... -
Page 6: Optional Settings - Feature Table
Optional Settings - Feature Table Wiring Diagram - Time Clock Mode FEATURE DESCRIPTION SETTING Program Mode 01 = Weekday/Weekend Programming 230V AC MAINS SUPPLY 02 = 7 Day Programming 16 Amp Max 03 = 24 Hour Mode Factory Reset RT1 - RT2 N LOAD The thermostat has a reset function to restore all settings to their factory defaults.
Need help?
Do you have a question about the PRT-EAU1 and is the answer not in the manual?
Questions and answers