
Related Manuals for REED ST-8839


Summary of Contents for REED ST-8839
- Page 1 ST-8839 Model Non-Contact Infrared Thermometer Instruction Manual reedinstruments...
-
Page 2: Table Of Contents
Table Of Contents Safety ......................2 Features ...................... 3 Specifications ..................3-4 Instrument Description ................5-6 Operating Instructions ................6-9 Applications ..................6 MODE Button Function ................ 7 Switching Settings ................7 Cleaning ....................8 Notes ....................8-9 Battery Replacement ................10 Safety • Use extreme caution when the laser beam is turned on •... -
Page 3: Features
Features • Precise non-contact temperature measurement • Unique flat surface, modern housing design • Built-in laser pointer • Automatic Data Hold • Automatic power off • °C/°F switch • Emissivity, digitally adjustable from 0.10 to 1.0 • MAX, MIN, DIF, AVG record •... - Page 4 Diode Laser: Output <1mW, Wavelength 630~670nm, Class 2 (II) laser product Operating Temp.: 0 to 50°C (32 to 122°F) Storage Temp.: –20 to 60°C (-4 to 140°F) Relative Humidity: 10%~90% RH operating, <80%RH storage Power Supply: 9V battery, NEDA 1604A or IEC 6LR61, or equivalent Dimensions: 100 x 56 x 230mm (3.9 x 2.2 x 9.0”)
-
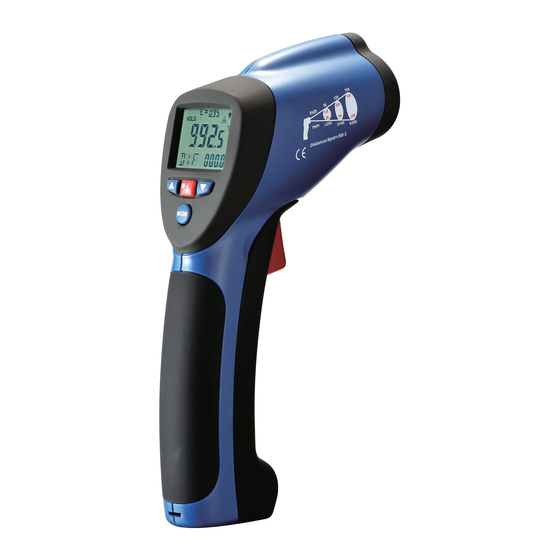
Page 5: Instrument Description
Instrument Description IR Sensor Laser Pointer Beam LCD Display Down Button Up Button Mode Button Laser/Backlight Button Measurement Trigger Handle Grip 10. Battery Cover Display Description 1. Data Hold 2. Measuring indication 3. Emissivity symbol & value 4. Low battery, lock & laser “on” 5. -
Page 6: Operating Instructions
Button Description 1. Up button (for EMS, HAL, LAL) 2. MODE button (for cycling through the mode loop) 3. Down button (for EMS, HAL, LAL) 4. Laser/Backlight On/Off button (pull trigger & press button to activate laser/backlight) See page 7 for more details. Operating Instructions 1. -
Page 7: Mode Button Function
MODE Button Function This infrared thermometer measures Maximum (MAX), Minimum (MIN), Differential (DIF), and Average (AVG) Temperatures. Each time you take a reading, this data is stored and can be recalled with the MODE button until a new measurement is taken. When the trigger is pulled again, the unit will begin measuring in the last mode selected. -
Page 8: Cleaning
Notes How it Works This REED Infrared Thermometer measures the surface temperature of an object. The unit’s optics sense emitted, reflected, and transmitted energy which is collected and focused onto a detector. The unit’s electronics translate the information into a temperature reading which is displayed on the unit. - Page 9 Emissivity Emissivity is a term used to describe the energy-emitting characteristics of materials. Most (90% of typical applications) organic materials and painted or oxidized surfaces have an emissivity of 0.95 (pre-set in the unit). Inaccurate readings will result from measuring shiny or polished metal surfaces.
-
Page 10: Battery Replacement
2. Open battery cover, take out the battery from the instrument and replace with a new 9V battery and place the battery cover back into place For service on this or any other REED product or information on other REED products, contact REED Instruments at info@reedinstruments.com... - Page 11 Notes _________________________________________ ________________________________________________ ________________________________________________ ________________________________________________ ________________________________________________ ________________________________________________ ________________________________________________ ________________________________________________ ________________________________________________ ________________________________________________ ________________________________________________ ________________________________________________ ________________________________________________ ________________________________________________ ________________________________________________ ________________________________________________ ________________________________________________ ________________________________________________ reedinstruments...
- Page 12 Notes _________________________________________ ________________________________________________ ________________________________________________ ________________________________________________ ________________________________________________ ________________________________________________ ________________________________________________ ________________________________________________ ________________________________________________ ________________________________________________ ________________________________________________ ________________________________________________ ________________________________________________ ________________________________________________ ________________________________________________ ________________________________________________ ________________________________________________ ________________________________________________ reedinstruments...
Need help?
Do you have a question about the ST-8839 and is the answer not in the manual?
Questions and answers