Table of Contents
Advertisement
Quick Links
Owner's Manual
* This device contains demo data (Phrase Memory 90–99).
Once you delete these, they cannot be recovered. Please back them up as described in "Backing up to your computer" (p. 37).
* With the factory settings, the RC-300's power will automatically be switched off 10 hours after you stop playing or operating the unit.
If you want to have the power remain on all the time, change the "Auto Off" setting to "OFF" as described on "Auto Off Settings" (p. 33).
The settings you were editing will be lost when the power is turned off. If you want to keep your settings, you must save your settings
before turning the power off.
Main Features
Welcome to the Loop Station!
The RC-300 is a pedal-type recorder that lets you record audio phrases from your guitar or vocal etc., and play them back by operating the pedal.
You can create a wide variety of performances by layering sound while you record and carry out play back in real time.
• You can save a maximum of approximately 3 hours of stereo sound (*total for all phrase memory) and up to 99 phrase memories.
• Three-track recording allows a wide range of performance possibilities.
• You can input audio in stereo.
• In addition to guitar (INST) input, a MIC input and AUX IN jacks are also provided. You can connect a microphone and loop-record your voice, or
record sound from your digital audio player.
• You can easily connect the RC-300 to your computer using a single USB cable. Once connected, you gain a digital audio connection with your
computer and the ability to export/import loop phrases (WAV files) (p. 36).
• You can apply an effect that is synchronized with the tempo of tracks while you play it back. You can use the EXP (expression) pedal to control
effects (p. 28).
• Two RC-300 units can be synchronized after connecting them together using a MIDI cable (p. 39).
Advertisement
Table of Contents

Related Manuals for Boss RC-300


Summary of Contents for Boss RC-300
-
Page 1: Main Features
Once you delete these, they cannot be recovered. Please back them up as described in “Backing up to your computer” (p. 37). * With the factory settings, the RC-300’s power will automatically be switched off 10 hours after you stop playing or operating the unit. -
Page 2: Table Of Contents
Turning On the Power ......... . . 7 Synchronizing the Tempo of Two RC-300 Units (MIDI Sync) 2 1 Setting the Overdubbing Method (Overdubbing Mode) . - Page 3 System Settings (Settings for the Entire RC-300) . . . . . . . . . . . . . . . . .
-
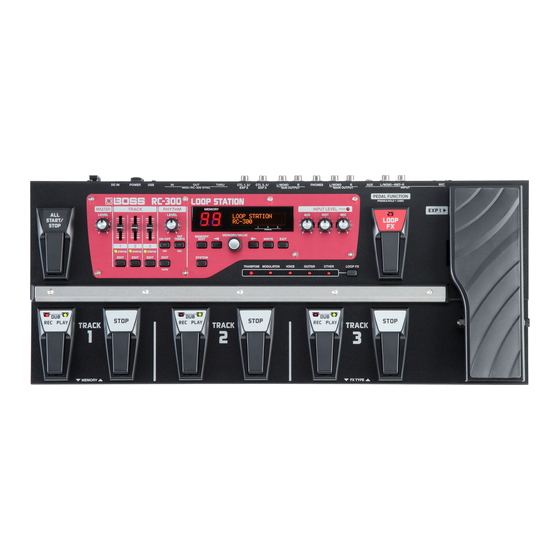
Page 4: Panel Descriptions
Panel Descriptions Top Panel Name Explanation Page MASTER Adjusts the volume of the entire RC-300 (MAIN OUTPUT jacks). MASTER [LEVEL] knob * The MASTER [LEVEL] knob does not affect the SUB OUTPUT jacks or USB audio. TRACK p. 17 TRACK [1]–[3] sliders Adjust the volume of the tracks. STATUS indicators Lights when there is data in a track. p. 10 TRACK [EDIT] buttons Used to make settings for each track. p. 17 RHYTHM RHYTHM [LEVEL] knob This adjusts the volume level of the rhythm sound. RHYTHM [ON/OFF] button This button turns the rhythm sound on/off. p. 25 [TAP TEMPO] button Press this button at the desired timing to set the tempo of the rhythm (phrase memory tempo: p. 21). -
Page 5: Panel Descriptions
Panel Descriptions Name Explanation Page MEMORY This indicates the current phrase memory number, or various other information. The following information is shown in the Play screen, which is the RC-300’s main screen. Phrase memory number Phrase memory name p. 10 Display INIT MEMORY Level meters for each track [MEMORY EDIT] button Press this button to make phrase memory settings. p. 20 [SYSTEM] button Press this button to edit the system settings. p. 32 Use these buttons to select the parameter shown in the display. p. 9 ] /[ ] buttons In the Play screen, use this knob to select the desired phrase memory. p. 10 [MEMORY/VALUE] knob In edit screens, use this knob to edit the value. p. 9 [WRITE] button Press this to save the phrase memory. p. 14 Press this button to exit an edit screen and return to the Play screen. You can also press this button to cancel an... -
Page 6: Rear Panel Connections
USB connector MIDI d evice ( p. 3 8). kensington.com/ You can also CTL 3, 4/EXP 3 jack Connect these jacks to your amp or monitor You can use a connect an speakers. commercially available additional You can connect EXP pedals USB cable to connect If your system is monaural, use only the OUTPUT RC-300 unit for (EV-5, etc. ; sold separately) or the RC-300 to your L jack. Sound that was input in stereo will also be synchronized foot switches (FS-5U, FS-6; sold computer, and use the output monaurally. playback. separately) here, and use them computer to read/write to control a variety of parameters RC-300 tracks (WAV files). SUB OUTPUT jacks (p. 24). -
Page 7: Turning On The Power
Caution when turning off the power While the RC-300 is in the following states, you must never turn off the power. Doing so may cause all the saved data to be lost. • While recording/overdubbing/playing back • While undoing/redoing • While switching between phrase memories... -
Page 8: Overview Of The Rc-300
Overview of the RC-300 How the RC-300 is organized Phrase Memory 99 Phrase Memory 1 Track 1 LOOP FX Track 2 Track 3 Rhythm System Settings What are tracks (p. 16) and phrase memories (p. 20)? The RC-300 provides three “tracks” that are used to record and play back the sound of an instrument or microphone. These three tracks combined form what is called a “phrase memory. ” Up to 99 phrase memories can be stored. What is a rhythm? (p. 25) In addition to the three tracks, the RC-300 can also play a “rhythm. -
Page 9: Basic Editing Procedure
Overview of the RC-300 Basic Editing Procedure Editing the RC-300’s settings is a simple and consistent procedure. Before you continue, please take a moment to learn the basic editing procedures. Reference For details on each item, refer to the pages listed below. Item Page Settings for each track p. 16 Phrase memory settings p. 20 Rhythm settings p. 25 LOOP FX settings p. 28 System settings p. 32 Press the button for the type of item you want to edit . -
Page 10: Basic Operation
Phrase memory name Pressing the [REC/DUB/PLAY] pedal switches the unit to overdubbing . INIT MEMORY • Auto recording (p. 22) lets you start recording the moment you begin EMPTY performing. • You can also record along with rhythm sounds (p. 25). • Pressing the [REC/DUB/PLAY] pedal will normally switch the RC-300’s state in the order of If all tracks are empty, this indicates “EMPTY” recording g overdubbing g playback. However, if desired, you can change this order to The STATUS indicators show whether each track contains data. recording g playback g overdubbing (p. 33). Indicator Explanation... -
Page 11: Overdubbing
Basic Operation Overdubbing Loop Playback Layer your performances while the track plays as a Play back track as loops . loop . Pressing the [REC/DUB/PLAY] pedal switches the unit to Pressing the [REC/DUB/PLAY] pedal switches the unit overdubbing . to playback . • You can Undo and Redo (p. 12). -
Page 12: Cancelling A Recording/Overdubbing (Undo/Redo/Track Clear)
Connect your microphone, and adjust the input level (p . 6) . Select an empty phrase memory (the lower left of the display will indicate “EMPTY”) (p . 10) . INIT MEMORY EMPTY Record while listening to the rhythm sound In addition to its three tracks, the RC-300 can sound a “rhythm. ” By recording while you listen to a rhythm at the tempo you’ve specified, you can record at an accurate tempo. For details, refer to “About Rhythm” (p. 25). -
Page 13: Recording On A Single Track
Basic Operation Recording on a Single Track With this method, you’ll overdub all of the sounds on track 1. When two measures have ended, press the track 1 [REC/DUB/PLAY] pedal to loop the sound at that Press the track 1 [REC/DUB/PLAY] pedal point. Record your vocal into the microphone: to start recording. “Dun! Dun! Dun! ...” Overdub your vocal into the microphone: Recording “Pah! Pah! Pah!” Overdubbing Overdub your vocal into the microphone: The sound will “Chi! Chi! Chi!” automatically start over at the end of the second measure. Press the track 1 [REC/DUB/PLAY] pedal to switch to loop playback. Loop Playback Recording on Multiple Tracks With this method, you’ll record the bass drum sound on track 1, the snare drum sound on track 2, and the hi-hat sound on track 3. By recording these sounds on three separate tracks, you can gain additional performance options, such as stopping just the hi-hat (track 3). -
Page 14: Saving A Phrase Memory
Saving a Phrase Memory Saving a Phrase Memory (Write) Copying a Track from Another Phrase Memory (Track Copy) If you select a different phrase memory or turn off the power after recording or overdubbing, the data you recorded will be lost. If you want to keep the data, you must save it. You can then take a specific track from that phrase memory and copy it to the current phrase memory. While playback is stopped, press the [WRITE] button . This is a convenient method to use when you need a pattern with the same backing, as it allows you to prepare tracks simply and easily without having to start recording from scratch again. To prevent loss of the content of the current work, press the [WRITE] button twice to save the current phrase memory . -
Page 15: Exchanging Phrase Memories
Saving a Phrase Memory Exchanging Phrase Memories Deleting a Phrase Memory (Initialize) You can exchange phrase memories with one another, rearranging the phrase memories. This operation erases a phrase memory and initializes its settings. Select an exchange-source phrase memory . * This device contains demo data (Phrase Memory 90–99). Once you delete these, they cannot be recovered. Please Press the [WRITE] button . back them up as described in “Backing up to your computer”... -
Page 16: Settings For Each Track
Settings for Each Track Overview of the Playback Settings Synchronizing the Tempo (Tempo Sync) Each track saves the tempo at which that track was recorded. This is The RC-300 lets you specify the playback method independently for called the “original tempo” (p. 19) of the track. The phrase memory each track. also has a “phrase memory tempo” (p. 21) that is shared by all tracks 1, 2, and 3. Loop Playback Settings (Play Mode) Normally, you should leave Tempo Sync on, so all tracks will play at the same tempo (the phrase memory tempo). If you turn Tempo For each track, you can specify either loop playback or one-shot Sync off for tracks for which you don’t want the tempo to change (i.e., not looped). (such as those with special effects), you’ll be able to obtain playback that is always at the original tempo. If one-shot playback is selected, playback will stop when it reaches the end of the phrase (it will not loop). Tracks for which Tempo Sync is on will Tracks for which Tempo Sync is off will play at the original tempo. -
Page 17: Settings For Each Track
Settings for Each Track Settings for Each Track Here you can specify the playback method and other settings individually for each track. First press the [EDIT] button of the track that you want to edit. For details, refer to “Basic Editing Procedure” (p. 9). Parameter Value Explanation Specifying How the Track Will Play (Play Mode) Track1:Play Mode LOOP This specifies whether the track playback will be looped or one-shot (i.e., not looped). If one-shot playback is Track 1 Loop selected, playback will stop when it reaches the One Shot Track 2 end of the phrase (it will not loop). Loop Track 3 * Recording/overdubbing cannot be carried out with respect to tracks that are set to “ONE SHOT. ” To create a track intended for one-shot playback, you first need to carry out recording/overdubbing while it is set to “LOOP” and save it. Then, you should change its setting to “ONE SHOT. -
Page 18: Adjusting The Recording Level Of The Tracks
Settings for Each Track Parameter Value Explanation Adjusting the recording level of the Tracks (Recording Level) Track1:Rec Level You can adjust the recording level of the tracks. If you set the recording level at 100 (default value), the volume of the performance and that of the recording will be identical. 0–200 If you set the recording level to a value lower than 100, the volume of the recording will be lower than that of the performance. As a result, the sound of the performance won’t get buried by the recorded sound, even if you record a multiple number of times. Adjusting the Positioning of the Track’s Sound (Pan) Track1:Pan CENTER You can adjust the positioning (panning) of the track’s sound. With the “CENTER” setting, the sound will be heard from the center. L50–CENTER–R50 “L” settings position the sound toward the left, and “R” settings position the sound toward the right. With a setting of L50, the sound will be heard only from the left. Aligning the Beginning of Loop Playback (Loop Sync) Track1:Loop Sync If you turn Loop Sync on for two or more tracks, loop playback of those tracks will be synchronized at the beginning... -
Page 19: Assigning A Track's Output Jacks (Output Select)
Settings for Each Track Parameter Value Explanation Assigning a Track’s Output Jacks (Output Select) Track1:Output MAIN+SUB For each track, you can specify the jacks from which its sound will be output. If desired, you can also make this setting apply to all phrase memories. g “Using the Same Output Jacks for All Phrase Memories (Input/Track 1, 2, 3/Rhythm Output)” (p. 33) MAIN The sound is output from the MAIN OUTPUT and PHONES jacks. The sound is output from the SUB OUTPUT jacks. The sound is not output from the MAIN OUTPUT and PHONES jacks. MAIN+SUB The sound is output from the MAIN and SUB OUTPUT jacks and the PHONES jack. About original tempo Each track saves the tempo at which that track was recorded. This is called the “original tempo” of the track. The phrase memory also has a “phrase memory tempo” (p. 21) that is shared by all tracks 1, 2, and 3. When recording ends, the original tempo is automatically calculated according to the following conditions. Condition Original tempo value to be saved Rhythm is playing Other tracks have phrases with the following settings Original tempo will be set from the “phrase memory tempo” (p. 21). -
Page 20: Phrase Memory Settings
Phrase Memory Settings Here you can make settings that apply to the entire phrase memory. First press the [MEMORY EDIT] button. For details, refer to “Basic Editing Procedure” (p. 9). Parameter Value Explanation Naming Phrase Memories (Memory Names) Memory:Name INIT MEMORY You can give names to phrase memories (memory names) using up to 16 characters. To access the memory name screen, press the [MEMORY EDIT] button and then press the [ ] button. MEMO Normally, the [ ] buttons are used to select parameters, but in the memory name screen they are used to move the cursor. When the cursor is located at the far right, pressing the [ ] button once again will take you to the next parameter. Use the [ ] buttons to move the cursor to the character that you want to edit, and turn the [MEMORY/ VALUE] knob to edit the character. You can also use the following buttons. Button Function Alternately switches the letter at the cursor position between uppercase and CAPS (RHYTHM EDIT) lowercase. INS (RHYTHM ON/OFF) Inserts a blank space at the cursor position. Deletes the character at the cursor position and shifts all characters after it to the DEL (RHYTHM TAP TEMPO) left. -
Page 21: Synchronizing The Tempo Of Two Rc-300 Units (Midi Sync) 2
Phrase Memory Settings Parameter Value Explanation Synchronizing the Tempo of Two RC-300 Units (MIDI Memory:MIDI Sync INTERNAL Sync) Two RC-300 units can be synchronized after connecting them together using a MIDI cable. For details, refer to “Connecting Two RC-300 Units” (p. 39). The “ MIDI Sync” setting allows two RC-300 units to play back in synchronization at the same tempo. MIDI OUT connector MIDI IN connector RC-300 (Master unit) RC-300 (Slave unit) Reference For more detailed information about MIDI and synchronization, refer to “MIDI settings” (p. 38). This RC-300 unit will operate at its own specified phrase memory tempo. Choose the INTERNAL “INTERNAL” setting if you’re using the RC-300 by itself, or if this is the master RC-300 unit. This RC-300 unit will synchronize to MIDI data received from the master RC-300 unit. MIDI Choose the “MIDI” setting for the slave RC-300 unit. Setting the Overdubbing Method (Overdubbing Mode) -
Page 22: Simultaneously Starting Recording When Sounds Are
Phrase Memory Settings Parameter Value Explanation Simultaneously Starting Recording When Sounds are Memory:Auto Rec Input (Auto Recording) “Auto recording” starts recording the moment you begin playing your guitar or play back your audio player. Recording will begin the instant you press the [REC/DUB/PLAY] pedal. When you press the [REC/DUB/PLAY] pedal, the REC indicator will blink rapidly, and the RC-300 will enter recording-standby mode. When you begin playing, the REC indicator will light and recording will start. Playing Only a Single Track (Single Track Play) Memory:Single Tr Play Normally, the RC-300 plays back its three tracks simultaneously. However, if you turn on the phrase memory’s “Single Track Play” setting, only one track will play. If Single Track Play is on, the track that’s currently playing will stop when you start playback of another track. Track 1... -
Page 23: Assigning The Function Of Pedals And External Controllers
Phrase Memory Settings Assigning the Function of Pedals and External Controllers (Assign) For each phrase memory, you can assign the function of the RC-300’s pedals and any connected external pedals (EXP pedals, foot switches: p. 24). You can also make assignments for control change messages received from an external MIDI device (e.g., FC-300). For each phrase memory, you can create eight different assignments (assignment numbers 1–8), which specify the parameter controlled by each controller. Parameter Value Explanation Enabling Assignments 1–8 (Assign Switch) Assign1 Switch Here you can specify whether assignments will be used. The assignment will not be used. The assignment will be used. Specifying the Assignment Target (Assign Target) Assign1 Target EFFECT CONTROL Here you can choose the Assignment Target. In addition to the following assignment targets, you can also specify... -
Page 24: Specifying The Type Of Operation (Source Mode)
Default assignments of functions controlled The default assignments are as follows. If you simply connect pedals without making any settings, you can use them to control the following parameters and functions. Assign Switch Assign Source Assign Target Explanation The effect that’s most suitable for the selected LOOP FX type will be Assign1 EXP1 PEDAL EFFECT CONTROL applied. Assign2 EXP2 PEDAL Level The pedal will control the volume of the phrase memory. Assign3 CTL1 PEDAL MEMORY INC The pedals will switch phrase memories. Assign4 CTL2 PEDAL MEMORY DEC Assign5 CTL3 PEDAL FX TYPE INC The pedals will switch the LOOP FX type. Assign6 CTL4 PEDAL FX TYPE DEC All tracks can be simultaneously played/stopped upon reception of Assign7 SYNC START/STOP ALL PLAY/STOP ALL START/STOP messages from the master RC-300 unit (p. 39). Assign8... -
Page 25: About Rhythm
About Rhythm In addition to its three tracks, the RC-300 can also play a “rhythm. ” You can record while listening to a rhythm at the tempo you specify. Sounding a Rhythm Press the RHYTHM [ON/OFF] button to turn the rhythm sound on/off . • Use the RHYTHM [LEVEL] knob to adjust the volume of the rhythm. • The [TAP TEMPO] button will blink in time with the rhythm (red on the first beat, green on subsequent beats). • When you save a phrase memory (p. 14), the rhythm setting selected at that time will also be saved. Setting the tempo The RC-300’s tempo settings include a “phrase memory tempo” (p. 21) that’s shared by tracks 1, 2, and 3, and an “original tempo” (p. 19) for each track. The rhythm will sound at the “phrase memory tempo. ” Press the [TAP TEMPO] button . The phrase memory tempo is displayed. Memory:Tempo 120.0 Set the tempo as described in “Specifying a Phrase Memory’s Tempo” (p. 21). -
Page 26: Playing A Count-In When Recording (Recording Count-In)
Playing a Count-In for Playback (Playback Count-In) Rhythm:PlayCount You can have playback start after a count-in sound is played. No count-in is played. 1MEAS Playback starts after a one-measure count-in is played. Stopping the Rhythm When the First Recording Ends Rhythm:Stop (Rhythm Stop) You can make the rhythm sound stop when the first pass of recording ends. The rhythm sound will stop when you press the [REC/DUB/PLAY] pedal to begin looping (i.e., when the RC-300 switches to overdubbing or playback). The rhythm will not stop when the first pass of recording ends. REC END The rhythm will stop when the first pass of recording ends. Adjusting the Volume of the Rhythm Sound (Rhythm Rhythm:Level Level) This adjusts the volume of the rhythm sound. You can also change this value with the RHYTHM[LEVEL] knob. 0–200 Volume of the rhythm sound... -
Page 27: Rhythm Pattern List
About Rhythm Rhythm pattern list g.03-100-Guide Beat Pattern Beat Pattern Beat Pattern Beat Pattern Simple Beat 1–4 Simple Beat 1–7 Simple Beat 1–6 Simple Beat 1–6 Shu e 1–2 Groove Beat 1–2 Groove Beat 1–3 Groove Beat 1–3 Hi-Hat 1–2 Shu e Bossa Feel Bossa Feel... -
Page 28: Using Loop Fx
Using LOOP FX You can apply an effect to the sound of each track. This effect is called a “LOOP FX. ” The effect will be applied in synchronization with the phrase memory tempo. Turning LOOP FX On/Off Press the [LOOP FX] pedal to turn LOOP FX on/off . Controlling LOOP FX You can control the LOOP FX by the depth to which you depress the [EXP 1] pedal. An effect that is most appropriate for the selected LOOP FX type will be applied by the [EXP 1] pedal. Reference You can also assign the [EXP 1] pedal to control something other than LOOP FX. For details, refer to “Assigning the Function of Pedals and External Controllers (Assign)” (p. 23). LOOP FX Settings First press the [LOOP FX] button. For details, refer to “Basic Editing Procedure” (p. 9). * The LOOP FX parameters will differ depending on the LOOP FX that is selected. Parameter Value Explanation Specifying What LOOP FX Will Apply To (LOOP FX Target) FX:Target MAIN OUT TOTAL Here you can specify the sound to which the LOOP FX will be applied. -
Page 29: Selecting The Loop Fx Category And Type (Loop Fx Category, Loop Fx Type)
Category, LOOP FX Type) Here you can select the LOOP FX category and type. FX:Type Press the [ ] button to access the type screen, and then select the LOOP FX type from within the selected TRANSPOSE category. (You can’t select types across categories.) Using pedals to select a LOOP FX (Pedal Function mode) Hold down the [LOOP FX] pedal for two seconds or longer to put the RC-300 in Pedal Function mode; now you can use the TRACK 3 pedals to select the LOOP FX type. Hold for 2 seconds or longer Blink Select a LOOP FX Press once again to return to normal mode Category Type... - Page 30 Using LOOP FX TRANSPOSE setting SLICER settings Parameter Value Explanation Parameter Value Explanation Specify the amount of transposi- FX:Transpose FX:Mode Selects the slice pattern used to tion in semitone units that will P01–P10 cut the sound. occur when the effect is on. -12–+12 With a setting of +12, the pitch 0–100, FX:Rate Specifies the rate at which the will be one octave higher when 16-step sequence will repeat. 1 MEAS– the effect is on. FX:Dir.Mix Controls the volume of the direct 0–100 sound when the effect is on. FLANGER, PHASER settings BEND settings Parameter Value Explanation FX:Rate...
- Page 31 Parameter Value Explanation Selects the type of effect. FX:Mode FX:Level Adjusts the volume level of the 0–100 NATURAL OD effect. Produces the natural sounding NATURAL OD distortion of a slightly overdriven amp. This is a unique overdrive that FILTER settings BLUES OD faithfully reproduces the nuances of picking. The sound of the BOSS OD-1. It OD-1 produces sweet, mild distortion. Parameter Value Explanation WARM OD A warm overdrive. OFF–100, FX:Rate Adjusts the rate of modulation. 4 MEAS– This is a sharp distortion with rich DISTORTION sustain. FX:Depth This is the sound of a large 0–100 Adjusts the depth of modulation.
-
Page 32: System Settings (Settings For The Entire Rc-300)
System Settings (Settings for the Entire RC-300) Settings that are shared by the entire RC-300, such as those for the contrast of display and the auto off function are called “system settings. ” First press the [SYSTEM] button. For details, refer to “Basic Editing Procedure” (p. 9). Parameter Value Explanation Adjusting the Display’s Brightness (LCD Contrast) Sys:LCD Contrast In some locations where the RC-300 is set up, you may find that the display is difficult to read. If this occurs, adjust the display’s contrast. 1–16 Adjusts the contrast of the display in a range from 1 (lightest) to 16 (darkest). Specifying the Operation of the [LOOP FX] Pedal Sys:LOOP FX Pdl FX ON/OFF + ASGN Here you can specify the operation of the [LOOP FX] pedal. FX ON/OFF + ASGN Controls LOOP FX on/off and the Assign function (p. 23). ASSIGN Controls only the Assign function (p. 23). -
Page 33: Adjusting The Auto Recording Sensitivity (Trigger Level)
System Settings (Settings for the Entire RC-300) Parameter Value Explanation Adjusting the Auto Recording Sensitivity (Trigger Level) Sys:Auto Rec Trigger This sets the input level at which recording is started (the trigger level) when Auto Recording (p. 22) is used. 0–100 Input levels at or above the value set here will cause recording to start. Changing the Switching Order of Recording g Sys:REC Pdl Act REC→OVERDUB Overdubbing g Playback (REC Pedal Action) When you press the [REC/DUB/PLAY] pedal, the RC-300 will switch its operation in the order of recording g overdubbing g playback (p. 10). However, you can change this so that the order is recording g playback g... -
Page 34: Midi-Related Settings
MIDI Omni Mode Sys:MIDI Omni Messages will be received only on the channel specified by the MIDI Receive Channel setting. Messages are received via all MIDI channels, regardless of the MIDI Receive Channel settings. MIDI Transmit Channel Sys:MIDI Tx Ch 1–16 This procedure sets the MIDI channel used for transmitting MIDI messages. The MIDI transmit channel will be the same as the MIDI receive channel. Synchronizing the Tempo of Two RC-300 Units (MIDI Sys:MIDI Sync MEMORY Sync) Two RC-300 units can be synchronized after connecting them together using a MIDI cable. For details, refer to “Connecting Two RC-300 Units” (p. 39). The “ MIDI Sync” setting allows two RC-300 units to play back in synchronization at the same tempo. MIDI OUT connector MIDI IN connector RC-300 (Master unit) RC-300 (Slave unit) Reference For more detailed information about MIDI and synchronization, refer to “MIDI settings” (p. 38). -
Page 35: Usb-Related Settings
System Settings (Settings for the Entire RC-300) USB-Related Settings Here you can make USB-related settings for when the RC-300 is connected to a computer via USB. USB audio flow RC-300 USB IN Out Select MAIN USB IN Level Reference MAIN+SUB For details on USB connection, refer to “Connecting to Your Computer via USB” (p. 36). USB OUT Level Same output sound as the MAIN OUTPUT jacks * The MASTER [LEVEL] knob does not affect USB audio. -
Page 36: Connecting To Your Computer Via Usb
Repeatedly press the [ ] button until the “USB Mode” parameter appears . Use an USB cable to connect the RC-300’s USB connector to your computer’s USB connector (a connector that Turn the [MEMORY/VALUE] knob to select the “STORAGE . ”... - Page 37 RC-300 * Never turn off the power while the RHYTHM [ON/OFF] button is blinking. * Performing this operation will erase all phrase memories that are currently saved in the RC-300. Be sure to make a NOTE backup before you proceed. In the BOSS_RC-300 drive, delete the “ROLAND” folder, and then * Never use your computer to format the “BOSS_RC-300” drive.
-
Page 38: Connecting An External Midi Device Or Another Rc-300 Unit
Settings for each phrase memory “Specifying the Controller (Assign Source)” (p. 23) * Use of MIDI requires that the MIDI channels be matched with those of the connected device. Data cannot be transmitted to, nor received from another MIDI device unless the MIDI channels are set properly. Controlling an External MIDI Device from the RC-300 Operation Over View Explanation Playing Performances on External MIDI Devices at the Same Tempo as the RC-300’s Tempo The RC-300’s performance tempo data is MIDI clock messages are output from the RC-300 at all times. Set the external MIDI device transmitted to external MIDI devices as MIDI beforehand so it is ready to receive MIDI Clock and MIDI Start and Stop messages. For details, clock. refer to the owner’s manual that came with the device. Transmitting Tempo... -
Page 39: Controlling The Rc-300 From An External Midi Device
Connecting an External MIDI Device or Another RC-300 Unit Controlling the RC-300 from an External MIDI Device Operation Over View Explanation Switching Phrase Memories The RC-300’s phrase memories You can switch the RC-300’s phrase memories with Program Change messages from external MIDI devices. switch simultaneously upon The RC-300 can receive Program Change messages numbered 1 through 99, corresponding to the 99 Switching Phrase receipt of corresponding individual phrase memories 1–99. Memory Numbers Program Change messages from * Program Change messages 100–128 cannot be received. external MIDI devices. * Even if received, Bank Select MIDI messages (Control Change #0, #32) are disregarded. -
Page 40: Adjusting The Expression Pedal
* If you execute “SYSTEM + MEMORY” or “MEMORY,” all of the “SYSTEM + MEMORY” in the following procedure. RC-300’s phrase memories will be erased, and cannot be recovered. Turn off the RC-300’s power . If you want to proceed with the factory reset, press the While holding down the [WRITE] and [EXIT] buttons, turn [WRITE] button . -
Page 41: Troubleshooting
Transmit settings (p. 23). The RC-300 will not receive MIDI clock or MIDI start/stop data from an external device. (The RC-300 cannot synchronize as the slave.) Can’t synchronize via MIDI Is the RC-300 set as the master unit? If you want to synchronize the RC-300 with an external device, the RC-300 must be assigned as the master. If you want to use start/stop for synchronization, you must specify “ALL PLAY/STOP” or “TR1–3 Are the assignment source “SYNC START/STOP” PLAY/STOP” as the assignment target for the assignment source “SYNC START/STOP” on the slave (p. 23) and assignment target set correctly? unit. Can’t synchronize two RC-300 units via MIDI Could you have changed the phrase memory tempo of the master unit during synchronized Do not change the phrase memory tempo of the master unit during synchronized performance. performance? Problems with USB Is the USB cable properly connected? Check the connection (p. 36). Unable to communicate with (If exchanging files with your computer via USB) Set the USB Mode to “STORAGE” as described in “Using USB to Exchange Files with Your computer Is the USB Mode set to “STORAGE”? Computer (USB Mass Storage)” (p. 36). -
Page 42: Error Message List
Decrease the amount of MIDI messages that are being sent to could not be processed properly . the RC-300. Data Error! A problem has occurred with the content of the RC-300’s Consult your Roland dealer or local Roland Service. memory . It may be that an invalid file was written while connected in USB mass storage mode (e .g ., when writing Data Damaged! a WAV file) . -
Page 43: Specifications
Specifications BOSS RC-300: Loop Station Sliders TRACK 1–3 sliders MASTER LEVEL knob RHYTHM LEVEL knob INPUT MIC: -50 dBu (variable) Knobs AUX knob Nominal Input Level INPUT INST: -10 dBu (variable) INST knob INPUT AUX: -20 dBu (variable) MIC knob INPUT MIC: 4 k ohms 7 segments, 2 characters (LED) Input Impedance INPUT INST: 1 M ohm Displays 16 characters, 2 lines (backlit LCD) INPUT AUX: 47 k ohms INPUT MIC jack: XLR type (balanced/phantom power: DC Nominal Output MAIN OUTPUT: -10 dBu 48 V, 10 mA) Level SUB OUTPUT: -10 dBu INPUT INST jacks (L/MONO, R): 1/4” phone type Output Impedance 2 k ohms INPUT AUX jack: Stereo miniature phone type MAIN OUTPUT jacks (L/MONO, R): 1/4” phone type... -
Page 44: Using The Unit Safely
USING THE UNIT SAFELY symbol alerts the user to important instructions or Used for instructions intended to alert the warnings.The speci c meaning of the symbol is user to the risk of death or severe injury determined by the design contained within the triangle. In should the unit be used improperly. -
Page 45: Important Notes
• Do not expose the unit to direct sunlight, place assume no responsibility whatsoever with regard to it near devices that radiate heat, leave it inside any infringements of third-party copyrights arising an enclosed vehicle, or otherwise subject it through your use of this product. to temperature extremes. Excessive heat can • The copyright of content in this product (the deform or discolor the unit. sound waveform data, style data, accompaniment • When moved from one location to another patterns, phrase data, audio loops and image data) where the temperature and/or humidity is very is reserved by Roland Corporation. different, water droplets (condensation) may • Purchasers of this product are permitted to utilize • BOSS and Loop Station are either registered form inside the unit. Damage or malfunction said content for the creating, performing, recording trademarks or trademarks of Roland Corporation may result if you attempt to use the unit in this and distributing original musical works. in the United States and/or other countries. condition. Therefore, before using the unit, you must allow it to stand for several hours, until the • Purchasers of this product are NOT permitted to • All product names mentioned in this document condensation has completely evaporated. extract said content in original or modified form, are trademarks or registered trademarks of their for the purpose of distributing recorded medium respective owners. • Depending on the material and temperature... -
Page 46: Index
Index AC adaptor ..... . . 6 Initialize ...... 15 PAN .
Need help?
Do you have a question about the RC-300 and is the answer not in the manual?
Questions and answers