Table of Contents
Advertisement
Original Instruction Manual
TS200C
Compact Cast Iron Table Saw
IMPORTANT
For your safety read instructions
carefully before assembling or using
this product. Save this manual for
future reference.
Version 2.1
February 2010
Woodworking Machines & Accessories
Record Power Ltd
Telephone: 01246 561 520
Unit B, Adelphi Way
Fax: 01246 561 537
Staveley S43 3LS
HEALTH AND SAFETY GUIDELINES
Always follow the instructions provided with the manual. Always wear safety glasses when using woodworking
equipment. Always disconnect the power before adjusting any equipment. Failure to observe proper safety
procedures and guidelines can result in serious injury.
WARNING: Do not allow familiarity (gained from frequent use of your machine and accessories) to become
commonplace. Always remember that a careless fraction of a second is sufficient to inflict severe injury.
Email: sales@recordpower.co.uk
www.recordpower.co.uk
Always wear safety glasses when
using woodworking equipment.
Always read the instructions
provided before using
woodworking equipment.
Advertisement
Table of Contents

Related Manuals for Record Power TS200C


Summary of Contents for Record Power TS200C
- Page 1 Save this manual for future reference. Version 2.1 February 2010 Woodworking Machines & Accessories Record Power Ltd Telephone: 01246 561 520 Email: sales@recordpower.co.uk Unit B, Adelphi Way Fax: 01246 561 537 www.recordpower.co.uk Staveley S43 3LS HEALTH AND SAFETY GUIDELINES Always follow the instructions provided with the manual.
-
Page 2: Table Of Contents
Contents Terms & Conditions Of Usage Health & Safety Guidance page 3 Additional Safety Instructions For Table Saws page 4 Record Power Guarantee page 5 EU Declaration Of Conformity page 33 User Manual Identifying Shipping Boxes page 6 Getting To Know Your Table Saw... -
Page 3: Health & Safety Guidance
13. Do not overreach. Keep proper footing and balance at all times. 14. Secure work. Ensure that your work piece is properly held before starting to cut. Record Power Health & Safety Guidance v1.0... -
Page 4: Additional Safety Instructions For Table Saws
Additional Safety Instructions for Table Saws SAFETY IS A COMBINATION OF OPERATOR 13. Always use a push stick and keep hands clear of the blade. COMMON SENSE AND ALERTNESS AT ALL TIMES 14. Never remove the crown guard or riving knife. These are there to protect the user. -
Page 5: Record Power Guarantee
2.2.2 We are given a reasonable opportunity after receiving notice of the claim to examine the product. 2.2.3 If asked to do so by us, you return the product to Record Power's premises or other approved premises such as those of the supplying dealer, for the examination to take place. - Page 6 It is advisable that before unpacking to have plenty of paper towels or cloths available to clean off the rust preservative. Contents of the shipment: 1. TS200C Table Saw 2. Sliding Table 3. Wheel kit (optional accessory) 4. Right hand extension table (optional accessory)
-
Page 7: Getting To Know Your Table Saw
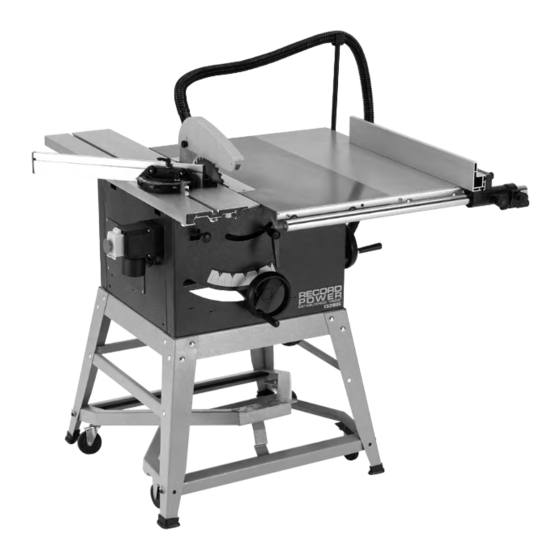
Cabinet Base Main Table Sliding Table Blade Raise & fall Cross Cut Fence 3. Machine Specification TS200C SPECIFICATION Blade size: 250mm Blade bore: 30mm Blade speed: 4000rpm Max width (blade to fence) : 600mm Table Height : 890mm Max depth of cut using 250mm blade: 80mm @ 90º / 56mm @ 45º... -
Page 8: Saw Unit Assembly
4. Saw Unit Assembly CAUTION Many of the items are very heavy. We recommend that assistance is sought before trying to lift the larger components. 4.1 Identification of saw unit components 1. 2 x Long mid brace supports 2. 2 x Short mid brace support 3. - Page 9 4. Saw Unit Assembly - cont. CAUTION Many of the items are very heavy. Fig.4.1 We recommend that assistance is sought before trying to lift the larger Fig.4.4 components. Note: When assembling this table saw, Do not fully tighten the nuts and bolts until the assembly is complete.
- Page 10 4. Saw Unit Assembly - cont. 4.3 Fitting the optional wheel kit 1. On the underside of the operating frame, find BRACE SUPPORT Fig.4.7A Fig.4.7F the two raised areas on either side. Mount the two back wheels and secure in place using the nuts and bolts provided Fig.4.7A.
- Page 11 4. Saw Unit Assembly - cont. 4.5 Fitting the handwheel Fig.4.9A Attached the handwheel for blade tilt and rise & fall with Hex. wrench. Fig.4.9A 4.6 Fitting the extraction hose 1. Unfasten the dust extraction hose from underneath the main saw unit and thread through the extraction hole in the side on the machine Fig.4.9B.
- Page 12 4. Saw Unit Assembly - cont. 4.8 Adjusting the sliding table The Sliding table is pre-adjusted in the factory. If it is out of Fig.4.14 parallel or not sliding smoothly, you can make adjustments according to the instructions below. 1.Checking the Height Put the straight gauge on the sliding table and cast table to check if the sliding table is the same height as the main table (Fig 4.13).
- Page 13 4. Saw Unit Assembly - cont. 4.8 Fitting the optional right table Fig.4.21 Fig.4.25A extension If you are fitting the optional table extension please proceed as below. 1. Take the 4 hex head bolts and washers, wind Approx. 10mm them into the location holes on right side of the main table leaving a gap of approximately 10mm between washer and table Fig.4.21.
- Page 14 4. Saw Unit Assembly - cont. 4.9 Fitting the crown guard Fig.4.28 Hook the crown guard into the keyway on top of the riving knife Fig.4.28 and tighten into position Fig.4.29. Fig.4.29...
-
Page 15: Rip Fence Assembly
5. Rip Fence Assembly 5.1 Identification of rip fence components 1. 4 x Hex. nuts 2. 8 x Washers 3. 1 x Front fence bar 4. 2 x Hex. socket screws 5. 2 x Hex. bolts, washers(4) & hex. nuts (each) 6. - Page 16 5. Rip Fence Assembly - cont. 5.3 Fitting the fence carrier Fig.5.3 Fasten the fence holding fixtures through the fence carrier casting Fig.5.3. Locate the fence HOLDING carrier on to the fence rail Fig. 5.4 FIXTURES 5.4 Fitting the rip fence Now simply slide the rip fence on to the fence carrier and tighten the holding fixtures.
-
Page 17: Final Assembly
6. Final Assembly Fitting crown guard extraction hose Fig.6.1 1. Fit the hose support in the U-piece that has been fitted in the rear main table or optional table extension. Fig.6.1. 2. Now attach one end of the hose to the crown Hose support guard Fig.6.2 3. -
Page 18: Connection Of The Electricity Supply
7. Connection Of The Electricity Supply Once the machine has been correctly assembled and set up the electricity Fig.7.1 supply can be connected. Connect the two pin plug socket on the end of the flex to the switch Fig.7.1. The machine can only be connected to a single phase supply. Before connecting the electrical supply ensure that it is the correct voltage, phase and frequency, and that it has sufficient capacity for the machine. -
Page 19: Operation & Sawing Practice
8. Operation & Sawing Practice Basic circular saw principles Fig.8.1 • The blade rotates on a spindle, and breaks through the timber, cutting on a continuous stroke Fig.8.1. • Slowly feed the workpiece towards the blade Fig.8.1, let the blade do the cutting it is not necessary to force the material. - Page 20 There are many blade types available and it is important to select the right blade for the job. The TS200C is supplied with a good multi- purpose blade, but for specialist applications a blade with a different tooth pattern may be required.
- Page 21 8. Operation & Sawing Practice - cont. Workpiece Support Fig.8.6A Good workpiece support is essential on a table saw. Additional supports should always be used if the workpiece overhangs the table. Roller stands are ideal for this purpose and should be used at both infeed and outfeed ends of the machine.
- Page 22 Pull saw Riving knife angle stop screw angle stop The TS200C features a pull saw function which is screw screw ideal for cross cutting small workpieces, accurate repetitive cuts can easily and safely be achieved. The first aspect which should be understood is the mitre fence hold down clamp.
-
Page 23: Dust Extraction
20 minutes every hour. 10.2 Record Power Extractors Record Power offer a range of high quality dust extractors, starting at the single motor 45 litre RSDE1 right up to the 200 litre twin motor DX5000. We offer both drum and bag type extractors and all models provide high filtration down 0.5 micron providing protection from harmful fine dusts such... -
Page 24: Maintenance
11. Maintenance Changing the blade Fig.11.5 Fig.11.1 1. To change the blade; first remove the crown guard by slackening off the locking screw and unhooking from the riving knife Fig.11.1. 2. Loosen the 3 screws on the table insert Fig.113 and remove the insert. 3. - Page 25 11. Maintenance - cont. NOTE Fig.11.10A Fig.11.13 To adjust the belt tension of the, motor it may be necessary to remove the tables to access the inside of the saw unit. Bolt 1 Tensioning the belt 1. When tensioning the belt the three motor mounting bolts must be slackened Fig.11.10A and Fig.11.10B.
-
Page 26: Parts Diagrams
12. Parts Diagrams... - Page 27 12. Parts Diagrams - cont.
- Page 28 12. Parts Diagrams - cont.
- Page 29 12. Parts Diagrams - cont.
- Page 30 12. Parts Diagrams - cont.
-
Page 31: Blade Guard
13. Parts List Ref No. Description Ref No. Description Blade guard assembly Tube Dust collecting tube Quill tube I Blade Screw M8X20 Mount adjusting base square nut Mount base Flat washer Lock handle assembly Spring washer 8 Flat washer 8 Angle rotating shaft Rotating support base Tube circlip... - Page 32 13. Parts List - cont. Ref No. Description Ref No. Description Tapping screw ST4.2X9.5 Position bracket Carrier cover Fence Carriage bolt M8X16 Carriage bolt M6X30 Flat washer 8 T bracket Spring washer 8 Mitre gauge Pan head nut M8 Countersunk head screw M6X70 Hex bolt M6X16 Flat washer 6 Right end cap...
-
Page 33: Eu Declaration Of Conformity
EU Declaration of Conformity Cert No: EU / TS200C / 1 RECORD POWER LIMITED, Unit B, Ireland Industrial Est. Adelphi Way, Staveley, Chesterfield S43 3LS declares that the machinery described:- Type: Table Saw Model No: TS200C Serial No ................. Conforms with the following directives:-... - Page 34 Notes...
- Page 35 Notes...
- Page 36 Visit www.recordpower.co.uk for the full range of Record Power products. Woodworking Blades Machinery Craft Accessories Finishes and Waxes DVDs Accessories Woodworking Machines & Accessories Record Power Limited Telephone: 01246 561 520 Email: sales@recordpower.co.uk Unit B, Adelphi Way www.recordpower.co.uk Facsimile: 01246 561 537 Ireland Industrial Est.
Need help?
Do you have a question about the TS200C and is the answer not in the manual?
Questions and answers