Advertisement
Table of Contents
- 1 Table of Contents
- 2 Health & Safety Guidance
- 3 Additional Safety Instructions
- 4 Record Power Guarantee
- 5 Getting to Know Your Router Table
- 6 Unpacking and Cleaning the Router Table
- 7 Contents of Loose Parts Bag
- 8 Machine Specification
- 9 Router Table Assembly
- 10 Using the Router Table
- 11 Parts List
- Download this manual
Advertisement
Table of Contents

Related Manuals for Record Power RPMSR


Summary of Contents for Record Power RPMSR
- Page 1 Instruction RPMSR Manual Professional Router Table IMPORTANT For your safety read instructions carefully before assembling or using this product. Save this manual for future reference. VERSION 2.0...
-
Page 3: Table Of Contents
Contents Terms & Conditions Of Usage Health & Safety Guidance page 4 Record Power Guarantee page 6 EU Declaration Of Conformity page 18 User Manual Unpacking and cleaning the Router Table page 7 Getting To Know Your Router Table page7... -
Page 4: Health & Safety Guidance
Keep proper footing and balance at all times. Should you need advice on the repair or maintenance of this product, our Customer Service Department can be contacted on 0870 770 1777 and will be happy to assist you. Record Power Health & Safety Guidance v1.0... -
Page 5: Additional Safety Instructions
Additional Safety Instructions For Table Saws SAFETY IS A COMBINATION OF OPERATOR 11. If the electrics are damaged, parts must only be replaced by a qualified electrician. COMMON SENSE AND ALERTNESS AT ALL 12. Never use a long extension cable. TIMES WHEN THE TABLE SAW IS BEING 13. -
Page 6: Record Power Guarantee
2.2.6 This Guarantee extends to the cost of carriage incurred by you returning the product to Record Power as long as it is demonstrated that the defect falls within the terms of this Guarantee and you follow the claims procedure as outlined below;... -
Page 7: Unpacking And Cleaning The Router Table
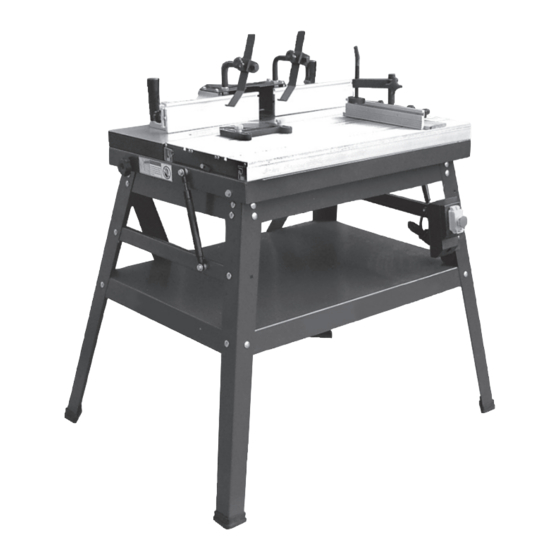
Unpacking and Cleaning the Router Table The router table is shipped in one carton. Note: Obtain assistance when lifting the carton, the gross weight is 56kgs. Lift with your legs not your back. Injuries may occur though incorrect lifting. 3. Set the carton down in a clean unclutered area leaving sufficient space to set out the various components, before attempting to carefully unpack the machine. 4. Ensure all loose items are present as listed in the manual. If any items are missing please contact your local dealer immediately. Remove the rust prevention oil thoroughly. Use a soft cloth moistened with Kerosene or white spirit, making sure the area is well ventilated and there are no naked flames or sources of ignition. The bulk of the rust preventative may best be removed by using a scraper or a material that will not mark the table before finishing off with the moistened cloth. Warning: Do not use gasoline or lacquer thinner to remove the rust prevention oil as this will damage the painted surface. Getting To Know Your Router Table Floor stand Work clamps Table tilt support lever Right fence Fixed table Toggle clamp Fence lock lever Sliding table push plate... -
Page 8: Contents Of Loose Parts Bag
Contents of Loose Parts Bag After the machine has been unpacked, check that all loose parts shown below are present. Again, if any parts are missing or incorrect please contact your local dealer before attempting to use your router table. Left fence assembly - 1 set Power cord (UK only) Switch box... -
Page 9: Router Table Assembly
Router Table Assembly Assemble the front upper brace and two upper side braces to the table legs using M8 x 12mm coach bolts, nuts and washers, as shown below. Note position of mounting holes for switch box on front leg. Do not fully tighten the nuts until all the assembly has been carried out. - Page 10 Router Table Assembly - cont. Attaching the table on to the stand Fig.1.2 Rubber mount Fig.1.1 1. As the table is heavy, it is suggested that two people lift the table during installation. 2. Align the two holes at the bottom of the table (away from the spindle hole) with the two holes drilled in left and right table supports...
- Page 11 Router Table Assembly - cont. Attaching Router to the table Fig.2.1 1. It is advisable to have another person help you when installing the router on the table. 2. Tilt the table to 45° to install the portable router. Lock the table in the tilted position by moving the table tilt lock levers into the lock position.
- Page 12 Router Table Assembly - cont. WARNING: Fig.3.1 This appliance must be earthed - failure to do so may lead to personal injury. Always ensure your router is correctly and fully earthed. Electrical Information The Router Table is supplied fitted with a BS1363 three pin plug.
-
Page 13: Using The Router Table
Using the Router Table WARNING: Before attempting to make adjustments to any settings make sure that the power supply to the machine is switched off and the supply cord is removed from the outlet. Serious injury may occur if the router is started while making these adjustments. - Page 14 Using the Router Table - cont. Rear Table Routing Fig.5.2 Fig.5.1 1. When working on small workpieces, the sliding table may be unnecessary. The fence assembly can be turned around and re-fixed to two holes closer to the sliding table . 2.
-
Page 15: Parts List
Parts List... - Page 16 Parts List - cont. Part No. Description Quantity Part No. Description Quantity Fence half Slide rail Sliding screw m6 x 20 Table right support Micrometric adjustment rod Fix piece Fence body Damper Fence body guard Table left support Micrometric adjustment rod 45°...
- Page 17 EU Declaration of Conformity Cert No: EU / RPMS-R / 2 RECORD POWER LIMITED, Unit B, Ireland Industrial Est. Adelphi Way, Staveley, Chesterfield S43 3LS declares that the machinery described:- Type: Router Table Model No: RPMS-R Serial No ................. Conforms with the following directives:-...
- Page 18 Woodworking Machines & Accessories Record Power Limited Telephone: 0870 770 1777 Email: sales@recordpower.co.uk Unit B, Adelphi Way http://www.recordpower.co.uk Facsimile: 0870 770 1888 Ireland Industrial Est. Staveley S43 3LS...
Need help?
Do you have a question about the RPMSR and is the answer not in the manual?
Questions and answers