Table of Contents
Advertisement
Advertisement
Table of Contents

Related Manuals for Juniper Allegro CX


Summary of Contents for Juniper Allegro CX
- Page 1 American Innovations Allegro CX Version 4.3.2 User Guide...
- Page 2 The American Innovations logo and icon are trademarks of American Innovations, Ltd. Juniper Systems, Allegro Field PC, and the company logo are registered trademarks of Juniper Systems, Inc. Allegro MX and Allegro CX are recognized trademarks of Juniper Systems, Inc. Bluetooth is a registered trademark of Bluetooth SIG, Inc.
-
Page 3: Table Of Contents
Contents Chapter 1 Getting Started ......... 1 Equipment List . - Page 4 AI Allegro CX User ’s Guide Chapter 3 Close Interval Survey (CeCi) ......33 Quick Start .
- Page 5 AI Allegro CX User ’s Guide View Survey Records and Show Bearing to Site ......57 Export a Survey File.
- Page 6 AI Allegro CX User ’s Guide Export Control Classif ication Number ...107 Software License ......107 Index .
-
Page 7: Getting Started
Getting Started This guide explains how to set up and use American Innovations’ software installed on the ® Allegro CX Field PC Topics in this chapter include those in the following list: Equipment List (page 1) • Preparing the Allegro for Use (page 2) •... -
Page 8: Preparing The Allegro For Use
Microsoft Getting Started CD with Windows Mobile Device Center and ActiveSync • Juniper Systems CD with owner’s manual and quick start guide • Preparing the Allegro for Use When you first receive the Allegro from AI, perform the following tasks to prepare the... - Page 9 AI Allegro CX User ’s Guide Place the battery pack in the battery compartment with the small arrow pointing to the right (Figure 1-2). Push the battery pack down and then slide it to the right to secure it in place.
-
Page 10: Set Display Properties For A Monochrome Display
AI Allegro CX User ’s Guide Complete the following settings in the Set Battery Parameters window (Figure 1-4): Set charge percentage to 10% in the field Enter new Battery Charge Level • (%). Set Battery Capacity to 4000 and then tap Accept to close the window. -
Page 11: Set Regional Settings, Time Zone, And Date/Time
AI Allegro CX User ’s Guide Set Regional Settings, Time Zone, and Date/Time Regional settings specify the style that date/time, numbers, and currency are displayed. After selecting a display style, set up the Allegro with your preferred time zone, date, and time. -
Page 12: Install Windows Mobile Device Center Or Activesync
AI Allegro CX User ’s Guide Install Windows Mobile Device Center or ActiveSync The Allegro communicates with a computer using either Windows Mobile Device Center (for Windows 7 and Vista) or Microsoft ActiveSync (for Windows XP or 2000). If your computer is not installed with Windows Mobile Device Center (WMDC) or ActiveSync, complete the following steps to install the software. - Page 13 AI Allegro CX User ’s Guide Windows XP/2000: Install ActiveSync If your computer is running Windows XP or Windows 2000, complete the following steps: Insert the Getting Started CD in the CD drive of your computer. The CD is included with the Allegro.
- Page 14 AI Allegro CX User ’s Guide Figure 1-10. ActiveSync Connected If a successful sync connection does not occur and you also use a VPN (virtual private network) software to establish a remote connection with a private network: (1) Disable or disconnect the VPN software. (2) Recycle power to the Allegro and your computer.
-
Page 15: Transfer Utility Files To Pcs
AI Allegro CX User ’s Guide Transfer Utility Files to PCS If you use Pipeline Compliance System (PCS) with the Allegro, complete the following steps to transfer two utility files from the Allegro installation CD to the PCS CPDM installation directory on your computer. The utility files are labeled wToCmd.exe and CeFileXer.exe on the Allegro installation CD. -
Page 16: Overview Of The Allegro Hardware
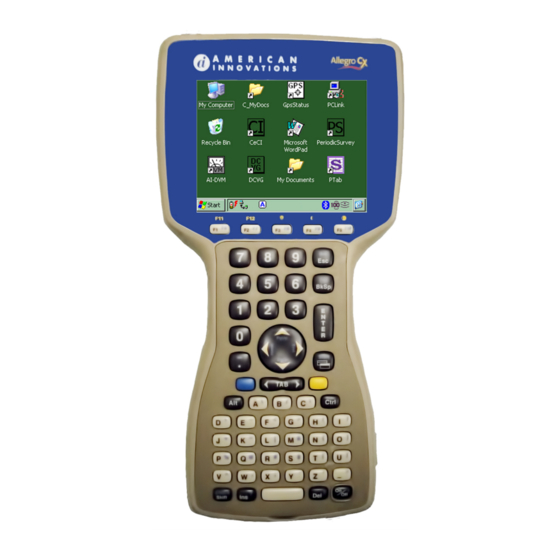
AI Allegro CX User ’s Guide Overview of the Allegro Hardware The Allegro includes a connector panel, touchscreen display, keypad, and function keys (Figure 1-12). Optional add-ons available for purchase include a GPS expansion pod with GPS antenna and a Trimble GPS receiver. For a complete list of add-ons available for purchase, contact AI Sales at 1-800-229-3404. -
Page 17: Connector Panel
AI Allegro CX User ’s Guide Connector Panel The connector panel is located at the top of the Allegro (Figure 1-13). It supports connections for items in the list below. GPS Antenna (optional add-on) Mini Stylus COM 2 COM 1... -
Page 18: Chainer/Stick Adapter Switch
AI Allegro CX User ’s Guide Chainer/Stick Adapter Switch A hardware switch inside the Allegro must be set before taking survey readings. Use the procedure below to set the switch in Chainer mode if using a data cane to take survey readings. -
Page 19: Overview Of Ai's Allegro Software
AI Allegro CX User ’s Guide Overview of AI’s Allegro Software The Allegro ships from AI with the following AI Allegro software factory-installed. AI Allegro software version 4.3.1 is compatible with all version 6 and 7 PCS software. Digital Voltmeter (AiDvm) -
Page 20: Touchscreen Display
AI Allegro CX User ’s Guide Touchscreen Display Use the provided stylus to tap the touchscreen and activate a software program or make a selection. Several system icons are available for selection that allow you to navigate. Avoid using sharp objects that may scratch or puncture the touchscreen MPORTANT display. -
Page 21: Keypad And Shortcut Keys
AI Allegro CX User ’s Guide Keypad and Shortcut Keys The Allegro keypad is similar to a computer keyboard (Figure 1-18). The keypad provides the following functionality: Alphanumeric and symbol keys for data entry. • Tab, Enter, Spacebar, and Circular keys for moving the cursor. - Page 22 AI Allegro CX User ’s Guide Table 1-1. Global Shortcut Keys Command Shortcut Keys Description Toggle Caps < Blue >< CapLk > Toggles caps lock on and off Display Backlight < Gold >< F3 > Toggles backlight on/off. Brighten/Dim Screen <...
- Page 23 AI Allegro CX User ’s Guide Table 1-2. Button and Button Sequence Functionality Button or Button Sequence Description Blue key + End Gold key + Function key Function keys F11 and F12 Blue key + Function key Function key F6 through F10...
-
Page 24: System Tray Icons
AI Allegro CX User ’s Guide System Tray Icons The system tray appears in the bottom right area of the Allegro desktop. See the next table for a description of the various icons that display in the system tray. Table 1-3. System Tray Icons... - Page 25 AI Allegro CX User ’s Guide Table 1-3. System Tray Icons (continued) Icon Description (monochrome screen only): appears when Heater touchscreen heater turns on. appears when Bluetooth is Bluetooth Connection: being actively used on the Allegro. Getting Started...
-
Page 26: Contacting Technical Services
AI Allegro CX User ’s Guide Contacting Technical Services If you need assistance with the AI software or Allegro, or have a comment or suggestion about this manual, contact Technical Services in any of the following ways: Telephone: 1-800-229-3404 (select 1, then press 2) pcstechservices@aiworldwide.com... - Page 27 AI Allegro CX User ’s Guide Notes Getting Started...
- Page 28 AI Allegro CX User ’s Guide Getting Started...
-
Page 29: Digital Voltmeter (Ai-Dvm)
Digital Voltmeter (AI-DVM) Ai-DVM measures voltage, current, resistance, and diode capacitance as a fully functional digital voltmeter (DVM) and as an integrated DVM to complement the following AI software: CeCi (close interval), DCVG (direct current voltage gradient), and Periodic Survey (annual/periodic survey). -
Page 30: Quick Start
AI Allegro CX User ’s Guide Quick Start This section provides quick start procedures for setting up and using AI-DVM. As a user you will perform the following actions: Connect test leads to the Allegro (page 24) • Set test function, voltage range, and sample rate (page 24) •... -
Page 31: Set Properties To Measure On/Off Potentials
AI Allegro CX User ’s Guide Set properties to measure on/off potentials Verify Vdc is selected in the main DVM window and then tap Options . Tap the On/Off tab. Tap Enable On/Off mode and then select HiLo or Gps-Sync in the Method field. -
Page 32: Set Data Logger Properties
AI Allegro CX User ’s Guide Complete one of the following steps: Tap as R value and enter a shunt resistance value in the Resistance field. -or- If you want AI-DVM to automatically calculate shunt resistance, tap as Amp/ and enter a shunt size in the mV and Amps fields. -
Page 33: Dvm Graph Overview
AI Allegro CX User ’s Guide DVM Graph Overview AI-DVM displays the on/off interruption cycle in real-time as a waveform graph in addition to the digital display in the main DVM window. When using AI-DVM during an on/off survey, tap Graph to view a waveform graph of the interruption cycle (Figure 2-2). -
Page 34: Data Logger Overview
AI Allegro CX User ’s Guide Other indicators that may appear in the status line include those in the following list: : indicates GPS and the number of satellites in view GPS (n) • : indicates high/low readings • HiLo... -
Page 35: Shortcut Keys
AI Allegro CX User ’s Guide Shortcut Keys Shortcut keys are an alternate method for using certain commands in AI-DVM instead of menu commands. Use the Allegro keypad to run any of the commands identified in the following table (Table 2-1). - Page 36 AI Allegro CX User ’s Guide Table 2-1. AI-DVM Shortcut Keys Command Shortcut Keys Description Navigate DVM The following are available for use Options Window in all tabs of DVM Options: < Tab > Press <Tab> to move cursor •...
- Page 37 AI Allegro CX User ’s Guide Notes Digital Voltmeter (AI-DVM)
- Page 38 AI Allegro CX User ’s Guide Digital Voltmeter (AI-DVM)
-
Page 39: Close Interval Survey (Ceci)
Close Interval Survey (CeCi) CeCi records pipeline potential readings for close interval (CI) surveys. The software collects survey readings from a data cane or wire counter connected to the Allegro. CeCi measures voltage using the digital voltmeter card inside the Allegro. This chapter explains how to set up and use AI’s close interval software, CeCi. -
Page 40: Quick Start
AI Allegro CX User ’s Guide Quick Start Procedures in this section explain how to set up CeCi to record pipeline potential readings for a close interval survey. As a user you will perform the following actions: Connect test leads to the Allegro (page 34) •... -
Page 41: Set Survey Properties
AI Allegro CX User ’s Guide Set survey properties Tap File > Properties to display the Survey tab. Provide information in the following fields of the Survey tab: : Enter the name of the ROW (right-of-way) in this required field. If •... - Page 42 AI Allegro CX User ’s Guide Set flagged mode properties If using a metric data cane to trigger reads, tap Metric to record readings in meters. Enter the distance between flags or station markers in the Flag distance field. Tap the drop-down arrow in the Direction field and select Ascending or to indicate how station numbers increment in the survey file.
-
Page 43: Set On/Off Survey Type
AI Allegro CX User ’s Guide Set on/off survey type Tap the On/Off tab. If you are taking an uninterrupted survey, tap the drop-down arrow in the Survey Type field and select On (single reading ). An interrupted survey includes an on, native, static, or depolarized survey. -
Page 44: Set Gps Properties
AI Allegro CX User ’s Guide For an On/off GPS Real-time survey, enter an on delay time in the On Delay field, an off delay time in the Off Delay field, and a setup time in the GPS-RT field. Setup Time On Delay is the time after the off-to-on transition when a reading is not •... -
Page 45: Set Survey File Options
AI Allegro CX User ’s Guide Set Survey File Options To set optional features in CeCi, tap View > Options . Topics in this section include those in the following list: Set audio and double-click properties (page 39) • Set autosave and skip mode properties (page 39) •... -
Page 46: Set Gps Properties
AI Allegro CX User ’s Guide Set GPS properties Tap the GPS tab. If you want CeCi to remove existing GPS coordinates when updated coordinates are unavailable after a specified amount of time, tap Clear GPS location after and enter the number of seconds in the seconds without updates field. -
Page 47: Add Remarks And Test Point Information
AI Allegro CX User ’s Guide Add Remarks and Test Point Information The Remarks and Test Point Information windows allow you to add additional information in the remarks field of a survey record. For example, add a geographical reference or the type of test point. -
Page 48: View Survey Records And Show Bearing To Site
AI Allegro CX User ’s Guide View Survey Records and Show Bearing to Site You can view survey records either as a list or single record. Tap View > Single record or List When viewing a single record with GPS coordinates, double-tap the GPS field to display the Site Locator window. -
Page 49: Transfer A Survey File To Pcs
AI Allegro CX User ’s Guide Transfer a Survey File to PCS PCS utility files labeled wToCmd.exe and CeFileXer.exe must be updated for the current release of Allegro software in order for survey files to transfer properly from the Allegro to PCS. -
Page 50: Survey File Features
AI Allegro CX User ’s Guide Survey File Features The following example (Figure 3-3) shows the type of information that displays in a survey file. Single Record View (View > Single record) Graph of survey readings (View > Options > Graph tab). -
Page 51: Shortcut Keys
AI Allegro CX User ’s Guide Shortcut Keys Shortcut keys listed in the following table (Table 3-1) are an alternate method for using certain commands in CeCi. Use the Allegro keypad to run any of the following commands. Table 3-1. CeCi Shortcut Keys... - Page 52 AI Allegro CX User ’s Guide Table 3-1. CeCi Shortcut Keys (continued) Command Shortcut Keys Description Skip/Lock/Normal < F3 > Toggles between Skip/Lock/ Normal in Fixed Increment mode. Pause < F5 > Pauses timed readings. Test Point < Ctrl >< T >...
- Page 53 AI Allegro CX User ’s Guide Table 3-1. CeCi Shortcut Keys (continued) Command Shortcut Keys Description Navigate Graph Tab < G > Press < G > to enable or disable Show Graph in Graph tab of Options. With Show Graph enabled: <...
- Page 54 AI Allegro CX User ’s Guide Notes Close Interval Survey (CeCi)
-
Page 55: Dc Voltage Gradient (Dcvg)
DC Voltage Gradient (DCVG) DCVG locates indications of pipeline coating defects. The software records the voltage gradient and GPS location for further review and analysis later. DCVG collects data from a data cane connected to the Allegro. This chapter explains how to set up and use AI’s DCVG software. Topics include those in the following list: Quick Start (page 49) •... -
Page 56: Connect Data Canes To The Allegro
AI Allegro CX User ’s Guide Set on/off survey type (page 52) • Set DCVG properties (page 53) • Set GPS properties (page 53) • Save survey file (page 54) • Record inspection readings (page 54) • Connect data canes to the Allegro DCVG collects data using two data canes connected to the red and black jacks on the Allegro connector panel. -
Page 57: Set Survey Properties
AI Allegro CX User ’s Guide Set survey properties Tap File > Properties to display the Survey tab. Provide information in the following fields of the Survey tab: : Enter the name of the ROW (right-of-way) in this required field. If •... -
Page 58: Set On/Off Survey Type
AI Allegro CX User ’s Guide Set flagged mode properties Tap Metric if you want readings recorded in meters instead of feet. Enter the distance between flags or station markers in the Flag distance field. Click the drop-down arrow in the Direction field and select Ascending or to indicate how station numbers increment in the survey file. -
Page 59: Set Dcvg Properties
AI Allegro CX User ’s Guide Set DCVG properties Tap the DCVG tab. Measure and enter the on reading taken at the beginning and end of the survey in the P/S On, Begin and End fields. Measure the Off reading taken at the beginning and end of the survey in the P/S Off, Begin, and End fields. -
Page 60: Save Survey File
AI Allegro CX User ’s Guide Save survey file Tap the save icon or File > Save . The Save As window displays when working with a new survey file that has not previously been saved. Enter a name for the new survey file in the field and then tap OK . -
Page 61: Set Optional Autosave Properties
AI Allegro CX User ’s Guide Set optional autosave properties Tap the File tab (View > Options > File tab). Tap Enable Autosave . Enter a time interval in the Interval (minutes) field. This allows DCVG to automatically save a survey file at regular time intervals based on the Interval (minutes) you specify. -
Page 62: Add Remarks, Indication, And Test Point Information
AI Allegro CX User ’s Guide Add Remarks, Indication, and Test Point Information The Remarks and Test Point Information windows allow you to add additional information in the remarks field of a survey record. For example, add information for an indication in Test Point Info or additional geographical references in Remarks. -
Page 63: Add Test Point Information
AI Allegro CX User ’s Guide Tap the IRGradient tab and complete the following steps: Take readings at the indication site until you reach remote earth. Press the data cane button to capture readings in DCVG, or press Enter on the Allegro keypad. -
Page 64: Export A Survey File
AI Allegro CX User ’s Guide Export a Survey File You can export DCVG survey files as a dBase file (.dbf) or comma separated file (.csv) for use with other software applications, such as Microsoft Excel. To export a survey file, follow these steps: Tap File >... -
Page 65: Survey File Features
AI Allegro CX User ’s Guide Survey File Features The following example shows the type of information that displays in a DCVG survey file (Figure 4-3). Single Record View (View > Single record) Live on/off reading, IR gradient, and polarity arrow. -
Page 66: Shortcut Keys
AI Allegro CX User ’s Guide Shortcut Keys Shortcut keys listed in the next table (Table 4-1) are an alternate method for using certain commands in DCVG. Use the Allegro keypad to run any of the following commands. Table 4-1. DCVG Shortcut Keys... - Page 67 AI Allegro CX User ’s Guide Notes DC Voltage Gradient (DCVG)
- Page 68 AI Allegro CX User ’s Guide DC Voltage Gradient (DCVG)
-
Page 69: Annual/Periodic Survey (Periodic Survey)
Annual/Periodic Survey (Periodic Survey) Periodic Survey (PS) measures voltage readings for annual and periodic surveys. The software collects survey readings from test leads connected to the Allegro. PS is used in conjunction with AI’s PCS software. Facility and inspection fields are established in PCS and then transferred to the Allegro. -
Page 70: Quick Start
AI Allegro CX User ’s Guide Quick Start Procedures in this section explain how to set up the Periodic Survey software to record readings for an annual or periodic survey. As a user you will perform the following actions: Connect test leads to the Allegro (page 64) •... -
Page 71: Set On/Off Survey Method
AI Allegro CX User ’s Guide Set on/off survey method If you plan to take on/off potential readings, tap View > Options to display the On/Off tab. Tap the drop-down arrow in the On-Off Method field and select one of the... -
Page 72: Add Or Delete A New Site
AI Allegro CX User ’s Guide If you are using a second GPS receiver (dual GPS), complete the following steps: Tap Edit > GPS > Gps Settings to display the GPS Port Settings window. Tap the drop-down arrow in the Comm port field and select the COM port the GPS receiver is connected to. -
Page 73: Change Font Properties
AI Allegro CX User ’s Guide Click the drop-down arrow in the ROW Code field. Select a ROW code or select Other and then enter a new ROW code. If you selected Other , complete the following steps to prevent entering an incorrect ROW code: Highlight an existing ROW code by pressing <... -
Page 74: Save Survey Route
AI Allegro CX User ’s Guide Click the drop-down arrow in the Size field and select a font size. Repeat steps 2 through 4 to change font properties for another item. When you finish, click OK to return to the survey file. -
Page 75: Set Autosave Properties
AI Allegro CX User ’s Guide Set Autosave Properties PS provides an Autosave option that automatically saves the survey route at regular intervals. To set Autosave properties, follow these steps: Tap View > Options > Misc tab. Tap Enable Autosave and select a time interval in the Interval (minutes) field. -
Page 76: Copy A Survey Route To A Computer
AI Allegro CX User ’s Guide Copy a Survey Route to a Computer Complete the following steps to copy one or more PS survey routes to a computer: Connect the provided serial cable to your computer and the Allegro. If you are using a USB power dock, connect the USB cable to the power dock and your computer. -
Page 77: Survey Route Features
AI Allegro CX User ’s Guide Survey Route Features A PS survey route includes three main areas of information as shown in the next example (Figure 5-3). Information fields (above horizontal line) from Allegro prompts set up in PCS route file. -
Page 78: Shortcut Keys
AI Allegro CX User ’s Guide Shortcut Keys Shortcut keys listed in the following table (Table 5-1) are an alternate method for using certain commands in PS. Use the Allegro keypad to run any of the following commands. Table 5-1. PS Shortcut Keys... - Page 79 AI Allegro CX User ’s Guide Table 5-1. PS Shortcut Keys (continued) Command Shortcut Keys Description Save < CTRL > < S > Save survey file. Next Page < Ctrl > < Down > Display next page of a multi- page site.
- Page 80 AI Allegro CX User ’s Guide Notes Annual/Periodic Survey (Periodic Survey)
-
Page 81: Recommendations For Interrupted On/Off Settings
Recommendations for Interrupted On/Off Settings This chapter provides recommendations for on/off settings in an interrupted survey set up in AiDvm, CeCi, or Periodic Survey. When a survey file is set up in On/Off GPS Sync or On/Off GPS Real-time mode, AI recommends the survey file also be set up with On/Off High/Low settings. - Page 82 AI Allegro CX User ’s Guide Table A-1. Suggested On/Off Settings (continued) On/Off High/Low setup for greater than 1 second cycle A minimum/maximum reading from a sample of readings. Of the remaining 99 readings, the most negative reading is equal to the on reading and the most positive reading is equal to the off reading.
- Page 83 AI Allegro CX User ’s Guide Table A-1. Suggested On/Off Settings (continued) On/Off GPS Real-time setup for greater than 2 second cycle 8.0 on 200 mSec On Delay Starts reading 200 mSec into on cycle (off-to-on). 2.0 off 250 mSec Off Delay Starts reading 250 mSec into off cycle (on-to-off).
- Page 84 AI Allegro CX User ’s Guide Notes Recommendations for Interrupted On/Off Settings...
-
Page 85: Faqs
FAQs This chapter provides answers to frequently asked questions (FAQs) about the Allegro Field PC and AI Allegro software. If you have a question not covered in this chapter, pcstechservices@aiworldwide.com contact Technical Services at How do I determine which version of software is installed on the Allegro? The software version is listed in the About window of each AI software. - Page 86 AI Allegro CX User ’s Guide I have a Trimble GPS receiver connected to the Allegro with successful communication established between the two. Why does the Allegro show HiLo mode instead of GPS mode? Using an external GPS receiver with the Allegro is referred to as dual GPS. Although the...
- Page 87 AI Allegro CX User ’s Guide How do I enlarge the font size or change the touchscreen brightness and contrast settings? To increase or decrease the font size Tap Settings > System tab > Screen > Text Size tab. Move the slider to increase or decrease text size. To change text size and font in a PS survey file tap View >...
- Page 88 AI Allegro CX User ’s Guide How can I verify interruption or make timing adjustments to ensure the Allegro is capturing the correct Structure P/S and Structure IRF at the correct time? Start AI-DVM to complete the following steps: Tap Options > On/Off tab > Enable On/Off mode .
- Page 89 AI Allegro CX User ’s Guide Why does CeCi switch to Hi-Lo mode when my survey file is set up with GPS Sync or GPS Real-Time mode? CeCi automatically switches to Hi-Lo mode when the Allegro loses the internal GPS time signal.
- Page 90 AI Allegro CX User ’s Guide Move the cursor to the Remarks field by tapping the field or pressing the Tab button (right arrow). Remarks Field Remarks Field Tap Remark to open the Remarks window. Select and then double-tap the remark to insert it in the survey record and close the window.
- Page 91 AI Allegro CX User ’s Guide Press the down arrow to move the cursor to the next station number (SN). Continue to survey to the other end of the SKIP (such as a road crossing, railroad crossing, exposed pipe, and so on).
- Page 92 AI Allegro CX User ’s Guide FAQs...
- Page 93 AI Allegro CX User ’s Guide Notes FAQs...
- Page 94 AI Allegro CX User ’s Guide FAQs...
-
Page 95: Utility Software
Utility Software Information in this chapter explains how to use and set up the following utility software: GPS Status (page 87) • GPS Config (page 93) • Save System (page 95) • Set DAQ Registry Keys (page 96) • GPS Status Use GPS Status (Figure C-1) to perform any of the following tasks: view current GPS data, such as number of satellites in view, GPS coordinates, •... - Page 96 AI Allegro CX User ’s Guide To start GPS Status, double-tap the GpsStatus icon on the Allegro desktop to display the Gps Status window shown below. See Table C-1 on page 88 for additional information. If the Allegro is unable to open the COM port, the message Unable to open GPS port COM3 (-2,317) displays.
- Page 97 AI Allegro CX User ’s Guide Table C-1. GPS Status Field Descriptions (continued) Field Description GPS status Status line may include any of the following messages: Receiving GPS • Initializing • Waiting • Information about the serial connection displays in parentheses during the startup process, such as Initializing (V 236).
-
Page 98: Gps Status Shortcut Keys
AI Allegro CX User ’s Guide Table C-1. GPS Status Field Descriptions (continued) Field Description Age of fix Shows the time since the last GPS satellite fix. Age of fix appears only when the GPS satellite signal is lost. It appears ten seconds after losing the satellite signal. - Page 99 AI Allegro CX User ’s Guide Table C-1. GPS Status Field Descriptions (continued) Field Description Beep If you want the Allegro to beep each time GPS readings update, tap Beep to enable the option. Options Tap Options to set the following parameters for a second GPS receiver (dual GPS): Select a COM port and baud rate.
- Page 100 AI Allegro CX User ’s Guide GPS Status Shortcut Keys Shortcut keys listed in the following table (Table C-2) are an alternate method for using certain commands in AI-DVM. Use the Allegro keypad to run any of the following commands.
-
Page 101: Gps Config
AI Allegro CX User ’s Guide GPS Config GPS Config allows you to change the default datum selection (WGS-84) and default acquisition method (Compromise) used by the internal GPS modem to acquire a GPS satellite fix. WGS84 is considered the worldwide standard and is typically the default setting for most GPS receivers. -
Page 102: Gps Pod Setup
AI Allegro CX User ’s Guide GPS Pod Setup GPS Pod Setup sets communication parameters for the internal GPS module. The Allegro ships from AI with communication parameters already set. However, when you perform a Power Reset to reset the Allegro, the internal GPS module loses these settings. -
Page 103: Save System
AI Allegro CX User ’s Guide Save System Save System automatically runs after installing or upgrading AI Allegro software. It saves registry settings, runs the Reset System utility software, and then reboots the Allegro. When the process completes and the Allegro desktop displays, turn the Allegro off and then on again. -
Page 104: Set Daq Registry Keys
AI Allegro CX User ’s Guide Set DAQ Registry Keys When the Allegro is unable to recognize the DVM DAQ card (digital voltmeter card), any of the following error messages may display when turning on the Allegro or using AI software. - Page 105 AI Allegro CX User ’s Guide Notes Utility Software...
- Page 106 AI Allegro CX User ’s Guide Utility Software...
-
Page 107: Gps Receivers
Set Up a Holux GPS Receiver The following procedure explains how to use the GPS Status software to set up a Holux GR213 receiver modified by Juniper Systems for use with the Allegro. Complete the following steps: Connect the Holux receiver in COM 1 of the Allegro using the cable provided with the receiver. -
Page 108: Install Gps Controller Software
AI Allegro CX User ’s Guide Tap the drop-down arrow in the Port field and select COM1 (Figure D-1). Figure D-1. GPS Status Tap the drop-down arrow in the Baud field and select 4800 . Tap Read PPS from Internal GPS to enable the option and place a check mark inside the option box. - Page 109 AI Allegro CX User ’s Guide Double-click the file labeled GPSControllerWinCESetup.exe to begin the software installation. Follow on-screen prompts to install the software. Set Up GPS Receiver The procedure in this section explains how to set up any of the following Trimble GPS...
- Page 110 AI Allegro CX User ’s Guide Double-tap the GPS Controller icon on the Allegro to display the Skyplot window (Figure D-2). Figure D-2. Skyplot Tap Skyplot > Setup > GPS Settings (Figure D-3). Figure D-3. Setup Options 102 GPS Receivers...
- Page 111 AI Allegro CX User ’s Guide Tap the drop-down arrow in the GPS Receiver Port field and select COM2: Serial Port COM2 (Figure D-4). Scroll down the window and set up the following fields as follows. When you finish, tap OK to return to the Setup window (Figure D-3).
- Page 112 AI Allegro CX User ’s Guide Tap GPS Settings and then scroll to the bottom of the window. Tap the wrench icon in the NEMA Output field to display the Setup NMEA Output Settings window (Figure D-6). Figure D-6. Setup NMEA Output Settings Set up fields in the Setup NMEA Output Settings window using information in the next table (Table D-1).
- Page 113 AI Allegro CX User ’s Guide Tap Real-time Settings to display the Setup Real-time Settings window (Figure D-7). Figure D-7. Real-time Settings Set up fields in the Setup Real-time Settings window using information in the next table (Table D-2). When you finish, tap OK to return to the Setup Options window (Figure D-5).
- Page 114 AI Allegro CX User ’s Guide Notes 106 GPS Receivers...
-
Page 115: Export Control Classification Number
Export Control Classification Number The Export Control Classification Number (ECCN) assigned to American Innovations’ Allegro software by the U.S. Bureau of Industry and Security (BIS) is as follows • ECCN Classification: No Classification • ECCN Code: EAR99 or NLR Software License AMERICAN INNOVATIONS SOFTWARE LICENSE AGREEMENT ®... -
Page 116: 108 Software License
AI Allegro CX User ’s Guide Remedies. AI’s entire liability and your exclusive remedy under the above limited warranty shall be that AI, in its sole discretion, will use reasonable commercial efforts to correct or provide a workaround for any reproducible error in the AI Software (each such action a “Remedy”), at AI’s cost and expense, provided you... -
Page 117: Index
Index Close interval software 33 AC charger 1 COM port unable to open 88 Accuracy 93 Compromise 93 ActiveSync 2, 7 Connector panel 10, 11 Add new site 66 Add remark 41 Add test point information 41 DAQ card Age of fix 90 data acquisition 23 AI software DAQ card version 80... - Page 118 AI Allegro CX User ’s Guide capacitance testing 23 Disable touchscreen Global positioning system 100 TS button 14 GPS 100 Display antenna 10 dual-GPS 25 monochrome 2 expansion pod 10 Display heater 14 receiver 10 DOP value 89 recording coordinates 38...
- Page 119 AI Allegro CX User ’s Guide external 23 Language Signal acquisition 93 regional settings 5 Stick adapter data cane 12 Stylus 1 Monochrome display 2 Survey file setting 4 options 39 Survey mode CI survey 35 Off delay 38 Survey type...
- Page 120 AI Allegro CX User ’s Guide GPS pod setup 87 voltage 53 GPS status 87 VDOP value 89 Key Redirect 87 Save system 87 Set DAQ registry 87 Waveform graph 27 Windows Mobile Device Center 2, 6 Wire counter V button...
-
Page 121: Keyboard Shortcuts
American Innovations Allegro CX v4.3.2 Keyboard Shortcuts Global Shortcuts AI-DVM CeCi Caps Toggle <Blue><CapLk> Toggles caps lock on and off. Accept Selection in <Enter> Press <Enter> to accept Open Move Menu <Alt> <M> Press <Alt> <M> to open Drop-down List selection in a drop-down list in Move menu. - Page 122 American Innovations Allegro CX v4.3.2 Keyboard Shortcuts Annual / Periodic Survey DCVG GPS Status Open <Ctrl> <O> Open File Open window. <Ctrl><N> Create new survey file. Navigating GPS <Tab> Press <Tab> or <Up/Down Status Window Arrows> to move cursor Save <Ctrl><S>...
Need help?
Do you have a question about the Allegro CX and is the answer not in the manual?
Questions and answers